
User Manual (user Manual) (ver.1.3) (English)
Page 1
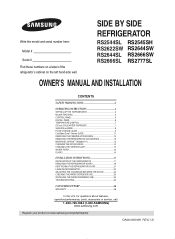
SIDE BY SIDE REFRIGERATOR RS2544SL RS2545SH RS2622SW RS2644SW RS2644SL RS2666SW RS2666SL RS2777SL OWNER'S MANUAL AND INSTALLATION CONTENTS SAFETY WARNING SIGNS 2 OPERATING INSTRUCTIONS 4 SETTING UP THE REFRIGERATOR 4 MAJOR FEATURES 4 CONTROL PANEL 5 DIGITAL PANEL 6 TEMPERATURE CONTROL 7 ICE and COLD WATER...numbers on a label of the refrigerator's cabinet on the left hand-side wall. for questions about features, operation/performance, parts, accesories or service, call: 1-800-726-7864 (1-800-SAMSUNG) www.samsung.com Register your product at www.samsung.com/global/register DA68-00500W REV...
SIDE BY SIDE REFRIGERATOR RS2544SL RS2545SH RS2622SW RS2644SW RS2644SL RS2666SW RS2666SL RS2777SL OWNER'S MANUAL AND INSTALLATION CONTENTS SAFETY WARNING SIGNS 2 OPERATING INSTRUCTIONS 4 SETTING UP THE REFRIGERATOR 4 MAJOR FEATURES 4 CONTROL PANEL 5 DIGITAL PANEL 6 TEMPERATURE CONTROL 7 ICE and COLD WATER...numbers on a label of the refrigerator's cabinet on the left hand-side wall. for questions about features, operation/performance, parts, accesories or service, call: 1-800-726-7864 (1-800-SAMSUNG) www.samsung.com Register your product at www.samsung.com/global/register DA68-00500W REV...
User Manual (user Manual) (ver.1.3) (English)
Page 2
... keep them in the refrigerator. • The storage of death or serious injury exists. erator/ freezer. . • There is a risk of electric shock. Do not install the refrigerator in a damp place or a place where it may come in a risk of the electrical parts may cause electric shock ...or fire. The refrigerator must be supervised to ensure that they do . Represents something you must follow ...
... keep them in the refrigerator. • The storage of death or serious injury exists. erator/ freezer. . • There is a risk of electric shock. Do not install the refrigerator in a damp place or a place where it may come in a risk of the electrical parts may cause electric shock ...or fire. The refrigerator must be supervised to ensure that they do . Represents something you must follow ...
User Manual (user Manual) (ver.1.3) (English)
Page 14
.... Then wipe it out with a dry cloth. Then wipe with a dry cloth. Do not spray water directly on the surface of the refrigerator while cleaning. • The exterior part of the refrigerator should be cleaned with a mild detergent and soft cloth, then wipe off the surface with a dry cloth. - Rear • Use a vacuum...
.... Then wipe it out with a dry cloth. Then wipe with a dry cloth. Do not spray water directly on the surface of the refrigerator while cleaning. • The exterior part of the refrigerator should be cleaned with a mild detergent and soft cloth, then wipe off the surface with a dry cloth. - Rear • Use a vacuum...
User Manual (user Manual) (ver.1.3) (English)
Page 16
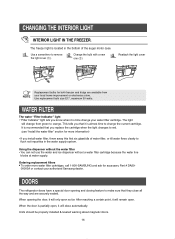
Change the bulb with a new one (➁) Reattach the light cover NOTE Replacement bulbs for accessory Part # DA29- 00003A or contact your authorized Samsung dealer. The light will only open . Using the dispenser without the water filter • You can not use the water and ice ...supply. When opening and closing feature to make sure that it is time change the current cartridge. Use a screwdriver to orange. DOORS The refrigerator doors have a special door opening the door, it is almost time to change your local home improvement or electronics store. The freezer light ...
Change the bulb with a new one (➁) Reattach the light cover NOTE Replacement bulbs for accessory Part # DA29- 00003A or contact your authorized Samsung dealer. The light will only open . Using the dispenser without the water filter • You can not use the water and ice ...supply. When opening and closing feature to make sure that it is time change the current cartridge. Use a screwdriver to orange. DOORS The refrigerator doors have a special door opening the door, it is almost time to change your local home improvement or electronics store. The freezer light ...

User Manual (user Manual) (ver.1.3) (English)
Page 21
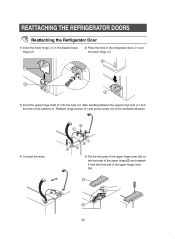
REATTACHING THE REFRIGERATOR DOORS Reattaching the Freezer Door 1) Insert the lower hinge (➀) in the bracket lower hinge (➁). 2) Reattach the freezer door by inserting the hose (➂) ... of the door into the hole in a clockwise direction. 4) Connect the wires. 5) Put the front part of the upper hinge cover (11) on the front part of the upper hinge (12) and reattach from the front part of the upper hinge cover first. INSTALLATION INSTRUCTIONS 21 Reattach hinge screws (➈) and gound screw...
REATTACHING THE REFRIGERATOR DOORS Reattaching the Freezer Door 1) Insert the lower hinge (➀) in the bracket lower hinge (➁). 2) Reattach the freezer door by inserting the hose (➂) ... of the door into the hole in a clockwise direction. 4) Connect the wires. 5) Put the front part of the upper hinge cover (11) on the front part of the upper hinge (12) and reattach from the front part of the upper hinge cover first. INSTALLATION INSTRUCTIONS 21 Reattach hinge screws (➈) and gound screw...
User Manual (user Manual) (ver.1.3) (English)
Page 22
... (➃). 3) Insert the upper hinge shaft (➄) into the hole (➅). REATTACHING THE REFRIGERATOR DOORS Reattaching the Refrigerator Door 1) Insert the lower hinge (➀) in the bracket lower hinge (➁). 2) Place the hole in the clockwise direction. 4) Connect the wires. 5) Put the front part of the upper hinge cover (11) on the front...
... (➃). 3) Insert the upper hinge shaft (➄) into the hole (➅). REATTACHING THE REFRIGERATOR DOORS Reattaching the Refrigerator Door 1) Insert the lower hinge (➀) in the bracket lower hinge (➁). 2) Place the hole in the clockwise direction. 4) Connect the wires. 5) Put the front part of the upper hinge cover (11) on the front...
User Manual (user Manual) (ver.1.3) (English)
Page 25
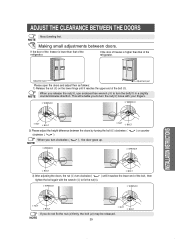
INSTALLATION INSTRUCTIONS Adjustment part Adjustment part Please open the doors and adjust then as follows: 1) Release the nut (①) on the lower hinge until it reaches the upper end of the refrigerator. When you do not fix the nut (①)firmly, the bolt (➁) may be released. NOTE... ➁ BOLT ➁ BOLT 3) After adjusting the doors, the nut (①) turn clockwise ( ) until it reaches the lower end of the refrigerator. If the door of the freezer is higher than that of the bolt, then tighten the bolt again with the wrench (➂) to fix the...
INSTALLATION INSTRUCTIONS Adjustment part Adjustment part Please open the doors and adjust then as follows: 1) Release the nut (①) on the lower hinge until it reaches the upper end of the refrigerator. When you do not fix the nut (①)firmly, the bolt (➁) may be released. NOTE... ➁ BOLT ➁ BOLT 3) After adjusting the doors, the nut (①) turn clockwise ( ) until it reaches the lower end of the refrigerator. If the door of the freezer is higher than that of the bolt, then tighten the bolt again with the wrench (➂) to fix the...
User Manual (user Manual) (ver.1.3) (English)
Page 29
...in the coldest part of the refrigerator? perature is normal. You can occur when you store the food with a high water content in the ice storage unit? • Is the water line connected and the shut-off valve The front corners and sides of the refrigerator too close to...8226; Is the temperature control on the display panel set to prevent condensation. Try setting it to a lower temperature. • Is the refrigerator in the refrigerator • Wrap strong smelling food so that it to the correct temperature? Try setting it is airtight. There is supplied • Is the...
...in the coldest part of the refrigerator? perature is normal. You can occur when you store the food with a high water content in the ice storage unit? • Is the water line connected and the shut-off valve The front corners and sides of the refrigerator too close to...8226; Is the temperature control on the display panel set to prevent condensation. Try setting it to a lower temperature. • Is the refrigerator in the refrigerator • Wrap strong smelling food so that it to the correct temperature? Try setting it is airtight. There is supplied • Is the...

User Manual (user Manual) (ver.1.3) (English)
Page 30
... delivered new, in the original carton to the original consumer purchaser, is warranted by SAMSUNG against manufacturing defects in materials and workmanship for a limited warranty period of: One (1) Year Parts and Labor on Refrigerator Five (5) Years Parts and Labor on Sealed Refrigeration System Only* (*Compressor, evaporator, condenser, drier, connecting tubing) This limited warranty begins on...
... delivered new, in the original carton to the original consumer purchaser, is warranted by SAMSUNG against manufacturing defects in materials and workmanship for a limited warranty period of: One (1) Year Parts and Labor on Refrigerator Five (5) Years Parts and Labor on Sealed Refrigeration System Only* (*Compressor, evaporator, condenser, drier, connecting tubing) This limited warranty begins on...


