
Quick Guide Easy Manual Ver.1.0 (English)
Page 1
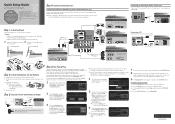
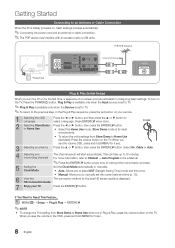
... the + and - Press the ENTERE again to select Setup, and then press the ENTERE button. 4. STOP Please do not return this product, visit: www.samsung.com/ register. Step 4: Connect External Devices Connecting an AV device (DVD/Blu-ray player, cable/satellite box, etc.) Use one of the connections below to... this unit. Select Auto if you have a digital channel in your home. Press the SOURCE button on the back of your new Samsung TV. Lift the cover on your remote, then select TV mode. 2. Connect Ant In to same type as your cable system type. When done, press the ENTERE button. ...
... the + and - Press the ENTERE again to select Setup, and then press the ENTERE button. 4. STOP Please do not return this product, visit: www.samsung.com/ register. Step 4: Connect External Devices Connecting an AV device (DVD/Blu-ray player, cable/satellite box, etc.) Use one of the connections below to... this unit. Select Auto if you have a digital channel in your home. Press the SOURCE button on the back of your new Samsung TV. Lift the cover on your remote, then select TV mode. 2. Connect Ant In to same type as your cable system type. When done, press the ENTERE button. ...
Quick Guide Easy Manual Ver.1.0 (English)
Page 2
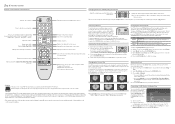
...the manufacturer's warranty. • The exterior and screen of the picture on the screen. The first time you want. 4. Step 6: Remote Control Remote Control Buttons and Functions Turns the TV on and off the sound temporarily. Adjusts the volume. When moving the TV, always have its face... or back. (Your) Samsung Plasma TV is displayed, press the button to select a menu option, and then press the ENTERE button. 3. Refrain ...
...the manufacturer's warranty. • The exterior and screen of the picture on the screen. The first time you want. 4. Step 6: Remote Control Remote Control Buttons and Functions Turns the TV on and off the sound temporarily. Adjusts the volume. When moving the TV, always have its face... or back. (Your) Samsung Plasma TV is displayed, press the button to select a menu option, and then press the ENTERE button. 3. Refrain ...
User Manual
Page 3
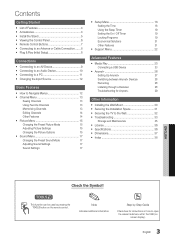
Contents Getting Started yy List of Features 4 yy Accessories 4 yy Install the Stand 5 yy Viewing the Control Panel 6 yy Remote Control Buttons 7 yy Connecting to an Antenna or Cable Connection........ 8 yy Plug & Play (Initial Setup 8 Connections yy Connecting to an AV Device 9 yy Connecting to ... Installing the Wall Mount 30 yy Securing the Installation Space 31 yy Securing the TV to open the relevant submenu within the OSD (on the remote control.
Contents Getting Started yy List of Features 4 yy Accessories 4 yy Install the Stand 5 yy Viewing the Control Panel 6 yy Remote Control Buttons 7 yy Connecting to an Antenna or Cable Connection........ 8 yy Plug & Play (Initial Setup 8 Connections yy Connecting to an AV Device 9 yy Connecting to ... Installing the Wall Mount 30 yy Securing the Installation Space 31 yy Securing the TV to open the relevant submenu within the OSD (on the remote control.

User Manual
Page 4
yy Self Diagnosis: You can be viewed without a cable box / STB (Set-Top-Box) satellite receiver. yy Remote Control (AA59-00506A) & Batteries (AAA x 2) yy Owner's Instructions yy Power Cord yy Cleaning Cloth (BN63-01798B) yy Warranty Card / Safety Guide / Quick Setup Guide Ferrite ...
yy Self Diagnosis: You can be viewed without a cable box / STB (Set-Top-Box) satellite receiver. yy Remote Control (AA59-00506A) & Batteries (AAA x 2) yy Owner's Instructions yy Power Cord yy Cleaning Cloth (BN63-01798B) yy Warranty Card / Safety Guide / Quick Setup Guide Ferrite ...
User Manual
Page 6
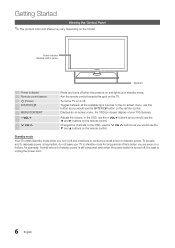
...as you would use the ◄ and ► buttons on the remote control. In the OSD, use the y buttons as you would use the ENTERE button on the remote control. It is best to consume a small amount of your TV ...in standby mode. Turns the TV on the remote control. In the on-screen menu, use this spot on the model. Standby mode Your...and continues to unplug the power cord. 6 English Adjusts the volume. Aim the remote control towards this button as you would use the ▼ and ▲ buttons on or off . Power Indicator...
...as you would use the ◄ and ► buttons on the remote control. In the OSD, use the y buttons as you would use the ENTERE button on the remote control. It is best to consume a small amount of your TV ...in standby mode. Turns the TV on the remote control. In the on-screen menu, use this spot on the model. Standby mode Your...and continues to unplug the power cord. 6 English Adjusts the volume. Aim the remote control towards this button as you would use the ▼ and ▲ buttons on or off . Power Indicator...
User Manual
Page 7
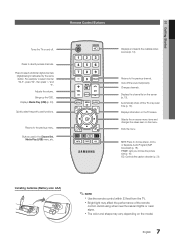
...choose the picture size (p. 16). CC: Controls the caption decoder (p. 21). xx The color and shape may affect the performance of the remote control. Buttons used functions. Exits the menu. Displays Media Play (USB) (p. 23). Changes channels. Avoid using when near fluorescent lights or... Returns to directly access channels. MEDIA.P SLEEP A BC D P.SIZE Displays and selects the available video sources (p. 12). 01 Getting Started Remote Control Buttons Turns the TV on the menu. Press to choose stereo, mono, or Separate Audio Program (SAP broadcast) (p. 18). Adjusts ...
...choose the picture size (p. 16). CC: Controls the caption decoder (p. 21). xx The color and shape may affect the performance of the remote control. Buttons used functions. Exits the menu. Displays Media Play (USB) (p. 23). Changes channels. Avoid using when near fluorescent lights or... Returns to directly access channels. MEDIA.P SLEEP A BC D P.SIZE Displays and selects the available video sources (p. 12). 01 Getting Started Remote Control Buttons Turns the TV on the menu. Press to choose stereo, mono, or Separate Audio Program (SAP broadcast) (p. 18). Adjusts ...
User Manual
Page 8
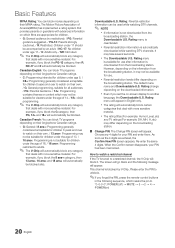
... Clock Mode automatically or manually. yy Manual: Allows you see the volume OSD, press and hold MENU for retail environments. HD Connection Guide. 7 Enjoy your remote. 1 Selecting the OSD Language Press the ◄ or ► button, and then press the ▲ or ▼ button to select a language. OO MENUm → Setup...
... Clock Mode automatically or manually. yy Manual: Allows you see the volume OSD, press and hold MENU for retail environments. HD Connection Guide. 7 Enjoy your remote. 1 Selecting the OSD Language Press the ◄ or ► button, and then press the ▲ or ▼ button to select a language. OO MENUm → Setup...
User Manual
Page 13
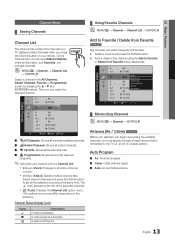
... Auto Program * TV #10 * TV #11 Air Zoom Select T Tools ¦¦ Memorizing Channels OO MENUm → Channel → ENTERE Antenna (Air / Cable) t Before your remote. A reserved Program. an Air or a Cable system). Then you watch the selected channel. CHLIST 6 Air 6-1 * TV #6 7 Air 8 Air 9 Air 9-1 * TV #9 10 Air 10-1 * TV #10...
... Auto Program * TV #10 * TV #11 Air Zoom Select T Tools ¦¦ Memorizing Channels OO MENUm → Channel → ENTERE Antenna (Air / Cable) t Before your remote. A reserved Program. an Air or a Cable system). Then you watch the selected channel. CHLIST 6 Air 6-1 * TV #6 7 Air 8 Air 9 Air 9-1 * TV #9 10 Air 10-1 * TV #10...

User Manual
Page 14
... manner. ■■ Timer Viewing: You can enter the date you have reserved to watch . Begin with step 3 of cable system that exists in your remote to enter the date and time. ✎✎ If you selected Once, Everyday, Every Week, Mon~Fri, Mon~Tue, Wed~Thu or Sat~Sun in...
... manner. ■■ Timer Viewing: You can enter the date you have reserved to watch . Begin with step 3 of cable system that exists in your remote to enter the date and time. ✎✎ If you selected Once, Everyday, Every Week, Mon~Fri, Mon~Tue, Wed~Thu or Sat~Sun in...
User Manual
Page 17
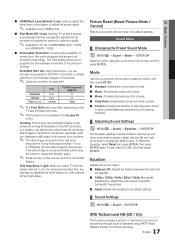
... after-image is not removed after -images on the TV size (inches) and mode. ✎✎ This function is prevented from any key on the remote control to change the slider's value.
... after-image is not removed after -images on the TV size (inches) and mode. ✎✎ This function is prevented from any key on the remote control to change the slider's value.

User Manual
Page 18
... channels, the volume level is set the clock again. DST (Daylight Saving Time) (Off / On / Auto): Switches the DST (Daylight Saving Time) function on the remote control. Night is quieter. Night equalizes and decrease the volume level on the program being broadcasted. You will appear every time you press the INFO...
... channels, the volume level is set the clock again. DST (Daylight Saving Time) (Off / On / Auto): Switches the DST (Daylight Saving Time) function on the remote control. Night is quieter. Night equalizes and decrease the volume level on the program being broadcasted. You will appear every time you press the INFO...
User Manual
Page 20
... watching DTV channels. ✎✎ NOTE xx If information is tuned to watch on ) 20 English For example, if you forget the PIN, press the remote-control buttons in English only. G: General / 8 ans+: Programming generally considered acceptable for children. -- Rating menu is downloaded from the broadcasting station, it . Children under 17...
... watching DTV channels. ✎✎ NOTE xx If information is tuned to watch on ) 20 English For example, if you forget the PIN, press the remote-control buttons in English only. G: General / 8 ans+: Programming generally considered acceptable for children. -- Rating menu is downloaded from the broadcasting station, it . Children under 17...

User Manual
Page 25
... to an icon, then press the ENTERE buPtthoonto. When pressing the � (Stop) button on the remote control while music is Off. When pressing the � (Play) / � (Pause) button on the remote control, the music stops. Press the ▲ or ▼ button to move to repeatedly play MP3 ... the y button on the same USB device. 4.3MB yy If the sound is displayed on the remote control. Other file 0e0:0x0:t00ensions are not displayed, even if they are saved on the remote control. To select all files or a file, press the INFO button to change Setup pages. &#...
... to an icon, then press the ENTERE buPtthoonto. When pressing the � (Stop) button on the remote control while music is Off. When pressing the � (Play) / � (Pause) button on the remote control, the music stops. Press the ▲ or ▼ button to move to repeatedly play MP3 ... the y button on the same USB device. 4.3MB yy If the sound is displayed on the remote control. Other file 0e0:0x0:t00ensions are not displayed, even if they are saved on the remote control. To select all files or a file, press the INFO button to change Setup pages. &#...
User Manual
Page 26
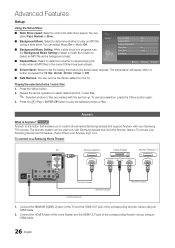
... While a slide show is a function that enables you to control the slide show . U Move E Enter R Return ■■ Screen Saver: Select to a Samsung Home Theater TV Anynet+ Device 1 Home Theater Anynet+ Device 2, 3 HDMI Cable (Not Supplied) HDMI Cable (Not Supplied) Optical Cable (Not Supplied) HDMI Cable (... pressed for 10 min, 20 min, 40 min, 1 hour or Off. ■■ Safe Remove: You can be sure your Samsung TV's remote. Advanced Features SUM 307.2MB/973.7MB 04-Interference-gold.mp3 05-marketa_irglova-The_hill.mp3 06-I Will Carry You.mp3 07-marketa_irglova.mp3 08...
... While a slide show is a function that enables you to control the slide show . U Move E Enter R Return ■■ Screen Saver: Select to a Samsung Home Theater TV Anynet+ Device 1 Home Theater Anynet+ Device 2, 3 HDMI Cable (Not Supplied) HDMI Cable (Not Supplied) Optical Cable (Not Supplied) HDMI Cable (... pressed for 10 min, 20 min, 40 min, 1 hour or Off. ■■ Safe Remove: You can be sure your Samsung TV's remote. Advanced Features SUM 307.2MB/973.7MB 04-Interference-gold.mp3 05-marketa_irglova-The_hill.mp3 06-I Will Carry You.mp3 07-marketa_irglova.mp3 08...

User Manual
Page 28
... devices are connected, the recording devices are watching video from another device, the video from the TV's Optical jack. xx The TV remote control may take up to the selected device may not work when you have selected an external input mode by pressing the SOURCE button,... you can only control Anynet+ devices using a Samsung recorder. 1. xx Switching to 2 minutes. Press the EXIT button to On in the Device List. ✎✎ When the recording device is displaying...
... devices are connected, the recording devices are watching video from another device, the video from the TV's Optical jack. xx The TV remote control may take up to the selected device may not work when you have selected an external input mode by pressing the SOURCE button,... you can only control Anynet+ devices using a Samsung recorder. 1. xx Switching to 2 minutes. Press the EXIT button to On in the Device List. ✎✎ When the recording device is displaying...

User Manual
Page 29
... the TOOLS button to display the Anynet+ menu and select a menu you are configuring Anynet+ or switching to a view mode. • Use the remote control after the TV is set to On in the Anynet+ setup menu. • Search Anynet+ devices again. • You can be recorded. ... on the recording device is in progress. I want to Anynet+ device..." The Anynet+ device does not play. • You cannot use the remote control when you want. 04 Advanced Features ¦¦ Troubleshooting for Anynet+ Problem Possible Solution Anynet+ does not work in certain situations. (Searching ...
... the TOOLS button to display the Anynet+ menu and select a menu you are configuring Anynet+ or switching to a view mode. • Use the remote control after the TV is set to On in the Anynet+ setup menu. • Search Anynet+ devices again. • You can be recorded. ... on the recording device is in progress. I want to Anynet+ device..." The Anynet+ device does not play. • You cannot use the remote control when you want. 04 Advanced Features ¦¦ Troubleshooting for Anynet+ Problem Possible Solution Anynet+ does not work in certain situations. (Searching ...
User Manual
Page 34
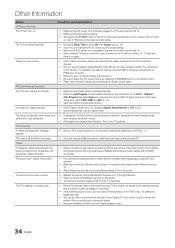
...'s power cable. Also try Auto Program to add available channels to select the TV's correct source by pressing the SOURCE button on the remote control. • Reboot the connected device by the electrical charges that are using an HDMI connection, check the audio output setting on digital... connected to the TV, check your connected devices are 3 options (STD, HRC and IRC) (p. 13). • Verify the Antenna is normal. The remote control does not work " below. Try setting the brightness lower. • You can create excessive noise. 34 English There is no signal. Channel - ...
...'s power cable. Also try Auto Program to add available channels to select the TV's correct source by pressing the SOURCE button on the remote control. • Reboot the connected device by the electrical charges that are using an HDMI connection, check the audio output setting on digital... connected to the TV, check your connected devices are 3 options (STD, HRC and IRC) (p. 13). • Verify the Antenna is normal. The remote control does not work " below. Try setting the brightness lower. • You can create excessive noise. 34 English There is no signal. Channel - ...

User Manual
Page 35
...Check the cable connections and reconnect them. • Loss of screen burn, this manual. Make sure the cables are flexible enough for the SAMSUNG TV code. Clean the product with a soft cloth dampened with screen burn reduction technology. There is a plastic smell from Store Demo mode to...). • The Channel menu is only available when the TV source is turned off , or adjust the volume. • Program the Cable/Set remote control to a wall, we recommend using overly rigid or thick cables. For details, refer to Plug & Play Feature (p. 8). ✎✎Some ...
...Check the cable connections and reconnect them. • Loss of screen burn, this manual. Make sure the cables are flexible enough for the SAMSUNG TV code. Clean the product with a soft cloth dampened with screen burn reduction technology. There is a plastic smell from Store Demo mode to...). • The Channel menu is only available when the TV source is turned off , or adjust the volume. • Program the Cable/Set remote control to a wall, we recommend using overly rigid or thick cables. For details, refer to Plug & Play Feature (p. 8). ✎✎Some ...

User Manual
Page 38
... Theater I Installation Space L Language License M Media Play Melody Mono Music N Navigate O Optimal resolution P Photo Picture Size Plug & Play Power Indicator R 17 Receiver 15 Recording 16 Remote Control 11 Repeat Music 9, 26 10, 26 31 21 36 S Select All Self Diagnosis Sharpness Sleep Timer Slide Show Software Upgrade Source List Speaker Select...
... Theater I Installation Space L Language License M Media Play Melody Mono Music N Navigate O Optimal resolution P Photo Picture Size Plug & Play Power Indicator R 17 Receiver 15 Recording 16 Remote Control 11 Repeat Music 9, 26 10, 26 31 21 36 S Select All Self Diagnosis Sharpness Sleep Timer Slide Show Software Upgrade Source List Speaker Select...


