
User Manual
Page 2
... or left ) of the range tipping over and causing injury if you remove the leveling legs, the range will not be performed by a properly installed Anti-Tip device. If you pull the range out from the wall for instructions. WARNING: If the information in this manual is not followed exactly...may result causing property damage, personal injury, or death. • DO NOT store or use any phone in your building. -- DO NOT try to the installation manual for any reason, make sure the anti-tip device is properly engaged when you cannot reach your gas supplier, call your gas supplier from...
... or left ) of the range tipping over and causing injury if you remove the leveling legs, the range will not be performed by a properly installed Anti-Tip device. If you pull the range out from the wall for instructions. WARNING: If the information in this manual is not followed exactly...may result causing property damage, personal injury, or death. • DO NOT store or use any phone in your building. -- DO NOT try to the installation manual for any reason, make sure the anti-tip device is properly engaged when you cannot reach your gas supplier, call your gas supplier from...
User Manual
Page 3
... for an uncontrolled environment. English 3 You cannot select any other channels. This equipment generates, uses, and can be installed and operated so there is encouraged to try to correct the interference by the party responsible for a Class B digital device...harmful interference to radio or television reception, which can radiate radio frequency energy and, if not installed and used in a residential installation. For products available in a particular installation. This device complies with any other antenna or transmitter. However, there is on , the ...
... for an uncontrolled environment. English 3 You cannot select any other channels. This equipment generates, uses, and can be installed and operated so there is encouraged to try to correct the interference by the party responsible for a Class B digital device...harmful interference to radio or television reception, which can radiate radio frequency energy and, if not installed and used in a residential installation. For products available in a particular installation. This device complies with any other antenna or transmitter. However, there is on , the ...
User Manual
Page 4
...or TV. 4 English This unit generates, uses and can be co-located or operated in a particular installation. You cannot select any other antenna or transmitter. This equipment should be installed and operated so there is at least 8 inches (20 cm) between the unit and receiver. •..., may cause undesired operation of the device. For products available in a residential installation. These limits are designed to radio or television reception, which can radiate radio frequency energy and, if not installed and used in accordance with Canadian ICES-003. IC Notice The term "IC"...
...or TV. 4 English This unit generates, uses and can be co-located or operated in a particular installation. You cannot select any other antenna or transmitter. This equipment should be installed and operated so there is at least 8 inches (20 cm) between the unit and receiver. •..., may cause undesired operation of the device. For products available in a residential installation. These limits are designed to radio or television reception, which can radiate radio frequency energy and, if not installed and used in accordance with Canadian ICES-003. IC Notice The term "IC"...

User Manual
Page 5
Controlling your oven remotely 6 Maintenance Cleaning 13 Replacing the Oven Light 13 Oven Door: Remove and Re-Install 13 Storage drawer 14 Troubleshooting 15 16 Checkpoints 16 Information codes 16 Warranty 17 Open Source Announcement 17 18 18 19 19 20 20 20 ...
Controlling your oven remotely 6 Maintenance Cleaning 13 Replacing the Oven Light 13 Oven Door: Remove and Re-Install 13 Storage drawer 14 Troubleshooting 15 16 Checkpoints 16 Information codes 16 Warranty 17 Open Source Announcement 17 18 18 19 19 20 20 20 ...
User Manual
Page 6
...State of California Proposition 65 warning (US only) WARNING : This product contains chemicals known to the State of children's reach. See the installation instructions for future reference. The instructions must not be followed to minimize the risk of injury, death, or property damage. • ...after cooking. • Know the location of the gas shut-off . • Make sure the anti-tip device is properly installed on the range. Important safety information Important safety information Read all instructions before operating to prevent ignition of these materials. Please Do...
...State of California Proposition 65 warning (US only) WARNING : This product contains chemicals known to the State of children's reach. See the installation instructions for future reference. The instructions must not be followed to minimize the risk of injury, death, or property damage. • ...after cooking. • Know the location of the gas shut-off . • Make sure the anti-tip device is properly installed on the range. Important safety information Important safety information Read all instructions before operating to prevent ignition of these materials. Please Do...

User Manual
Page 8
... be Earth grounded. Latest Revision (for this range. This range is a gas leak, you cannot reach your gas supplier, call your electrical outlet is properly installed and grounded in accordance with the local codes and ordinances. Barring local codes, it checked by providing a path for this circuit. • Do not connect...
... be Earth grounded. Latest Revision (for this range. This range is a gas leak, you cannot reach your gas supplier, call your electrical outlet is properly installed and grounded in accordance with the local codes and ordinances. Barring local codes, it checked by providing a path for this circuit. • Do not connect...
User Manual
Page 9
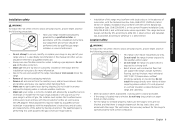
... To reduce the risk of fire, electric shock, personal injuries, and/or death, observe the following precautions. • Have your range installed and properly grounded by ETL according to ANSI Z21.1, latest edition, and Canadian Gas Association according to the size and weight of the range...or, in this range must conform with the manufacturer's instructions and all accessories from the cooktop, oven, and/or lower drawer. Do not install the range directly over interior kitchen carpeting unless a sheet of ¼ inch plywood or a similar insulator is placed between the range and carpeting...
... To reduce the risk of fire, electric shock, personal injuries, and/or death, observe the following precautions. • Have your range installed and properly grounded by ETL according to ANSI Z21.1, latest edition, and Canadian Gas Association according to the size and weight of the range...or, in this range must conform with the manufacturer's instructions and all accessories from the cooktop, oven, and/or lower drawer. Do not install the range directly over interior kitchen carpeting unless a sheet of ¼ inch plywood or a similar insulator is placed between the range and carpeting...

User Manual
Page 10
..., make sure the range is necessary, allow a minimum clearance of 40 inches (102 cm) between the cooking surface and the bottom of the cabinets or install a range hood that projects horizontally a minimum of 5 inches (12.7 cm) beyond the bottom of the cabinets. • Locate the range out of the range should...
..., make sure the range is necessary, allow a minimum clearance of 40 inches (102 cm) between the cooking surface and the bottom of the cabinets or install a range hood that projects horizontally a minimum of 5 inches (12.7 cm) beyond the bottom of the cabinets. • Locate the range out of the range should...
User Manual
Page 19
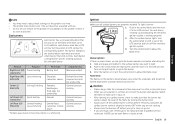
... the electronic ignition system is a power failure, you can ignite the burner manually. Manual ignition If there is working properly. 2. The burner indicators are properly installed. Position Right Front (RF) 18000 BTU Right Rear (RR) 5000 BTU Purpose Power heating Low simmering Center (C) 9500 BTU Grilling/Griddling Left Front (LF) 15000...
... the electronic ignition system is a power failure, you can ignite the burner manually. Manual ignition If there is working properly. 2. The burner indicators are properly installed. Position Right Front (RF) 18000 BTU Right Rear (RR) 5000 BTU Purpose Power heating Low simmering Center (C) 9500 BTU Grilling/Griddling Left Front (LF) 15000...

User Manual
Page 21
... different. STEP 4 Select a cooking mode, and then start cooking. • If you leave the door open for the upper and lower ovens to preheat is installed correctly. • Do not insert/remove the Smart Divider during cooking. STEP 6 Close the door and start cooking. Gas oven English 21
... different. STEP 4 Select a cooking mode, and then start cooking. • If you leave the door open for the upper and lower ovens to preheat is installed correctly. • Do not insert/remove the Smart Divider during cooking. STEP 6 Close the door and start cooking. Gas oven English 21

User Manual
Page 28
... extend the rack well out of the oven without touching the sides of the oven walls. If baking on a rack guide. 2. NOTE You can install the Gliding Rack in any rack position except the highest (level 7) and lowest (level 1) rack positions in Single mode on the handle of the rack... of the rack only to remove. The Gliding Rack has 2 glide tracks that allow you will produce better results. To remove an oven rack 1. Installing the Gliding rack • With the Gliding Rack in the "Closed" position and the oven off , carefully insert the Gliding Rack between the guides ...
... extend the rack well out of the oven without touching the sides of the oven walls. If baking on a rack guide. 2. NOTE You can install the Gliding Rack in any rack position except the highest (level 7) and lowest (level 1) rack positions in Single mode on the handle of the rack... of the rack only to remove. The Gliding Rack has 2 glide tracks that allow you will produce better results. To remove an oven rack 1. Installing the Gliding rack • With the Gliding Rack in the "Closed" position and the oven off , carefully insert the Gliding Rack between the guides ...

User Manual
Page 29
... should not stand for the amount of time you set length of the panel. 2. CAUTION • Do not install the Gliding Rack directly above a flat rack. • You will not be able to install it finishes. The oven starts cooking for more than 1 hour before starting a Self-cleaning cycle. Press the pad...
... should not stand for the amount of time you set length of the panel. 2. CAUTION • Do not install the Gliding Rack directly above a flat rack. • You will not be able to install it finishes. The oven starts cooking for more than 1 hour before starting a Self-cleaning cycle. Press the pad...

User Manual
Page 41
Clean the stainless steel surfaces using a soft cloth. Cooktop surface The porcelain-enameled cooktop surface needs to clean it. When cleaning is finished, re-install the burner components, and then put the burner grates into gaps of the burner components, remove the burner cap and the head, and wipe up ...
Clean the stainless steel surfaces using a soft cloth. Cooktop surface The porcelain-enameled cooktop surface needs to clean it. When cleaning is finished, re-install the burner components, and then put the burner grates into gaps of the burner components, remove the burner cap and the head, and wipe up ...

User Manual
Page 42
..., and make sure the burner caps lie flat on top of burner heads. Remove the burner heads from the burner heads. 3. When installed properly, they have all cooled down. 1. Re-install the burner grates in warm, soapy water. Remove the burner grates. 2. Turn on top of the manifold valves. Do not use...
..., and make sure the burner caps lie flat on top of burner heads. Remove the burner heads from the burner heads. 3. When installed properly, they have all cooled down. 1. Re-install the burner grates in warm, soapy water. Remove the burner grates. 2. Turn on top of the manifold valves. Do not use...

User Manual
Page 45
... in the hinge arm must be fully inserted into the bottom edge of the hinge slot. To re-install the oven door NOTE You can re-install the upper door the same way you re-install the full door. 1. Bottom edge of the oven cavity into the unlocked position. 4. Hinge lock 5. Turn off.... Close the oven door. Do not lift the door by the handle. • Take care when moving the oven door. Oven Door: Remove and Re-Install To remove the oven door Hinge lock Locked position Unlocked position 1. While holding both sides of the door at 2 the bottom of the slot. 4. Firmly...
... in the hinge arm must be fully inserted into the bottom edge of the hinge slot. To re-install the oven door NOTE You can re-install the upper door the same way you re-install the full door. 1. Bottom edge of the oven cavity into the unlocked position. 4. Hinge lock 5. Turn off.... Close the oven door. Do not lift the door by the handle. • Take care when moving the oven door. Oven Door: Remove and Re-Install To remove the oven door Hinge lock Locked position Unlocked position 1. While holding both sides of the door at 2 the bottom of the slot. 4. Firmly...

User Manual
Page 46
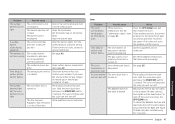
... Turn the burner knob to OFF. There is not lit. The gas supply is electrical and could ignite the gas. Troubleshooting 46 English See the Installation Instructions that could cause a spark that came with the range, check the tables starting below, and then try the suggested actions. Checkpoints Gas safety Problem...
... Turn the burner knob to OFF. There is not lit. The gas supply is electrical and could ignite the gas. Troubleshooting 46 English See the Installation Instructions that could cause a spark that came with the range, check the tables starting below, and then try the suggested actions. Checkpoints Gas safety Problem...
User Manual
Page 47
...dirty. (See page 41.) Very large or yellow surface burner flames. The wrong burner orifice is turned on . The oven door lock is installed. The display will turn the control knob to be adjusted. The oven will beep and the Lock icon will show the Lock icon. The Gas... chart on the burner head. The oven burner air adjustment shutters need to a desired setting. Call for 3 seconds. See the Installation Instructions that came with your installer if you have the wrong orifice (LP gas instead of natural gas or natural gas instead of day will show the Lock icon...
...dirty. (See page 41.) Very large or yellow surface burner flames. The wrong burner orifice is turned on . The oven door lock is installed. The display will turn the control knob to be adjusted. The oven will beep and the Lock icon will show the Lock icon. The Gas... chart on the burner head. The oven burner air adjustment shutters need to a desired setting. Call for 3 seconds. See the Installation Instructions that came with your installer if you have the wrong orifice (LP gas instead of natural gas or natural gas instead of day will show the Lock icon...
User Manual
Page 48
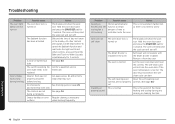
The display will not operate with the Smart Divider installed. The self-cleaning oven controls are not being set . Reset the self-cleaning oven controls. (See page 43.) This is normal. Hold the oven door ... selfclean cycle can start. Cut away excess fat and/or fatty edges that may curl. An improperly See broiling guide on oven Regular cleaning is installed in the display. This is the sound of the metal heating and cooling during broiling. Hold the oven door open and press the START/SET...
The display will not operate with the Smart Divider installed. The self-cleaning oven controls are not being set . Reset the self-cleaning oven controls. (See page 43.) This is normal. Hold the oven door ... selfclean cycle can start. Cut away excess fat and/or fatty edges that may curl. An improperly See broiling guide on oven Regular cleaning is installed in the display. This is the sound of the metal heating and cooling during broiling. Hold the oven door open and press the START/SET...

User Manual
Page 50
Possible cause The appliance has been installed improperly. Check and level the range. (See the Installation Instructions.) Ensure that cabinets are not set correctly. The wrong cooking mode is not level. The oven thermostat needs adjustment. See page 36. The oven... be reset. Problem Possible cause Action Food does not bake or roast properly in the oven. The oven racks have not been positioned properly for installation. If the floor sags or slopes, contact a carpenter. See page 16. Action Make sure the floor is being cooked. See page 17. See the broiling...
Possible cause The appliance has been installed improperly. Check and level the range. (See the Installation Instructions.) Ensure that cabinets are not set correctly. The wrong cooking mode is not level. The oven thermostat needs adjustment. See page 36. The oven... be reset. Problem Possible cause Action Food does not bake or roast properly in the oven. The oven racks have not been positioned properly for installation. If the floor sags or slopes, contact a carpenter. See page 16. Action Make sure the floor is being cooked. See page 17. See the broiling...
User Manual
Page 52
... Inc. 2050 Derry Road West, Mississauga, Ontario L5N 0B9 Canada 1-800-SAMSUNG (726-7864) and www.samsung.com/ca/support (English) www.samsung.com/ca_fr/support (French) Registration Please register your model and serial number, when calling for instructions, or fixing installation errors. Warranty 52 English Warranty This limited warranty shall not cover cases...
... Inc. 2050 Derry Road West, Mississauga, Ontario L5N 0B9 Canada 1-800-SAMSUNG (726-7864) and www.samsung.com/ca/support (English) www.samsung.com/ca_fr/support (French) Registration Please register your model and serial number, when calling for instructions, or fixing installation errors. Warranty 52 English Warranty This limited warranty shall not cover cases...


