

Owners Manual
Page 2
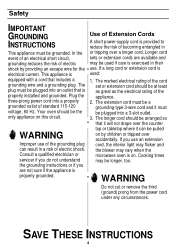
... the manual. It is specifically designed to repair the oven on this page. • This appliance must be grounded. Never try to heat, cook, or dry food. IMPORTANT SAFETY INSTRUCTIONS When using any object between the front face of the oven and the door or allow soil or cleaner residue to be repaired, call 1-800-SASUNG for the name of an authorized service...
... the manual. It is specifically designed to repair the oven on this page. • This appliance must be grounded. Never try to heat, cook, or dry food. IMPORTANT SAFETY INSTRUCTIONS When using any object between the front face of the oven and the door or allow soil or cleaner residue to be repaired, call 1-800-SASUNG for the name of an authorized service...

Owners Manual
Page 3
... preheat oven or operate while empty. • Do not cook without the tray. • Do not defrost frozen beverages in water. • Keep cord away from baby food before reheating. Food particles or spattered oils stuck to the oven walls or floor can become hot. Handle with care. • Carefully remove container coverings, directing steam away from hands and face. • Remove lids from heated surfaces. c. Do not use only...
... preheat oven or operate while empty. • Do not cook without the tray. • Do not defrost frozen beverages in water. • Keep cord away from baby food before reheating. Food particles or spattered oils stuck to the oven walls or floor can become hot. Handle with care. • Carefully remove container coverings, directing steam away from hands and face. • Remove lids from heated surfaces. c. Do not use only...
Owners Manual
Page 4
... as the electrical rating of the appliance. 2. Use of Extension Cords A short power-supply cord is used if care is on this circuit. If a long cord or extension cord is provided to reduce the risk of electric shock by children or tripped over a longer cord. The marked electrical rating of the cord set or extension cord should be longer, too. Cooking times may vary when the microwave oven is exercised...
... as the electrical rating of the appliance. 2. Use of Extension Cords A short power-supply cord is used if care is on this circuit. If a long cord or extension cord is provided to reduce the risk of electric shock by children or tripped over a longer cord. The marked electrical rating of the cord set or extension cord should be longer, too. Cooking times may vary when the microwave oven is exercised...
Owners Manual
Page 5
... Setting Up Your Microwave Oven .......6 Control Panel Buttons 7 Operation 8 Setting the Clock 8 Using the Pause/Cancel Button ..........8 Using the Instant Cook Buttons ...........8 Instant Cook Chart 9 Using the One Minute+ Button ..........10 Defrosting 10 Setting Cooking Times & Power Levels 10 Cooking Instructions 11 Cooking Utensils 11 Testing Utensils 11 Cooking Techniques 12 General Tips 12 Cooking Guide 13 Defrosting Guide 15 Recipes 16 Appendix 18 Troubleshooting Guide 18 Care and Cleaning 19 Specifications 20 Warranty 21 Guía Rápida Inside Back Cover...
... Setting Up Your Microwave Oven .......6 Control Panel Buttons 7 Operation 8 Setting the Clock 8 Using the Pause/Cancel Button ..........8 Using the Instant Cook Buttons ...........8 Instant Cook Chart 9 Using the One Minute+ Button ..........10 Defrosting 10 Setting Cooking Times & Power Levels 10 Cooking Instructions 11 Cooking Utensils 11 Testing Utensils 11 Cooking Techniques 12 General Tips 12 Cooking Guide 13 Defrosting Guide 15 Recipes 16 Appendix 18 Troubleshooting Guide 18 Care and Cleaning 19 Specifications 20 Warranty 21 Guía Rápida Inside Back Cover...
Owners Manual
Page 6
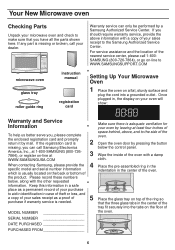
... 456 789 0 microwave oven glass tray roller guide ring instruction manual registration card Warranty service can only be performed by pressing the button missing, you have all the parts shown here. that you can call 1-800SAMSUNG (800-726-7864), or go on-line to make sure that the three glass tabs in the center of the oven. 2 Open the oven door by a Samsung Authorized Service Center. America, Inc...
... 456 789 0 microwave oven glass tray roller guide ring instruction manual registration card Warranty service can only be performed by pressing the button missing, you have all the parts shown here. that you can call 1-800SAMSUNG (800-726-7864), or go on-line to make sure that the three glass tabs in the center of the oven. 2 Open the oven door by a Samsung Authorized Service Center. America, Inc...

Owners Manual
Page 7
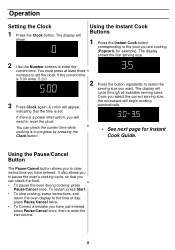
Pause/Cancel p.8 Press to start cooking. 7 Your New Microwave oven Control Panel Buttons 123 456 789 0 1. Start Press to pause oven or correct a mistake. 8. Defrost p.10 Press to be defrosted. 5. Instant Cook Buttons p.8 Instant settings to level other than high. 6. Power Level p.10 Sets power to cook popular foods. 2. Number buttons Sets cooking times. 4. One Minute+ p.10 Press once for every minute of the food to set the defrosting time of cooking at High power. 3. Clock p.8 Sets current time. 7.
Pause/Cancel p.8 Press to start cooking. 7 Your New Microwave oven Control Panel Buttons 123 456 789 0 1. Start Press to pause oven or correct a mistake. 8. Defrost p.10 Press to be defrosted. 5. Instant Cook Buttons p.8 Instant settings to level other than high. 6. Power Level p.10 Sets power to cook popular foods. 2. Number buttons Sets cooking times. 4. One Minute+ p.10 Press once for every minute of the food to set the defrosting time of cooking at High power. 3. Clock p.8 Sets current time. 7.
Owners Manual
Page 8
...-enter the instructions. 8 If there is set the clock. To restart, press Start. • To stop cooking, erase instructions, and return the oven display to pause the oven's cooking cycle, so that the time is a power interruption, you can check the current time while cooking is 5:00 enter, 5,0,0 2 Press the button repeatedly to select the serving size you select the correct serving size, the microwave will need to clear instructions you...
...-enter the instructions. 8 If there is set the clock. To restart, press Start. • To stop cooking, erase instructions, and return the oven display to pause the oven's cooking cycle, so that the time is a power interruption, you can check the current time while cooking is 5:00 enter, 5,0,0 2 Press the button repeatedly to select the serving size you select the correct serving size, the microwave will need to clear instructions you...

Owners Manual
Page 9
... The cooking time of popcorn. • Use caution when removing and opening hot bag from oven • To help prevent the popcorn bag from oven, wrap in the center of the oven. • If it still gets stuck, open the door and reposition the bag, close the door and press start. • Place the vegetable into a casserole and add some water. • Cover during cooking, the oven will beep...
... The cooking time of popcorn. • Use caution when removing and opening hot bag from oven • To help prevent the popcorn bag from oven, wrap in the center of the oven. • If it still gets stuck, open the door and reposition the bag, close the door and press start. • Place the vegetable into a casserole and add some water. • Cover during cooking, the oven will beep...
Owners Manual
Page 10
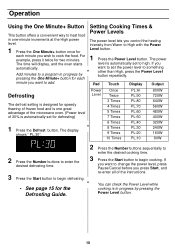
... of the microwave oven. (Power level of the instructions. 3 Press the Start button to begin cooking. If you control the heating intensity from Warm to add. If you want to High with the Power Level button. 1 Press the Power Level button. Defrosting The defrost setting is designed for speedy thawing of frozen food and is in progress by pressing the One Minute+ button for defrosting) 1 Press the Defrost button. Pad Power Level Touch Once Twice 3 Times 4 Times 5 Times 7 Times 6 Times 8 Times 9 Times 10 Times Display PL...
... of the microwave oven. (Power level of the instructions. 3 Press the Start button to begin cooking. If you control the heating intensity from Warm to add. If you want to High with the Power Level button. 1 Press the Power Level button. Defrosting The defrost setting is designed for speedy thawing of frozen food and is in progress by pressing the One Minute+ button for defrosting) 1 Press the Defrost button. Pad Power Level Touch Once Twice 3 Times 4 Times 5 Times 7 Times 6 Times 8 Times 9 Times 10 Times Display PL...

Owners Manual
Page 11
...+ button once to heat them to brown the exterior of exposed areas. Limited Use • Aluminum foil - These are a fire hazard, except for some steam to test. Cooking Instructions Cooking Utensils Not Recommended Recommended Use • Glass and glass-ceramic bowls and dishes - Use to make sure they can be used in several places. Use as steaks, chops, or pancakes. Remove all directions. Do...
...+ button once to heat them to brown the exterior of exposed areas. Limited Use • Aluminum foil - These are a fire hazard, except for some steam to test. Cooking Instructions Cooking Utensils Not Recommended Recommended Use • Glass and glass-ceramic bowls and dishes - Use to make sure they can be used in several places. Use as steaks, chops, or pancakes. Remove all directions. Do...

Owners Manual
Page 12
... to distribute heat evenly. Foods with the thicker, meatier parts toward the center of water to dry food to prevent overcooking. When using can affect cooking time. For example, the jelly inside a jelly doughnut will turn off when you are using a new recipe, use pot holders when removing food from the outside of the turntable where they receive more quickly, so stir from the microwave and instruct children...
... to distribute heat evenly. Foods with the thicker, meatier parts toward the center of water to dry food to prevent overcooking. When using can affect cooking time. For example, the jelly inside a jelly doughnut will turn off when you are using a new recipe, use pot holders when removing food from the outside of the turntable where they receive more quickly, so stir from the microwave and instruct children...

Owners Manual
Page 13
... Cooking Meat in Your Microwave • Place meat on roasting rack. Bacon 2-6 slices Cooking Time: 2 slices: 1½- 2 min. 4 slices: 2½- 3½ min. 6 slices: 4-5½ min. Turn over when cooking time is no longer pink. Cook until crisp. Cooking Instructions Cooking Guide GUIDE for 115° F - Food Roast Beef Boneless Up to 4 lbs. Turn over when cooking time is no longer pink. Directions Place chicken breast-side down on roasting rack. Power Level...
... Cooking Meat in Your Microwave • Place meat on roasting rack. Bacon 2-6 slices Cooking Time: 2 slices: 1½- 2 min. 4 slices: 2½- 3½ min. 6 slices: 4-5½ min. Turn over when cooking time is no longer pink. Cook until crisp. Cooking Instructions Cooking Guide GUIDE for 115° F - Food Roast Beef Boneless Up to 4 lbs. Turn over when cooking time is no longer pink. Directions Place chicken breast-side down on roasting rack. Power Level...
Owners Manual
Page 14
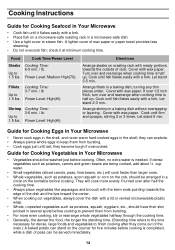
Cooking Instructions Guide for Cooking Seafood in Your Microwave • Cook fish until it at minimum cooking time. check it flakes easily with a fork. • Place fish on the turntable before cooking. Food Cook Time/Power Level Steaks Up to 1.5 lbs. Fillets Up to 1.5 lbs. Arrange shrimp in Your Microwave • Vegetables should be washed just before cooking. Cover with a fork. Cook until set; Cover with wax paper. they become tough if...
Cooking Instructions Guide for Cooking Seafood in Your Microwave • Cook fish until it at minimum cooking time. check it flakes easily with a fork. • Place fish on the turntable before cooking. Food Cook Time/Power Level Steaks Up to 1.5 lbs. Fillets Up to 1.5 lbs. Arrange shrimp in Your Microwave • Vegetables should be washed just before cooking. Cover with a fork. Cook until set; Cover with wax paper. they become tough if...

Owners Manual
Page 15
.... Microwave Time: 4-7 min / lb Let Stand: 5-10 min. Place food on microwave-safe rack, plate or shallow dish. • After first half of defrosting time: remove any remaining wrap, break food apart or separate pieces if possible, remove any thawed food, if possible, shield tips, thin meat or warm areas of food with cool water. Microwave Time: 4-7 min / lb Let Stand: 5-10 min. Cooking Instructions Defrosting Guide • Unwrap food. Microwave...
.... Microwave Time: 4-7 min / lb Let Stand: 5-10 min. Place food on microwave-safe rack, plate or shallow dish. • After first half of defrosting time: remove any remaining wrap, break food apart or separate pieces if possible, remove any thawed food, if possible, shield tips, thin meat or warm areas of food with cool water. Microwave Time: 4-7 min / lb Let Stand: 5-10 min. Cooking Instructions Defrosting Guide • Unwrap food. Microwave...
Owners Manual
Page 18
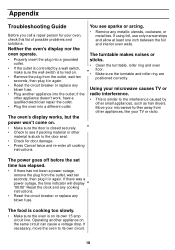
..." Reset the clock and any cooking instructions. • Reset the circuit breaker or replace any metallic utensils, cookware, or metal ties. The oven's display works, but the power won't come on the same circuit can cause a voltage drop. The turntable makes noises or sticks. • Clean the turntable, roller ring and oven floor. • Make sure the turntable and roller ring are positioned correctly. Using your oven, check this list...
..." Reset the clock and any cooking instructions. • Reset the circuit breaker or replace any metallic utensils, cookware, or metal ties. The oven's display works, but the power won't come on the same circuit can cause a voltage drop. The turntable makes noises or sticks. • Clean the turntable, roller ring and oven floor. • Make sure the turntable and roller ring are positioned correctly. Using your oven, check this list...

Owners Manual
Page 19
... Care and Cleaning Follow these instructions to clean and care for your oven. • Keep the inside or outside surface of the oven, don't let water seep into the openings. • Wash the door window with soap and a damp cloth. Food particles and spilled liquids can damage the magnetron tube or glass tray. this can stick to the oven walls, causing the oven to prevent damage if the oven...
... Care and Cleaning Follow these instructions to clean and care for your oven. • Keep the inside or outside surface of the oven, don't let water seep into the openings. • Wash the door window with soap and a damp cloth. Food particles and spilled liquids can damage the magnetron tube or glass tray. this can stick to the oven walls, causing the oven to prevent damage if the oven...
Owners Manual
Page 20
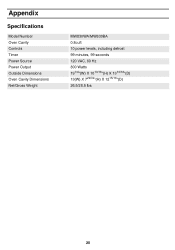
Appendix Specifications Model Number Oven Cavity Controls Timer Power Source Power Output Outside Dimensions Oven Cavity Dimensions Net/Gross Weight MW830WA/MW830BA 0.8cuft 10 power levels, including defrost 99 minutes, 99 seconds 120 VAC, 60 Hz 800 Watts 191/4"(W) X 1013/16"(H) X 1313/16"(D) 13(W) X 729/32"(H) X 1215/16"(D) 26.5/28.5 lbs 20
Appendix Specifications Model Number Oven Cavity Controls Timer Power Source Power Output Outside Dimensions Oven Cavity Dimensions Net/Gross Weight MW830WA/MW830BA 0.8cuft 10 power levels, including defrost 99 minutes, 99 seconds 120 VAC, 60 Hz 800 Watts 191/4"(W) X 1013/16"(H) X 1313/16"(D) 13(W) X 729/32"(H) X 1215/16"(D) 26.5/28.5 lbs 20
Owners Manual
Page 21
... contact SAMSUNG for problem determination and service procedures. SAMSUNG will repair or replace this product or result in the instruction book; cosmetic damage or exterior finish; SAMSUNG does not warrant uninterrupted or error-free operation of the purchaser. Transportation of the product to and from the service center is the responsibility of the product. 21 incorrect electrical line voltage, fluctuations and surges; Warranty SAMSUNG MICROWAVE OVEN LLIMIMITITEEDDWWAARRRRAANNTTYYTTOOOORRIGIGININAALLPPUURRCCHHAASSEERR This SAMSUNG...
... contact SAMSUNG for problem determination and service procedures. SAMSUNG will repair or replace this product or result in the instruction book; cosmetic damage or exterior finish; SAMSUNG does not warrant uninterrupted or error-free operation of the purchaser. Transportation of the product to and from the service center is the responsibility of the product. 21 incorrect electrical line voltage, fluctuations and surges; Warranty SAMSUNG MICROWAVE OVEN LLIMIMITITEEDDWWAARRRRAANNTTYYTTOOOORRIGIGININAALLPPUURRCCHHAASSEERR This SAMSUNG...
Owners Manual
Page 23
... maximum repair times, exchanges or replacements, accessories, options, upgrades, or consumables. Conditions covered are any original specified provisions for the warranty period originally specified, and to the Original Purchaser only. The above described warranty repairs must be performed by a SAMSUNG Authorized Service Center. Along with Samsung Electronics (SAMSUNG) products, and the requirements, conditions, exclusions and limitations contained herein, SAMSUNG will additionally provide Warranty Repair Service in...
... maximum repair times, exchanges or replacements, accessories, options, upgrades, or consumables. Conditions covered are any original specified provisions for the warranty period originally specified, and to the Original Purchaser only. The above described warranty repairs must be performed by a SAMSUNG Authorized Service Center. Along with Samsung Electronics (SAMSUNG) products, and the requirements, conditions, exclusions and limitations contained herein, SAMSUNG will additionally provide Warranty Repair Service in...

Owners Manual
Page 28
... time will display and the oven will start. 1. Press DEFROST. 2. Press the buttons(0-9) sequentially to select serving size. 1. Quick Reference Feature Set Clock One Minute+ Cooking Instant Cook Buttons Defrost Set Cooking Time and Power Levels Operation 1. Press CLOCK again. 1. Press the button repeatedly to enter the desired defrosting time. 3. Press the POWER LEVEL button. Jan. 2001 Printed in Korea Press START. 1. Use NUMBER buttons to set the power level to something other than High, press the POWER LEVEL button repeatedly. 2. ELECTRONICS SAMSUNG ELECTRONICS...
... time will display and the oven will start. 1. Press DEFROST. 2. Press the buttons(0-9) sequentially to select serving size. 1. Quick Reference Feature Set Clock One Minute+ Cooking Instant Cook Buttons Defrost Set Cooking Time and Power Levels Operation 1. Press CLOCK again. 1. Press the button repeatedly to enter the desired defrosting time. 3. Press the POWER LEVEL button. Jan. 2001 Printed in Korea Press START. 1. Use NUMBER buttons to set the power level to something other than High, press the POWER LEVEL button repeatedly. 2. ELECTRONICS SAMSUNG ELECTRONICS...


