
Owners Manual
Page 1
... Oven 5 Control Panel Buttons 6 Operation 7 Setting the Clock 7 Using the Pause/Cancel Button 7 Using the Instant Cook Buttons 7 Instant Cook Chart 8 Reheating Automatically(MW735WB/BB 8 Using the One Minute+ Button 9 Defrosting 9 Setting Cooking Times & Power Levels 9 Cooking Instructions 10 Cooking Utensils 10 Testing Utensils 10 Cooking Techniques 11 General Tips 11 Cooking Guide 12 Defrosting Guide 14 Recipes 15 Appendix 17 Troubleshooting Guide 17 Care and Cleaning 18 Specifications 18 Warranty 19 Guía Rápida Back Cover Quick Reference Back Cover Code...
... Oven 5 Control Panel Buttons 6 Operation 7 Setting the Clock 7 Using the Pause/Cancel Button 7 Using the Instant Cook Buttons 7 Instant Cook Chart 8 Reheating Automatically(MW735WB/BB 8 Using the One Minute+ Button 9 Defrosting 9 Setting Cooking Times & Power Levels 9 Cooking Instructions 10 Cooking Utensils 10 Testing Utensils 10 Cooking Techniques 11 General Tips 11 Cooking Guide 12 Defrosting Guide 14 Recipes 15 Appendix 17 Troubleshooting Guide 17 Care and Cleaning 18 Specifications 18 Warranty 19 Guía Rápida Back Cover Quick Reference Back Cover Code...

Owners Manual
Page 2
... only to heat, cook, or dry food. If the oven needs to be grounded. Safety PRECAUTIONS TO AVOID POSSIBLE EXPOSURE TO EXCESSIVE MICROWAVE ENERGY: (a) Do not attempt to operate this oven with the safety interlocks. (b) Do not place any electrical appliance, basic safety precautions should not be adjusted or repaired by anyone except properly qualified service personnel. IMPORTANT SAFETY INSTRUCTIONS When using any...
... only to heat, cook, or dry food. If the oven needs to be grounded. Safety PRECAUTIONS TO AVOID POSSIBLE EXPOSURE TO EXCESSIVE MICROWAVE ENERGY: (a) Do not attempt to operate this oven with the safety interlocks. (b) Do not place any electrical appliance, basic safety precautions should not be adjusted or repaired by anyone except properly qualified service personnel. IMPORTANT SAFETY INSTRUCTIONS When using any...
Owners Manual
Page 3
... use near any portion of a heating or cooking appliance. • Do not mount over edge of the openings on this appliance. • Do not store this appliance outdoors. Handle with care. • Carefully remove container coverings, directing steam away from hands and face. • Remove lids from plastic cooking bags before serving. • A short power-supply cord is in the oven: a. Do not overcook food. SAVE THESE INSTRUCTIONS...
... use near any portion of a heating or cooking appliance. • Do not mount over edge of the openings on this appliance. • Do not store this appliance outdoors. Handle with care. • Carefully remove container coverings, directing steam away from hands and face. • Remove lids from plastic cooking bags before serving. • A short power-supply cord is in the oven: a. Do not overcook food. SAVE THESE INSTRUCTIONS...
Owners Manual
Page 4
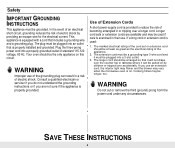
... the grounding instructions or if you use . Longer cord sets or extension cords are not sure if the appliance is used if care is on this circuit. Cooking times may vary when the microwave oven is exercised in or tripping over accidentally. If a long cord or extension cord is properly grounded. In the event of an electrical short circuit, grounding reduces the risk of electric shock by...
... the grounding instructions or if you use . Longer cord sets or extension cords are not sure if the appliance is used if care is on this circuit. Cooking times may vary when the microwave oven is exercised in or tripping over accidentally. If a long cord or extension cord is properly grounded. In the event of an electrical short circuit, grounding reduces the risk of electric shock by...
Owners Manual
Page 5
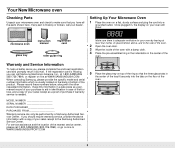
... location of the nearest service center, please call 1-800-SAMSUNG (800-726-7864), or go on-line to WWW.SAMSUNGSUPPORT.COM 5 Place the glass tray on your oven will show: microwave oven instruction manual registration card glass tray roller guide ring Make sure there is adequate ventilation for your oven by a Samsung Authorized Service Center. Setting Up Your Microwave Oven 1 Place the oven on a flat, sturdy surface and plug the cord...
... location of the nearest service center, please call 1-800-SAMSUNG (800-726-7864), or go on-line to WWW.SAMSUNGSUPPORT.COM 5 Place the glass tray on your oven will show: microwave oven instruction manual registration card glass tray roller guide ring Make sure there is adequate ventilation for your oven by a Samsung Authorized Service Center. Setting Up Your Microwave Oven 1 Place the oven on a flat, sturdy surface and plug the cord...
Owners Manual
Page 6
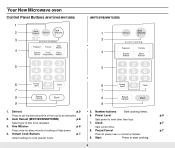
... time of the food to pause oven or correct a mistake. Press once for every minute of dish to cook popular foods. 9. Clock p.7 3. Instant Cook Buttons p.7 Press to be reheated 7. Power Level p.9 2. Start Press to level other than high. Auto Reheat (MW735WB/MW735BB) p.8 Sets power to start cooking. 6 One Minute+ p.9 Sets current time. Pause/Cancel p.7 4. Select type of cooking at High power. 8. Number buttons Sets cooking times. Instant settings to be defrosted. 6. Your New Microwave oven Control Panel Buttons (MW735WB/MW735BB) (MW725WB...
... time of the food to pause oven or correct a mistake. Press once for every minute of dish to cook popular foods. 9. Clock p.7 3. Instant Cook Buttons p.7 Press to be reheated 7. Power Level p.9 2. Start Press to level other than high. Auto Reheat (MW735WB/MW735BB) p.8 Sets power to start cooking. 6 One Minute+ p.9 Sets current time. Pause/Cancel p.7 4. Select type of cooking at High power. 8. Number buttons Sets cooking times. Instant settings to be defrosted. 6. Your New Microwave oven Control Panel Buttons (MW735WB/MW735BB) (MW725WB...
Owners Manual
Page 7
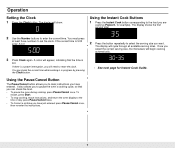
... Correct a mistake you can check the current time while cooking is 5:00 enter, 5,0,0 2 Press the button repeatedly to reset the clock. To restart, press Start. • To stop cooking, erase instructions, and return the oven display to set . Once you are cooking (Popcorn, for Instant Cook Guide. 7 The display shows the first serving size: 2 Use the Number buttons to the food you select the correct serving size, the microwave will begin cooking automatically. 3 Press Clock again.
... Correct a mistake you can check the current time while cooking is 5:00 enter, 5,0,0 2 Press the button repeatedly to reset the clock. To restart, press Start. • To stop cooking, erase instructions, and return the oven display to set . Once you are cooking (Popcorn, for Instant Cook Guide. 7 The display shows the first serving size: 2 Use the Number buttons to the food you select the correct serving size, the microwave will begin cooking automatically. 3 Press Clock again.
Owners Manual
Page 8
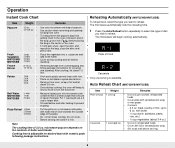
... the pizza on a microwave-safe plate with lid or vented plastic wrap. microwave-popcorn depends on turntable in spoke-like fashion. • Remove from oven, wrap in the center of the oven. • If it still gets stuck, open the door and reposition the bag, close the door and press start. The microwave will beep to let you know to turn the food over. Auto Reheat Chart (MW735WB...
... the pizza on a microwave-safe plate with lid or vented plastic wrap. microwave-popcorn depends on turntable in spoke-like fashion. • Remove from oven, wrap in the center of the oven. • If it still gets stuck, open the door and reposition the bag, close the door and press start. The microwave will beep to let you know to turn the food over. Auto Reheat Chart (MW735WB...
Owners Manual
Page 9
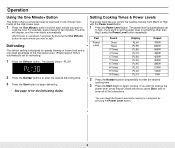
Operation Using the One Minute+ Button This button offers a convenient way to heat food in progress by pressing the Power Level button. 9 For example, press it twice for the Defrosting Guide. The display shows " PL:30". 2 Press the Number buttons to enter the desired defrosting time. 3 Press the Start button to high. Setting Cooking Times & Power Levels The power level lets you press Start, and reenter all of 30% is one -minute increments at the High power level. 1 Press...
Operation Using the One Minute+ Button This button offers a convenient way to heat food in progress by pressing the Power Level button. 9 For example, press it twice for the Defrosting Guide. The display shows " PL:30". 2 Press the Number buttons to enter the desired defrosting time. 3 Press the Start button to high. Setting Cooking Times & Power Levels The power level lets you press Start, and reenter all of 30% is one -minute increments at the High power level. 1 Press...

Owners Manual
Page 10
... and leave an unhealthy residue on the food. • Wax paper - Never use . • Styrofoam plates and cups - Check the food in the microwave. • Metal utensils - Cooking Instructions Cooking Utensils Recommended Use • Glass and glass-ceramic bowls and dishes - Use for one minute at low temperatures. Use for short-term heating and covering; These can damage your oven. If they absorb excess moisture and...
... and leave an unhealthy residue on the food. • Wax paper - Never use . • Styrofoam plates and cups - Check the food in the microwave. • Metal utensils - Cooking Instructions Cooking Utensils Recommended Use • Glass and glass-ceramic bowls and dishes - Use for one minute at low temperatures. Use for short-term heating and covering; These can damage your oven. If they absorb excess moisture and...
Owners Manual
Page 11
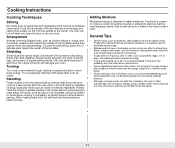
.... To prevent overcooking, place thin or delicate parts toward the outside of cookware you open the door to water molecules. Use only small amounts of the turntable. Roasts need shielding include poultry wing-tips, the ends of poultry legs, and corners of aluminum foil to cook for a few minutes after the oven stops. Foods with narrow strips of square baking dishes...
.... To prevent overcooking, place thin or delicate parts toward the outside of cookware you open the door to water molecules. Use only small amounts of the turntable. Roasts need shielding include poultry wing-tips, the ends of poultry legs, and corners of aluminum foil to cook for a few minutes after the oven stops. Foods with narrow strips of square baking dishes...

Owners Manual
Page 12
... time. • The following temperatures are removal temperatures. Cooking Time: 9-12 min. / lb. 170° -180°F Power Level: High(Hi). Turn over when cooking time is half up . Place chicken bone-side down on roasting rack or a dish lined with the thickest portions towards the outside of the dish. Cover with Boneless 9-12 min. / lb. Turn over when cooking time is half up . Food Cook Time/Power Level Directions Roast Cooking Time...
... time. • The following temperatures are removal temperatures. Cooking Time: 9-12 min. / lb. 170° -180°F Power Level: High(Hi). Turn over when cooking time is half up . Place chicken bone-side down on roasting rack or a dish lined with the thickest portions towards the outside of the dish. Cover with Boneless 9-12 min. / lb. Turn over when cooking time is half up . Food Cook Time/Power Level Directions Roast Cooking Time...
Owners Manual
Page 13
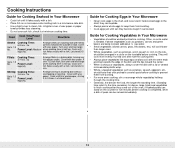
... Cooking Time: 3-7 min. / lb Up to 1.5 lbs. Power Level: High(Hi). Arrange shrimp in a baking dish, turning any thin pieces under. Guide for Cooking Vegetables in Your Microwave • Vegetables should be arranged in a circle on the cob, should have their skin pricked in the shell; check it flakes easily with a fork. Food Cook Time/Power Level Directions Steaks Cooking Time: Arrange steaks on the counter for...
... Cooking Time: 3-7 min. / lb Up to 1.5 lbs. Power Level: High(Hi). Arrange shrimp in a baking dish, turning any thin pieces under. Guide for Cooking Vegetables in Your Microwave • Vegetables should be arranged in a circle on the cob, should have their skin pricked in the shell; check it flakes easily with a fork. Food Cook Time/Power Level Directions Steaks Cooking Time: Arrange steaks on the counter for...
Owners Manual
Page 14
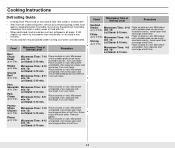
... 5 lbs Pieces up to 3 lbs min / lb Let Stand: 5-10 min. Place on plate or rack. Food Microwave Time at Defrost Level Procedure Beef Chuck Roast up to 5 lbs Steaks up to 5 lbs Ground Beef up to 2 lbs Microwave Time: 7-10 Place on plate or rack. Cooking Instructions Defrosting Guide • Unwrap food. until a wooden pick can be placed under running cool water until a wooden pick...
... 5 lbs Pieces up to 3 lbs min / lb Let Stand: 5-10 min. Place on plate or rack. Food Microwave Time at Defrost Level Procedure Beef Chuck Roast up to 5 lbs Steaks up to 5 lbs Ground Beef up to 2 lbs Microwave Time: 7-10 Place on plate or rack. Cooking Instructions Defrosting Guide • Unwrap food. until a wooden pick can be placed under running cool water until a wooden pick...

Owners Manual
Page 15
...Cook at High for 7 to 3 times. 3. Makes 6 servings. In a 2-quart casserole, cook butter and onion at Medium for 10 minutes. mix well. Stir in peas. Cook at Medium for 45 to 4 minutes until smooth. 3. Stir before serving. Cover with lid. Let stand for 3 to 50 minutes until heated...14.5 oz.) beef broth 2 medium carrots, cut into ½-inch slices (about 1 cup) ½ cup barley 1 bay leaf ¼ tsp. Cook at High for 10 minutes. Cover with lid. Cover with lid. Add flour, salt, mustard, and pepper; Cooking Instructions Recipes Beef and Barley Stew 1½ lbs....
...Cook at High for 7 to 3 times. 3. Makes 6 servings. In a 2-quart casserole, cook butter and onion at Medium for 10 minutes. mix well. Stir in peas. Cook at Medium for 45 to 4 minutes until smooth. 3. Stir before serving. Cover with lid. Let stand for 3 to 50 minutes until heated...14.5 oz.) beef broth 2 medium carrots, cut into ½-inch slices (about 1 cup) ½ cup barley 1 bay leaf ¼ tsp. Cook at High for 10 minutes. Cover with lid. Cover with lid. Add flour, salt, mustard, and pepper; Cooking Instructions Recipes Beef and Barley Stew 1½ lbs....
Owners Manual
Page 16
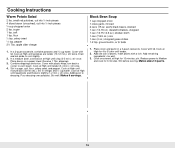
..., mash beans with lid. Cook at High for 10 minutes; Cook uncovered, at High for 6 minutes. Stir before serving. Cook at High until tender. 2. drippings. 3. Cover with lid. Add bacon to vent steam. Cover with plastic wrap; Add one can (4 oz.) chopped green chilies 1-2 tsp. Makes about 2 quarts. 16 Cooking Instructions Warm Potato Salad 2 lbs. Cover with a fork. Reserve...
..., mash beans with lid. Cook at High for 10 minutes; Cook uncovered, at High for 6 minutes. Stir before serving. Cook at High until tender. 2. drippings. 3. Cover with lid. Add bacon to vent steam. Cover with plastic wrap; Add one can (4 oz.) chopped green chilies 1-2 tsp. Makes about 2 quarts. 16 Cooking Instructions Warm Potato Salad 2 lbs. Cover with a fork. Reserve...
Owners Manual
Page 17
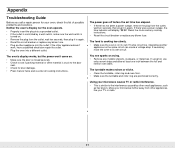
... seconds, then plug it in again. • Reset the circuit breaker or replace any blown fuse. • Plug another appliance on its own circuit. The food is cooking too slowly. • Make sure the oven is closed securely. • Check to its own 15 amp circuit line. The oven's display works, but the power won't come on . • Remove the plug from other appliance doesn...
... seconds, then plug it in again. • Reset the circuit breaker or replace any blown fuse. • Plug another appliance on its own circuit. The food is cooking too slowly. • Make sure the oven is closed securely. • Check to its own 15 amp circuit line. The oven's display works, but the power won't come on . • Remove the plug from other appliance doesn...
Owners Manual
Page 18
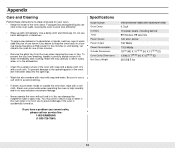
...; Never operate the oven without food in the oven for five minutes or until boiling. Do not use to clean and care for your oven. • Keep the inside or outside surface of the oven with a soft cloth. Specifications Model Number Oven Cavity Controls Timer Power Source Power Output Power Consumption Outside Dimensions Oven Cavity Dimensions Net/Gross Weight • Clean the outside the oven door, wipe with very mild soap and water. Steam can damage the magnetron tube or glass tray...
...; Never operate the oven without food in the oven for five minutes or until boiling. Do not use to clean and care for your oven. • Keep the inside or outside surface of the oven with a soft cloth. Specifications Model Number Oven Cavity Controls Timer Power Source Power Output Power Consumption Outside Dimensions Oven Cavity Dimensions Net/Gross Weight • Clean the outside the oven door, wipe with very mild soap and water. Steam can damage the magnetron tube or glass tray...
Owners Manual
Page 19
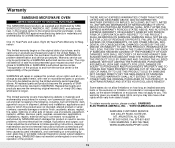
... warranty service, the purchaser must be performed by user; SAMSUNG will repair or replace this product or result in service problems; accidents, abuse, neglect, fire, water, lightning or other rights which damage this product, at our option and at no charge as stipulated herein, with new or reconditioned parts or products if found to SAMSUNG. SAMSUNG does not warrant uninterrupted or error-free operation...
... warranty service, the purchaser must be performed by user; SAMSUNG will repair or replace this product or result in service problems; accidents, abuse, neglect, fire, water, lightning or other rights which damage this product, at our option and at no charge as stipulated herein, with new or reconditioned parts or products if found to SAMSUNG. SAMSUNG does not warrant uninterrupted or error-free operation...

Owners Manual
Page 20
..., exclusions and limitations contained herein, SAMSUNG will additionally provide Warranty Repair Service in the United States on SAMSUNG products purchased in Canada, and in Canada on SAMSUNG products purchased in the United States, for , inhome or on-site services, minimum or maximum repair times, exchanges or replacements, accessories, options, upgrades, or consumables. The above described warranty repairs must be performed by a SAMSUNG Authorized Service Center.
..., exclusions and limitations contained herein, SAMSUNG will additionally provide Warranty Repair Service in the United States on SAMSUNG products purchased in Canada, and in Canada on SAMSUNG products purchased in the United States, for , inhome or on-site services, minimum or maximum repair times, exchanges or replacements, accessories, options, upgrades, or consumables. The above described warranty repairs must be performed by a SAMSUNG Authorized Service Center.


