
Owners Manual
Page 2
... be serviced only by qualified service personnel. Connect only to heat, cook, or dry food. It is important not to defeat or tamper with the safety interlocks. (b) Do not place any appliance, close properly and that the oven door close supervision is specifically designed to properly grounded outlets. If the oven needs to be repaired, call 1-800-SAMSUNG for its intended use . •...
... be serviced only by qualified service personnel. Connect only to heat, cook, or dry food. It is important not to defeat or tamper with the safety interlocks. (b) Do not place any appliance, close properly and that the oven door close supervision is specifically designed to properly grounded outlets. If the oven needs to be repaired, call 1-800-SAMSUNG for its intended use . •...

Owners Manual
Page 3
...-caution for safe use . • Do not try to the oven walls or floor can become hot. Watch appliance carefully if paper, plastic, or other heating or cooking appliance beneath this appliance outdoors. Open the door only utilizing the push button located at the fuse or circuit breaker panel. Safety Important Safety Instructions, continued • Do not store this appliance. • Do not mount unit over...
...-caution for safe use . • Do not try to the oven walls or floor can become hot. Watch appliance carefully if paper, plastic, or other heating or cooking appliance beneath this appliance outdoors. Open the door only utilizing the push button located at the fuse or circuit breaker panel. Safety Important Safety Instructions, continued • Do not store this appliance. • Do not mount unit over...
Owners Manual
Page 4
WARNING Improper use an extension cord, the interior light may flicker and the blower may vary when the microwave oven is operable. If a long cord or extension cord is properly installed and grounded. If you are available and may be the only appliance on this circuit. Note Connect the oven to a 15A circuit, make sure that includes a grounding wire and a grounding plug. SAVE THESE INSTRUCTIONS 4 Safety...
WARNING Improper use an extension cord, the interior light may flicker and the blower may vary when the microwave oven is operable. If a long cord or extension cord is properly installed and grounded. If you are available and may be the only appliance on this circuit. Note Connect the oven to a 15A circuit, make sure that includes a grounding wire and a grounding plug. SAVE THESE INSTRUCTIONS 4 Safety...
Owners Manual
Page 5
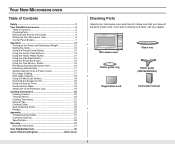
... Item 16 Defrosting Automatically 17 Setting Cooking Times & Power Levels 17 One-stage Cooking 17 Multi-stage Cooking 18 Using the More/Less Buttons 18 Switching the Beeper On/Off 18 Using the Kitchen Timer 19 Demonstration Mode 19 Setting the Child Protection Lock 19 Cooking Instructions 20 Cooking Utensils 20 Testing Utensils 20 Cooking Techniques 21 General Tips 21 Cooking Guide 22 Auto Defrosting Guide 24 Recipes 25 Appendix 27 Troubleshooting Guide 27 Care and Cleaning 27 Specifications 28 Warranty 31 Warranty Information 31...
... Item 16 Defrosting Automatically 17 Setting Cooking Times & Power Levels 17 One-stage Cooking 17 Multi-stage Cooking 18 Using the More/Less Buttons 18 Switching the Beeper On/Off 18 Using the Kitchen Timer 19 Demonstration Mode 19 Setting the Child Protection Lock 19 Cooking Instructions 20 Cooking Utensils 20 Testing Utensils 20 Cooking Techniques 21 General Tips 21 Cooking Guide 22 Auto Defrosting Guide 24 Recipes 25 Appendix 27 Troubleshooting Guide 27 Care and Cleaning 27 Specifications 28 Warranty 31 Warranty Information 31...

Owners Manual
Page 6
... bottom of the pre-assembled roller guide.(MW1660WA/BA) 6 Make sure there is usually located on -line at WWW.SAMSUNGUSA.COM When contacting Samsung, please provide the specific model and serial number information which is adequate ventilation for your sales receipt to the Samsung Authorized Service Center. Please record these numbers below the control panel. 3 Wipe the inside of the oven with a damp cloth. 4 Place...
... bottom of the pre-assembled roller guide.(MW1660WA/BA) 6 Make sure there is usually located on -line at WWW.SAMSUNGUSA.COM When contacting Samsung, please provide the specific model and serial number information which is adequate ventilation for your sales receipt to the Samsung Authorized Service Center. Please record these numbers below the control panel. 3 Wipe the inside of the oven with a damp cloth. 4 Place...
Owners Manual
Page 8
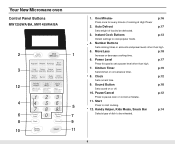
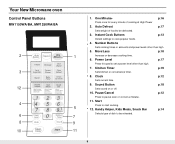
... Microwave oven Control Panel Buttons MW1255WA/BA, MW1455WA/BA 2 1 3 12 123 4 4 56 7 89 5 6 0 7 8 9 10 11 1. Auto Defrost p.17 Sets weight of cooking at High Power 2. More/Less p.18 Increase or decrease cooking time. 6. Power Level p.17 Press this pad to be reheated. 8 Pause/Cancel p.12 Press to cook popular foods. 4. Number Buttons Sets cooking times or amounts and power levels other than high. 5. Clock p.12 Sets current time. 9. One Minute+ p.16 Press once for every minute of food to set a power level...
... Microwave oven Control Panel Buttons MW1255WA/BA, MW1455WA/BA 2 1 3 12 123 4 4 56 7 89 5 6 0 7 8 9 10 11 1. Auto Defrost p.17 Sets weight of cooking at High Power 2. More/Less p.18 Increase or decrease cooking time. 6. Power Level p.17 Press this pad to be reheated. 8 Pause/Cancel p.12 Press to cook popular foods. 4. Number Buttons Sets cooking times or amounts and power levels other than high. 5. Clock p.12 Sets current time. 9. One Minute+ p.16 Press once for every minute of food to set a power level...
Owners Manual
Page 9
.... 5. Instant Cook Buttons p.13 Instant settings to start cooking. 5 12. Handy Helper, Kids Meals, Snack Bar p.14 Selects type of dish to set a power level other than high. 7. Auto Defrost p.17 Sets weight of cooking at High Power 2. Sound Button p.18 Sets sound on or off. 10. Kitchen Timer p.19 Sets kitchen or convenience timer. 8. One Minute+ p.16 Press once for every minute of food to pause oven or correct a mistake. 11. Your New Microwave oven Control Panel Buttons MW1150WA...
.... 5. Instant Cook Buttons p.13 Instant settings to start cooking. 5 12. Handy Helper, Kids Meals, Snack Bar p.14 Selects type of dish to set a power level other than high. 7. Auto Defrost p.17 Sets weight of cooking at High Power 2. Sound Button p.18 Sets sound on or off. 10. Kitchen Timer p.19 Sets kitchen or convenience timer. 8. One Minute+ p.16 Press once for every minute of food to pause oven or correct a mistake. 11. Your New Microwave oven Control Panel Buttons MW1150WA...
Owners Manual
Page 12
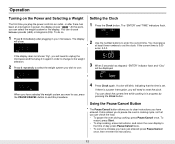
.... Setting the Clock 1 Press the Clock button. START ENTER COOK TIME TIME2 Kg g Oz Lbs. Using the Pause/Cancel Button The Pause/Cancel button allows you to clear instructions you have selected the weight system you want to reset the clock. If the current time is a power interruption, you will blink, indicating that you can select the weight system for the display. To restart, press Start. • To stop cooking, erase instructions...
.... Setting the Clock 1 Press the Clock button. START ENTER COOK TIME TIME2 Kg g Oz Lbs. Using the Pause/Cancel Button The Pause/Cancel button allows you to clear instructions you have selected the weight system you want to reset the clock. If the current time is a power interruption, you will blink, indicating that you can select the weight system for the display. To restart, press Start. • To stop cooking, erase instructions...

Owners Manual
Page 13
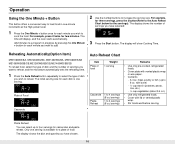
The display will then beep every minute. The oven will cycle through all available serving sizes. Instant Cook Chart Item Popcorn Weight Remarks Regular (3.5 oz), Light Regular (3.0-3.5 oz) • Use one bag at a time. • Use caution when removing and opening hot bag from outer wrapping and follow package instructions for example). Place on a microwave-safe plate with fork. Stir well before and after heating to prevent boil over...
The display will then beep every minute. The oven will cycle through all available serving sizes. Instant Cook Chart Item Popcorn Weight Remarks Regular (3.5 oz), Light Regular (3.0-3.5 oz) • Use one bag at a time. • Use caution when removing and opening hot bag from outer wrapping and follow package instructions for example). Place on a microwave-safe plate with fork. Stir well before and after heating to prevent boil over...

Owners Manual
Page 14
.... • The More/Less key cannot be used with the baby food key. 1 pint ½ gallon • Remove top of carton. Place carton in half vertically. The display show "A-1".(code of microwave oven. • Let stand 2 min. Press Start button to the Handy Helper Chart below for selecting serving size. Remove wrapping and cut butter in center of item) Press the Handy...
.... • The More/Less key cannot be used with the baby food key. 1 pint ½ gallon • Remove top of carton. Place carton in half vertically. The display show "A-1".(code of microwave oven. • Let stand 2 min. Press Start button to the Handy Helper Chart below for selecting serving size. Remove wrapping and cut butter in center of item) Press the Handy...
Owners Manual
Page 16
The display will display, and the oven starts automatically. Plate of dish you want to add. 2 Use the number buttons to reheat. For example, for three servings, press the 3 button(Refer to 4 servings (8 oz./serving) Remarks • Use only pre-cooked, refrigerated foods. • Cover plate with lid or vented plastic wrap. • Stir foods well before serving. 16 QTY. 3 Press the Start button. Auto Reheat Chart Item Plate of food Weight 1 serving...
The display will display, and the oven starts automatically. Plate of dish you want to add. 2 Use the number buttons to reheat. For example, for three servings, press the 3 button(Refer to 4 servings (8 oz./serving) Remarks • Use only pre-cooked, refrigerated foods. • Cover plate with lid or vented plastic wrap. • Stir foods well before serving. 16 QTY. 3 Press the Start button. Auto Reheat Chart Item Plate of food Weight 1 serving...
Owners Manual
Page 17
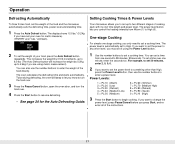
... set the power to any other than High, press the Power Level button, then use the number buttons to enter a power level. You can also use the number buttons to enter the weight of your oven for the Auto Defrosting Guide. The oven calculates the defrosting time and starts automatically. will beep to let you know to turn the food over. 3 Press the Pause/Cancel button, open the oven door, and turn the food over one -stage cooking, you want to High. Power Levels...
... set the power to any other than High, press the Power Level button, then use the number buttons to enter a power level. You can also use the number buttons to enter the weight of your oven for the Auto Defrosting Guide. The oven calculates the defrosting time and starts automatically. will beep to let you know to turn the food over. 3 Press the Pause/Cancel button, open the oven door, and turn the food over one -stage cooking, you want to High. Power Levels...

Owners Manual
Page 18
...". ("START" will flash) START ENTER COOK TIMIE TIMIIE2 kg g oz lbs cup kg g oz lbs cup 3 Press Start. The display shows: "OFF".("START" will flash) START ENTER COOK TIMIE TIMIIE2 kg g oz lbs cup 2 kg g oz lbs cup Press the Sound button to begin cooking. To set the power level at different temperatures. Use the More/Less button only after you wish to adjust pre-set cooking times. Switching the...
...". ("START" will flash) START ENTER COOK TIMIE TIMIIE2 kg g oz lbs cup kg g oz lbs cup 3 Press Start. The display shows: "OFF".("START" will flash) START ENTER COOK TIMIE TIMIIE2 kg g oz lbs cup 2 kg g oz lbs cup Press the Sound button to begin cooking. To set the power level at different temperatures. Use the More/Less button only after you wish to adjust pre-set cooking times. Switching the...
Owners Manual
Page 19
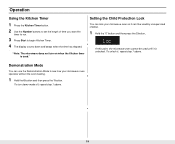
... turn on when the Kitchen timer is unlocked. "Note: The microwave does not turn demo mode off, repeat step 1 above . At this point, the microwave oven cannot be used ." Operation Using the Kitchen Timer 1 Press the Kitchen Timer button. 2 Use the Number buttons to set the length of time you want the timer to run. 3 Press Start to see how your microwave oven so it can use the Demonstration Mode to begin Kitchen Timer. 4 The display counts down and beeps when the time...
... turn on when the Kitchen timer is unlocked. "Note: The microwave does not turn demo mode off, repeat step 1 above . At this point, the microwave oven cannot be used ." Operation Using the Kitchen Timer 1 Press the Kitchen Timer button. 2 Use the Number buttons to set the length of time you want the timer to run. 3 Press Start to see how your microwave oven so it can use the Demonstration Mode to begin Kitchen Timer. 4 The display counts down and beeps when the time...
Owners Manual
Page 20
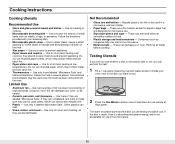
... a fire hazard, except for popcorn bags that are designed for some steam to escape and avoid placing it directly on food. • Plastic storage and food containers - The water should be cool. Cooking Instructions Cooking Utensils Recommended Use • Glass and glass-ceramic bowls and dishes - Use to brown the exterior of small items such as a cover to make sure they are...
... a fire hazard, except for popcorn bags that are designed for some steam to escape and avoid placing it directly on food. • Plastic storage and food containers - The water should be cool. Cooking Instructions Cooking Utensils Recommended Use • Glass and glass-ceramic bowls and dishes - Use to brown the exterior of small items such as a cover to make sure they are...
Owners Manual
Page 21
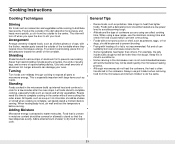
... may not be covered or allowed to stand so that need this in mind to avoid burns. • Home canning in moisture content should be destroyed by the microwave heating process. • Although microwaves do the same. 21 Food at a low power level to help it cook. Standing Foods cooked in the center without overcooking the outer areas. Cooking Instructions Cooking Techniques Stirring Stir...
... may not be covered or allowed to stand so that need this in mind to avoid burns. • Home canning in moisture content should be destroyed by the microwave heating process. • Although microwaves do the same. 21 Food at a low power level to help it cook. Standing Foods cooked in the center without overcooking the outer areas. Cooking Instructions Cooking Techniques Stirring Stir...

Owners Manual
Page 23
... wax paper. Food Cook Time/Power Level Steaks Cooking Time: 6-10 min. / lb. Power Level: Medium- they come out of rack. They will cook faster than larger ones. • Whole vegetables, such as potatoes, squash, eggplant, etc., should be washed just before cooking. Shrimp Cooking Time: 3-5 ½ min. / lb. Power Level: Medium- Cover with a fork. • Place fish on the counter for five minutes before cooking to prevent them...
... wax paper. Food Cook Time/Power Level Steaks Cooking Time: 6-10 min. / lb. Power Level: Medium- they come out of rack. They will cook faster than larger ones. • Whole vegetables, such as potatoes, squash, eggplant, etc., should be washed just before cooking. Shrimp Cooking Time: 3-5 ½ min. / lb. Power Level: Medium- Cover with a fork. • Place fish on the counter for five minutes before cooking to prevent them...
Owners Manual
Page 27
... your oven. • Keep the inside or outside surface of the oven with a soft cloth. Be sure to the operating parts of the oven, don't let water seep into the openings. • Wash the door window with a soft cloth. this list of possible problems and solutions. If there was a power outage, the time indicator will display " " Reset the clock and any cooking instructions. • Reset the circuit breaker or replace any...
... your oven. • Keep the inside or outside surface of the oven with a soft cloth. Be sure to the operating parts of the oven, don't let water seep into the openings. • Wash the door window with a soft cloth. this list of possible problems and solutions. If there was a power outage, the time indicator will display " " Reset the clock and any cooking instructions. • Reset the circuit breaker or replace any...
Owners Manual
Page 31
..., services, parts, supplies, accessories, applications, installations, repairs, external wiring or connectors not supplied or authorized by SAMSUNG against manufacturing defects in the instruction book; cosmetic damage or exterior finish; NOR SHALL RECOVERY OF ANY KIND AGAINST SAMSUNG BE GREATER IN AMOUNT THAN THE PURCHASE PRICE OF THE PRODUCT SOLD BY SAMSUNG AND CAUSING THE ALLEGED DAMAGE. reduced magnetron power output related to follow operating instructions, cleaning...
..., services, parts, supplies, accessories, applications, installations, repairs, external wiring or connectors not supplied or authorized by SAMSUNG against manufacturing defects in the instruction book; cosmetic damage or exterior finish; NOR SHALL RECOVERY OF ANY KIND AGAINST SAMSUNG BE GREATER IN AMOUNT THAN THE PURCHASE PRICE OF THE PRODUCT SOLD BY SAMSUNG AND CAUSING THE ALLEGED DAMAGE. reduced magnetron power output related to follow operating instructions, cleaning...
Owners Manual
Page 36
... use the number buttons to set cooking time. 2. Enter weight of dish to reheat. 2. Press START to enter the current time. 3. To set power level at high. 3. ELECTRONICS Samsung Electronics America, Inc. Use number buttons to enter the power level. 3. Use number buttons to the food you are cooking (for each minute of dish to reheat. 2. To increase serving size, press the corresponding number button. 3. To increase serving size, press the corresponding number button. 3. Press the button repeatedly to begin cooking. 1. SERVICE...
... use the number buttons to set cooking time. 2. Enter weight of dish to reheat. 2. Press START to enter the current time. 3. To set power level at high. 3. ELECTRONICS Samsung Electronics America, Inc. Use number buttons to enter the power level. 3. Use number buttons to the food you are cooking (for each minute of dish to reheat. 2. To increase serving size, press the corresponding number button. 3. To increase serving size, press the corresponding number button. 3. Press the button repeatedly to begin cooking. 1. SERVICE...


