

User Manual (user Manual) (ver.1.0) (English)
Page 5
... Components 17 Connecting the FM Antenna 17 Connecting Headphones SETUP 18 BASIC FUNCTIONS 22 18 Before Starting (Initial Setting) 18 Setting the Setup menu 19 Display 19 TV Aspect 19 BD Wise 19 Resoultion 20 HDMI Format 20 Audio 20 DRC (Dynamic Range Compression) 20 AUDIO-SYNC 20 HDMI AUDIO 20... Playback 22 Audio CD(CD-DA)/MP3/WMA Playback 23 JPEG File Playback 23 Using the Playback Function 28 Sound Mode 29 Mute Function 29 Display Function 30 Listening to Radio 31 Setting the Clock 31 Timer Function 32 Sleep Timer Function 5 English
... Components 17 Connecting the FM Antenna 17 Connecting Headphones SETUP 18 BASIC FUNCTIONS 22 18 Before Starting (Initial Setting) 18 Setting the Setup menu 19 Display 19 TV Aspect 19 BD Wise 19 Resoultion 20 HDMI Format 20 Audio 20 DRC (Dynamic Range Compression) 20 AUDIO-SYNC 20 HDMI AUDIO 20... Playback 22 Audio CD(CD-DA)/MP3/WMA Playback 23 JPEG File Playback 23 Using the Playback Function 28 Sound Mode 29 Mute Function 29 Display Function 30 Listening to Radio 31 Setting the Clock 31 Timer Function 32 Sleep Timer Function 5 English

User Manual (user Manual) (ver.1.0) (English)
Page 11
BUILT IN SPEAKER 2. VOLUME CONTROL BUTTON 7. OPEN/CLOSE BUTTON 9. FUNCTION BUTTON 6. SKIP/SEARCH FUNCTION BUTTON 4. BUILT IN SPEAKER 12. POWER BUTTON 5. WINDOW DISPLAY 11. iPod Dock JACK 78 11 English SKIP/SEARCH FUNCTION BUTTON 8. 01 Getting Started Front Panel Description 13 12 1 11 10 2 3 9 45 6 1. TUNING MODE OR STOP BUTTON 3. DISC SLOT 13. PLAY/PAUSE BUTTON 10.
BUILT IN SPEAKER 2. VOLUME CONTROL BUTTON 7. OPEN/CLOSE BUTTON 9. FUNCTION BUTTON 6. SKIP/SEARCH FUNCTION BUTTON 4. BUILT IN SPEAKER 12. POWER BUTTON 5. WINDOW DISPLAY 11. iPod Dock JACK 78 11 English SKIP/SEARCH FUNCTION BUTTON 8. 01 Getting Started Front Panel Description 13 12 1 11 10 2 3 9 45 6 1. TUNING MODE OR STOP BUTTON 3. DISC SLOT 13. PLAY/PAUSE BUTTON 10.
User Manual (user Manual) (ver.1.0) (English)
Page 13
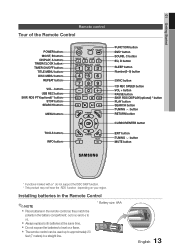
...a straight line. * Battery size: AAA 13 English 01 Getting Started Remote control Tour of the Remote Control POWER button MO/ST, B button DISPLAY, A button TIMER/CLOCK button TIMER ON/OFF button TITLE MENU button DISC MENU button REPEAT button VOL - button USB REC button SKIP, RDS ...DVD* button SOUND, C button EQ, D button SLEEP button Number(0~9) button SYNC button CD REC SPEED button VOL + button PAUSE button SKIP, RDS DISPLAY(optional) * button PLAY button SEARCH button TUNING button RETURN button CURSOR/ENTER button EXIT button TUNING button MUTE button * Functions marked with a * ...
...a straight line. * Battery size: AAA 13 English 01 Getting Started Remote control Tour of the Remote Control POWER button MO/ST, B button DISPLAY, A button TIMER/CLOCK button TIMER ON/OFF button TITLE MENU button DISC MENU button REPEAT button VOL - button USB REC button SKIP, RDS ...DVD* button SOUND, C button EQ, D button SLEEP button Number(0~9) button SYNC button CD REC SPEED button VOL + button PAUSE button SKIP, RDS DISPLAY(optional) * button PLAY button SEARCH button TUNING button RETURN button CURSOR/ENTER button EXIT button TUNING button MUTE button * Functions marked with a * ...

User Manual (user Manual) (ver.1.0) (English)
Page 15
... on the television. If your TV's audio through a VCR. etc) and a display device (TV, projector. Content is not available if an HDMI cable does not support CEC. Depending on your Samsung TV's remote control. Anynet + can select ARC by connecting this product to control ...Digital Content Protection) is an interface that transfers audio from being copied. Using HDMI, the product transmits a digital video and audio signal and displays a vivid picture on the remote control and the product. 15 English This is a function that support Anynet+. 1. Set the Anynet+ ...
... on the television. If your TV's audio through a VCR. etc) and a display device (TV, projector. Content is not available if an HDMI cable does not support CEC. Depending on your Samsung TV's remote control. Anynet + can select ARC by connecting this product to control ...Digital Content Protection) is an interface that transfers audio from being copied. Using HDMI, the product transmits a digital video and audio signal and displays a vivid picture on the remote control and the product. 15 English This is a function that support Anynet+. 1. Set the Anynet+ ...

User Manual (user Manual) (ver.1.0) (English)
Page 18
... GUI (Graphical User Interface) in the product. If the Initial Setting screen does not appear, refer to Initial Setting. (see page 21) 1 MENU BUTTON : Display the home menu. 2 RETURN BUTTON : Return to the previous setup menu. Press the ▲▼ buttons to select desired TV Aspect, then press the ENTER... language selection will apply to all menus: On-Screen Menu, Disc Menu, Audio, Subtitle. If you turn the TV and the product on -screen displays. Confirm the setting. 4 EXIT BUTTON : Exit the setup menu.
... GUI (Graphical User Interface) in the product. If the Initial Setting screen does not appear, refer to Initial Setting. (see page 21) 1 MENU BUTTON : Display the home menu. 2 RETURN BUTTON : Return to the previous setup menu. Press the ▲▼ buttons to select desired TV Aspect, then press the ENTER... language selection will apply to all menus: On-Screen Menu, Disc Menu, Audio, Subtitle. If you turn the TV and the product on -screen displays. Confirm the setting. 4 EXIT BUTTON : Exit the setup menu.

User Manual (user Manual) (ver.1.0) (English)
Page 19
... BD-Wise to each other via HDMI to the TV direct. • Off : The output resolution will be cut off.). Resolution Lets you connect Samsung products with a 4:3 ratio screen(The extreme left and right portions of progressive video. • BD Wise : Automatically sets the optimal resolution when connected...the resolution supports only 480i (576i). 1080P may not appear depending on the type(NTSC or PAL) of main unit you have , the TV display picture may want to adjust the screen aspect ratio. • 4:3 Pan-Scan • 4:3 Letter Box • 16:9 Wide Select when you want ...
... BD-Wise to each other via HDMI to the TV direct. • Off : The output resolution will be cut off.). Resolution Lets you connect Samsung products with a 4:3 ratio screen(The extreme left and right portions of progressive video. • BD Wise : Automatically sets the optimal resolution when connected...the resolution supports only 480i (576i). 1080P may not appear depending on the type(NTSC or PAL) of main unit you have , the TV display picture may want to adjust the screen aspect ratio. • 4:3 Pan-Scan • 4:3 Letter Box • 16:9 Wide Select when you want ...

User Manual (user Manual) (ver.1.0) (English)
Page 20
...61524; In the iPod mode, this menu is connected. • You can set to 'On', the volume can be toggled On/Off. 20 English Settings Display Audio System Language Security Support DRC : 0 0 ms Audio Sync : 50 m2S5ecms HDMI Audio Audio Return Ch. 50 ms 75 ms 100 ms 125 ms ... the product is only available if an ARC- If this occurs, adjust the audio delay time to match the audio to the optimal status. Settings Display Audio System Language Security Support DRC : 0 Full Audio Sync : 506m/8Sec HDMI Audio 4/8 Audio Return Ch. 2/8 Off Move Select Return • You can ...
...61524; In the iPod mode, this menu is connected. • You can set to 'On', the volume can be toggled On/Off. 20 English Settings Display Audio System Language Security Support DRC : 0 0 ms Audio Sync : 50 m2S5ecms HDMI Audio Audio Return Ch. 50 ms 75 ms 100 ms 125 ms ... the product is only available if an ARC- If this occurs, adjust the audio delay time to match the audio to the optimal status. Settings Display Audio System Language Security Support DRC : 0 Full Audio Sync : 506m/8Sec HDMI Audio 4/8 Audio Return Ch. 2/8 Off Move Select Return • You can ...

User Manual (user Manual) (ver.1.0) (English)
Page 21
...seconds or more. a You cannot select OTHERS in Disc Menu, Audio and Subtitle, and enter the language code of the content. Settings Display Audio System Language Security Support Parental Rating Password : Off : Change Move Select Return OSD Language Select the language for disc audio. All ...revert to Level 6, discs that have set the language, and TV Aspect Ratio. Subtitle Select the language for the disc menu displays. 03 Setup System Initial Settings Function By using the Initial Settings function, you can select the language you prefer for on-screen ...
...seconds or more. a You cannot select OTHERS in Disc Menu, Audio and Subtitle, and enter the language code of the content. Settings Display Audio System Language Security Support Parental Rating Password : Off : Change Move Select Return OSD Language Select the language for disc audio. All ...revert to Level 6, discs that have set the language, and TV Aspect Ratio. Subtitle Select the language for the disc menu displays. 03 Setup System Initial Settings Function By using the Initial Settings function, you can select the language you prefer for on-screen ...

User Manual (user Manual) (ver.1.0) (English)
Page 26
...search function does not operate on some functions may not be identified as a reference. Press the ▲▼ buttons to select AUDIO ( ) display. 3. A DVD Disc can contain up to 32 subtitle languages. Angle( ): When a DVD contains multiple angles of a particular scene, you can...select the desired audio language. • Depending on the number of the film from a desired time. Press the TOOLS button. 2. Basic Functions Displaying Disc Information d 03/04 001/001 0:00:21 KO 1/2 EN 02/02 1/1 Change Select D 2/3 KO 1/2 EN 02/02 Change when there is...
...search function does not operate on some functions may not be identified as a reference. Press the ▲▼ buttons to select AUDIO ( ) display. 3. A DVD Disc can contain up to 32 subtitle languages. Angle( ): When a DVD contains multiple angles of a particular scene, you can...select the desired audio language. • Depending on the number of the film from a desired time. Press the TOOLS button. 2. Basic Functions Displaying Disc Information d 03/04 001/001 0:00:21 KO 1/2 EN 02/02 1/1 Change Select D 2/3 KO 1/2 EN 02/02 Change when there is...

User Manual (user Manual) (ver.1.0) (English)
Page 27
... Samsung_007CD1.smi • You can use *.smi, *.sub, or *.srt suffixes. Press the TOOLS button. 2. Press the ▲▼ buttons to select SUBTITLE ( ) display. 3. 04 Basic Functions Selecting the Subtitle Language Angle Function dD d 1. Caption Function D • You must have been recorded. ✎ NOTE Depending on a DVD disc... pressed. Press the TOOLS button. 2. Subtitle files larger than 148 kbytes are not supported. 27 English Press the ▲▼ buttons to select ANGLE ( ) display. 3.
... Samsung_007CD1.smi • You can use *.smi, *.sub, or *.srt suffixes. Press the TOOLS button. 2. Press the ▲▼ buttons to select SUBTITLE ( ) display. 3. 04 Basic Functions Selecting the Subtitle Language Angle Function dD d 1. Caption Function D • You must have been recorded. ✎ NOTE Depending on a DVD disc... pressed. Press the TOOLS button. 2. Subtitle files larger than 148 kbytes are not supported. 27 English Press the ▲▼ buttons to select ANGLE ( ) display. 3.
User Manual (user Manual) (ver.1.0) (English)
Page 28
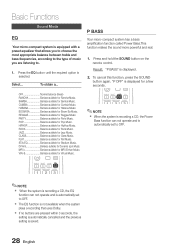
...Music. POP Balance suitable for Flat Music. FLAT Balance suitable for Pop Music. Press the EQ button until the required option is displayed for Virtual Music. ✎ NOTE When the system is recording a CD, the Power Bass function can not operate... appropriate balance between treble and bass frequencies, according to . 1. HIPHOP Balance suitable for MP3 Enhan Music. Select... Result: "P BASS" is displayed. 2. MP3 Banlace suitable for HipHop Music. VIR+S Banlace suitable for a few seconds. SAMBA Banlace suitable for Habana Music. HABANA Banlace suitable ...
...Music. POP Balance suitable for Flat Music. FLAT Balance suitable for Pop Music. Press the EQ button until the required option is displayed for Virtual Music. ✎ NOTE When the system is recording a CD, the Power Bass function can not operate... appropriate balance between treble and bass frequencies, according to . 1. HIPHOP Balance suitable for MP3 Enhan Music. Select... Result: "P BASS" is displayed. 2. MP3 Banlace suitable for HipHop Music. VIR+S Banlace suitable for a few seconds. SAMBA Banlace suitable for Habana Music. HABANA Banlace suitable ...
User Manual (user Manual) (ver.1.0) (English)
Page 29
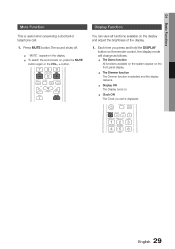
... functions available on the system appear on the front panel display. The Dimmer function The Dimmer function is selected and the display darkens. Display ON The Display turns on the display and adjust the brightness of the display. 1. 04 Basic Functions Mute Function This is displayed. Each time you set is useful when answering a doorbell...
... functions available on the system appear on the front panel display. The Dimmer function The Dimmer function is selected and the display darkens. Display ON The Display turns on the display and adjust the brightness of the display. 1. 04 Basic Functions Mute Function This is displayed. Each time you set is useful when answering a doorbell...
User Manual (user Manual) (ver.1.0) (English)
Page 30
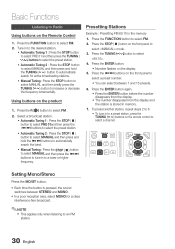
...incrementally. Press the # $ buttons on the remote control to select a channel. Basic Functions Listening to Radio Using buttons on the display. 5. Press the TUNING ( ) button to select FM. 2. Press the ENTER button again. • Press the ENTER button before the number disappears ...from the display. • The number disappears from the display and the station is pressed, the sound switches between 1 and 15 presets. 6. Press the ENTER button. • Number fl...
...incrementally. Press the # $ buttons on the remote control to select a channel. Basic Functions Listening to Radio Using buttons on the display. 5. Press the TUNING ( ) button to select FM. 2. Press the ENTER button again. • Press the ENTER button before the number disappears ...from the display. • The number disappears from the display and the station is pressed, the sound switches between 1 and 15 presets. 6. Press the ENTER button. • Number fl...

User Manual (user Manual) (ver.1.0) (English)
Page 31
...You can also use # or $ on or off at specific times automatically. Before setting the timer, check that the current time is displayed. 7. Result: The source to be played when the system switches on time. 4. b Select a preset station by pressing the POWER button. 2. Press and... hold the TIMER/CLOCK button and then press ◄ or ► buttons until TIME is displayed for a few seconds. The timer enables you to switch the system on by pressing the ◄ or ► button. DVD/CD (compact ...
...You can also use # or $ on or off at specific times automatically. Before setting the timer, check that the current time is displayed. 7. Result: The source to be played when the system switches on time. 4. b Select a preset station by pressing the POWER button. 2. Press and... hold the TIMER/CLOCK button and then press ◄ or ► buttons until TIME is displayed for a few seconds. The timer enables you to switch the system on by pressing the ◄ or ► button. DVD/CD (compact ...

User Manual (user Manual) (ver.1.0) (English)
Page 32
...timer, press and hold the SLEEP button one or more times to indicate how long the system should continue playing before it . 1. Result: OFF is displayed, you can press the ◄ or ► button to use the timer, you can set the tuner timing recording. 2). Press the ENTER (...ENTER ( ) button. Press and hold the SLEEP button: Result: The playback starts and the following indications are identical, the word ERROR is displayed. If the switch-on time. Cancelling the Timer After having set the tuner timing recording. You can cancel it switches off: 90MIN Š...
...timer, press and hold the SLEEP button one or more times to indicate how long the system should continue playing before it . 1. Result: OFF is displayed, you can press the ◄ or ► button to use the timer, you can set the tuner timing recording. 2). Press the ENTER (...ENTER ( ) button. Press and hold the SLEEP button: Result: The playback starts and the following indications are identical, the word ERROR is displayed. If the switch-on time. Cancelling the Timer After having set the tuner timing recording. You can cancel it switches off: 90MIN Š...
User Manual (user Manual) (ver.1.0) (English)
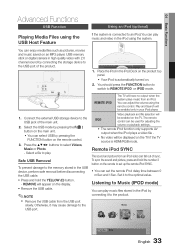
Page 33
... the USB port slowly. REMOTE IPOD The TV will appear on . 2. Video playback and file selection will be displayed on the TV if the TV source is automatically turned on the display. • Remove the USB cable. ✎ NOTE Remove the USB cable from an iPod. Set it may cause...
... the USB port slowly. REMOTE IPOD The TV will appear on . 2. Video playback and file selection will be displayed on the TV if the TV source is automatically turned on the display. • Remove the USB cable. ✎ NOTE Remove the USB cable from an iPod. Set it may cause...

User Manual (user Manual) (ver.1.0) (English)
Page 34
... File information including the artist name, album name, music title and genre will charge your iPod and product. When the product is not be displayed according to play by composer. Songs To play by genre. Press the FUNCTION button to select Music. 3. iPod models you have a problem using iPod, please...
... File information including the artist name, album name, music title and genre will charge your iPod and product. When the product is not be displayed according to play by composer. Songs To play by genre. Press the FUNCTION button to select Music. 3. iPod models you have a problem using iPod, please...

User Manual (user Manual) (ver.1.0) (English)
Page 35
... the PC, and then format the USB device. When there is recording from an external source into the recording. "PROCESSING XX%"" is displayed on the remote control, the recording speed will change as follows: RECORDSPD x 1ŠRECORDSPD x 3 When the system is not enough ...memory in the USB device, the system displays "NOT ENOUGH MEMORY". The recording function supports USB devices or HDDs formatted in your USB device. ✎ NOTE Do not disconnect ...
... the PC, and then format the USB device. When there is recording from an external source into the recording. "PROCESSING XX%"" is displayed on the remote control, the recording speed will change as follows: RECORDSPD x 1ŠRECORDSPD x 3 When the system is not enough ...memory in the USB device, the system displays "NOT ENOUGH MEMORY". The recording function supports USB devices or HDDs formatted in your USB device. ✎ NOTE Do not disconnect ...

User Manual (user Manual) (ver.1.0) (English)
Page 37
...the appropriate code number for longer than 5 seconds. Do not use this unless necessary. • While the "NO DISC" message appears on the display of the product, press and hold the main unit's STOP () button for longer than 5 seconds with good reception. Can't receive radio broadcast.... • While the "NO DISC" message appears on the display of the product, press and hold the STOP () button on the display and all settings will erase all stored settings. Using the RESET function will return to the default values....
...the appropriate code number for longer than 5 seconds. Do not use this unless necessary. • While the "NO DISC" message appears on the display of the product, press and hold the main unit's STOP () button for longer than 5 seconds with good reception. Can't receive radio broadcast.... • While the "NO DISC" message appears on the display of the product, press and hold the STOP () button on the display and all settings will erase all stored settings. Using the RESET function will return to the default values....

