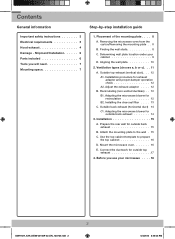
Installation Instructions
Page 2
... procedure for recirculation 12 B2. Mount the microwave oven 16 E. Connect the ductwork for outside back exhaust 14 3. Finding the wall studs 8 C. Installing the charcoal filter 13 C. Adapting the microwave blower for exhaust adaptor and proper damper operation check 12 A2. Use the top cabinet template to the wall . . 15 C. Ventilation...
... procedure for recirculation 12 B2. Mount the microwave oven 16 E. Connect the ductwork for outside back exhaust 14 3. Finding the wall studs 8 C. Installing the charcoal filter 13 C. Adapting the microwave blower for exhaust adaptor and proper damper operation check 12 A2. Use the top cabinet template to the wall . . 15 C. Ventilation...
Installation Instructions
Page 6
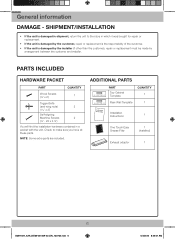
... - TTTeeemmmppplllaaattteee ADTeDmpIlaTte IONAL PARTS PART TOP CABINET TEMPLATE INITNROSSEPTATACRRLAUWLBACIANTLTELIIOTOTNTENEMSMPPLLAATTEE REAR WALL TEMPLATE Top Cabinet Template Rear Wall Template QUANTITY 1 1 Installation Instructions 1 One Touch Easy Grease Filter 1 (Installed) Exhaust adaptor 1 IIINNNIIINNNSSSSSSTTTTTTAAARRRLLLUUULLLAAACCCTTTTTTIIIIIIOOOOOONNNNNNSSS 6 SMH1927_XAA_DE68-04108A-02_EN_120725.indd 6 5/3/2013 8:45:01 AM
... - TTTeeemmmppplllaaattteee ADTeDmpIlaTte IONAL PARTS PART TOP CABINET TEMPLATE INITNROSSEPTATACRRLAUWLBACIANTLTELIIOTOTNTENEMSMPPLLAATTEE REAR WALL TEMPLATE Top Cabinet Template Rear Wall Template QUANTITY 1 1 Installation Instructions 1 One Touch Easy Grease Filter 1 (Installed) Exhaust adaptor 1 IIINNNIIINNNSSSSSSTTTTTTAAARRRLLLUUULLLAAACCCTTTTTTIIIIIIOOOOOONNNNNNSSS 6 SMH1927_XAA_DE68-04108A-02_EN_120725.indd 6 5/3/2013 8:45:01 AM

Installation Instructions
Page 8
... the Styrofoam. CCaarrtotonn SSttyyrorofofoaamm 3. Step-by probing the wall with a small nail to find the edges of the stud. Remove the installation instructions, Exhaust adaptor, filters, glass tray, and the small hardware bag. Placement of the mounting plate A. Removing the microwave oven from the mounting plate. This will be 16˝...
... the Styrofoam. CCaarrtotonn SSttyyrorofofoaamm 3. Step-by probing the wall with a small nail to find the edges of the stud. Remove the installation instructions, Exhaust adaptor, filters, glass tray, and the small hardware bag. Placement of the mounting plate A. Removing the microwave oven from the mounting plate. This will be 16˝...
Installation Instructions
Page 11
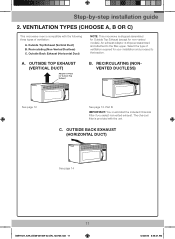
...Horizontal Duct) NOTE: This microwave is provided with the following three types of ventilation required for non-vented models). The charcoal filter is shipped assembled for Outside Top Exhaust (except for your installation and proceed to the filler-upper. A. Outside top exhaust ... Top Exhaust B. Recirculating (nonvented ductless) See page 12 See page 12, Part B IMPORTANT: You must install the included Charcoal Filter if you select nonvented exhaust. Step-by-step installation guide 2. C. Outside back exhaust (horizontal duct) See page 14 11 SMH1927_XAA_DE68...
...Horizontal Duct) NOTE: This microwave is provided with the following three types of ventilation required for non-vented models). The charcoal filter is shipped assembled for Outside Top Exhaust (except for your installation and proceed to the filler-upper. A. Outside top exhaust ... Top Exhaust B. Recirculating (nonvented ductless) See page 12 See page 12, Part B IMPORTANT: You must install the included Charcoal Filter if you select nonvented exhaust. Step-by-step installation guide 2. C. Outside back exhaust (horizontal duct) See page 14 11 SMH1927_XAA_DE68...
Installation Instructions
Page 13
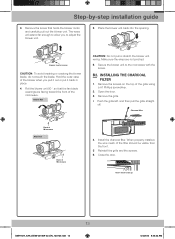
... avoid breaking or cracking the blower blade, do not touch the blade. Secure the blower unit to adjust the blower unit. 5. Install the charocal filter. Insert mesh-side up 13 SMH1927_XAA_DE68-04108A-02_EN_120725.indd 13 5/3/2013 8:45:22 AM Roll the blower unit 90 ° so that holds the ...blower motor and carefully pull out the blower unit. Before Roll CAUTION: Do not pull or stretch the blower unit wiring. Installing the charcoal filter 1. Close the door. Place the blower unit back into the opening. B2. Remove the grille. • Push the grille left, and then pull...
... avoid breaking or cracking the blower blade, do not touch the blade. Secure the blower unit to adjust the blower unit. 5. Install the charocal filter. Insert mesh-side up 13 SMH1927_XAA_DE68-04108A-02_EN_120725.indd 13 5/3/2013 8:45:22 AM Roll the blower unit 90 ° so that holds the ...blower motor and carefully pull out the blower unit. Before Roll CAUTION: Do not pull or stretch the blower unit wiring. Installing the charcoal filter 1. Close the door. Place the blower unit back into the opening. B2. Remove the grille. • Push the grille left, and then pull...

Installation Instructions
Page 16
...that will occur from the wall to avoid pinching your cabinet is metal, use filler blocks is properly centered under any cabinet with the grease filter installed, don't push up on the TOP CABINET TEMPLATE. • Tape it tight throughout Steps 1-3. CAUTION: Wear safety goggles when drilling ...unit under the cabinet. Step-by-step installation guide To use the handle during installation to support the microwave. Tighten the screw. Grease Filter mount the oven. Do not 16 SMH1927_XAA_DE68-04108A-02_EN_120725.indd 16 5/3/2013 8:45:23 AM Pull the plate away from over tightening screws...
...that will occur from the wall to avoid pinching your cabinet is metal, use filler blocks is properly centered under any cabinet with the grease filter installed, don't push up on the TOP CABINET TEMPLATE. • Tape it tight throughout Steps 1-3. CAUTION: Wear safety goggles when drilling ...unit under the cabinet. Step-by-step installation guide To use the handle during installation to support the microwave. Tighten the screw. Grease Filter mount the oven. Do not 16 SMH1927_XAA_DE68-04108A-02_EN_120725.indd 16 5/3/2013 8:45:23 AM Pull the plate away from over tightening screws...
Installation Instructions
Page 17
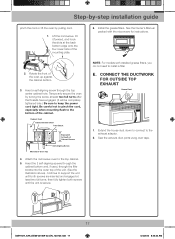
...the exhaust adaptor. 2. Rotate the front of CCaabbiinneettRReeccesesss Selff--AAlilgignnininggScSrcerwew MiMcricorwowaavveeOOvveenn TTop 4. See the Owner's Manual packed with installed grease filters, you do not need to the bottom of the mounting plate. 6. Insert a self-aligning screw through the filler blocks into ... until the unit is secure. NOTE: For models with the microwave for outside top exhaust HHousseeDDuucct t 1. Install the grease filters. Insert the 2 self-aligning screws through the cabinet bottom and, if used, through the top center cabinet hole. Continue to...
...the exhaust adaptor. 2. Rotate the front of CCaabbiinneettRReeccesesss Selff--AAlilgignnininggScSrcerwew MiMcricorwowaavveeOOvveenn TTop 4. See the Owner's Manual packed with installed grease filters, you do not need to the bottom of the mounting plate. 6. Insert a self-aligning screw through the filler blocks into ... until the unit is secure. NOTE: For models with the microwave for outside top exhaust HHousseeDDuucct t 1. Install the grease filters. Insert the 2 self-aligning screws through the cabinet bottom and, if used, through the top center cabinet hole. Continue to...


