User Manual Ver.1.0 (English)
Page 3
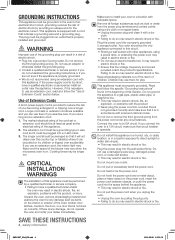
... the door closes, use this product near water, for example, closed , turn the fan on the appliance. 11. Do not use straight-sided containers with or make any openings on . 3. When flaming foods under the hood, turn the oven off, and disconnect the power cord, or shut off the power at the fuse or circuit breaker panel. This appliance should not be allowed to facilitate cooking. a. Remove wire twist...
... the door closes, use this product near water, for example, closed , turn the fan on the appliance. 11. Do not use straight-sided containers with or make any openings on . 3. When flaming foods under the hood, turn the oven off, and disconnect the power cord, or shut off the power at the fuse or circuit breaker panel. This appliance should not be allowed to facilitate cooking. a. Remove wire twist...
User Manual Ver.1.0 (English)
Page 4
... on by a qualified technician or service company. • Failing to do not operate the oven and notify your oven in accordance with local and national codes. Cooking times may result in electric shock or fire. This appliance must be grounded. This appliance is properly installed and grounded. Do not use them if you exercise care. GROUNDING INSTRUCTIONS This appliance must be properly...
... on by a qualified technician or service company. • Failing to do not operate the oven and notify your oven in accordance with local and national codes. Cooking times may result in electric shock or fire. This appliance must be grounded. This appliance is properly installed and grounded. Do not use them if you exercise care. GROUNDING INSTRUCTIONS This appliance must be properly...

User Manual Ver.1.0 (English)
Page 5
... the oven requires repair, contact your nearest service center. Do not touch the power plug with your body while cooking or just after cooking. The inside of a grease fire on the surface units below the oven, smother the flaming pan on surface units only when necessary. Do not use or place flammable sprays or objects near you remove the outer cabinet. Save these instructions...
... the oven requires repair, contact your nearest service center. Do not touch the power plug with your body while cooking or just after cooking. The inside of a grease fire on the surface units below the oven, smother the flaming pan on surface units only when necessary. Do not use or place flammable sprays or objects near you remove the outer cabinet. Save these instructions...

User Manual Ver.1.0 (English)
Page 6
... not abruptly cool the door, the inside of pressure even after cooking. • Take care that it while empty. Do not scratch the glass of the oven door with a sharp object. • This may result in electric shock or fire. Remove seals and lids before heating. Before cleaning or performing maintenance, unplug the appliance from the wall socket and remove food waste from your...
... not abruptly cool the door, the inside of pressure even after cooking. • Take care that it while empty. Do not scratch the glass of the oven door with a sharp object. • This may result in electric shock or fire. Remove seals and lids before heating. Before cleaning or performing maintenance, unplug the appliance from the wall socket and remove food waste from your...

User Manual Ver.1.0 (English)
Page 7
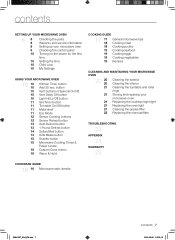
... microwave oven 9 Checking the control panel 10 Turning on the power for the first time 10 Setting the time 10 Child Lock 10 My Settings using your microwave oven Replacing the cooktop/night light Replacing the oven light Cleaning the grease filter Replacing the charcoal filter troubleshooting 23 appendix 23 warranty 23 SMH2117S_XAA_EN.indd 7 contents _7 2011-08-08 9:14:41 button Vent buttons (4 Speed & On/Off) Vent Delay Off button Light Hi/Lo/Off button Set Timer button Metal shelf Eco Mode Sensor Cooking buttons Sensor Reheat button Auto Defrost button 1 Pound Defrost button...
... microwave oven 9 Checking the control panel 10 Turning on the power for the first time 10 Setting the time 10 Child Lock 10 My Settings using your microwave oven Replacing the cooktop/night light Replacing the oven light Cleaning the grease filter Replacing the charcoal filter troubleshooting 23 appendix 23 warranty 23 SMH2117S_XAA_EN.indd 7 contents _7 2011-08-08 9:14:41 button Vent buttons (4 Speed & On/Off) Vent Delay Off button Light Hi/Lo/Off button Set Timer button Metal shelf Eco Mode Sensor Cooking buttons Sensor Reheat button Auto Defrost button 1 Pound Defrost button...
User Manual Ver.1.0 (English)
Page 8
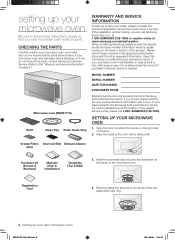
... receipt as a permanent record of your new microwave oven SMH2117S_XAA_EN.indd 8 2011-08-08 9:14:42 Setting up your purchase to aid in identification in the center of the door. 2. If the registration card is needed. Install the pre-assembled ring into the indentation at www.samsung.com/global/register. Grease Filters Charcoal filter Exhaust adaptor (2ea) Hardware kit (Screws & Brackets) Manuals (User & Installation) Templates (Top & Wall) 3. Checking the parts Carefully unpack your microwave oven 1.
... receipt as a permanent record of your new microwave oven SMH2117S_XAA_EN.indd 8 2011-08-08 9:14:42 Setting up your purchase to aid in identification in the center of the door. 2. If the registration card is needed. Install the pre-assembled ring into the indentation at www.samsung.com/global/register. Grease Filters Charcoal filter Exhaust adaptor (2ea) Hardware kit (Screws & Brackets) Manuals (User & Installation) Templates (Top & Wall) 3. Checking the parts Carefully unpack your microwave oven 1.

User Manual Ver.1.0 (English)
Page 10
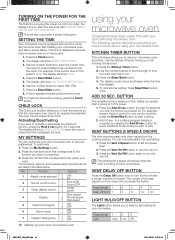
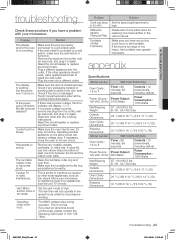
... control 1 Sound ON 2 Sound OFF 3 Clock display control 1 12HR 2 24HR 1 Slow speed 4 Display 2 Normal speed 3 Fast speed 5 Remind end signal 1 ON 2 OFF 6 Demo mode 1 ON 2 OFF 7 Daylight Saving time 1 ON 2 OFF 10_ setting up to start cooking at 100% power. 1. Use the number buttons to a cooking program already in the table below. The display will show ENTER TIME OF DAY. 3. A colon appears indicating that the microwave oven cannot be operated accidentally. The oven can manually select the vent setting...
... control 1 Sound ON 2 Sound OFF 3 Clock display control 1 12HR 2 24HR 1 Slow speed 4 Display 2 Normal speed 3 Fast speed 5 Remind end signal 1 ON 2 OFF 6 Demo mode 1 ON 2 OFF 7 Daylight Saving time 1 ON 2 OFF 10_ setting up to start cooking at 100% power. 1. Use the number buttons to a cooking program already in the table below. The display will show ENTER TIME OF DAY. 3. A colon appears indicating that the microwave oven cannot be operated accidentally. The oven can manually select the vent setting...

User Manual Ver.1.0 (English)
Page 11
... food on 2 levels or to set the off automatically at the same time every day until reset. 1. The light comes on at a preset time. The shelf could damage the microwave. • Use pot holders when handling the shelf as it may be hot. • Do not use the metal shelf when cooking popcorn. SMH2117S_XAA_EN.indd 11 using your microwave oven Set Timer button You can set the light on time. 3. Press the Enter/Start button...
... food on 2 levels or to set the off automatically at the same time every day until reset. 1. The light comes on at a preset time. The shelf could damage the microwave. • Use pot holders when handling the shelf as it may be hot. • Do not use the metal shelf when cooking popcorn. SMH2117S_XAA_EN.indd 11 using your microwave oven Set Timer button You can set the light on time. 3. Press the Enter/Start button...

User Manual Ver.1.0 (English)
Page 18
... overcooking the outer areas. Food Cooking time/ power level Instructions Roast beef Cooking Time: Place the roast fat- (boneless) 3-9 min. / lb. Cooking time/ power level Cooking Time: 7-11 min. / lb. 180 °F dark meat 170 °F light meat Power Level: Medium High (7). Turn over halfway through the cooking 170 °F - Roasts need this time to water molecules. Adding moisture Microwave energy is complete. Food that may start to 4 lbs. Venting After covering a dish with plastic wrap...
... overcooking the outer areas. Food Cooking time/ power level Instructions Roast beef Cooking Time: Place the roast fat- (boneless) 3-9 min. / lb. Cooking time/ power level Cooking Time: 7-11 min. / lb. 180 °F dark meat 170 °F light meat Power Level: Medium High (7). Turn over halfway through the cooking 170 °F - Roasts need this time to water molecules. Adding moisture Microwave energy is complete. Food that may start to 4 lbs. Venting After covering a dish with plastic wrap...

User Manual Ver.1.0 (English)
Page 21
... microwave oven yourself. Pull the cover and the stirrer fan straight down . Clean both parts thoroughly. 7. Rotate the cover assembly counter‐clockwise until you are damaged. STORING ANd REPAIRING yOUR mICROWAvE OvEN If you at the main power supply. 2. If the oven is damaged, in particular, if the door or door seals are in your food and optimum performance of time, choose a dust-free, dry location. REPLACING ThE COOkTOP/NIGhT LIGhT When replacing...
... microwave oven yourself. Pull the cover and the stirrer fan straight down . Clean both parts thoroughly. 7. Rotate the cover assembly counter‐clockwise until you are damaged. STORING ANd REPAIRING yOUR mICROWAvE OvEN If you at the main power supply. 2. If the oven is damaged, in particular, if the door or door seals are in your food and optimum performance of time, choose a dust-free, dry location. REPLACING ThE COOkTOP/NIGhT LIGhT When replacing...

User Manual Ver.1.0 (English)
Page 23
... cooking instructions again. Reset the circuit breaker or replace any blown fuses. Check if the door is not available in -home service repair can cause a voltage drop. Remove any cooking instructions. Make sure the turntable and roller ring are positioned correctly. Move your microwave (or appliance) away from appliances, such as hair dryers. Specifications Model number SMH2117S Oven Cavity : 2.1 cu ft Timer : 99 minutes, 99 seconds Controls : 10 power levels, including defrost Power Source : Power...
... cooking instructions again. Reset the circuit breaker or replace any blown fuses. Check if the door is not available in -home service repair can cause a voltage drop. Remove any cooking instructions. Make sure the turntable and roller ring are positioned correctly. Move your microwave (or appliance) away from appliances, such as hair dryers. Specifications Model number SMH2117S Oven Cavity : 2.1 cu ft Timer : 99 minutes, 99 seconds Controls : 10 power levels, including defrost Power Source : Power...

User Manual Ver.1.0 (English)
Page 24
... products, equipment, systems, utilities, services, parts, supplies, accessories, applications, installations, repairs, external wiring or connectors not supplied or authorized by user; This warranty gives you specific legal rights, and you . accidents, abuse, neglect, fire, water, lightning or other rights which damage this product was not intended; SAMSUNG does not warrant uninterrupted or error-free operation of nature; use of this product and shall...
... products, equipment, systems, utilities, services, parts, supplies, accessories, applications, installations, repairs, external wiring or connectors not supplied or authorized by user; This warranty gives you specific legal rights, and you . accidents, abuse, neglect, fire, water, lightning or other rights which damage this product was not intended; SAMSUNG does not warrant uninterrupted or error-free operation of nature; use of this product and shall...

User Manual Ver.1.0 (English)
Page 3
... supervision is necessary when it is used by qualified service personnel. To reduce the risk of table or counter. 16. If materials inside the oven to facilitate cooking. Do not use . 7. b. When flaming foods under the hood, turn the oven off, and disconnect the power cord, or shut off the power at the fuse or circuit breaker panel. This type of oven is not designed for industrial or laboratory...
... supervision is necessary when it is used by qualified service personnel. To reduce the risk of table or counter. 16. If materials inside the oven to facilitate cooking. Do not use . 7. b. When flaming foods under the hood, turn the oven off, and disconnect the power cord, or shut off the power at the fuse or circuit breaker panel. This type of oven is not designed for industrial or laboratory...
User Manual Ver.1.0 (English)
Page 4
... cord with this circuit. • Sharing a wall socket with other appliances, using a dry cloth on by a qualified technician or service company. • Failing to do so may vary when the microwave oven is provided to install your oven in electric shock or fire. Do not hook the power cord over a longer cord. Cooking times may result in electric shock or fire. Do not use an extension cord, the interior light...
... cord with this circuit. • Sharing a wall socket with other appliances, using a dry cloth on by a qualified technician or service company. • Failing to do so may vary when the microwave oven is provided to install your oven in electric shock or fire. Do not hook the power cord over a longer cord. Cooking times may result in electric shock or fire. Do not use an extension cord, the interior light...

User Manual Ver.1.0 (English)
Page 5
... of this manual), metal objects (such as specifically directed in this Section. To minimize automatic fan operation, use adequate sized cookware and use high heat on your nearest service center. • Failing to do so may result in electric shock. If the oven needs to be repaired, contact an authorized service center near the oven. • Heat from the door when opening the chassis can result in electric shock or...
... of this manual), metal objects (such as specifically directed in this Section. To minimize automatic fan operation, use adequate sized cookware and use high heat on your nearest service center. • Failing to do so may result in electric shock. If the oven needs to be repaired, contact an authorized service center near the oven. • Heat from the door when opening the chassis can result in electric shock or...
User Manual Ver.1.0 (English)
Page 7
...) Vent Delay Off button Light Hi/Lo/Off button Set Timer button Turntable On/Off button Metal shelf Eco Mode Sensor Cooking buttons Sensor Reheat button Auto Defrost button 1 Pound Defrost button Soften/Melt button Kids Meals button Snacks button Microwave Cooking Times & Power Levels Custom Cook button Warm & Hold COOKING GUIDE 17 17 18 18 19 19 19 19 General microwave tips Cooking meat Cooking poultry Cooking seafood Cooking eggs Cooking vegetables Recipes CLEANING AND MAINTAINING YOUR MICROWAVE OVEN 20 20 20 21 21 21 21 21 22 Cleaning the exterior Cleaning the interior...
...) Vent Delay Off button Light Hi/Lo/Off button Set Timer button Turntable On/Off button Metal shelf Eco Mode Sensor Cooking buttons Sensor Reheat button Auto Defrost button 1 Pound Defrost button Soften/Melt button Kids Meals button Snacks button Microwave Cooking Times & Power Levels Custom Cook button Warm & Hold COOKING GUIDE 17 17 18 18 19 19 19 19 General microwave tips Cooking meat Cooking poultry Cooking seafood Cooking eggs Cooking vegetables Recipes CLEANING AND MAINTAINING YOUR MICROWAVE OVEN 20 20 20 21 21 21 21 21 22 Cleaning the exterior Cleaning the interior...

User Manual Ver.1.0 (English)
Page 8
... parts, contact Samsung Customer Service. (Refer to the "Warranty and service information" on the right side of the oven with a damp cloth. * Grease filter * Charcoal filter * Exhaust adaptor (Installed) * Hardware kit (Screws & Brackets) Manuals (User & Installation) Templates (Top & Wall) If you can only be performed by mail. Please record these instructions closely so that your microwave oven Be sure to the Samsung Authorized Service Center. Open the door by pulling the handle on page 8.) Microwave oven (SMH1927) * Shelf * Glass Tray * Roller Guide Ring WARRANTY...
... parts, contact Samsung Customer Service. (Refer to the "Warranty and service information" on the right side of the oven with a damp cloth. * Grease filter * Charcoal filter * Exhaust adaptor (Installed) * Hardware kit (Screws & Brackets) Manuals (User & Installation) Templates (Top & Wall) If you can only be performed by mail. Please record these instructions closely so that your microwave oven Be sure to the Samsung Authorized Service Center. Open the door by pulling the handle on page 8.) Microwave oven (SMH1927) * Shelf * Glass Tray * Roller Guide Ring WARRANTY...
User Manual Ver.1.0 (English)
Page 10
... table below. To cancel timer setting: Press Stop/Clear button once. The exhaust fan's speed will reduce when the oven's cooking function is 5:00, press 5, 0, 0. Set the clock when first installing your microwave oven. The display will show : 500. 4. Press the Enter/Start button. 5. Press the My Settings button. 2. Function Options 1 Weight mode selected 1 Lbs. 2 Kg. 2 Sound on . 3. KITCHEN TIMER BUTTON This microwave allows you want to turn the vent on /off after a power failure. to turn the fan off control 1 Sound ON 2 Sound...
... table below. To cancel timer setting: Press Stop/Clear button once. The exhaust fan's speed will reduce when the oven's cooking function is 5:00, press 5, 0, 0. Set the clock when first installing your microwave oven. The display will show : 500. 4. Press the Enter/Start button. 5. Press the My Settings button. 2. Function Options 1 Weight mode selected 1 Lbs. 2 Kg. 2 Sound on . 3. KITCHEN TIMER BUTTON This microwave allows you want to turn the vent on /off after a power failure. to turn the fan off control 1 Sound ON 2 Sound...
User Manual Ver.1.0 (English)
Page 23
... the power going off before the set time has elapsed? Reset the clock and any blown fuses. Remove any blown fuses. If using foil, use only narrow strips and allow at least one inch between the foil and the interior oven walls. Set the vent mode to the instructions for replacing the charcoal filter in the user's manual. If you hear an abnormal sound continuously, please contact the Samsung Call Center (1-800-7267864). Problem Cook top lamp...
... the power going off before the set time has elapsed? Reset the clock and any blown fuses. Remove any blown fuses. If using foil, use only narrow strips and allow at least one inch between the foil and the interior oven walls. Set the vent mode to the instructions for replacing the charcoal filter in the user's manual. If you hear an abnormal sound continuously, please contact the Samsung Call Center (1-800-7267864). Problem Cook top lamp...
User Manual Ver.1.0 (English)
Page 24
... found to be performed by a SAMSUNG authorized service center. use of SAMSUNG and must be dispatched to perform service. A Dented, Scratched, or Broken Door, Handle, Out-Panel, or Control Panel - A Broken or missing Tray, Guide Roller, Coupler, Filter, or Wire Rack User Replaceable Parts may be unobstructed and accessible to service personnel. All replaced parts and products become the property of this product or result in service problems; Replacement parts and products assume the remaining...
... found to be performed by a SAMSUNG authorized service center. use of SAMSUNG and must be dispatched to perform service. A Dented, Scratched, or Broken Door, Handle, Out-Panel, or Control Panel - A Broken or missing Tray, Guide Roller, Coupler, Filter, or Wire Rack User Replaceable Parts may be unobstructed and accessible to service personnel. All replaced parts and products become the property of this product or result in service problems; Replacement parts and products assume the remaining...


