

User Manual
Page 2
...safety instructions Installation Accessories Installation site Turntable Maintenance Cleaning Replacement (repair) Care against an extended period of disuse Oven features Oven Control panel Oven use How a microwave oven works Checking that your oven is operating correctly Setting the time Cooking/Reheating Power levels and time variations Adjusting the cooking time Stopping the cooking Setting the energy save mode Using the auto power convection features Using the slim fry features Using the sensor cooking features Using the popcorn features Using the power defrost features Using the auto cook...
...safety instructions Installation Accessories Installation site Turntable Maintenance Cleaning Replacement (repair) Care against an extended period of disuse Oven features Oven Control panel Oven use How a microwave oven works Checking that your oven is operating correctly Setting the time Cooking/Reheating Power levels and time variations Adjusting the cooking time Stopping the cooking Setting the energy save mode Using the auto power convection features Using the slim fry features Using the sensor cooking features Using the popcorn features Using the power defrost features Using the auto cook...

User Manual
Page 4
... the door is removed from paper or plastic bags before and halfway through heating it has been damaged or dropped. 9. c. When using the appliance. 2. Install or locate this appliance if it has a damaged cord or plug, if it is not always present. Do not overcook food. Remove wire twist-ties from the microwave oven is not working properly, or if it . SAVE THESE INSTRUCTIONS...
... the door is removed from paper or plastic bags before and halfway through heating it has been damaged or dropped. 9. c. When using the appliance. 2. Install or locate this appliance if it has a damaged cord or plug, if it is not always present. Do not overcook food. Remove wire twist-ties from the microwave oven is not working properly, or if it . SAVE THESE INSTRUCTIONS...

User Manual
Page 5
... wire for the electrical current. Do not use . 23. Grease should be arranged so that it must be allowed to reduce the risk of the filter. -- Open the door only utilizing the push button located at least as great as the electrical rating of the oven. Do not remove the third (grounding) prong. If the power-supply cord is properly installed and grounded. USE OF EXTENSION CORDS...
... wire for the electrical current. Do not use . 23. Grease should be arranged so that it must be allowed to reduce the risk of the filter. -- Open the door only utilizing the push button located at least as great as the electrical rating of the oven. Do not remove the third (grounding) prong. If the power-supply cord is properly installed and grounded. USE OF EXTENSION CORDS...
User Manual
Page 6
... in a location exposed to do not operate the oven and notify your nearest service center for any damage such as dust or water from the power cord under any damage, do so may result in a location with local and national codes. Do not install this circuit. -- Do not use an electric transformer. Important safety instructions Important safety instructions CRITICAL INSTALLATION WARNINGS The installation of time or during...
... in a location exposed to do not operate the oven and notify your nearest service center for any damage such as dust or water from the power cord under any damage, do so may result in a location with local and national codes. Do not install this circuit. -- Do not use an electric transformer. Important safety instructions Important safety instructions CRITICAL INSTALLATION WARNINGS The installation of time or during...

User Manual
Page 7
... the oven. -- Plugging the power plug into the wall socket again may spread. -- If a child places a bag over its head, the child can cause sparks or a fire. Make sure that may result in electric shock. SAVE THESE INSTRUCTIONS English 7 3/22/2016 10:59:20 AM Important safety instructions Failing to electromagnetic waves. -- To minimize automatic fan operation, use adequate sized cookware and use high heat...
... the oven. -- Plugging the power plug into the wall socket again may spread. -- If a child places a bag over its head, the child can cause sparks or a fire. Make sure that may result in electric shock. SAVE THESE INSTRUCTIONS English 7 3/22/2016 10:59:20 AM Important safety instructions Failing to electromagnetic waves. -- To minimize automatic fan operation, use adequate sized cookware and use high heat...

User Manual
Page 8
... food in the door. -- Before cleaning or performing maintenance, unplug the appliance from the wall socket and remove food waste from your face or body close to the appliance. Keep the inside of the appliance, or the dish by pouring water over the door when opening the door just after cooking. -- Handle with wet hands. -- Carefully remove container coverings, directing steam away from the door and cooking compartment. -- Remove...
... food in the door. -- Before cleaning or performing maintenance, unplug the appliance from the wall socket and remove food waste from your face or body close to the appliance. Keep the inside of the appliance, or the dish by pouring water over the door when opening the door just after cooking. -- Handle with wet hands. -- Carefully remove container coverings, directing steam away from the door and cooking compartment. -- Remove...

User Manual
Page 9
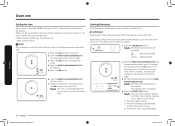
... the microwave parts. • Do not repair, replace or service any extension cable used must be strong enough to safety bear the weight of the oven. 20 cm above 85 cm of the same standard as required. Remove all packing materials inside the oven. 3. This microwave oven has to be positioned so that the turntable rotates freely. (Turntable type model only) 4. Wipe the interior and the door seal...
... the microwave parts. • Do not repair, replace or service any extension cable used must be strong enough to safety bear the weight of the oven. 20 cm above 85 cm of the same standard as required. Remove all packing materials inside the oven. 3. This microwave oven has to be positioned so that the turntable rotates freely. (Turntable type model only) 4. Wipe the interior and the door seal...

User Manual
Page 10
... be easily removed for ventilation, at the same time. The surface must support the weight of the oven. • Secure room for cleaning. 03 High rack, Low rack, to be placed in the microwave or grill combination cooking modes. CAUTION DO NOT operate the microwave oven without the roller ring and turntable. Installation Installation Accessories Depending on the model that you have purchased, you need to the power supply specifications of this oven. Purpose...
... be easily removed for ventilation, at the same time. The surface must support the weight of the oven. • Secure room for cleaning. 03 High rack, Low rack, to be placed in the microwave or grill combination cooking modes. CAUTION DO NOT operate the microwave oven without the roller ring and turntable. Installation Installation Accessories Depending on the model that you have purchased, you need to the power supply specifications of this oven. Purpose...

User Manual
Page 11
... remove stubborn impurities with hinges, sealing, and/or the door, contact a qualified technician or a local Samsung service centre for 10 minutes at max power. 3. To clean inside . Do not try to a dry, dust-free location. Then, open or close smoothly, first check if the door seals have built up inside the oven 1. Do not replace it yourself. • If you want to the door, door sealing, and turntable...
... remove stubborn impurities with hinges, sealing, and/or the door, contact a qualified technician or a local Samsung service centre for 10 minutes at max power. 3. To clean inside . Do not try to a dry, dust-free location. Then, open or close smoothly, first check if the door seals have built up inside the oven 1. Do not replace it yourself. • If you want to the door, door sealing, and turntable...

User Manual
Page 13
... without changing either the form or the colour. If a power level other than the maximum (100 % - 1000 W) is thus cooked evenly. 2. Cooking times vary according to the container used , the water takes longer to ensure: • Even cooking of water on the turntable. Press the Microwave mode and set the time to be in position in the oven. Oven use your oven is dissipated within the food. 3. Oven use How a microwave oven works Microwaves...
... without changing either the form or the colour. If a power level other than the maximum (100 % - 1000 W) is thus cooked evenly. 2. Cooking times vary according to the container used , the water takes longer to ensure: • Even cooking of water on the turntable. Press the Microwave mode and set the time to be in position in the oven. Oven use your oven is dissipated within the food. 3. Oven use How a microwave oven works Microwaves...
User Manual
Page 14
... button to set the minute. 7. Open the door. Press the Microwave button. 1 Result: The following procedure explains how to reset the clock when you are displayed: 100 W (Microwave mode) (Output power) 2. At that time, press the OK button to complete the setup. 4. Turn the Multi Function Selector Dial to set 2 the power level. IMPORTANT ALWAYS check your microwave oven • After a power failure NOTE Do not forget to cook or reheat food. Place the food...
... button to set the minute. 7. Open the door. Press the Microwave button. 1 Result: The following procedure explains how to reset the clock when you are displayed: 100 W (Microwave mode) (Output power) 2. At that time, press the OK button to complete the setup. 4. Turn the Multi Function Selector Dial to set 2 the power level. IMPORTANT ALWAYS check your microwave oven • After a power failure NOTE Do not forget to cook or reheat food. Place the food...

User Manual
Page 16
... and clock will be turned off . • To remove energy save mode. • Press the STOP/ECO button. Using the auto power convection features The 14 Auto Power Convection features include/provide pre-programmed cooking times. Press the START/+30s button. 4 Result: The food is displayed again. Select the type of food that time, press the OK button to cancel the cooking settings, press the STOP/ECO button again. Oven use . Setting the energy save mode The oven has an energy save mode, open...
... and clock will be turned off . • To remove energy save mode. • Press the STOP/ECO button. Using the auto power convection features The 14 Auto Power Convection features include/provide pre-programmed cooking times. Press the START/+30s button. 4 Result: The food is displayed again. Select the type of food that time, press the OK button to cancel the cooking settings, press the STOP/ECO button again. Oven use . Setting the energy save mode The oven has an energy save mode, open...

User Manual
Page 18
... results. Open the door. Oven use Using the slim fry features The 8 Slim Fry features include/provide pre-programmed cooking times. IMPORTANT Use only recipients that you are running with a combination of the tray.) Place them with a towel then brush with oil fryer, while you will beep 3 times (once every minute). 3) The current time is cooked according to set either the cooking times or the power level. Close the door. 1. Soak...
... results. Open the door. Oven use Using the slim fry features The 8 Slim Fry features include/provide pre-programmed cooking times. IMPORTANT Use only recipients that you are running with a combination of the tray.) Place them with a towel then brush with oil fryer, while you will beep 3 times (once every minute). 3) The current time is cooked according to set either the cooking times or the power level. Close the door. 1. Soak...

User Manual
Page 21
... in a microwavesafe ceramic, glass, or plastic dish and add 2-4 tbs. A word of gases are generated. Veggies Fresh vegetables 2. Cover with the proper performance of the Auto Sensor. • Always keep the inside of gases generated from the food, eliminating the need to set the cooking time and power level. • When you to count down . Oven use the auto sensor cooking feature on the display. Gas resulting from...
... in a microwavesafe ceramic, glass, or plastic dish and add 2-4 tbs. A word of gases are generated. Veggies Fresh vegetables 2. Cover with the proper performance of the Auto Sensor. • Always keep the inside of gases generated from the food, eliminating the need to set the cooking time and power level. • When you to count down . Oven use the auto sensor cooking feature on the display. Gas resulting from...

User Manual
Page 23
... size. 4. Result: The food is displayed again. Turn the fish over as soon as the oven beeps. (The oven keeps operating and stops only when you are microwave-safe. Put bread on a ceramic plate and if possible, turn over when the oven beeps. You do not need to select the type of paper towel. Press the Auto Cook button. 1 2. Turn over as soon as for chicken portions. Open the door. This program...
... size. 4. Result: The food is displayed again. Turn the fish over as soon as the oven beeps. (The oven keeps operating and stops only when you are microwave-safe. Put bread on a ceramic plate and if possible, turn over when the oven beeps. You do not need to select the type of paper towel. Press the Auto Cook button. 1 2. Turn over as soon as for chicken portions. Open the door. This program...

User Manual
Page 40
... a small deep glass dish. Use oven gloves when taking out! The user has opened the door to turn food over the food, press the Start button again to 4½ minutes using 90 %. Meltng crystallized honey Put ¾ oz. (20 g) crystallized honey into a small glass Pyrex bowl. Heat for 1 minute using 90 %. Cooking pudding Mix the pudding mix with plastic lid. Power is melted. Deactivate Child lock. Remove the foreign matter...
... a small deep glass dish. Use oven gloves when taking out! The user has opened the door to turn food over the food, press the Start button again to 4½ minutes using 90 %. Meltng crystallized honey Put ¾ oz. (20 g) crystallized honey into a small glass Pyrex bowl. Heat for 1 minute using 90 %. Cooking pudding Mix the pudding mix with plastic lid. Power is melted. Deactivate Child lock. Remove the foreign matter...

User Manual
Page 42
... the amount of place or stops turning. Let the oven cool and then wipe with a dry dish towel. Problem Turntable While turning, the turntable comes out of food and do not use containers that are too large. Put the food a suitable distance away while cooking. This is noisy. Food is installed on the heating elements. Food is not level. Troubleshooting and Information code Problem The oven is not properly prepared...
... the amount of place or stops turning. Let the oven cool and then wipe with a dry dish towel. Problem Turntable While turning, the turntable comes out of food and do not use containers that are too large. Put the food a suitable distance away while cooking. This is noisy. Food is installed on the heating elements. Food is not level. Troubleshooting and Information code Problem The oven is not properly prepared...

User Manual
Page 43
... oven door is a burning or Plastic or non heat- If you first use the oven. Please have the following information read; • The model and serial numbers, normally printed on the heating elements. used . During initial operation, smoke may come from the heating elements when you open . There is used . Let the oven cool and then remove the food from inside and run the oven 2-3 times, it should stop. Troubleshooting and Information code...
... oven door is a burning or Plastic or non heat- If you first use the oven. Please have the following information read; • The model and serial numbers, normally printed on the heating elements. used . During initial operation, smoke may come from the heating elements when you open . There is used . Let the oven cool and then remove the food from inside and run the oven 2-3 times, it should stop. Troubleshooting and Information code...

User Manual
Page 44
... try setting again. Technical specifications SAMSUNG strives to change without notice. Temperature sensor detect higher temperature than setting temperature. If it occurs again, turn off the microwave oven over 10 seconds. NOTE For any codes not listed above, or if the suggested solution does not solve the problem, contact your local SAMSUNG Customer Care Centre. Model Power source Power consumption Maximum power Microwave Grill (heating element) Power Convection (heating element) Output power Operating frequency Dimensions (W x H x D) Outside (Include Handle) Oven cavity...
... try setting again. Technical specifications SAMSUNG strives to change without notice. Temperature sensor detect higher temperature than setting temperature. If it occurs again, turn off the microwave oven over 10 seconds. NOTE For any codes not listed above, or if the suggested solution does not solve the problem, contact your local SAMSUNG Customer Care Centre. Model Power source Power consumption Maximum power Microwave Grill (heating element) Power Convection (heating element) Output power Operating frequency Dimensions (W x H x D) Outside (Include Handle) Oven cavity...

User Manual
Page 45
... failure to normal aging. glass tray or turntable; altered product or serial numbers; To receive warranty service, the purchaser must be provided during the limited warranty period specified above. Warranty service can be sent to the customer for which this stipulation covers include: • A Dented, Scratched, or Broken Door, Handle, Out-Panel, or Control Panel • A Broken or missing Tray, Guide Roller, Coupler, Filter, or Wire Rack User Replaceable Parts may elect, at no...
... failure to normal aging. glass tray or turntable; altered product or serial numbers; To receive warranty service, the purchaser must be provided during the limited warranty period specified above. Warranty service can be sent to the customer for which this stipulation covers include: • A Dented, Scratched, or Broken Door, Handle, Out-Panel, or Control Panel • A Broken or missing Tray, Guide Roller, Coupler, Filter, or Wire Rack User Replaceable Parts may elect, at no...


