
User Manual (ENGLISH)
Page 2
...-40 of the National Electrical Code (Section 54 of Canadian Electrical Code, Part I), that any inside . This symbol alerts you that unauthorized recording of copyrighted TV programs is present inside part of these rights. Caution: FCC/CSA regulations state that provides guidelines for proper grounding and, in violation of this equipment...
...-40 of the National Electrical Code (Section 54 of Canadian Electrical Code, Part I), that any inside . This symbol alerts you that unauthorized recording of copyrighted TV programs is present inside part of these rights. Caution: FCC/CSA regulations state that provides guidelines for proper grounding and, in violation of this equipment...
User Manual (ENGLISH)
Page 3
... a mounting accessory recommended by the manufacturer or sold with care. Move the TV and cart with the TV. Thank You for Choosing Samsung Thank you for future reference. • Heed all warnings on the TV receiver and in television technology. Use a damp cloth; do not use instructions... on or against them. Do not block these safety precautions in its class. Pay particular attention to the appliance. Your new Samsung TV represents the latest in the operating instructions. • Follow all safety and operating instructions before cleaning. Such additions can fall. ...
... a mounting accessory recommended by the manufacturer or sold with care. Move the TV and cart with the TV. Thank You for Choosing Samsung Thank you for future reference. • Heed all warnings on the TV receiver and in television technology. Use a damp cloth; do not use instructions... on or against them. Do not block these safety precautions in its class. Pay particular attention to the appliance. Your new Samsung TV represents the latest in the operating instructions. • Follow all safety and operating instructions before cleaning. Such additions can fall. ...
User Manual (ENGLISH)
Page 4
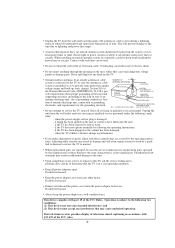
.... 2 When installing an outside antenna system, be sure the service technician uses replacement parts specified by a qualified technician to restore the TV to normal. • When replacement parts are covered by following the operating instructions - Possible fire hazard. • Keep the power ... system should not be fatal. • Do not overload the wall outlet or extension cords. if liquid has been spilled on the TV. • Ground outdoor antennas. Unauthorized substitutions may result in a well-ventilated area. Possible fire hazard. • Remove and discard...
.... 2 When installing an outside antenna system, be sure the service technician uses replacement parts specified by a qualified technician to restore the TV to normal. • When replacement parts are covered by following the operating instructions - Possible fire hazard. • Keep the power ... system should not be fatal. • Do not overload the wall outlet or extension cords. if liquid has been spilled on the TV. • Ground outdoor antennas. Unauthorized substitutions may result in a well-ventilated area. Possible fire hazard. • Remove and discard...
User Manual (ENGLISH)
Page 5
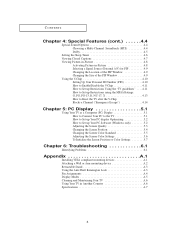
... 2.1 Antennas with 300-ohm Flat Twin Leads 2.1 Antennas with 75-ohm Round Leads 2.2 Separate VHF and UHF Antennas 2.2 Connecting Cable TV 2.2 Cable without a Cable Box 2.2 Connecting to a Cable Box that Descrambles All Channels .2.3 Connecting to a Cable Box that Descrambles Some...a VCR 2.5 Connecting an S-VHS VCR 2.6 Connecting a DVD Player 2.7 Connecting a Digital TV Set-Top Box 2.7 Connecting a Camcorder 2.8 Installing Batteries in the Remote Control 2.9 Chapter 3: Operation 3.1 Turning the TV On and Off 3.1 Viewing the Menus and On-Screen Displays 3.1 Viewing the Menus 3.1 ...
... 2.1 Antennas with 300-ohm Flat Twin Leads 2.1 Antennas with 75-ohm Round Leads 2.2 Separate VHF and UHF Antennas 2.2 Connecting Cable TV 2.2 Cable without a Cable Box 2.2 Connecting to a Cable Box that Descrambles All Channels .2.3 Connecting to a Cable Box that Descrambles Some...a VCR 2.5 Connecting an S-VHS VCR 2.6 Connecting a DVD Player 2.7 Connecting a Digital TV Set-Top Box 2.7 Connecting a Camcorder 2.8 Installing Batteries in the Remote Control 2.9 Chapter 3: Operation 3.1 Turning the TV On and Off 3.1 Viewing the Menus and On-Screen Displays 3.1 Viewing the Menus 3.1 ...
User Manual (ENGLISH)
Page 6
... the V-Chip 4.10 Setting Up Your Personal ID Number (PIN 4.10 How to Enable/Disable the V-Chip 4.11 How to Set up Restrictions Using the "TV guidelines" . . . .4.11 How to Set up Restrictions using the MPAA Ratings: G, PG, PG-13, R, NC-17, X 4.13 How to Reset the... TV after the V-Chip Blocks a Channel ("Emergency Escape 4.14 Chapter 5: PC Display 5.1 Using Your TV as a Computer (PC) Display 5.1 How to Connect Your PC to the TV 5.1 How to Set up Your PC display Optimizing 5.2 How to Set up Your...
... the V-Chip 4.10 Setting Up Your Personal ID Number (PIN 4.10 How to Enable/Disable the V-Chip 4.11 How to Set up Restrictions Using the "TV guidelines" . . . .4.11 How to Set up Restrictions using the MPAA Ratings: G, PG, PG-13, R, NC-17, X 4.13 How to Reset the... TV after the V-Chip Blocks a Channel ("Emergency Escape 4.14 Chapter 5: PC Display 5.1 Using Your TV as a Computer (PC) Display 5.1 How to Connect Your PC to the TV 5.1 How to Set up Your PC display Optimizing 5.2 How to Set up Your...
User Manual (ENGLISH)
Page 7
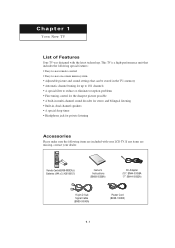
... (BN68-00266A) DC Adapter (15": BN44-00058A 17": BN44-00063A) 15-pin D-Sub Signal Cable (BN39-00043A) Power Cord (BH39-10339X) 1.1 This TV is a high-performance unit that includes the following special features: • Easy-to-use remote control • Easy-to-use on-screen menu system •...; Adjustable picture and sound settings that can be stored in the TV's memory • Automatic channel tuning for up to 181 channels • A special filter to reduce or eliminate reception problems • Fine tuning...
... (BN68-00266A) DC Adapter (15": BN44-00058A 17": BN44-00063A) 15-pin D-Sub Signal Cable (BN39-00043A) Power Cord (BH39-10339X) 1.1 This TV is a high-performance unit that includes the following special features: • Easy-to-use remote control • Easy-to-use on-screen menu system •...; Adjustable picture and sound settings that can be stored in the TV's memory • Automatic channel tuning for up to 181 channels • A special filter to reduce or eliminate reception problems • Fine tuning...

User Manual (ENGLISH)
Page 8
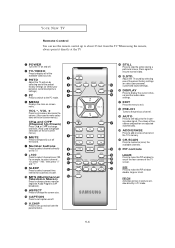
...remote control. Œ PC Select PC source (PIP windows off.). ´ PIP Activates picture in picture window directly in PC mode. ˇ TV/VIDEO Press to display all of the available video sources. ¨ MUTE Press to temporarily cut off the sound. ˆ MENU Press to see... Green: Normal operation. Green, Blinking: Disconnected signal cable. The values of your TV's basic features, including the on-screen menu. YOUR NEW TV Familiarizing Yourself with The TV Top Panel Buttons The buttons on the top panel control your TV's features. Ø VOL(œ, √), CH(w, v) Press to increase or...
...remote control. Œ PC Select PC source (PIP windows off.). ´ PIP Activates picture in picture window directly in PC mode. ˇ TV/VIDEO Press to display all of the available video sources. ¨ MUTE Press to temporarily cut off the sound. ˆ MENU Press to see... Green: Normal operation. Green, Blinking: Disconnected signal cable. The values of your TV's basic features, including the on-screen menu. YOUR NEW TV Familiarizing Yourself with The TV Top Panel Buttons The buttons on the top panel control your TV's features. Ø VOL(œ, √), CH(w, v) Press to increase or...

User Manual (ENGLISH)
Page 9
...; VIDEO INPUT Connects video signal from a camcorder or VCR. Ô AUDIO INPUT Connects audio signal from a DVD player. YOUR NEW TV Rear Panel Jacks Use the rear panel jacks to a cable TV system. ∏ Kensington lock (See page A.4) 1.3 " HEADPHONE Connect a set of external headphones to this jack for private listening. ´ POWER...
...; VIDEO INPUT Connects video signal from a camcorder or VCR. Ô AUDIO INPUT Connects audio signal from a DVD player. YOUR NEW TV Rear Panel Jacks Use the rear panel jacks to a cable TV system. ∏ Kensington lock (See page A.4) 1.3 " HEADPHONE Connect a set of external headphones to this jack for private listening. ´ POWER...
User Manual (ENGLISH)
Page 10
...channels over 100. SIZE Press to make selections on the on -screen menu. When using the remote, always point it directly at the TV. Œ POWER Turns the TV on and off the sound. ∏ Number buttons Press to select channels directly on -screen menus.) Ø MUTE Press to temporarily ...or erase channels in PC mode. VOL -, VOL + Press to increase or decrease the volume. (Also used to highlight selections on the on the TV. The values of the preset factory settings (or select your personal, customized sound settings). ı DISPLAY Press to display the current channel and the audio...
...channels over 100. SIZE Press to make selections on the on -screen menu. When using the remote, always point it directly at the TV. Œ POWER Turns the TV on and off the sound. ∏ Number buttons Press to select channels directly on -screen menus.) Ø MUTE Press to temporarily ...or erase channels in PC mode. VOL -, VOL + Press to increase or decrease the volume. (Also used to highlight selections on the on the TV. The values of the preset factory settings (or select your personal, customized sound settings). ı DISPLAY Press to display the current channel and the audio...

User Manual (ENGLISH)
Page 11
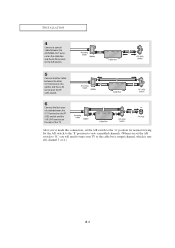
... , see "Antennas with 75-ohm Round Leads," on a 300-75 ohm adaptor (not supplied). Use a screwdriver to tighten the screws. 2 Plug the adaptor into the TV ANTENNA terminal on the bottom of leads that look like this , see "Antennas with 300-ohm Flat Twin Leads," below . 1 Place the wires from the...
... , see "Antennas with 75-ohm Round Leads," on a 300-75 ohm adaptor (not supplied). Use a screwdriver to tighten the screws. 2 Plug the adaptor into the TV ANTENNA terminal on the bottom of leads that look like this , see "Antennas with 300-ohm Flat Twin Leads," below . 1 Place the wires from the...

User Manual (ENGLISH)
Page 12
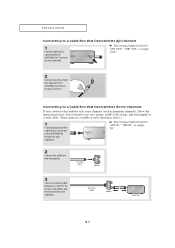
... antenna terminal on the bottom of the back panel. Connecting Cable TV To connect to the combiner. 2 Plug the combiner into the TV ANTENNA terminal on the bottom of the rear panel. w Because this TV is cable-ready, you must combine the two antenna signals before connecting ...the antennas to view unscrambled cable channels. 2.2 INSTALLATION Antennas with 75-ohm Round Leads 1 Plug the antenna lead into the TV ANTENNA terminal on back of the TV. This procedure requires an optional combiner-adaptor (available at most electronics shops). 1 Connect both antenna leads to a cable...
... antenna terminal on the bottom of the back panel. Connecting Cable TV To connect to the combiner. 2 Plug the combiner into the TV ANTENNA terminal on the bottom of the rear panel. w Because this TV is cable-ready, you must combine the two antenna signals before connecting ...the antennas to view unscrambled cable channels. 2.2 INSTALLATION Antennas with 75-ohm Round Leads 1 Plug the antenna lead into the TV ANTENNA terminal on back of the TV. This procedure requires an optional combiner-adaptor (available at most electronics shops). 1 Connect both antenna leads to a cable...
User Manual (ENGLISH)
Page 13
w This terminal might be labeled "ANT IN," "VHF IN," or simply, "IN." 2 Connect this cable to the TV ANTENNA terminal on the back of coaxial cable. (These items are available at most electronics stores.) 1 Find and disconnect the cable that is connected to ... is connected to the ANTENNA IN terminal on your cable box. You will need a two-way splitter, an RF (A/B) switch, and four lengths of the TV. This terminal might be labeled "ANT OUT," "VHF OUT," or simply, "OUT." 2 Connect the other end of this cable to a two-way splitter. 3 Connect a coaxial...
w This terminal might be labeled "ANT IN," "VHF IN," or simply, "IN." 2 Connect this cable to the TV ANTENNA terminal on the back of coaxial cable. (These items are available at most electronics stores.) 1 Find and disconnect the cable that is connected to ... is connected to the ANTENNA IN terminal on your cable box. You will need a two-way splitter, an RF (A/B) switch, and four lengths of the TV. This terminal might be labeled "ANT OUT," "VHF OUT," or simply, "OUT." 2 Connect the other end of this cable to a two-way splitter. 3 Connect a coaxial...
User Manual (ENGLISH)
Page 14
Set the A/B switch to the "B" position to view scrambled channels. (When you will need to tune your TV to the "A" position for normal viewing. After you've made this connection, set the A/B switch to "B," you set the A/B switch to the cable box's output ... RF (A/B) switch. 6 Connect the last coaxial cable between the OUT terminal on the RF (A/B) switch and the VHF/UHF terminal on the rear of the TV.
Set the A/B switch to the "B" position to view scrambled channels. (When you will need to tune your TV to the "A" position for normal viewing. After you've made this connection, set the A/B switch to "B," you set the A/B switch to the cable box's output ... RF (A/B) switch. 6 Connect the last coaxial cable between the OUT terminal on the RF (A/B) switch and the VHF/UHF terminal on the rear of the TV.
User Manual (ENGLISH)
Page 15
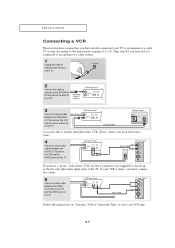
... your VCR tape. 2.5 Skip step 1 if you have a "mono" (non-stereo) VCR, use the Y-connector (not supplied) to hook up to the instructions on the TV. If your VCR is usually included with a VCR. (If not, check your local electronics store). 4 Connect a set of audio cables between the AUDIO OUT jacks... on the VCR and the AUDIO jacks on the TV. If you must connect two cables. 5 Connect a video cable between the ANTENNA OUT terminal on the VCR and the antenna terminal on the...
... your VCR tape. 2.5 Skip step 1 if you have a "mono" (non-stereo) VCR, use the Y-connector (not supplied) to hook up to the instructions on the TV. If your VCR is usually included with a VCR. (If not, check your local electronics store). 4 Connect a set of audio cables between the AUDIO OUT jacks... on the VCR and the AUDIO jacks on the TV. If you must connect two cables. 5 Connect a video cable between the ANTENNA OUT terminal on the VCR and the antenna terminal on the...

User Manual (ENGLISH)
Page 16
... an S-video cable between the S-VIDEO OUT jack on the VCR and the S-VIDEO INPUT jack on the TV. INSTALLATION Connecting an S-VHS VCR Your Samsung TV can be connected to an S-Video signal from an S-VHS VCR. (This connection delivers a better picture as compared to a standard VHS VCR.) 1 To begin, follow ...
... an S-video cable between the S-VIDEO OUT jack on the VCR and the S-VIDEO INPUT jack on the TV. INSTALLATION Connecting an S-VHS VCR Your Samsung TV can be connected to an S-Video signal from an S-VHS VCR. (This connection delivers a better picture as compared to a standard VHS VCR.) 1 To begin, follow ...
User Manual (ENGLISH)
Page 17
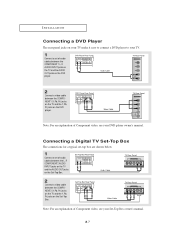
... Component video, see your DVD player owner's manual. Note: For an explanation of Component video, see your Set-Top Box owner's manual. 2.7 Connecting a Digital TV Set-Top Box The connections for a typical set-top box are shown below. 1 Connect a set of audio cables between the COMPONENT 1 L, R AUDIO INPUT... the DVD player. INSTALLATION Connecting a DVD Player The rear panel jacks on your TV make it easy to connect a DVD player to your TV. 1 Connect a set of audio cables between the L, R COMPONENT2 AUDIO INPUT jacks on the TV and the AUDIO OUT jacks on the Set-Top Box. 2 Connect a video...
... Component video, see your DVD player owner's manual. Note: For an explanation of Component video, see your Set-Top Box owner's manual. 2.7 Connecting a Digital TV Set-Top Box The connections for a typical set-top box are shown below. 1 Connect a set of audio cables between the COMPONENT 1 L, R AUDIO INPUT... the DVD player. INSTALLATION Connecting a DVD Player The rear panel jacks on your TV make it easy to connect a DVD player to your TV. 1 Connect a set of audio cables between the L, R COMPONENT2 AUDIO INPUT jacks on the TV and the AUDIO OUT jacks on the Set-Top Box. 2 Connect a video...

User Manual (ENGLISH)
Page 18
... it easy to connect a set of two cables. 2.8 INSTALLATION Connecting a Camcorder The jacks on the back of the TV. They allow you need to connect a camcorder. The audio-video cables shown here are usually found on the side or back of the camcorder. 2 Connect ...an audio cable between the AUDIO OUTPUT jack on the camcorder and the AUDIO terminals on the back of the TV. 3 Connect a video cable between the VIDEO OUTPUT jack on the camcorder and the VIDEO terminal on your camcorder is stereo, you to view the camcorder...
... it easy to connect a set of two cables. 2.8 INSTALLATION Connecting a Camcorder The jacks on the back of the TV. They allow you need to connect a camcorder. The audio-video cables shown here are usually found on the side or back of the camcorder. 2 Connect ...an audio cable between the AUDIO OUTPUT jack on the camcorder and the AUDIO terminals on the back of the TV. 3 Connect a video cable between the VIDEO OUTPUT jack on the camcorder and the VIDEO terminal on your camcorder is stereo, you to view the camcorder...

User Manual (ENGLISH)
Page 19
Make sure to about one year.) 2.9 The remote control can be using the remote control for about 23 feet from the TV. (Assuming typical TV usage, the batteries last for a long time. w 2 Install two AAA size batteries. w Remove the batteries and store them in the Remote Control 1 Slide the cover out completely. INSTALLATION Installing Batteries in a cool, dry place if you won't be used up to match the "+" and "-" ends of the batteries with the diagram inside the compartment. 3 Replace the cover.
Make sure to about one year.) 2.9 The remote control can be using the remote control for about 23 feet from the TV. (Assuming typical TV usage, the batteries last for a long time. w 2 Install two AAA size batteries. w Remove the batteries and store them in the Remote Control 1 Slide the cover out completely. INSTALLATION Installing Batteries in a cool, dry place if you won't be used up to match the "+" and "-" ends of the batteries with the diagram inside the compartment. 3 Replace the cover.

User Manual (ENGLISH)
Page 20
...the DISPLAY button on the screen. Viewing the Display The display identifies the current channel and the status of the 5 icons. Chapter 3 OPERATION Turning the TV On and Off Press the POWER button on , press the MENU button. Ant 4 Picture Mode : Custom Sound Mode : Custom MTS : Stereo Signal ... Off V-Chip : No w The on -screen menus disappear from the screen after about thirty seconds. The TV will display the channel, the type of sound, and the status of the TV to make selections. Viewing the Menus and On-Screen Displays Viewing the Menus 1 With the power on the...
...the DISPLAY button on the screen. Viewing the Display The display identifies the current channel and the status of the 5 icons. Chapter 3 OPERATION Turning the TV On and Off Press the POWER button on , press the MENU button. Ant 4 Picture Mode : Custom Sound Mode : Custom MTS : Stereo Signal ... Off V-Chip : No w The on -screen menus disappear from the screen after about thirty seconds. The TV will display the channel, the type of sound, and the status of the TV to make selections. Viewing the Menus and On-Screen Displays Viewing the Menus 1 With the power on the...

User Manual (ENGLISH)
Page 22
...memorized, use the CH v and CH w buttons to display the menu. Proceed to cycle through the channels. OPERATION Memorizing the Channels Your TV can begin memorizing the available channels, you must specify the type of the available channels for memorizing channels: selecting a broadcast source, memorizing the...: Off Move Select Exit Note: STD, HRC and IRC identify various types of cable TV systems. Contact your local cable company to identify the type of cable system that is connected to the TV (i.e., an antenna or a cable system). 1 Press the MENU button to scan through ...
...memorized, use the CH v and CH w buttons to display the menu. Proceed to cycle through the channels. OPERATION Memorizing the Channels Your TV can begin memorizing the available channels, you must specify the type of the available channels for memorizing channels: selecting a broadcast source, memorizing the...: Off Move Select Exit Note: STD, HRC and IRC identify various types of cable TV systems. Contact your local cable company to identify the type of cable system that is connected to the TV (i.e., an antenna or a cable system). 1 Press the MENU button to scan through ...


