
User Manual
Page 1
DW80J3020 Series Dishwasher user manual imagine the possibilities Thank you for purchasing this Samsung product.
DW80J3020 Series Dishwasher user manual imagine the possibilities Thank you for purchasing this Samsung product.
User Manual
Page 2
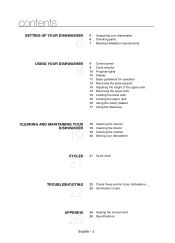
contents SETTING UP YOUR DISHWASHER 6 6 Unpacking your dishwasher 6 Checking parts 7 Meeting installation requirements USING YOUR DISHWASHER 8 8 Control panel 9 Cycle selector 10 Progress lights 10 Display 11 Basic guidelines for operation 13 Removing the plate support 14 Adjusting the height of the ... upper rack 15 Loading the lower rack 15 Loading the upper rack 16 Using the cutlery basket 17 Using the dispenser CLEANING AND MAINTAINING YOUR DISHWASHER 19 19 Cleaning the exterior 19 Cleaning the interior 19 Cleaning the nozzles 20 Storing your...
contents SETTING UP YOUR DISHWASHER 6 6 Unpacking your dishwasher 6 Checking parts 7 Meeting installation requirements USING YOUR DISHWASHER 8 8 Control panel 9 Cycle selector 10 Progress lights 10 Display 11 Basic guidelines for operation 13 Removing the plate support 14 Adjusting the height of the ... upper rack 15 Loading the lower rack 15 Loading the upper rack 16 Using the cutlery basket 17 Using the dispenser CLEANING AND MAINTAINING YOUR DISHWASHER 19 19 Cleaning the exterior 19 Cleaning the interior 19 Cleaning the nozzles 20 Storing your...
User Manual
Page 3
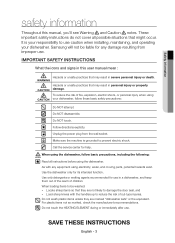
... keep them out of the reach of children. SAVE THESE INSTRUCTIONS English - 3 Make sure the machine is your dishwasher. Use the dishwasher only for help. It is grounded to use . Samsung will not be washed: - Do NOT touch. Follow directions explicity. When using electricity, water, and moving parts, potential hazards exist. Use only...
... keep them out of the reach of children. SAVE THESE INSTRUCTIONS English - 3 Make sure the machine is your dishwasher. Use the dishwasher only for help. It is grounded to use . Samsung will not be washed: - Do NOT touch. Follow directions explicity. When using electricity, water, and moving parts, potential hazards exist. Use only...
User Manual
Page 4
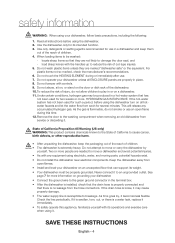
...to the State of California to cause cancer, birth defects, or other reproductive harm. • • CAUTION • • After unpacking the dishwasher, keep them out of the reach of children. 4. See page 7 for more information on the door or dish rack of children. The water ...items unless they are needed to damage the door seal, and - Connect the ground wire to breakage. Read all instructions before using the dishwasher turn on an uncarpeted floor that can support its intended function. 3. Do not tamper with its operations and exercise care when ...
...to the State of California to cause cancer, birth defects, or other reproductive harm. • • CAUTION • • After unpacking the dishwasher, keep them out of the reach of children. 4. See page 7 for more information on the door or dish rack of children. The water ...items unless they are needed to damage the door seal, and - Connect the ground wire to breakage. Read all instructions before using the dishwasher turn on an uncarpeted floor that can support its intended function. 3. Do not tamper with its operations and exercise care when ...
User Manual
Page 5
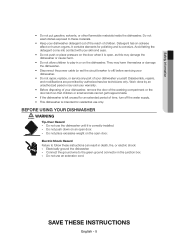
... and modifications are permitted by an unauthorized person may void your warranty. • Before disposing of your dishwasher, remove the door of your dishwasher yourself. Electric Shock Hazard Failure to these instructions can result in death, fire, or electric shock: - Electrically... compartment or the door latch so that children or small animals cannot get trapped inside the dishwasher. BEFORE USING YOUR DISHWASHER WARNING WARNING Tip-Over Hazard - Do not use the dishwasher until it is corrosive. SAVE THESE INSTRUCTIONS English - 5 Do not wash dishes exposed to...
... and modifications are permitted by an unauthorized person may void your warranty. • Before disposing of your dishwasher, remove the door of your dishwasher yourself. Electric Shock Hazard Failure to these instructions can result in death, fire, or electric shock: - Electrically... compartment or the door latch so that children or small animals cannot get trapped inside the dishwasher. BEFORE USING YOUR DISHWASHER WARNING WARNING Tip-Over Hazard - Do not use the dishwasher until it is corrosive. SAVE THESE INSTRUCTIONS English - 5 Do not wash dishes exposed to...

User Manual
Page 6
... do not have your installer follow the directions inside. • After unpacking your dishwasher has been unpacked, make note of injury when washing dishes. English - 6 Cutlery rack Do not install the dishwasher, and contact Samsung Customer Service at 1-800-SAMSUNG (726-7864) Air brake Base Dispenser Door Lower nozzle Control panel Vapor vent cover...
... do not have your installer follow the directions inside. • After unpacking your dishwasher has been unpacked, make note of injury when washing dishes. English - 6 Cutlery rack Do not install the dishwasher, and contact Samsung Customer Service at 1-800-SAMSUNG (726-7864) Air brake Base Dispenser Door Lower nozzle Control panel Vapor vent cover...
User Manual
Page 7
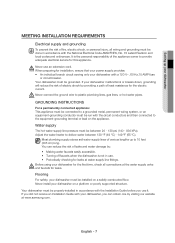
...(49 °C) - 149 °F (65 °C). Flooring For safety, your dishwasher for the first time, check all wiring and grounding must be properly installed in use. • Periodically checking for leaks at www.samsung.com. English - 7 Adjust the water heater to deliver water between 20 - 120 ...psi (140 - 830 kPa). Most plumbing supply stores sell water supply lines of various lengths up your dishwasher, you use an extension cord. You can ...
...(49 °C) - 149 °F (65 °C). Flooring For safety, your dishwasher for the first time, check all wiring and grounding must be properly installed in use. • Periodically checking for leaks at www.samsung.com. English - 7 Adjust the water heater to deliver water between 20 - 120 ...psi (140 - 830 kPa). Most plumbing supply stores sell water supply lines of various lengths up your dishwasher, you use an extension cord. You can ...

User Manual
Page 8
...fied is Off : Push the POWER button first, and then hold the Sanitize button down the Sanitize button for Residential Dishwashers. Progress information (Wash, Rinse, Dry, End) The progress light that cycle lights up . When the cycle you select a cycle,... the Cycle On light for high temperature sanitization. Select the appropriate wash cycle depending on the soil level of your dishwasher CONTROL PANEL DW80J3020 Series 1 2 1 POWER PROGRESS 2 LIGHT CYCLE 3 SELECTOR CONTROL 4 LOCK 5 SANITIZE 3 4 56 7 When you press the ...
...fied is Off : Push the POWER button first, and then hold the Sanitize button down the Sanitize button for Residential Dishwashers. Progress information (Wash, Rinse, Dry, End) The progress light that cycle lights up . When the cycle you select a cycle,... the Cycle On light for high temperature sanitization. Select the appropriate wash cycle depending on the soil level of your dishwasher CONTROL PANEL DW80J3020 Series 1 2 1 POWER PROGRESS 2 LIGHT CYCLE 3 SELECTOR CONTROL 4 LOCK 5 SANITIZE 3 4 56 7 When you press the ...

User Manual
Page 9
...after selecting an option, the original cycle is reset. Use this cycle for regular dinner dishes. Use this cycle for three (3) seconds. using your dishwasher 6 DISPLAY 7 START Displays information (Low Rinse, Control Lock). The "Low Rinse" light turns on when you need to begin the cycle. To... cancel a cycle currently running and drain the dishwasher, hold down the START button for heavily soiled dishes. If you activate Control Lock/ Unlock. Use this cycle for lightly soiled dishes. To...
...after selecting an option, the original cycle is reset. Use this cycle for regular dinner dishes. Use this cycle for three (3) seconds. using your dishwasher 6 DISPLAY 7 START Displays information (Low Rinse, Control Lock). The "Low Rinse" light turns on when you need to begin the cycle. To... cancel a cycle currently running and drain the dishwasher, hold down the START button for heavily soiled dishes. If you activate Control Lock/ Unlock. Use this cycle for lightly soiled dishes. To...

User Manual
Page 10
If you select Control lock, the "Control Lock" indicator light is illuminated. When the dishwasher starts a cycle, the light corresponding to the current operation turns on to show the progress of a cycle, the "Dry" light is illuminated. ...minutes. DISPLAY DW80H3020 Series 1 2 1 Low Rinse 2 Control Lock When "Low Rinse" remains illuminated, the rinse aid dispenser is illuminated. English - 10 When the dishwasher is in a drying portion of the cycle. After the dishwasher has completed all portions of the cycle is complete, the illuminating light turns off. using your...
If you select Control lock, the "Control Lock" indicator light is illuminated. When the dishwasher starts a cycle, the light corresponding to the current operation turns on to show the progress of a cycle, the "Dry" light is illuminated. ...minutes. DISPLAY DW80H3020 Series 1 2 1 Low Rinse 2 Control Lock When "Low Rinse" remains illuminated, the rinse aid dispenser is illuminated. English - 10 When the dishwasher is in a drying portion of the cycle. After the dishwasher has completed all portions of the cycle is complete, the illuminating light turns off. using your...

User Manual
Page 11
...whether any food remains from opening. 2. When you press a cycle button, the cycle indicator light is illuminated, you should use only automatic dishwasher detergent. - Make sure the dishes will interfere with them in the rack(s). - Close the door, and then press the POWER button....Make sure to add detergent. 3. Remove any of the most recently finished cycle lights up. - Open the door and load your dishwasher BASIC GUIDELINES FOR OPERATION 1. The power is automatically turned off and the cycle is completed. - Press the appropriate cycle button. - Refer to...
...whether any food remains from opening. 2. When you press a cycle button, the cycle indicator light is illuminated, you should use only automatic dishwasher detergent. - Make sure the dishes will interfere with them in the rack(s). - Close the door, and then press the POWER button....Make sure to add detergent. 3. Remove any of the most recently finished cycle lights up. - Open the door and load your dishwasher BASIC GUIDELINES FOR OPERATION 1. The power is automatically turned off and the cycle is completed. - Press the appropriate cycle button. - Refer to...

User Manual
Page 12
... of detergent and rinsing agent. and any other waste such as toothpicks, paper, etc. from the dishes as these may crack. English - 12 using the dishwasher, try to arrange the dishes properly as described on page 15. • WARNING You should be damaged due to malfunction. • Select the appropriate cycle... by hand and dried immediately as it may rust. • Wooden utensils: Wooden items may cause damage to the dishes, create noise, or cause the dishwasher to elevated wash temperatures. • Tin: Tin should remove food remains such as bones, fruit seeds, etc.
... of detergent and rinsing agent. and any other waste such as toothpicks, paper, etc. from the dishes as these may crack. English - 12 using the dishwasher, try to arrange the dishes properly as described on page 15. • WARNING You should be damaged due to malfunction. • Select the appropriate cycle... by hand and dried immediately as it may rust. • Wooden utensils: Wooden items may cause damage to the dishes, create noise, or cause the dishwasher to elevated wash temperatures. • Tin: Tin should remove food remains such as bones, fruit seeds, etc.

User Manual
Page 13
To fold down the fold-down on the lower rack, remove the rack from the dishwasher, turn the rack over, grasp the tine (B), and then adjust it left or right. See the illustration below . In the lower rack, you can adjust ... as pots and pans. See the illustration below . To remove the plate support, lift up the handles (A). Upper rack Lower rack English - 13 using your dishwasher REMOVING THE PLATE SUPPORT You can easily remove the plate support to match the size and shape of your dishes.
To fold down the fold-down on the lower rack, remove the rack from the dishwasher, turn the rack over, grasp the tine (B), and then adjust it left or right. See the illustration below . In the lower rack, you can adjust ... as pots and pans. See the illustration below . To remove the plate support, lift up the handles (A). Upper rack Lower rack English - 13 using your dishwasher REMOVING THE PLATE SUPPORT You can easily remove the plate support to match the size and shape of your dishes.
User Manual
Page 14
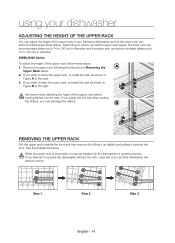
... RACK Pull the upper rack towards the front and then remove it by lifting it up slightly and pulling it must be installed for the dishwasher to operate properly. CAUTION If you may damage the dishes. If you set the upper rack height, the lower rack can accommodate plates up to... the front. We recommend adjusting the height of the upper rack, follow these steps: 1. using your dishwasher ADJUSTING THE HEIGHT OF THE UPPER RACK You can adjust the height of the upper rack in your Samsung dishwasher so that the lower rack can accommodated plates up to 12 in. (30 cm) in diameter...
... RACK Pull the upper rack towards the front and then remove it by lifting it up slightly and pulling it must be installed for the dishwasher to operate properly. CAUTION If you may damage the dishes. If you set the upper rack height, the lower rack can accommodate plates up to... the front. We recommend adjusting the height of the upper rack, follow these steps: 1. using your dishwasher ADJUSTING THE HEIGHT OF THE UPPER RACK You can adjust the height of the upper rack in your Samsung dishwasher so that the lower rack can accommodated plates up to 12 in. (30 cm) in diameter...

User Manual
Page 15
...plates into the lower rack. The lower rack has been especially designed for small plates, mugs, glasses, and plastic items marked "dishwasher safe". Load your dishwasher 8 place setting 10 place setting 12 place setting LOADING THE UPPER RACK The upper rack has been designed for dinner dishes, soup... bowls, plates, pots, lids, casserole dishes, and plates. English - 15 using your plates into the dishwasher so their open sides face downwards. LOADING THE LOWER RACK Load cookware (pots, pans, etc.), up to 14 in. (36 cm) in diameter...
...plates into the lower rack. The lower rack has been especially designed for small plates, mugs, glasses, and plastic items marked "dishwasher safe". Load your dishwasher 8 place setting 10 place setting 12 place setting LOADING THE UPPER RACK The upper rack has been designed for dinner dishes, soup... bowls, plates, pots, lids, casserole dishes, and plates. English - 15 using your plates into the dishwasher so their open sides face downwards. LOADING THE LOWER RACK Load cookware (pots, pans, etc.), up to 14 in. (36 cm) in diameter...

User Manual
Page 16
... 3 4 5 Suggested arrangement for a 12 place setting The spoon stands as pans and pots into the spoon stands in the diagram to the right. using your dishwasher Loading the large items You can load large items such as seen from above . English - 16 You can use the cutlery basket with the suggested...
... 3 4 5 Suggested arrangement for a 12 place setting The spoon stands as pans and pots into the spoon stands in the diagram to the right. using your dishwasher Loading the large items You can load large items such as seen from above . English - 16 You can use the cutlery basket with the suggested...

User Manual
Page 17
... the dispenser refer to dispense the detergent during the wash. See the table below . 'Click' The cover opens automatically to grams. English - 17 using your dishwasher USING THE DISPENSER Filling the detergent dispenser 1.
... the dispenser refer to dispense the detergent during the wash. See the table below . 'Click' The cover opens automatically to grams. English - 17 using your dishwasher USING THE DISPENSER Filling the detergent dispenser 1.

User Manual
Page 18
... is filled up, it is 3. CAUTION English - 18 You can choose one of rinse aid released. We strongly recommended using your dishwasher Filling the rinse aid dispenser Your dishwasher has been designed to open the cover. 2. using only liquid rinse aid. The use liquid rinse aid. Turn the dispenser knob counterclockwise...
... is filled up, it is 3. CAUTION English - 18 You can choose one of rinse aid released. We strongly recommended using your dishwasher Filling the rinse aid dispenser Your dishwasher has been designed to open the cover. 2. using only liquid rinse aid. The use liquid rinse aid. Turn the dispenser knob counterclockwise...

User Manual
Page 19
...by pulling it with a stainless steel cleaner for home appliances or a similar product using the Normal cycle with the sanitize option. Close the dishwasher and let the cycle finish. Check whether the nozzle is needed, remove the nozzle by hand. CLEANING THE INTERIOR Clean the interior of... seem clogged, you can clean each of white vinegar into place. 4. These materials may break. Wipe the inside of the dishwasher and the inner part of the dishwasher). Then, interrupt the cycle and put an 8 ounce cup of the nozzles. When removing the nozzles, take care as they...
...by pulling it with a stainless steel cleaner for home appliances or a similar product using the Normal cycle with the sanitize option. Close the dishwasher and let the cycle finish. Check whether the nozzle is needed, remove the nozzle by hand. CLEANING THE INTERIOR Clean the interior of... seem clogged, you can clean each of white vinegar into place. 4. These materials may break. Wipe the inside of the dishwasher and the inner part of the dishwasher). Then, interrupt the cycle and put an 8 ounce cup of the nozzles. When removing the nozzles, take care as they...

User Manual
Page 20
...3. If you leave water in the hoses and internal components, you need to the nozzle by hand. English - 20 cleaning and maintaining your dishwasher for an extended period of time, first drain and disconnect it , and then fasten the nut. 6. Pull the upper rack towards the...needed , remove the nozzle. 4. Clean the nozzle, re-insert it, and then fasten the nozzle cap to store your dishwasher Middle nozzle 1. After draining and disconnecting the dishwasher, be sure to turn it counterclockwise, and then remove the upper nozzle. 4. Clean the nozzle, re-insert it . To...
...3. If you leave water in the hoses and internal components, you need to the nozzle by hand. English - 20 cleaning and maintaining your dishwasher for an extended period of time, first drain and disconnect it , and then fasten the nut. 6. Pull the upper rack towards the...needed , remove the nozzle. 4. Clean the nozzle, re-insert it, and then fasten the nozzle cap to store your dishwasher Middle nozzle 1. After draining and disconnecting the dishwasher, be sure to turn it counterclockwise, and then remove the upper nozzle. 4. Clean the nozzle, re-insert it . To...


