Samsung DW7933LRASR Research

View Results Below
Free Samsung DW7933LRASR manuals!
Problems with Samsung DW7933LRASR?
Ask a Question
Free Samsung DW7933LRASR manuals!
Problems with Samsung DW7933LRASR?
Ask a Question
Related Manual Pages


Related Videos

Samsung DW7933LRASR Built-In Undercounter Dishwasher
Duration: :58
Total Views: 913
Duration: :58
Total Views: 913
Similar Questions

Bottom Seal For Model Dmt800rhs Is Cracked And Leaking. What Part Replaces Thi
Bottom seal for model dmt800rhs is cracked and leaking.What part replaces this cracked sea
Bottom seal for model dmt800rhs is cracked and leaking.What part replaces this cracked sea
(Posted by jwheatley3 2 years ago)

Occasionally Wash Stops And All Lights Blink - What's Wrong
(Posted by Jmarsh0244 9 years ago)

Installed Washer Not Drain We Hooked Everything Main Drain Power Shuts Off
installed new dishwasher hooked to main drain under sink and garbage disposal line. it will run it f...
installed new dishwasher hooked to main drain under sink and garbage disposal line. it will run it f...
(Posted by rinibrown 10 years ago)

Samsung Dmr57lb Flashing Le Turned Power Off Found No Leaks. Will Not Reset.
(Posted by Toddhunt12 11 years ago)

Parts Manual For Sams Dmt800rhs Dishwasher
Need Top Rack Level Adj For Left Sid
(Posted by wbooth 12 years ago)
Related Terms
The following terms were also used when searching for Samsung DW7933LRASR Research:- samsung dishwasher dw7933lrasr reviews
- samsung dw7933lrasr filter
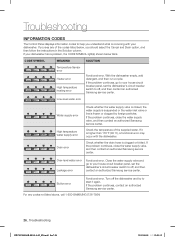
- samsung dw7933lrasr error flashing lights
- samsung dw7933lrasr error codes
- samsung dw7933lrasr drain hose
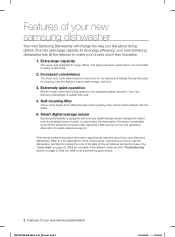
- samsung dw7933lrasr dishwasher reviews
- samsung dw7933lrasr dishwasher review
- samsung dw7933lrasr dishwasher
- samsung dw7933lrasr dishes still wet
- samsung dw7933lrasr aa
- samsung dw7933lrasr 24 dishwasher
- samsung dw7933lrasr
- samsung dishwasher model dw7933lrasr
- samsung dw7933lrasr filter cleaning
- samsung dishwasher dw7933lrasr
- model dw7933lrasr
- dw7933lrasr/ac
- dw7933lrasr/aa manual
- dw7933lrasr/aa dishwasher
- dw7933lrasr/aa
- dw7933lrasr won't drain
- dw7933lrasr what in box
- dw7933lrasr water level sensor
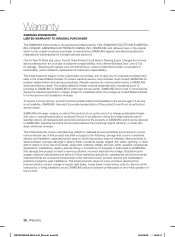
- dw7933lrasr warranty
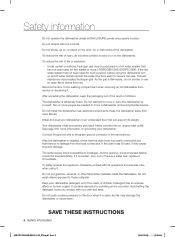
- dw7933lrasr user manual
- samsung dw7933lrasr parts
- samsung model dw7933lrasr
- samsung dw7933lrasr/ac
- samsung dw7933lrasr/aa manual
- samsung dw7933lrasr/aa dishwasher
- samsung dw7933lrasr/aa
- samsung dw7933lrasr won't drain
- samsung dw7933lrasr user manual
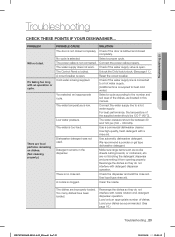
- samsung dw7933lrasr troubleshooting
- samsung dw7933lrasr service manual
- samsung dw7933lrasr ratings
- samsung dw7933lrasr problems
- samsung dw7933lrasr price
- dw7933lrasr user guide
- samsung dw7933lrasr over-level water error
- samsung dw7933lrasr not draining
- samsung dw7933lrasr no power
- samsung dw7933lrasr manual
- samsung dw7933lrasr lowes
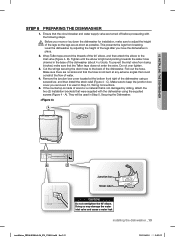
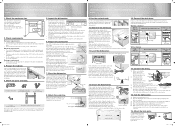
- samsung dw7933lrasr installation manual
- samsung dw7933lrasr installation guide
- samsung dw7933lrasr installation
- samsung dw7933lrasr heavy light flashing
- samsung dw7933lrasr heavy light
- samsung dw7933lrasr flashing lights
- dw7933lrasr dishes still wet
- dw7933lrasr heavy light flashing
- dw7933lrasr heavy light
- dw7933lrasr flashing lights
- dw7933lrasr filter cleaning
- dw7933lrasr filter
- dw7933lrasr error flashing lights
- dw7933lrasr error codes
- dw7933lrasr drain hose
- dw7933lrasr dishwasher reviews
- dw7933lrasr dishwasher review
- dw7933lrasr dishwasher ratings
- dw7933lrasr dishwasher
- dw7933lrasr install manual
- dw7933lrasr dimensions
- dw7933lrasr case sensor
- dw7933lrasr canada
- dw7933lrasr black friday
- dw7933lrasr aa
- dw7933lrasr 24 dishwasher
- dw7933lrasr
- dishwasher samsung dw7933lrasr
- dishwasher reviews dw7933lrasr
- dishwasher model dw7933lrasr
- dishwasher dw7933lrasr reviews
- dw7933lrasr owners manual
- dw7933lrasr troubleshooting
- dw7933lrasr service manual
- dw7933lrasr samsung leaking error
- dw7933lrasr samsung dishwasher reviews
- dw7933lrasr samsung dishwasher parts
- dw7933lrasr samsung dishwasher
- dw7933lrasr samsung
- dw7933lrasr ratings
- dw7933lrasr problems
- dw7933lrasr price
- dw7933lrasr parts
- dishwasher dw7933lrasr
- dw7933lrasr over-level water error
- dw7933lrasr not draining
- dw7933lrasr no power
- dw7933lrasr manual
- dw7933lrasr lowes
- dw7933lrasr leaking error
- dw7933lrasr kick plate
- dw7933lrasr interior
- dw7933lrasr installation manual
- dw7933lrasr installation guide
- dw7933lrasr installation