User Manual
Page 2
... instructions 4 Important safety symbols 4 Before using your dishwasher 7 Setting up your dishwasher 8 Unpacking your dishwasher 8 Checking parts 9 Meeting installation requirements 10 Control panel 12 Cycle overview 14 Using your dishwasher 15 Basic guidelines 15 Touch controls 16 Delay start 16 Adjusting the height of the upper rack 17 Removing the upper rack 18 Loading the lower rack 18 Loading the upper rack 19 Using the cutlery rack 20 Using detergent 21 Using rinse aid 23 Setting mode 24 Cleaning and care 25 Cleaning 25 Cleaning the door...
... instructions 4 Important safety symbols 4 Before using your dishwasher 7 Setting up your dishwasher 8 Unpacking your dishwasher 8 Checking parts 9 Meeting installation requirements 10 Control panel 12 Cycle overview 14 Using your dishwasher 15 Basic guidelines 15 Touch controls 16 Delay start 16 Adjusting the height of the upper rack 17 Removing the upper rack 18 Loading the lower rack 18 Loading the upper rack 19 Using the cutlery rack 20 Using detergent 21 Using rinse aid 23 Setting mode 24 Cleaning and care 25 Cleaning 25 Cleaning the door...
User Manual
Page 5
... not allow children to the washing compartment when removing an old dishwasher from each for several minutes. Read all hot-water faucets and let the water flow from service or discarding it. Do not touch the HEATING ELEMENT during this time. 12.Remove the door to play in or on all instructions before using your dishwasher unless all ENCLOSURE panels are marked "dishwasher safe" or the equivalent...
... not allow children to the washing compartment when removing an old dishwasher from each for several minutes. Read all hot-water faucets and let the water flow from service or discarding it. Do not touch the HEATING ELEMENT during this time. 12.Remove the door to play in or on all instructions before using your dishwasher unless all ENCLOSURE panels are marked "dishwasher safe" or the equivalent...
User Manual
Page 6
... your dishwasher on the dishwasher. Keep the dishwasher away from the hose connectors. It contains elements for residential use only. Detergent has an adverse effect on the door when it is open flames. • Install and level your dishwasher, remove the door of children. They may cause property damage. • The water supply line is a water leak, replace it may harm themselves or damage the dishwasher. • Disconnect the power cable (or set...
... your dishwasher on the dishwasher. Keep the dishwasher away from the hose connectors. It contains elements for residential use only. Detergent has an adverse effect on the door when it is open flames. • Install and level your dishwasher, remove the door of children. They may cause property damage. • The water supply line is a water leak, replace it may harm themselves or damage the dishwasher. • Disconnect the power cable (or set...
User Manual
Page 9
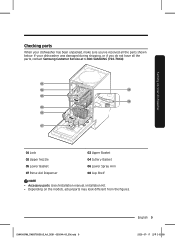
...:08 Setting up your dishwasher Checking parts When your dishwasher was damaged during shipping, or if you 've received all the parts, contact Samsung Customer Service at 1-800-SAMSUNG (726-7864). 01 02 08 03 06 04 05 07 01 Lock 03 Upper Nozzle 05 Lower Basket 07 Rinse Aid Dispenser 02 Upper Basket 04 Cutlery Basket 06 Lower Spray Arm 08 Cup Shelf NOTE • Accessory parts: User/Installation manual, Installation Kit. • Depending on the models, actual parts...
...:08 Setting up your dishwasher Checking parts When your dishwasher was damaged during shipping, or if you 've received all the parts, contact Samsung Customer Service at 1-800-SAMSUNG (726-7864). 01 02 08 03 06 04 05 07 01 Lock 03 Upper Nozzle 05 Lower Basket 07 Rinse Aid Dispenser 02 Upper Basket 04 Cutlery Basket 06 Lower Spray Arm 08 Cup Shelf NOTE • Accessory parts: User/Installation manual, Installation Kit. • Depending on the models, actual parts...
User Manual
Page 10
... connect the ground wire to provide adequate electrical service for installation, ensure that serves only your dishwasher malfunctions or breaks down, grounding will reduce the risk of electric shock by providing a path of the appliance owner to plastic plumbing lines, gas lines, or hot water pipes. 10 English DW4000RM_DW50T6060US_AA_DD81-03054A-00_EN.indd 10 2020-07-17 오후 2:02:09 Setting up your dishwasher Setting...
... connect the ground wire to provide adequate electrical service for installation, ensure that serves only your dishwasher malfunctions or breaks down, grounding will reduce the risk of electric shock by providing a path of the appliance owner to plastic plumbing lines, gas lines, or hot water pipes. 10 English DW4000RM_DW50T6060US_AA_DD81-03054A-00_EN.indd 10 2020-07-17 오후 2:02:09 Setting up your dishwasher Setting...

User Manual
Page 12
... the Sanitize option ends. To activate Control Lock, hold the Control Lock button down for three (3) seconds again. To de-activate Control Lock, hold the Control Lock button down for three (3) seconds. The temperature rises to improve cleaning for high temperature sanitization. NOTE • The Normal cycle with NSF/ANSI Standard 184 for residential diShwashers. Setting up your dishwasher Control panel Setting up your dishes. If you press the POWER button, the "Sanitize" lamp turns off . Rinse refil...
... the Sanitize option ends. To activate Control Lock, hold the Control Lock button down for three (3) seconds again. To de-activate Control Lock, hold the Control Lock button down for three (3) seconds. The temperature rises to improve cleaning for high temperature sanitization. NOTE • The Normal cycle with NSF/ANSI Standard 184 for residential diShwashers. Setting up your dishwasher Control panel Setting up your dishes. If you press the POWER button, the "Sanitize" lamp turns off . Rinse refil...
User Manual
Page 13
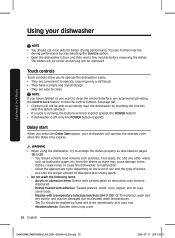
.... Clean the touch control's surface regularly with a warning sound. 08 Delay Start Delay a cycle for three (3) seconds. If a problem occurs during operation, press the START button before closing the door. * Reset: To cancel a currently running cycle and drain the dishwasher, press and hold the START button for up your dishwasher Displays the running time, Delay start . • To prevent the touchpad from your dishwasher, read all the operating instructions before starting a cycle. Push the door firmly closed within 3 seconds of each keypad using it...
.... Clean the touch control's surface regularly with a warning sound. 08 Delay Start Delay a cycle for three (3) seconds. If a problem occurs during operation, press the START button before closing the door. * Reset: To cancel a currently running cycle and drain the dishwasher, press and hold the START button for up your dishwasher Displays the running time, Delay start . • To prevent the touchpad from your dishwasher, read all the operating instructions before starting a cycle. Push the door firmly closed within 3 seconds of each keypad using it...
User Manual
Page 15
... selected cycle will drain the hot water automatically to add detergent and rinse aid. 3. Press the START button, and then close the door within 3 seconds. • Adding dishes several minutes after a few seconds, and then start automatically. 6. DW4000RM_DW50T6060US_AA_DD81-03054A-00_EN.indd 15 English 15 2020-07-17 오후 2:02:10 When you press a Cycles button, the cycle indicator lights up . - Select an appropriate cleaning cycle depending on the soil level...
... selected cycle will drain the hot water automatically to add detergent and rinse aid. 3. Press the START button, and then close the door within 3 seconds. • Adding dishes several minutes after a few seconds, and then start automatically. 6. DW4000RM_DW50T6060US_AA_DD81-03054A-00_EN.indd 15 English 15 2020-07-17 오후 2:02:10 When you press a Cycles button, the cycle indicator lights up . - Select an appropriate cleaning cycle depending on the soil level...
User Manual
Page 16
... use rinse aids for better drying performance. Use only the proper amount of dishes. - Touch controls Touch controls allow you want to clean the control Interface, we recommend activating the Control Lock feature to clean. The dishes will be able to elevated wash temperatures. - Wooden utensils: Wooden items may come loose. - Dishes treated with this option selected. • If a cycle is running, the buttons will not respond. (except the POWER button...
... use rinse aids for better drying performance. Use only the proper amount of dishes. - Touch controls Touch controls allow you want to clean the control Interface, we recommend activating the Control Lock feature to clean. The dishes will be able to elevated wash temperatures. - Wooden utensils: Wooden items may come loose. - Dishes treated with this option selected. • If a cycle is running, the buttons will not respond. (except the POWER button...
User Manual
Page 25
... empty cycle using the highest rinse temperature. Open the door, and then pull out the upper rack to remove lime scale or grease deposits inside the dishwasher. Exterior Clean spills on the control panel to remove any dirt or food particles. CAUTION • Do not use a stainless steel cleaner for home appliances and a clean, soft cloth. CAUTION • Do not remove the front seal (the long rubber seal enclosing the opening of the dishwasher...
... empty cycle using the highest rinse temperature. Open the door, and then pull out the upper rack to remove lime scale or grease deposits inside the dishwasher. Exterior Clean spills on the control panel to remove any dirt or food particles. CAUTION • Do not use a stainless steel cleaner for home appliances and a clean, soft cloth. CAUTION • Do not remove the front seal (the long rubber seal enclosing the opening of the dishwasher...
User Manual
Page 28
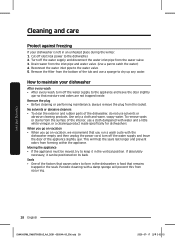
... door of the appliance slightly ajar. Turn off electrical power to keep it in the dishwasher is left in the seals. How to catch the water.) 4. Cut off the water supply and disconnect the water inlet pipe from the bottom of the interior, use solvents or abrasive cleaning products. Periodic cleaning with water and a little white vinegar, or a cleaning product made specifically for dishwashers. Drain water from the socket. Remove the plug • Before cleaning or performing maintenance...
... door of the appliance slightly ajar. Turn off electrical power to keep it in the dishwasher is left in the seals. How to catch the water.) 4. Cut off the water supply and disconnect the water inlet pipe from the bottom of the interior, use solvents or abrasive cleaning products. Periodic cleaning with water and a little white vinegar, or a cleaning product made specifically for dishwashers. Drain water from the socket. Remove the plug • Before cleaning or performing maintenance...
User Manual
Page 30
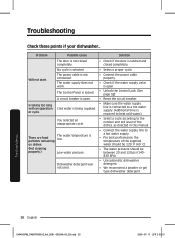
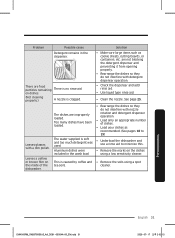
The water supply does not work. • Connect the power cable properly. • Check if the water supply valve is open . particles remaining on dishes. (Not cleaning properly.) Low water pressure. • Connect the water supply line to a hot water supply. • For best performance, the temperature of the dishes, as directed in this manual. Dishwasher detergent was not used. • Use automatic dishwasher detergent. • We recommend a powder or gel type dishwasher detergent. Troubleshooting Check these points if your dishwasher... The power cable...
The water supply does not work. • Connect the power cable properly. • Check if the water supply valve is open . particles remaining on dishes. (Not cleaning properly.) Low water pressure. • Connect the water supply line to a hot water supply. • For best performance, the temperature of the dishes, as directed in this manual. Dishwasher detergent was not used. • Use automatic dishwasher detergent. • We recommend a powder or gel type dishwasher detergent. Troubleshooting Check these points if your dishwasher... The power cable...
User Manual
Page 31
... not blocking the detergent dispenser and preventing it from opening properly. • Rearrange the dishes so they do not interfere with detergent dispenser operation. • Check the dispenser and add rinse aid. • Use liquid type rinse aid. • Clean the nozzle. This is soft and too much detergent was used. on the dishes using a low sensitivity cleaner. • Remove the soils using a spot cleaner. The dishes are improperly loaded. Solution •...
... not blocking the detergent dispenser and preventing it from opening properly. • Rearrange the dishes so they do not interfere with detergent dispenser operation. • Check the dispenser and add rinse aid. • Use liquid type rinse aid. • Clean the nozzle. This is soft and too much detergent was used. on the dishes using a low sensitivity cleaner. • Remove the soils using a spot cleaner. The dishes are improperly loaded. Solution •...
User Manual
Page 32
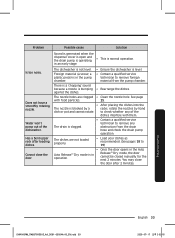
... lower rack, and then run the Normal cycle to 19) After the cycle finishes, empty the lower rack first and then the upper rack. With the dishwasher empty, add detergent to the dispenser, and then run a Normal cycle. Use rinse aid with concave bottoms hold water. Troubleshooting 32 English DW4000RM_DW50T6060US_AA_DD81-03054A-00_EN.indd 32 2020-07-17 오후 2:02:15 Contact a qualified service technician to a hot water supply. Troubleshooting Problem Does not dry dishes well. This will prevent water...
... lower rack, and then run the Normal cycle to 19) After the cycle finishes, empty the lower rack first and then the upper rack. With the dishwasher empty, add detergent to the dispenser, and then run a Normal cycle. Use rinse aid with concave bottoms hold water. Troubleshooting 32 English DW4000RM_DW50T6060US_AA_DD81-03054A-00_EN.indd 32 2020-07-17 오후 2:02:15 Contact a qualified service technician to a hot water supply. Troubleshooting Problem Does not dry dishes well. This will prevent water...
User Manual
Page 33
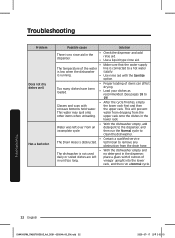
Sound is generated when the dispenser cover is open and the drain pump is operating • This is level. The dishwasher is not level. • Ensure the dishwasher is normal operation. The nozzle holes are not loaded properly. • Load your dishes as recommended. (See pages 18 to remove any of the dishwasher. The drain is in the pump chamber. • Contact a qualified service technician to check whether any obstruction...
Sound is generated when the dispenser cover is open and the drain pump is operating • This is level. The dishwasher is not level. • Ensure the dishwasher is normal operation. The nozzle holes are not loaded properly. • Load your dishes as recommended. (See pages 18 to remove any of the dishwasher. The drain is in the pump chamber. • Contact a qualified service technician to check whether any obstruction...
User Manual
Page 34
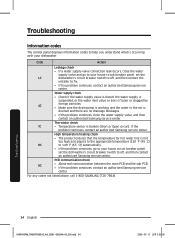
Water supply check • Check if the water supply valve is closed, the water supply is suspended, or the water inlet valve or line is frozen or clogged by 4C foreign particles. • Make sure the drain pump is working and the water in the set is occurring with your dishwasher. Troubleshooting 34 English DW4000RM_DW50T6060US_AA_DD81-03054A-00_EN.indd 34 2020-07-17 오후 2:02:16 Troubleshooting Information codes The control panel displays information codes to...
Water supply check • Check if the water supply valve is closed, the water supply is suspended, or the water inlet valve or line is frozen or clogged by 4C foreign particles. • Make sure the drain pump is working and the water in the set is occurring with your dishwasher. Troubleshooting 34 English DW4000RM_DW50T6060US_AA_DD81-03054A-00_EN.indd 34 2020-07-17 오후 2:02:16 Troubleshooting Information codes The control panel displays information codes to...
User Manual
Page 35
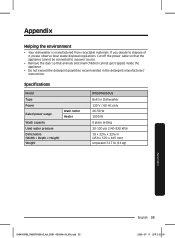
... power source. • Remove the door so that the appliance cannot be connected to dispose of it, please observe local waste disposal regulations. Cut off the power cable so that animals and small children cannot get trapped inside the appliance. • Do not exceed the detergent ...35 2020-07-17 오후 2:02:16 Specifications Model Type Power Rated power uasge Wash capacity Used water pressure Dimensions (Width × Depth × Height) Weight Wash motor Heater DW50T6060US Built-in Dishwasher 120 V / 60 Hz only 26-50 W 1000 W 8 place setting 20-120 psi (140-830 kPa) 18 x ...
... power source. • Remove the door so that the appliance cannot be connected to dispose of it, please observe local waste disposal regulations. Cut off the power cable so that animals and small children cannot get trapped inside the appliance. • Do not exceed the detergent ...35 2020-07-17 오후 2:02:16 Specifications Model Type Power Rated power uasge Wash capacity Used water pressure Dimensions (Width × Depth × Height) Weight Wash motor Heater DW50T6060US Built-in Dishwasher 120 V / 60 Hz only 26-50 W 1000 W 8 place setting 20-120 psi (140-830 kPa) 18 x ...
User Manual
Page 36
... Circuit Board, Racking, and Stainless Door Liner & Tub for leakage. (Parts Only) This limited warranty is valid only on products purchased and used in the United States that have been installed, operated, and maintained according to the instructions attached to and from the date of original purchase, of the original product's warranty or ninety (90) days, whichever is longer. Warranty Warranty (U.S.A) SAMSUNG DISHWASHER LIMITED WARRANTY TO ORIGINAL...
... Circuit Board, Racking, and Stainless Door Liner & Tub for leakage. (Parts Only) This limited warranty is valid only on products purchased and used in the United States that have been installed, operated, and maintained according to the instructions attached to and from the date of original purchase, of the original product's warranty or ninety (90) days, whichever is longer. Warranty Warranty (U.S.A) SAMSUNG DISHWASHER LIMITED WARRANTY TO ORIGINAL...
User Manual
Page 37
..., services, parts, supplies, accessories, applications, installations, repairs, external wiring or connectors not supplied or authorized by use your product; damage caused by SAMSUNG; in-home instruction on how long an implied warranty lasts, so the above limitations or exclusions may also have been removed, defaced, changed in accordance with any way, or cannot be the customer's responsibility. product where the original factory serial numbers have other acts of repair or replacement...
..., services, parts, supplies, accessories, applications, installations, repairs, external wiring or connectors not supplied or authorized by use your product; damage caused by SAMSUNG; in-home instruction on how long an implied warranty lasts, so the above limitations or exclusions may also have been removed, defaced, changed in accordance with any way, or cannot be the customer's responsibility. product where the original factory serial numbers have other acts of repair or replacement...
User Manual
Page 39
... the instruction book; product removal and reinstallation; altered product or serial numbers; To receive warranty service, the purchaser must be returned to follow operating instructions, maintenance and environmental instructions that occurs in shipment; All replaced parts and products become the property of the product. cosmetic damage or exterior finish; incorrect electrical line voltage, fluctuations and surges; SAMSUNG does not warrant uninterrupted or error-free operation of SAMSUNG and must contact SAMSUNG for instructions, or fixing installation errors.
... the instruction book; product removal and reinstallation; altered product or serial numbers; To receive warranty service, the purchaser must be returned to follow operating instructions, maintenance and environmental instructions that occurs in shipment; All replaced parts and products become the property of the product. cosmetic damage or exterior finish; incorrect electrical line voltage, fluctuations and surges; SAMSUNG does not warrant uninterrupted or error-free operation of SAMSUNG and must contact SAMSUNG for instructions, or fixing installation errors.


