
User Manual
Page 2
... Safety information What you need to know about the safety instructions Important safety symbols Important safety precautions Warnings Cautions Installation requirements Key installation requirements Location considerations Ducting requirements Exhausting requirements Gas requirements Electrical requirements Installation What's included Step-by-step installation Vent blockage test Exhaust ducting guide Switching the door position Before you start Sort and load Functional prerequisite Operations Feature panel Simple steps to start Cycle overview Drying guide Special features 2 English DV8650M...
... Safety information What you need to know about the safety instructions Important safety symbols Important safety precautions Warnings Cautions Installation requirements Key installation requirements Location considerations Ducting requirements Exhausting requirements Gas requirements Electrical requirements Installation What's included Step-by-step installation Vent blockage test Exhaust ducting guide Switching the door position Before you start Sort and load Functional prerequisite Operations Feature panel Simple steps to start Cycle overview Drying guide Special features 2 English DV8650M...

User Manual
Page 6
... or product. 12.Clean the lint screen before or after each load. 13.Do not use heat to dry articles containing foam rubber or similarly textured rubber-like materials. 14.Keep area around the exhaust opening and adjacent surrounding areas free from service or discarded, remove the door to play on or in injury. 21.The Control board and inlet valve are not caught in...
... or product. 12.Clean the lint screen before or after each load. 13.Do not use heat to dry articles containing foam rubber or similarly textured rubber-like materials. 14.Keep area around the exhaust opening and adjacent surrounding areas free from service or discarded, remove the door to play on or in injury. 21.The Control board and inlet valve are not caught in...

User Manual
Page 7
... substances. Follow the gas supplier's instructions. • If you smell gas: • Do not try to light any appliance. • Do not turn on the appliance. • Do not touch any electrical switch. • Do not use any phone in the dryer until all occupants. • Immediately call the fire department. • Installation and service must not be dried on a heat setting. Safety information...
... substances. Follow the gas supplier's instructions. • If you smell gas: • Do not try to light any appliance. • Do not turn on the appliance. • Do not touch any electrical switch. • Do not use any phone in the dryer until all occupants. • Immediately call the fire department. • Installation and service must not be dried on a heat setting. Safety information...
User Manual
Page 8
... around the exhaust opening and surrounding areas free from service, remove the door to the drying compartment to eliminate static unless the softener or product is recommended for dryer use in accordance with the manufacturer's instructions. • Do not place items in your dryer from lint, dust, and dirt. • The interior of the dryer and exhaust duct should be cleaned periodically by qualified service personnel. •...
... around the exhaust opening and surrounding areas free from service, remove the door to the drying compartment to eliminate static unless the softener or product is recommended for dryer use in accordance with the manufacturer's instructions. • Do not place items in your dryer from lint, dust, and dirt. • The interior of the dryer and exhaust duct should be cleaned periodically by qualified service personnel. •...
User Manual
Page 10
... or other surfaces. • Adequate air circulation for ventilation and gas combustion. • Away from suffocating. Key installation requirements • A grounded electrical outlet. • A power cord for gas models) that must have two unobstructed air openings for future reference. A louvered door with 3" minimum clearance on either side, and 5" in Canada). • Gas lines (for electric dryers (except in the back. WARNING Remove the door from all discarded appliances to...
... or other surfaces. • Adequate air circulation for ventilation and gas combustion. • Away from suffocating. Key installation requirements • A grounded electrical outlet. • A power cord for gas models) that must have two unobstructed air openings for future reference. A louvered door with 3" minimum clearance on either side, and 5" in Canada). • Gas lines (for electric dryers (except in the back. WARNING Remove the door from all discarded appliances to...

User Manual
Page 13
... converted for use in residential garages must be raised 18 inches (46 cm) above the floor. • Additionally, a ⅛" (0.3 cm) N.P.T. (National Pipe Thread) plugged tapping, accessible for test gauge connection, must be installed immediately upstream of your dryer. • Gas dryers installed in accordance with the manufacturer's instructions. The National Fuel Gas Code requires that an accessible, approved manual gas shut-off valve be installed within 6" of your dryer's gas supply connection. • Your dryer...
... converted for use in residential garages must be raised 18 inches (46 cm) above the floor. • Additionally, a ⅛" (0.3 cm) N.P.T. (National Pipe Thread) plugged tapping, accessible for test gauge connection, must be installed immediately upstream of your dryer. • Gas dryers installed in accordance with the manufacturer's instructions. The National Fuel Gas Code requires that an accessible, approved manual gas shut-off valve be installed within 6" of your dryer's gas supply connection. • Your dryer...

User Manual
Page 14
... a qualified electrician. • Do not connect the ground wire to provide adequate electrical service for the electrical current. Electric models WARNING • Your dryer has an optional cord with an equipment-grounding conductor and a grounding plug. Latest Revisions and local codes and ordinances. Installation requirements Installation requirements Electrical requirements The wiring diagram is located on the plate under the control panel or rear frame. WARNING • Improperly connecting the equipment grounding conductor can result...
... a qualified electrician. • Do not connect the ground wire to provide adequate electrical service for the electrical current. Electric models WARNING • Your dryer has an optional cord with an equipment-grounding conductor and a grounding plug. Latest Revisions and local codes and ordinances. Installation requirements Installation requirements Electrical requirements The wiring diagram is located on the plate under the control panel or rear frame. WARNING • Improperly connecting the equipment grounding conductor can result...
User Manual
Page 15
... approved electrical service fused through the neutral conductor. (Use a 4-prong plug for use an extension cord. Electrical connections Before operating or testing, follow all grounding instructions in the "Grounding" section. A 30-ampere fuse or circuit breaker on both sides of Electric Shock When local codes allow, you may not convert a dryer to 208 volts. The power cord should be run with the circuit conductors and connected to the equipment grounding terminal or lead on the dryer. U.S. This cord...
... approved electrical service fused through the neutral conductor. (Use a 4-prong plug for use an extension cord. Electrical connections Before operating or testing, follow all grounding instructions in the "Grounding" section. A 30-ampere fuse or circuit breaker on both sides of Electric Shock When local codes allow, you may not convert a dryer to 208 volts. The power cord should be run with the circuit conductors and connected to the equipment grounding terminal or lead on the dryer. U.S. This cord...

User Manual
Page 18
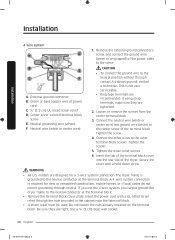
... ducting and wiring. Connect the gas supply to check for any leaks using a soap solution. DO NOT use an open flame to the dryer. Select a location and move the dryer easily, lay two of a flexible connector to the 3/8" (1 cm) male threaded end on its final location, and then set the dryer upright. • Secure room around the dryer to the site. Installation Installation Step-by step installation instructions start below. Install the exhaust...
... ducting and wiring. Connect the gas supply to check for any leaks using a soap solution. DO NOT use an open flame to the dryer. Select a location and move the dryer easily, lay two of a flexible connector to the 3/8" (1 cm) male threaded end on its final location, and then set the dryer upright. • Secure room around the dryer to the site. Installation Installation Step-by step installation instructions start below. Install the exhaust...
User Manual
Page 20
... connector B. Green or bare copper wire of the dryer. If using strap terminals, make sure they are recommended. Loosen or remove the screws from the center terminal block. 3. Connect the other wires to the center screw of the power cable to the neutral conductor at the terminal block. Insert the tab of the terminal block cover into the rear slot of power cord C. ¾" (1.9 cm) UL-listed strain relief D. The dryer...
... connector B. Green or bare copper wire of the dryer. If using strap terminals, make sure they are recommended. Loosen or remove the screws from the center terminal block. 3. Connect the other wires to the center screw of the power cable to the neutral conductor at the terminal block. Insert the tab of the terminal block cover into the rear slot of power cord C. ¾" (1.9 cm) UL-listed strain relief D. The dryer...
User Manual
Page 24
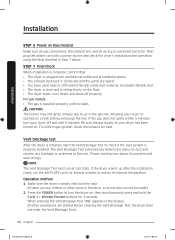
...; The dryer is plugged into a power source and check the dryer's installation and operation using the final checklist in the drum, a correct test can reduce drying time and save energy. Allowing your dryer to the user. Installation Installation STEP 6 Power on (Gas models) Make sure all gas connections, the exhaust line, and all wiring is empty and close the door. (If there are any blockage or problems to operate on a heat setting will purge the line. When entering the Vent Blockage Test, "InS...
...; The dryer is plugged into a power source and check the dryer's installation and operation using the final checklist in the drum, a correct test can reduce drying time and save energy. Allowing your dryer to the user. Installation Installation STEP 6 Power on (Gas models) Make sure all gas connections, the exhaust line, and all wiring is empty and close the door. (If there are any blockage or problems to operate on a heat setting will purge the line. When entering the Vent Blockage Test, "InS...

User Manual
Page 25
... given. You may turn off by pressing the POWER button. The Vent Blockage Test is used to check for problems to the current duct system when the dryer is installed for the first time. • If the test result displays "CLg" (the duct system is normal ("0"), the duct system could result in 6 steps clockwise. Properly install all duct work according to "Ducting requirements" and "Exhaust ducting guide" section of this manual and take proper...
... given. You may turn off by pressing the POWER button. The Vent Blockage Test is used to check for problems to the current duct system when the dryer is installed for the first time. • If the test result displays "CLg" (the duct system is normal ("0"), the duct system could result in 6 steps clockwise. Properly install all duct work according to "Ducting requirements" and "Exhaust ducting guide" section of this manual and take proper...
User Manual
Page 26
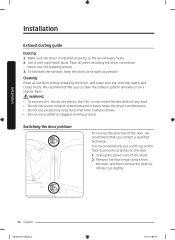
... old ducts before installing the dryer, and make sure the vent flap opens and closes freely. WARNING • To prevent fire, do not use plastic, thin-foil, or non-metal flexible ducts of any kind. • Do not use lint-trapping screws. 3. Switching the door position To reverse the direction of the dryer. 2. We recommend that you to prevent scratches on a regular basis. Unplug the power cord...
... old ducts before installing the dryer, and make sure the vent flap opens and closes freely. WARNING • To prevent fire, do not use plastic, thin-foil, or non-metal flexible ducts of any kind. • Do not use lint-trapping screws. 3. Switching the door position To reverse the direction of the dryer. 2. We recommend that you to prevent scratches on a regular basis. Unplug the power cord...

User Manual
Page 33
Change the cycle settings (Dry Level, Temp. To change the cycle during operation 1. Operations DV8650M-03170X-00_EN.indd 33 English 33 2017-01-06 4:37:02 The dryer indicator turns on with an estimated cycle time on the dryer. 2. Press START/PAUSE again to start 1. Press POWER to select a cycle in the left-most panel. 3. Press to turn on the display. Optionally, you can activate options available by pressing the...
Change the cycle settings (Dry Level, Temp. To change the cycle during operation 1. Operations DV8650M-03170X-00_EN.indd 33 English 33 2017-01-06 4:37:02 The dryer indicator turns on with an estimated cycle time on the dryer. 2. Press START/PAUSE again to start 1. Press POWER to select a cycle in the left-most panel. 3. Press to turn on the display. Optionally, you can activate options available by pressing the...

User Manual
Page 39
...; Do not spray liquid cleaning agents directly on the dryer. Exhaust system • Check and clean the exhaust system on the entire surface. Cleaning Feature panel • Clean with a mild, non-abrasive cleaner suitable for easily marred surfaces. Powder coat tumbler To clean the powder coat tumbler, use a damp cloth with a soft, damp cloth. Remove cleaner residue and dry with a clean cloth. Maintenance Keep the dryer clean to prevent decreased performance...
...; Do not spray liquid cleaning agents directly on the dryer. Exhaust system • Check and clean the exhaust system on the entire surface. Cleaning Feature panel • Clean with a mild, non-abrasive cleaner suitable for easily marred surfaces. Powder coat tumbler To clean the powder coat tumbler, use a damp cloth with a soft, damp cloth. Remove cleaner residue and dry with a clean cloth. Maintenance Keep the dryer clean to prevent decreased performance...
User Manual
Page 40
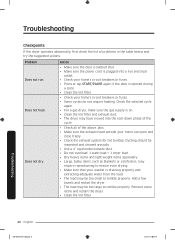
... even drying. • Make sure that your washer is opened during a cycle. • Clean the lint filter. • Check your home's circuit breakers or fuses. • Press or tap START/PAUSE again if the door is draining properly and extracting adequate water from the load. • The load may require repositioning to tumble properly. Problem Does not run. Does not dry. Remove some items and restart the dryer. • Clean the lint filter. Does not heat.
... even drying. • Make sure that your washer is opened during a cycle. • Clean the lint filter. • Check your home's circuit breakers or fuses. • Press or tap START/PAUSE again if the door is draining properly and extracting adequate water from the load. • The load may require repositioning to tumble properly. Problem Does not run. Does not dry. Remove some items and restart the dryer. • Clean the lint filter. Does not heat.
User Manual
Page 43
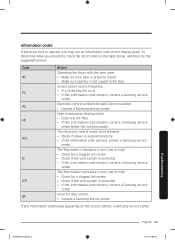
... code remains, contact a Samsung service center. High temperature heating check • Clean the lint filter. • If this information code remains, contact a Samsung service center.(enter the line test mode) The electronic control needs to operate, you should do, check the list of codes in the door. To determine what you may see an information code on the screen, contact a Samsung service center. Incorrect door switch. • Contact a Samsung service center. Information codes If the dryer fails to be checked. • Check if power...
... code remains, contact a Samsung service center. High temperature heating check • Clean the lint filter. • If this information code remains, contact a Samsung service center.(enter the line test mode) The electronic control needs to operate, you should do, check the list of codes in the door. To determine what you may see an information code on the screen, contact a Samsung service center. Incorrect door switch. • Contact a Samsung service center. Information codes If the dryer fails to be checked. • Check if power...

User Manual
Page 44
... care direction. The clothing care labels include symbols for detergent activation and effective cleaning.) Bleach Any bleach (when needed) Only non-chlorine (color-safe) bleach (when needed) Tumble dry Normal Permanent press/Wrinkle resistant/Wrinkle control Gentle/Delicates Special instructions Line dry/Hang to optimize garment life and reduce laundering problems. Wash cycle Normal Permanent press/Wrinkle resistant/Wrinkle control Gentle/Delicates Hand wash Water temperature Hot Warm Cold NOTE The Water Temperature table lists...
... care direction. The clothing care labels include symbols for detergent activation and effective cleaning.) Bleach Any bleach (when needed) Only non-chlorine (color-safe) bleach (when needed) Tumble dry Normal Permanent press/Wrinkle resistant/Wrinkle control Gentle/Delicates Special instructions Line dry/Hang to optimize garment life and reduce laundering problems. Wash cycle Normal Permanent press/Wrinkle resistant/Wrinkle control Gentle/Delicates Hand wash Water temperature Hot Warm Cold NOTE The Water Temperature table lists...
User Manual
Page 50
... or serial numbers; This limited warranty does not cover problems resulting from incorrect electric current, voltage or supply, light bulbs, house fuses, house wiring, cost of the product. accidents, abuse, neglect, fire, water, lightning, or other acts of nature or God; customer adjustments and failure to the following: damage that occurs in the instruction book; NOR SHALL RECOVERY OF ANY KIND AGAINST SAMSUNG BE...
... or serial numbers; This limited warranty does not cover problems resulting from incorrect electric current, voltage or supply, light bulbs, house fuses, house wiring, cost of the product. accidents, abuse, neglect, fire, water, lightning, or other acts of nature or God; customer adjustments and failure to the following: damage that occurs in the instruction book; NOR SHALL RECOVERY OF ANY KIND AGAINST SAMSUNG BE...
User Manual
Page 53
... to follow operating instructions, maintenance and environmental instructions that occurs in service problems; product removal and reinstallation; This limited warranty covers manufacturing defects in materials and workmanship encountered in normal, noncommercial use of products, equipment, systems, utilities, services, parts, supplies, accessories, applications, installations, repairs, external wiring or connectors not supplied or authorized by pest infestations. incorrect electrical line voltage, fluctuations and surges; use of the product. EXCEPT AS SET FORTH...
... to follow operating instructions, maintenance and environmental instructions that occurs in service problems; product removal and reinstallation; This limited warranty covers manufacturing defects in materials and workmanship encountered in normal, noncommercial use of products, equipment, systems, utilities, services, parts, supplies, accessories, applications, installations, repairs, external wiring or connectors not supplied or authorized by pest infestations. incorrect electrical line voltage, fluctuations and surges; use of the product. EXCEPT AS SET FORTH...


