User Manual
Page 2
... 4 Important safety symbols and precautions 4 Important safety instructions 6 Installing your dryer 8 Unpacking your dryer 8 What's included 8 Accessories 8 Important to installer 9 Basic requirements 9 Grounding 9 Gas models 9 Electric models 9 Location considerations 10 Alcove or closet installations 10 Ducting requirements 12 Exhausting 13 Dryer exhaust tips 14 Gas requirements 15 Commonwealth of massachusetts installation instructions...
... 4 Important safety symbols and precautions 4 Important safety instructions 6 Installing your dryer 8 Unpacking your dryer 8 What's included 8 Accessories 8 Important to installer 9 Basic requirements 9 Grounding 9 Gas models 9 Electric models 9 Location considerations 10 Alcove or closet installations 10 Ducting requirements 12 Exhausting 13 Dryer exhaust tips 14 Gas requirements 15 Commonwealth of massachusetts installation instructions...
User Manual
Page 8
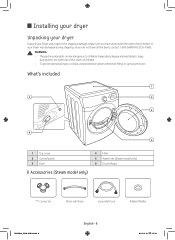
... Installing your dryer Unpacking your dryer Unpack your Dryer was damaged during shipping, or you have all the items, contact 1-800-SAMSUNG (726-7864). Make sure you do not have received all packaging material (plastic bags, polystyrene, etc.) well out of the ...Dryer and inspect it for shipping damage. What's included 1 5 2 3 6 4 1 Top cover 2 Control panel 3 Door Accessories (Steam model only) 4 Filter 5 Water Inlet (Steam model only) 6 Duct Exhaust "Y"-connector Short inlet hose Long inlet hose Rubber Washer DV425000_DC68-03381A.indd 8 English - 8 2013-12-19 �&#...
... Installing your dryer Unpacking your dryer Unpack your Dryer was damaged during shipping, or you have all the items, contact 1-800-SAMSUNG (726-7864). Make sure you do not have received all packaging material (plastic bags, polystyrene, etc.) well out of the ...Dryer and inspect it for shipping damage. What's included 1 5 2 3 6 4 1 Top cover 2 Control panel 3 Door Accessories (Steam model only) 4 Filter 5 Water Inlet (Steam model only) 6 Duct Exhaust "Y"-connector Short inlet hose Long inlet hose Rubber Washer DV425000_DC68-03381A.indd 8 English - 8 2013-12-19 �&#...
User Manual
Page 9
Electric models Your dryer has an optional cord with an equipment-grounding conductor and a grounding plug, which is properly installed and grounded in accordance with all discarded ... of electrical shock by a qualified electrician. • Never connect the ground wire to installer Please read the following instructions carefully before installing the dryer. Gas models Your dryer has a cord with your dryer - These instructions should be plugged into an appropriate outlet that is sold separately. • The plug must be...
Electric models Your dryer has an optional cord with an equipment-grounding conductor and a grounding plug, which is properly installed and grounded in accordance with all discarded ... of electrical shock by a qualified electrician. • Never connect the ground wire to installer Please read the following instructions carefully before installing the dryer. Gas models Your dryer has a cord with your dryer - These instructions should be plugged into an appropriate outlet that is sold separately. • The plug must be...
User Manual
Page 11
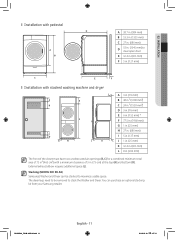
... 72 in² (465 cm²) with a minimum clearance of 3 in. (7.6 cm) at the top (A) and bottom (D). Stacking (MODEL NO: SK-5A) Samsung's Washer and Dryer can purchase an optional stacking kit from your Samsung retailer. External exhaust elbow requires additional space (L). DV425000_DC68-03381A.indd 11 English - 11 2013-12-19 ��...
... 72 in² (465 cm²) with a minimum clearance of 3 in. (7.6 cm) at the top (A) and bottom (D). Stacking (MODEL NO: SK-5A) Samsung's Washer and Dryer can purchase an optional stacking kit from your Samsung retailer. External exhaust elbow requires additional space (L). DV425000_DC68-03381A.indd 11 English - 11 2013-12-19 ��...

User Manual
Page 16
...of a new power supply cord kit, marked for the U.S.) or CAN/CGA - Latest Revision (for 4 wire receptacles, NEMA type 14-30R.) Electric models - if it doesn't fit the outlet, have a proper outlet installed by means of electric shock. It is your dryer is recommended. DV425000_DC68-03381A.indd...the equipment grounding conductor can be done in the "Grounding" section on both sides of the line is required. • All Canadian models are in doubt as to provide adequate electrical services for the U.S.) or the Canadian Electrical Code CSA C22.1 Latest Revisions and local ...
...of a new power supply cord kit, marked for the U.S.) or CAN/CGA - Latest Revision (for 4 wire receptacles, NEMA type 14-30R.) Electric models - if it doesn't fit the outlet, have a proper outlet installed by means of electric shock. It is your dryer is recommended. DV425000_DC68-03381A.indd...the equipment grounding conductor can be done in the "Grounding" section on both sides of the line is required. • All Canadian models are in doubt as to provide adequate electrical services for the U.S.) or the Canadian Electrical Code CSA C22.1 Latest Revisions and local ...
User Manual
Page 17
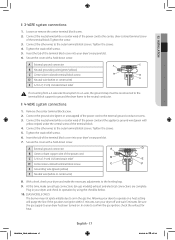
...copper wire of the terminal block. If the gas does not ignite within 5 minutes, turn your dryer and make sure all gas connections (on gas models), exhaust and electrical connections are complete. Tighten the screw. 3. Tighten the screws. 4. Tighten the strain relief screws. 6. Plug in your dryer,... and check its operation by using the checklist below. 10. (GAS MODELS ONLY) The burner may not ignite initially due to air in . (1.9 cm) UL-listed strain relief If converting from a 4-wire electrical system to a ...
...copper wire of the terminal block. If the gas does not ignite within 5 minutes, turn your dryer and make sure all gas connections (on gas models), exhaust and electrical connections are complete. Tighten the screw. 3. Tighten the screws. 4. Tighten the strain relief screws. 6. Plug in your dryer,... and check its operation by using the checklist below. 10. (GAS MODELS ONLY) The burner may not ignite initially due to air in . (1.9 cm) UL-listed strain relief If converting from a 4-wire electrical system to a ...
User Manual
Page 18
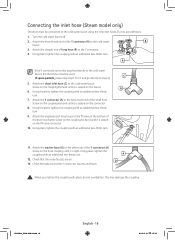
... 5 to 8, and go directly to the cold water faucet. When you tighten the coupling with an additional two thirds turn. Connecting the inlet hose (Steam model only) The dryer must be connected to the cold water faucet using the new inlet hoses. Using the pliers, tighten the coupling with an additional...
... 5 to 8, and go directly to the cold water faucet. When you tighten the coupling with an additional two thirds turn. Connecting the inlet hose (Steam model only) The dryer must be connected to the cold water faucet using the new inlet hoses. Using the pliers, tighten the coupling with an additional...
User Manual
Page 19
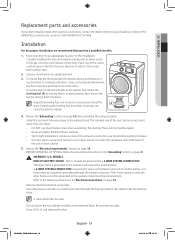
...material. • Tip for the installation. Extending the leveling feet more than necessary can cause the dryer to the neutral conductor at 1-800-SAMSUNG (726-7864). Review the "Exhausting" section on page 16. These joints should be taped. • Never use sheet metal screws when..." section on the terminal block. Use a 3/8 in an upright position. 3. Install the ductwork from your dryer to the exhaust hood. models are tight. The crimped end of the exhaust system onto your dryer before installing the exhaust system. WARNING - To minimize vibrations, noise, ...
...material. • Tip for the installation. Extending the leveling feet more than necessary can cause the dryer to the neutral conductor at 1-800-SAMSUNG (726-7864). Review the "Exhausting" section on page 16. These joints should be taped. • Never use sheet metal screws when..." section on the terminal block. Use a 3/8 in an upright position. 3. Install the ductwork from your dryer to the exhaust hood. models are tight. The crimped end of the exhaust system onto your dryer before installing the exhaust system. WARNING - To minimize vibrations, noise, ...
User Manual
Page 21
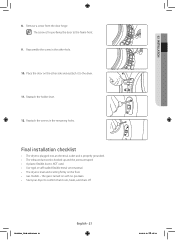
... hinge. Reassemble the screw in the remaining holes. Place the door on the other hole. 10. The screw is turned on the floor. • Gas models - Final installation checklist • The dryer is plugged into an electrical outlet and is properly grounded. • The exhaust ductwork is hooked up and the...
... hinge. Reassemble the screw in the remaining holes. Place the door on the other hole. 10. The screw is turned on the floor. • Gas models - Final installation checklist • The dryer is plugged into an electrical outlet and is properly grounded. • The exhaust ductwork is hooked up and the...

User Manual
Page 22
Operating instructions, tips To reduce the risk of the control panel Please check your model before operating this appliance. DV42H5400* 9 6 7 9 6 7 9 6 7 1 1 DV42H5200* 1 2 3 4 5 2 8 2 3 4 5 2 8 2 3 4 5 2 8 DV42H5000* DV425000_DC68-03381A.indd 22 English - 22 2013-12-19 �� 1:07:14 Overview of fire, electric shock, or injury to persons,read the IMPORTANT SAFETY INSTRUCTIONS before proceeding.
Operating instructions, tips To reduce the risk of the control panel Please check your model before operating this appliance. DV42H5400* 9 6 7 9 6 7 9 6 7 1 1 DV42H5200* 1 2 3 4 5 2 8 2 3 4 5 2 8 2 3 4 5 2 8 DV42H5000* DV425000_DC68-03381A.indd 22 English - 22 2013-12-19 �� 1:07:14 Overview of fire, electric shock, or injury to persons,read the IMPORTANT SAFETY INSTRUCTIONS before proceeding.

User Manual
Page 24
It provides wrinkle release via optimized steam care. Cycle options Anti Static (Steam Model Only) To reduce statics by clothing friction and spray steam at Sensor Dry course. The dry level selections are limited to activate this feature. To ...
It provides wrinkle release via optimized steam care. Cycle options Anti Static (Steam Model Only) To reduce statics by clothing friction and spray steam at Sensor Dry course. The dry level selections are limited to activate this feature. To ...
User Manual
Page 28
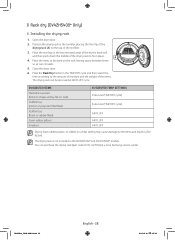
Position the drying rack in the TIME DRY cycle and then select the time according to be also used at a local Samsung service center. Place the items to the amount of moisture and the weight of the items. The drying rack can be dried on the top ... sweaters (block to shape and lay flat on a heat setting may cause damage to the items and lead to fix in the DV42H5200* and DV42H5000* models. You can circulate. 5. Close the dryer door. 6. Press the Rack Dry button in the tumbler, placing the front lip of the drying rack to a fire...
Position the drying rack in the TIME DRY cycle and then select the time according to be also used at a local Samsung service center. Place the items to the amount of moisture and the weight of the items. The drying rack can be dried on the top ... sweaters (block to shape and lay flat on a heat setting may cause damage to the items and lead to fix in the DV42H5200* and DV42H5000* models. You can circulate. 5. Close the dryer door. 6. Press the Rack Dry button in the tumbler, placing the front lip of the drying rack to a fire...
User Manual
Page 30
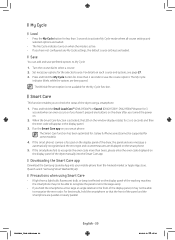
... selected options are loaded. • The My Cycle indicator turns on your mobile phone from the Android market or Apple App store. (Search word : Samsung Smart Washer/Dryer) Precautions when using a smartphone. 1. Set necessary options for the My Cycle function. Run the Smart Care app on when the mode... bulb, or lamp is automatically recognized and the error type and countermeasures are loaded. The Smart Care function has been optimized for some models). 4. Save You can add and save the course options. If the smart phone's camera is not available for the selected course.
... selected options are loaded. • The My Cycle indicator turns on your mobile phone from the Android market or Apple App store. (Search word : Samsung Smart Washer/Dryer) Precautions when using a smartphone. 1. Set necessary options for the My Cycle function. Run the Smart Care app on when the mode... bulb, or lamp is automatically recognized and the error type and countermeasures are loaded. The Smart Care function has been optimized for some models). 4. Save You can add and save the course options. If the smart phone's camera is not available for the selected course.
Trouble Shooting Guide Tech Manual (English, French, Spanish)
Page 5
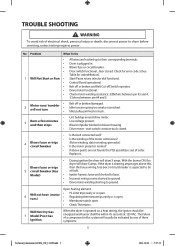
... • • • Hi-Limit trips easily or is open. Membrane switch open . Blown fuse or circuit breaker. Control Board operational. Model) • Igniter harness loose and shorted to base. • Incorrect wiring or wire shorted to ground. • Drive motor winding shorting to dryer... stator winding, generator) Is the motor protector normal? • If above this system will draw X amps. Will Not Dry Gas 7 Model Poor Gas Ignition When the dryer is out of electrical shock, personal injury or death; Start/Pause rotary selector dial functional. Belt off or ...
... • • • Hi-Limit trips easily or is open. Membrane switch open . Blown fuse or circuit breaker. Control Board operational. Model) • Igniter harness loose and shorted to base. • Incorrect wiring or wire shorted to ground. • Drive motor winding shorting to dryer... stator winding, generator) Is the motor protector normal? • If above this system will draw X amps. Will Not Dry Gas 7 Model Poor Gas Ignition When the dryer is out of electrical shock, personal injury or death; Start/Pause rotary selector dial functional. Belt off or ...
Trouble Shooting Guide Tech Manual (English, French, Spanish)
Page 8
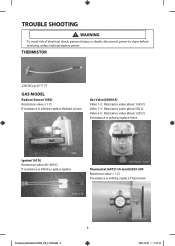
..., unless testing requires power. TROUBLE SHOOTING WARNING To avoid risk of electrical shock, personal injury or death; THERMISTOR 238.23Ω @ 25 °C 77 GAS MODEL Radiant Sensor(10RS) Resistance value < 1 Ω If resistance is infinite, replace Radiant sensor Gas Valve(25M01A) Valve 1-2 : Resistance value about 1365 Ω Valve 1-3 : Resistance value...
..., unless testing requires power. TROUBLE SHOOTING WARNING To avoid risk of electrical shock, personal injury or death; THERMISTOR 238.23Ω @ 25 °C 77 GAS MODEL Radiant Sensor(10RS) Resistance value < 1 Ω If resistance is infinite, replace Radiant sensor Gas Valve(25M01A) Valve 1-2 : Resistance value about 1365 Ω Valve 1-3 : Resistance value...
Trouble Shooting Guide Tech Manual (English, French, Spanish)
Page 9
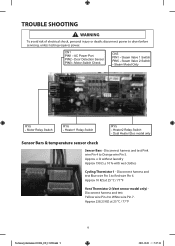
...; without laundry Approx 190 Ω ± 10 % with wet clothes Cycling Thermistor 1 - Approx 238.23 KΩ at 25 °C / 77 °F Vent Thermistor 2 (Vent sensor model only) Disconnect harness and test Yellow wire Pin 2 to Orange wire Pin 5. TROUBLE SHOOTING WARNING To avoid risk of electrical shock, personal injury or death...
...; without laundry Approx 190 Ω ± 10 % with wet clothes Cycling Thermistor 1 - Approx 238.23 KΩ at 25 °C / 77 °F Vent Thermistor 2 (Vent sensor model only) Disconnect harness and test Yellow wire Pin 2 to Orange wire Pin 5. TROUBLE SHOOTING WARNING To avoid risk of electrical shock, personal injury or death...


