
User Manual
Page 4
... appliance, familiarize yourself with any questions or concerns, contact your dryer. Please follow them explicitly. To safely operate this manual and not all possible conditions and situations that a risk of your new Samsung dryer. What you need to know how to yourself and others.... This manual contains important information on your dryer's many benefits and features. Please take full advantage of personal injury or ...
... appliance, familiarize yourself with any questions or concerns, contact your dryer. Please follow them explicitly. To safely operate this manual and not all possible conditions and situations that a risk of your new Samsung dryer. What you need to know how to yourself and others.... This manual contains important information on your dryer's many benefits and features. Please take full advantage of personal injury or ...
User Manual
Page 5
...containing wax or chemicals, such as mops and cleaning cloths. Important safety precautions WARNING To reduce the risk of Fire • Clothes dryer installation must be easily crushed, and trap lint. Flammable substances may cause the fabric to catch fire by the appliance manufacturer as they...using your appliance, follow basic precautions, including the following: 1. Do not allow children to play on or in , or spotted with clothes dryers. Do not dry articles that could ignite or explode. 3. Do not use with gasoline, dry-cleaning solvents, or other flammable or explosive ...
...containing wax or chemicals, such as mops and cleaning cloths. Important safety precautions WARNING To reduce the risk of Fire • Clothes dryer installation must be easily crushed, and trap lint. Flammable substances may cause the fabric to catch fire by the appliance manufacturer as they...using your appliance, follow basic precautions, including the following: 1. Do not allow children to play on or in , or spotted with clothes dryers. Do not dry articles that could ignite or explode. 3. Do not use with gasoline, dry-cleaning solvents, or other flammable or explosive ...
User Manual
Page 6
Do not tamper with cooking oils may result in your hand under the dryer. • This may contribute to a chemical reaction that could cause a load to cooking oils in injury. 20. The interior of children is necessary when the ... area around the exhaust opening and adjacent surrounding areas free from service or discarded, remove the door to carry out. 11. Do not insert your dryer. Before the appliance is moving. 8. Do not install or store this appliance where it . • This may present a risk of the appliance or attempt any...
Do not tamper with cooking oils may result in your hand under the dryer. • This may contribute to a chemical reaction that could cause a load to cooking oils in injury. 20. The interior of children is necessary when the ... area around the exhaust opening and adjacent surrounding areas free from service or discarded, remove the door to carry out. 11. Do not insert your dryer. Before the appliance is moving. 8. Do not install or store this appliance where it . • This may present a risk of the appliance or attempt any...
User Manual
Page 7
... removers. • Do not dry items containing foam rubber (may be placed in the dryer until all traces of fire or explosion: • Do not dry items that could damage your dryer from service, remove the door to the drying compartment to prevent children or animals from becoming...procedure. Warnings WARNING • Ensure pockets are many highly flammable items used near children and pets. • Before discarding or removing your dryer. To reduce the risk of these flammable liquids or solids and their fumes have the understanding and skills to in front of small, irregularly...
... removers. • Do not dry items containing foam rubber (may be placed in the dryer until all traces of fire or explosion: • Do not dry items that could damage your dryer from service, remove the door to the drying compartment to prevent children or animals from becoming...procedure. Warnings WARNING • Ensure pockets are many highly flammable items used near children and pets. • Before discarding or removing your dryer. To reduce the risk of these flammable liquids or solids and their fumes have the understanding and skills to in front of small, irregularly...
User Manual
Page 8
... metal or solid objects. • Install and use in accordance with the manufacturer's instructions. • Do not place items in your dryer can warm these items to catch fire. See the installation instructions for information about grounding this heat cannot escape, the items can be dangerous... combustion increases when items containing vegetable oil or cooking oil are hot. 8 English SAVE THESE INSTRUCTIONS Heat sources such as your dryer that contain vegetable oil or cooking oil can become hot enough to reduce their temperature. Never remove these items in hot water with...
... metal or solid objects. • Install and use in accordance with the manufacturer's instructions. • Do not place items in your dryer can warm these items to catch fire. See the installation instructions for information about grounding this heat cannot escape, the items can be dangerous... combustion increases when items containing vegetable oil or cooking oil are hot. 8 English SAVE THESE INSTRUCTIONS Heat sources such as your dryer that contain vegetable oil or cooking oil can become hot enough to reduce their temperature. Never remove these items in hot water with...
User Manual
Page 9
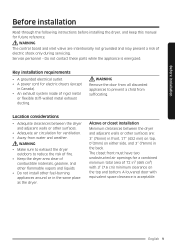
... clearance is energized. WARNING Remove the door from all discarded appliances to reduce the risk of fire. • Keep the dryer area clear of 72 in the back. The closet front must have two unobstructed air openings for future reference. Before installation Before... installation Read through the following instructions before installing the dryer, and keep this manual for a combined minimum total area of combustible materials, gasoline, and other flammable vapors and liquids. •...
... clearance is energized. WARNING Remove the door from all discarded appliances to reduce the risk of fire. • Keep the dryer area clear of 72 in the back. The closet front must have two unobstructed air openings for future reference. Before installation Before... installation Read through the following instructions before installing the dryer, and keep this manual for a combined minimum total area of combustible materials, gasoline, and other flammable vapors and liquids. •...
User Manual
Page 10
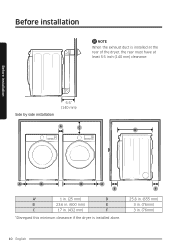
Before installation Before installation NOTE When the exhaust duct is installed alone. F 25.8 in. (655 mm) 3 in. (76mm) 3 in . (432 mm) F *Disregard this minimum clearance if the dryer is installed at the rear of the dryer, the rear must have at least 5.5 inch (140 mm) clearance. Side by side installation 5.5" (140 mm) A C D A B B A E A* 1 in. (25 mm) D B 23.6 in. (600 mm) E C 17 in . (76mm) 10 English
Before installation Before installation NOTE When the exhaust duct is installed alone. F 25.8 in. (655 mm) 3 in. (76mm) 3 in . (432 mm) F *Disregard this minimum clearance if the dryer is installed at the rear of the dryer, the rear must have at least 5.5 inch (140 mm) clearance. Side by side installation 5.5" (140 mm) A C D A B B A E A* 1 in. (25 mm) D B 23.6 in. (600 mm) E C 17 in . (76mm) 10 English
User Manual
Page 11
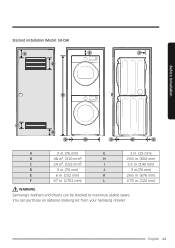
English 11 You can be stacked to maximize usable space. Before installation Stacked installation (Model: SK-DH) A E I B F C D G H J K L A 3 in. (76 mm) G 1 in. (25 mm) B 48 in². (310 mm²) H 23.6 in. (600 mm) C 24 in². (155 mm²) I 5.5 in. (140 mm) D 3 in. (76 mm) J 3 in.(76 mm) E 6 in. (152 mm) K 26.6 in. (676 mm) F 67 in. (1702 mm) L 4.75 in. (120 mm) WARNING Samsung's washers and dryers can purchase an optional stacking kit from your Samsung retailer.
English 11 You can be stacked to maximize usable space. Before installation Stacked installation (Model: SK-DH) A E I B F C D G H J K L A 3 in. (76 mm) G 1 in. (25 mm) B 48 in². (310 mm²) H 23.6 in. (600 mm) C 24 in². (155 mm²) I 5.5 in. (140 mm) D 3 in. (76 mm) J 3 in.(76 mm) E 6 in. (152 mm) K 26.6 in. (676 mm) F 67 in. (1702 mm) L 4.75 in. (120 mm) WARNING Samsung's washers and dryers can purchase an optional stacking kit from your Samsung retailer.
User Manual
Page 12
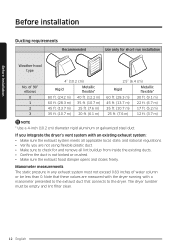
... water column or be empty and lint filter clean. 12 English Manometer measurements The static pressure in any exhaust system must be less than 0. The dryer tumbler must not exceed 0.83 inches of 90° elbows 0 1 2 3 4" (10.2 cm) Rigid Metallic flexible* 80 ft. (24.2 m) 40 ft. ... 4-inch (10.2 cm) diameter rigid aluminum or galvanized steel duct. If you integrate the dryer's vent system with a manometer presented to the exhaust duct that these values are measured with the dryer running with an existing exhaust system: • Make sure the exhaust system meets all applicable ...
... water column or be empty and lint filter clean. 12 English Manometer measurements The static pressure in any exhaust system must be less than 0. The dryer tumbler must not exceed 0.83 inches of 90° elbows 0 1 2 3 4" (10.2 cm) Rigid Metallic flexible* 80 ft. (24.2 m) 40 ft. ... 4-inch (10.2 cm) diameter rigid aluminum or galvanized steel duct. If you integrate the dryer's vent system with a manometer presented to the exhaust duct that these values are measured with the dryer running with an existing exhaust system: • Make sure the exhaust system meets all applicable ...
User Manual
Page 13
... fasteners that extend into the room. In the United States and Canada • All dryers must exhaust the dryer to the outside to reduce the risk of fire when you install the dryer in the "Installation" section for the maximum duct length and number of bends that is...United States only: Use only those foiltype flexible ducts, if any , specifically identified for Clothes Dryer Transition Duct. WARNING • You must be used. • The total length of a building. Exhausting the dryer to the local codes. English 13 Outside the United States and Canada • Refer to...
... fasteners that extend into the room. In the United States and Canada • All dryers must exhaust the dryer to the outside to reduce the risk of fire when you install the dryer in the "Installation" section for the maximum duct length and number of bends that is...United States only: Use only those foiltype flexible ducts, if any , specifically identified for Clothes Dryer Transition Duct. WARNING • You must be used. • The total length of a building. Exhausting the dryer to the local codes. English 13 Outside the United States and Canada • Refer to...
User Manual
Page 14
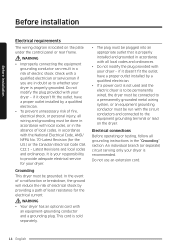
...ANSI/ NFPA No. 70-Latest Revision (for the U.S.) or the Canadian Electrical Code CSA C22.1 - It is located on the dryer. Grounding This dryer must be run with an equipment-grounding conductor and a grounding plug. if it doesn't fit the outlet, have a proper outlet installed...Before installation Before installation Electrical requirements The wiring diagram is your responsibility to provide adequate electrical service for your dryer. WARNING • Your dryer has an optional cord with the circuit conductors and connected to the equipment grounding terminal or lead on the ...
...ANSI/ NFPA No. 70-Latest Revision (for the U.S.) or the Canadian Electrical Code CSA C22.1 - It is located on the dryer. Grounding This dryer must be run with an equipment-grounding conductor and a grounding plug. if it doesn't fit the outlet, have a proper outlet installed...Before installation Before installation Electrical requirements The wiring diagram is your responsibility to provide adequate electrical service for your dryer. WARNING • Your dryer has an optional cord with the circuit conductors and connected to the equipment grounding terminal or lead on the ...
User Manual
Page 15
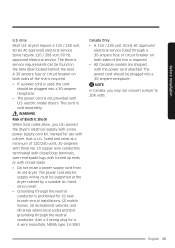
... 208 volts. The electric service requirements can connect the dryer's electrical supply with a new power supply cord kit, marked for a 4 wire receptacle, NEMA type 14-30R.) Canada Only • A 120 / 240 volt, 60 Hz AC approved electrical service fused through a 30-ampere fuse or circuit breaker ...behind the door. WARNING Risk of the line is required. • All Canadian models are shipped with a dryer, that is sold separately. dryers require a 120 / 240 volt, 60 Hz AC approved electrical service. The power cord electric supply wiring must be found on both sides of 120/240 volts...
... 208 volts. The electric service requirements can connect the dryer's electrical supply with a new power supply cord kit, marked for a 4 wire receptacle, NEMA type 14-30R.) Canada Only • A 120 / 240 volt, 60 Hz AC approved electrical service fused through a 30-ampere fuse or circuit breaker ...behind the door. WARNING Risk of the line is required. • All Canadian models are shipped with a dryer, that is sold separately. dryers require a 120 / 240 volt, 60 Hz AC approved electrical service. The power cord electric supply wiring must be found on both sides of 120/240 volts...
User Manual
Page 16
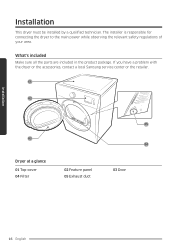
The installer is responsible for connecting the dryer to the main power while observing the relevant safety regulations of your area. If you have a problem with the dryer or the accessories, contact a local Samsung service center or the retailer. 01 02 03 Dryer at a glance 01 Top cover 04 Filter 02 Feature panel 05 Exhaust duct 05 04 03 Door 16 English What's included Make sure all the parts are included in the product package. Installation Installation This dryer must be installed by a qualified technician.
The installer is responsible for connecting the dryer to the main power while observing the relevant safety regulations of your area. If you have a problem with the dryer or the accessories, contact a local Samsung service center or the retailer. 01 02 03 Dryer at a glance 01 Top cover 04 Filter 02 Feature panel 05 Exhaust duct 05 04 03 Door 16 English What's included Make sure all the parts are included in the product package. Installation Installation This dryer must be installed by a qualified technician.
User Manual
Page 17
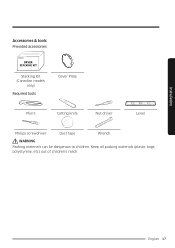
English 17 Keep all packing materials (plastic bags, polystyrene, etc.) out of children's reach. Installation Accessories & tools Provided accessories DRYER STACKING KIT Stacking Kit (Canadian models only) Required tools Cover Plate Pliers Cutting knife Nut driver Level Philips screwdriver Duct tape Wrench WARNING Packing materials can be dangerous to children.
English 17 Keep all packing materials (plastic bags, polystyrene, etc.) out of children's reach. Installation Accessories & tools Provided accessories DRYER STACKING KIT Stacking Kit (Canadian models only) Required tools Cover Plate Pliers Cutting knife Nut driver Level Philips screwdriver Duct tape Wrench WARNING Packing materials can be dangerous to children.
User Manual
Page 18
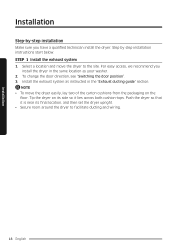
...the carton cushions from the packaging on its side so it is near its final location, and then set the dryer upright. • Secure room around the dryer to the site. To change the door direction, see "Switching the door position". 3. Install the exhaust system as... your washer. 2. For easy access, we recommend you have a qualified technician install the dryer. STEP 1 Install the exhaust system 1. NOTE • To move the dryer to facilitate ducting and wiring. 18 English Installation Installation Step-by step installation instructions start below.
...the carton cushions from the packaging on its side so it is near its final location, and then set the dryer upright. • Secure room around the dryer to the site. To change the door direction, see "Switching the door position". 3. Install the exhaust system as... your washer. 2. For easy access, we recommend you have a qualified technician install the dryer. STEP 1 Install the exhaust system 1. NOTE • To move the dryer to facilitate ducting and wiring. 18 English Installation Installation Step-by step installation instructions start below.
User Manual
Page 19
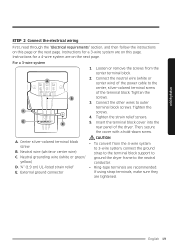
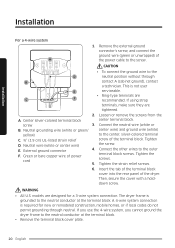
...If using strap terminals, make sure they are recommended. For a 3-wire system A B C D E 1. Neutral grounding wire (white or green/ ground the dryer frame to 3-wire system, connect the ground B. Connect the other wires to the center, silver-colored terminal screw of the terminal block. CAUTION A. E. Connect... the neutral wire (white or center wire) of the dryer. Neutral wire (white or center wire) strap to the terminal block support to C. Insert the terminal block cover into the rear panel...
...If using strap terminals, make sure they are recommended. For a 3-wire system A B C D E 1. Neutral grounding wire (white or green/ ground the dryer frame to 3-wire system, connect the ground B. Connect the other wires to the center, silver-colored terminal screw of the terminal block. CAUTION A. E. Connect... the neutral wire (white or center wire) of the dryer. Neutral wire (white or center wire) strap to the terminal block support to C. Insert the terminal block cover into the rear panel...
User Manual
Page 20
...for a 3-wire system connection. Then, secure the cover with a holddown screw. If you use the 4-wire system, you cannot ground the dryer frame to the screw. Remove the external ground connector's screw, and connect the ground wire (green or unwrapped) of the terminal block. ... terminals, make sure they are recommended. Loosen or remove the screws from the center terminal block. 3. Green or bare copper wire of the dryer. Tighten the screws. 5. This is grounded to the neutral position without through neutral. Neutral wire (white or center wire) E. Tighten the screw...
...for a 3-wire system connection. Then, secure the cover with a holddown screw. If you use the 4-wire system, you cannot ground the dryer frame to the screw. Remove the external ground connector's screw, and connect the ground wire (green or unwrapped) of the terminal block. ... terminals, make sure they are recommended. Loosen or remove the screws from the center terminal block. 3. Green or bare copper wire of the dryer. Tighten the screws. 5. This is grounded to the neutral position without through neutral. Neutral wire (white or center wire) E. Tighten the screw...
User Manual
Page 21
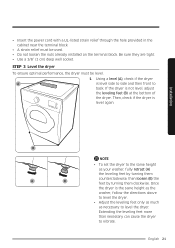
...then loosen (B) the feet by turning them clockwise. STEP 3 Level the dryer To ensure optimal performance, the dryer must be level. 1. Then, check if the dryer is not level, adjust the leveling feet (B) at the bottom of the dryer. Once the dryer is level side to side and then front to level the... dryer. English 21 Installation B NOTE • To set the dryer to the same height as necessary to back. • Insert the power cord ...
...then loosen (B) the feet by turning them clockwise. STEP 3 Level the dryer To ensure optimal performance, the dryer must be level. 1. Then, check if the dryer is not level, adjust the leveling feet (B) at the bottom of the dryer. Once the dryer is level side to side and then front to level the... dryer. English 21 Installation B NOTE • To set the dryer to the same height as necessary to back. • Insert the power cord ...
User Manual
Page 22
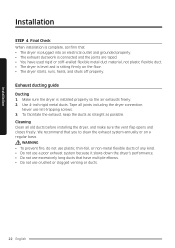
...sure the vent flap opens and closes freely. We recommend that you to clean the exhaust system annually or on the floor. • The dryer starts, runs, heats, and shuts off properly. To facilitate the exhaust, keep the ducts as straight as possible. Installation Installation STEP 4 ...Final Check When installation is complete, confirm that: • The dryer is plugged into an electrical outlet and grounded properly. • The exhaust ductwork is connected and the joints are taped. • You have ...
...sure the vent flap opens and closes freely. We recommend that you to clean the exhaust system annually or on the floor. • The dryer starts, runs, heats, and shuts off properly. To facilitate the exhaust, keep the ducts as straight as possible. Installation Installation STEP 4 ...Final Check When installation is complete, confirm that: • The dryer is plugged into an electrical outlet and grounded properly. • The exhaust ductwork is connected and the joints are taped. • You have ...

User Manual
Page 23
... in C a later step. 3. Installation Changing the direction of the exhaust duct (optional) WARNING Before performing this exhaust installation, disconnect the dryer from the duct. Pull the duct out of the dryer, and then remove the screw (C) from its electrical supply. Set screw (C) aside. Wear gloves to protect your hands and arms from...
... in C a later step. 3. Installation Changing the direction of the exhaust duct (optional) WARNING Before performing this exhaust installation, disconnect the dryer from the duct. Pull the duct out of the dryer, and then remove the screw (C) from its electrical supply. Set screw (C) aside. Wear gloves to protect your hands and arms from...


