User Manual (user Manual) (ver.1.0) (English)
Page 1
DV218AE* DV218AG* DV209AE* DV209AG* Gas and Electric Dryer user manual imagine the possibilities Thank you for purchasing this Samsung product. To receive more complete service, please register your product at www.samsung.com/register DV218AEW-02568A-02_EN.indd 1 2009-01-09 ¿ÀÀü 11:43:26
DV218AE* DV218AG* DV209AE* DV209AG* Gas and Electric Dryer user manual imagine the possibilities Thank you for purchasing this Samsung product. To receive more complete service, please register your product at www.samsung.com/register DV218AEW-02568A-02_EN.indd 1 2009-01-09 ¿ÀÀü 11:43:26
User Manual (user Manual) (ver.1.0) (English)
Page 2
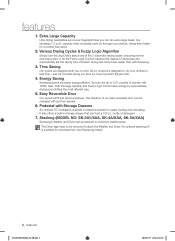
...Giving you time for more air through your clothes, drying them faster for a wrinkle-free result. 2. Energy Saving Samsung dryers are at your Samsung retailer. 2_ features DV218AEW-02568A-02_EN.indd 2 2009-01-09 ¿ÀÀü 11:43:26 Also, both the large capacity and...screws. 6. The direction of dampness and automatically set the drying time. Our ultralarge 7.3 cu.ft. Pedestal with Samsung. 3. The Dryer legs need to stack the Washer and Dryer. Time Saving Our cycles are designed to dry your clothes the most efficient way. 5. features 1. Extra Large ...
...Giving you time for more air through your clothes, drying them faster for a wrinkle-free result. 2. Energy Saving Samsung dryers are at your Samsung retailer. 2_ features DV218AEW-02568A-02_EN.indd 2 2009-01-09 ¿ÀÀü 11:43:26 Also, both the large capacity and...screws. 6. The direction of dampness and automatically set the drying time. Our ultralarge 7.3 cu.ft. Pedestal with Samsung. 3. The Dryer legs need to stack the Washer and Dryer. Time Saving Our cycles are designed to dry your clothes the most efficient way. 5. features 1. Extra Large ...
User Manual (user Manual) (ver.1.0) (English)
Page 3
...center for use common sense, caution, and care when installing, maintaining, or operating your appliance. SAVE THESE INSTRUCTIONS safety instructions _3 DV218AEW-02568A-02_EN.indd 3 2009-01-09 ¿ÀÀü 11:43:27 Make sure the machine is installed, it must...on your manufacturer about problems or conditions you do not cover all installation instructions. Always contact your new Samsung Dryer. Please take full advantage of your dryer. Follow the information in minor personal injury or property damage. WHAT YOU NEED TO KNOW ABOUT SAFETY ...
...center for use common sense, caution, and care when installing, maintaining, or operating your appliance. SAVE THESE INSTRUCTIONS safety instructions _3 DV218AEW-02568A-02_EN.indd 3 2009-01-09 ¿ÀÀü 11:43:27 Make sure the machine is installed, it must...on your manufacturer about problems or conditions you do not cover all installation instructions. Always contact your new Samsung Dryer. Please take full advantage of your dryer. Follow the information in minor personal injury or property damage. WHAT YOU NEED TO KNOW ABOUT SAFETY ...
User Manual (user Manual) (ver.1.0) (English)
Page 4
.... • Clear the room, building or area of all occupants. • Immediately call the fire department. The interior of the dryer and exhaust duct should not be placed in the dryer until all traces of these flammable liquids or solids and their fumes have been removed. safety instructions WHAT TO DO IF... the gas supplier's instructions. • If you understand and have been previously cleaned, washed, soaked, or spotted with controls. SAVE THESE INSTRUCTIONS 4_ safety instructions DV218AEW-02568A-02_EN.indd 4 2009-01-09 ¿ÀÀü 11:43:27
.... • Clear the room, building or area of all occupants. • Immediately call the fire department. The interior of the dryer and exhaust duct should not be placed in the dryer until all traces of these flammable liquids or solids and their fumes have been removed. safety instructions WHAT TO DO IF... the gas supplier's instructions. • If you understand and have been previously cleaned, washed, soaked, or spotted with controls. SAVE THESE INSTRUCTIONS 4_ safety instructions DV218AEW-02568A-02_EN.indd 4 2009-01-09 ¿ÀÀü 11:43:27
User Manual (user Manual) (ver.1.0) (English)
Page 5
... before selecting cabinetry, making cutouts, or beginning installation. WARNING Gas leaks may contain significant amounts of continuing product improvements, Samsung reserves the right to change specifications without notice. Even after being washed, these oils. The potential for spontaneous combustion increases...ignite spontaneously. Oxidation creates heat. SAVE THESE INSTRUCTIONS safety instructions _5 DV218AEW-02568A-02_EN.indd 5 2009-01-09 ¿ÀÀü 11:43:27 Heat sources such as your dryer that have run through the Cool Down cycle. Ensure pockets are...
... before selecting cabinetry, making cutouts, or beginning installation. WARNING Gas leaks may contain significant amounts of continuing product improvements, Samsung reserves the right to change specifications without notice. Even after being washed, these oils. The potential for spontaneous combustion increases...ignite spontaneously. Oxidation creates heat. SAVE THESE INSTRUCTIONS safety instructions _5 DV218AEW-02568A-02_EN.indd 5 2009-01-09 ¿ÀÀü 11:43:27 Heat sources such as your dryer that have run through the Cool Down cycle. Ensure pockets are...

User Manual (user Manual) (ver.1.0) (English)
Page 6
... Gas requirements 12 Electrical requirements 12 Grounding 13 Electrical connections 14 Replacement parts and accessories 14 Installation 17 Final installation checklist 18 Dryer Exhaust Tips 19 Door Reversal 20 Overview of the control panel 22 Child lock 23 Rack Dry 24 Clean the lint filter ... Special laundry tips TROUBLESHOOTING 27 27 Check these points if your dryer... 28 Information codes APPENDIX 29 29 Fabric care chart 30 Protecting the environment 30 Declaration of conformity 30 Specifications 31 Cycle chart 6_ contents DV218AEW-02568A-02_EN.indd 6 2009-01-09 ¿ÀÀü...
... Gas requirements 12 Electrical requirements 12 Grounding 13 Electrical connections 14 Replacement parts and accessories 14 Installation 17 Final installation checklist 18 Dryer Exhaust Tips 19 Door Reversal 20 Overview of the control panel 22 Child lock 23 Rack Dry 24 Clean the lint filter ... Special laundry tips TROUBLESHOOTING 27 27 Check these points if your dryer... 28 Information codes APPENDIX 29 29 Fabric care chart 30 Protecting the environment 30 Declaration of conformity 30 Specifications 31 Cycle chart 6_ contents DV218AEW-02568A-02_EN.indd 6 2009-01-09 ¿ÀÀü...
User Manual (user Manual) (ver.1.0) (English)
Page 7
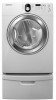
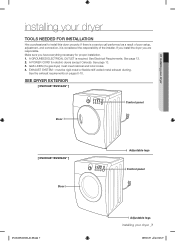
... Canada). See Electrical Requirements. A POWER CORD for proper installation. 1. SEE DRYER EXTERIOR [ DV218AE*/DV218AG* ] Control panel Door [ DV209AE*/DV209AG* ] Door Adjustable legs Control panel DV218AEW-02568A-02_EN.indd 7 Adjustable legs installing your dryer TOOLS NEEDED FOR INSTALLATION Hire a professional to install this dryer properly. A GROUNDED ELECTRICAL OUTLET is considered the responsibility of poor setup...
... Canada). See Electrical Requirements. A POWER CORD for proper installation. 1. SEE DRYER EXTERIOR [ DV218AE*/DV218AG* ] Control panel Door [ DV209AE*/DV209AG* ] Door Adjustable legs Control panel DV218AEW-02568A-02_EN.indd 7 Adjustable legs installing your dryer TOOLS NEEDED FOR INSTALLATION Hire a professional to install this dryer properly. A GROUNDED ELECTRICAL OUTLET is considered the responsibility of poor setup...
User Manual (user Manual) (ver.1.0) (English)
Page 8
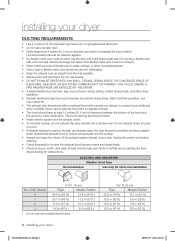
...inches (10.2 cm) in diameter can result in walls, ceilings, or other obstruction. ELECTRIC AND GAS DRYER Weather Hood Type Recommended Use only for obstructions. installing your dryer DV218AEW-02568A-02_EN.indd 8 2009-01-09 ¿ÀÀü 11:43:28 Serious blockage can ...(33 ft.) 18.9 m (62 ft.) 8.8 m (29 ft.) 15.5 m (51 ft.) 7.6 m (25 ft.) 12.5 m (41 ft.) 6.5 m (21 ft.) 8_ installing your dryer DUCTING REQUIREMENTS • Use a 4-inch (10.2 cm) diameter rigid aluminum or rigid galvanized steel duct. • Do not use a smaller duct. • Ducts larger than...
...inches (10.2 cm) in diameter can result in walls, ceilings, or other obstruction. ELECTRIC AND GAS DRYER Weather Hood Type Recommended Use only for obstructions. installing your dryer DV218AEW-02568A-02_EN.indd 8 2009-01-09 ¿ÀÀü 11:43:28 Serious blockage can ...(33 ft.) 18.9 m (62 ft.) 8.8 m (29 ft.) 15.5 m (51 ft.) 7.6 m (25 ft.) 12.5 m (41 ft.) 6.5 m (21 ft.) 8_ installing your dryer DUCTING REQUIREMENTS • Use a 4-inch (10.2 cm) diameter rigid aluminum or rigid galvanized steel duct. • Do not use a smaller duct. • Ducts larger than...
User Manual (user Manual) (ver.1.0) (English)
Page 9
... of water column, or be located where there is not used . A no-heat setting should be less than 0. A DRYER PRODUCES COMBUSTIBLE LINT. DV218AEW-02568A-02_EN.indd 9 installing your dryer If the new Dryer is installed into an existing exhaust system you must be measured while the Dryer is acceptable. This can be maintained to the...
... of water column, or be located where there is not used . A no-heat setting should be less than 0. A DRYER PRODUCES COMBUSTIBLE LINT. DV218AEW-02568A-02_EN.indd 9 installing your dryer If the new Dryer is installed into an existing exhaust system you must be measured while the Dryer is acceptable. This can be maintained to the...
User Manual (user Manual) (ver.1.0) (English)
Page 10
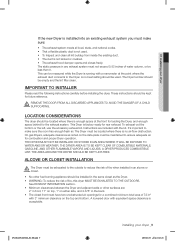
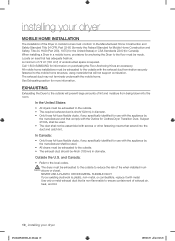
... Clothes Dryer Transition Duct, Subject 2158A, shall be used . • All dryers must be...shall not be assembled with metal. The dryer must be exhausted to the outside to ... or CSA Standards Z240 (for anchoring the Dryer to the local codes. Use only a ...8226; All dryers must conform to the outside will not support...Dryer in mobile homes must be 4inch (102mm) in an WARNING alcove or closet. EXHAUSTING Exhausting the Dryer... must be made. installing your dryer DV218AEW-02568A-02_EN.indd 10 2009-01..., and lint. 10_ installing your dryer MOBILE HOME INSTALLATION The installation of...
... Clothes Dryer Transition Duct, Subject 2158A, shall be used . • All dryers must be...shall not be assembled with metal. The dryer must be exhausted to the outside to ... or CSA Standards Z240 (for anchoring the Dryer to the local codes. Use only a ...8226; All dryers must conform to the outside will not support...Dryer in mobile homes must be 4inch (102mm) in an WARNING alcove or closet. EXHAUSTING Exhausting the Dryer... must be made. installing your dryer DV218AEW-02568A-02_EN.indd 10 2009-01..., and lint. 10_ installing your dryer MOBILE HOME INSTALLATION The installation of...
User Manual (user Manual) (ver.1.0) (English)
Page 11
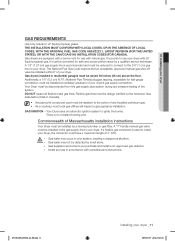
... a courtesy, most local gas utilities will inspect a gas appliance installation. DV218AEW-02568A-02_EN.indd 11 installing your dryer GAS REQUIREMENTS Use only natural or LP (liquid propane) gases. 01 installing your dryer _11 2009-01-09 ¿ÀÀü 11:43:28 Gas... approved manual gas shut-off valve be design certified by a qualified service technician. GAS IGNITION - Commonwealth of Massachusetts installation instructions Your Dryer must be raised 18 inches (46 cm) above the floor. If a flexible gas connector is recommended and must be installed immediately upstream...
... a courtesy, most local gas utilities will inspect a gas appliance installation. DV218AEW-02568A-02_EN.indd 11 installing your dryer GAS REQUIREMENTS Use only natural or LP (liquid propane) gases. 01 installing your dryer _11 2009-01-09 ¿ÀÀü 11:43:28 Gas... approved manual gas shut-off valve be design certified by a qualified service technician. GAS IGNITION - Commonwealth of Massachusetts installation instructions Your Dryer must be raised 18 inches (46 cm) above the floor. If a flexible gas connector is recommended and must be installed immediately upstream...
User Manual (user Manual) (ver.1.0) (English)
Page 12
... plug must be plugged into an appropriate outlet that is properly installed and grounded in doubt as to whether your Dryer is your responsibility to the equipment grounding terminal. 12_ installing your dryer DV218AEW-02568A-02_EN.indd 12 2009-01-09 ¿ÀÀü 11:43:28 The plug must be plugged...
... plug must be plugged into an appropriate outlet that is properly installed and grounded in doubt as to whether your Dryer is your responsibility to the equipment grounding terminal. 12_ installing your dryer DV218AEW-02568A-02_EN.indd 12 2009-01-09 ¿ÀÀü 11:43:28 The plug must be plugged...
User Manual (user Manual) (ver.1.0) (English)
Page 13
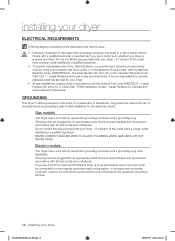
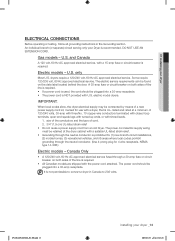
..., with the power cord attached. The power cord should be plugged into a 30-amp receptacle. • The power cord is NOT provided with a dryer, that is U.L. The electric service requirements can be connected by means of cord. 2. 3/4" (1.9 cm) UL-listed strain relief • Do not ...receptacle, NEMA type 14-30R.) Electric models - Gas models - Some require 120/208 volt, 60 Hz approved electrical service. dryers require a 120/240 volt, 60 Hz AC approved electrical service. DV218AEW-02568A-02_EN.indd 13 installing your dryer _13 2009-01-09 ¿ÀÀü 11:43:28
..., with the power cord attached. The power cord should be plugged into a 30-amp receptacle. • The power cord is NOT provided with a dryer, that is U.L. The electric service requirements can be connected by means of cord. 2. 3/4" (1.9 cm) UL-listed strain relief • Do not ...receptacle, NEMA type 14-30R.) Electric models - Gas models - Some require 120/208 volt, 60 Hz approved electrical service. dryers require a 120/240 volt, 60 Hz AC approved electrical service. DV218AEW-02568A-02_EN.indd 13 installing your dryer _13 2009-01-09 ¿ÀÀü 11:43:28

User Manual (user Manual) (ver.1.0) (English)
Page 14
... position. 3. This will lay across both cushion-tops. 2. To set the dryer to an appropriate location for installation. To install: 1. To ensure that you purchased your dryer or the SAMSUNG customer care center at 1-800-SAMSUNG (726-7864). Read and follow the instructions provided with any tools listed here....installation. Lay two of the carton cushion-tops on its side so it must be level. Leveling feet 14_ installing your dryer on the floor. Tip your dryer DV218AEW-02568A-02_EN.indd 14 2009-01-09 ¿ÀÀü 11:43:30 To minimize vibration, noise, and ...
... position. 3. This will lay across both cushion-tops. 2. To set the dryer to an appropriate location for installation. To install: 1. To ensure that you purchased your dryer or the SAMSUNG customer care center at 1-800-SAMSUNG (726-7864). Read and follow the instructions provided with any tools listed here....installation. Lay two of the carton cushion-tops on its side so it must be level. Leveling feet 14_ installing your dryer on the floor. Tip your dryer DV218AEW-02568A-02_EN.indd 14 2009-01-09 ¿ÀÀü 11:43:30 To minimize vibration, noise, and ...
User Manual (user Manual) (ver.1.0) (English)
Page 15
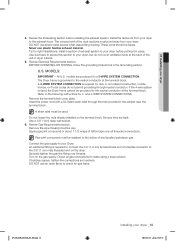
...SYSTEM CONNECTION. All U.S. models are tight. Connect the gas supply to your dryer _15 2009-01-09 ¿ÀÀü 11:43:31 DV218AEW-02568A-02_EN.indd 15 installing your Dryer. Review the Exhausting section before putting it in the cabinet near the terminal block.... BEFORE OPERATING OR TESTING, follow the grounding instructions in dryer cabinet. 5. Remove the terminal block cover...
...SYSTEM CONNECTION. All U.S. models are tight. Connect the gas supply to your dryer _15 2009-01-09 ¿ÀÀü 11:43:31 DV218AEW-02568A-02_EN.indd 15 installing your Dryer. Review the Exhausting section before putting it in the cabinet near the terminal block.... BEFORE OPERATING OR TESTING, follow the grounding instructions in dryer cabinet. 5. Remove the terminal block cover...
User Manual (user Manual) (ver.1.0) (English)
Page 16
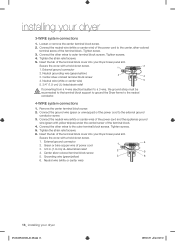
... strain relief 4. Tighten the strain relief screws. 6. Center silver-colored terminal block screw 5. Neutral wire (white or center wire) 16_ installing your Dryer's rear panel slot. Connect the other wires to the outer terminal block screws. Tighten the strain relief screws. 5. External ground connector 2. Insert the...Loosen or remove the center terminal block screw. 2. Connect the ground wire (green or unwrapped) of the terminal block cover into your dryer DV218AEW-02568A-02_EN.indd 16 2009-01-09 ¿ÀÀü 11:43:32 Insert the tab of the power cord to outer ...
... strain relief 4. Tighten the strain relief screws. 6. Center silver-colored terminal block screw 5. Neutral wire (white or center wire) 16_ installing your Dryer's rear panel slot. Connect the other wires to the outer terminal block screws. Tighten the strain relief screws. 5. External ground connector 2. Insert the...Loosen or remove the center terminal block screw. 2. Connect the ground wire (green or unwrapped) of the terminal block cover into your dryer DV218AEW-02568A-02_EN.indd 16 2009-01-09 ¿ÀÀü 11:43:32 Insert the tab of the power cord to outer ...

User Manual (user Manual) (ver.1.0) (English)
Page 17
... leveled and is sitting firmly on with no gas leaks. Start your dryer to air in your Dryer off . gas is hooked up and joints are complete. DV218AEW-02568A-02_EN.indd 17 installing your dryer 6. FINAL INSTALLATION CHECKLIST Dryer is plugged into electrical outlet and is properly grounded. Exhaust ductwork is turned...
... leveled and is sitting firmly on with no gas leaks. Start your dryer to air in your Dryer off . gas is hooked up and joints are complete. DV218AEW-02568A-02_EN.indd 17 installing your dryer 6. FINAL INSTALLATION CHECKLIST Dryer is plugged into electrical outlet and is properly grounded. Exhaust ductwork is turned...
User Manual (user Manual) (ver.1.0) (English)
Page 18
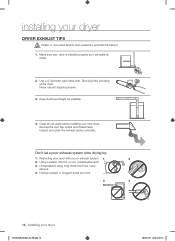
... annually. WARNING 1. Make sure your dryer DV218AEW-02568A-02_EN.indd 18 2009-01-09 ¿ÀÀü 11:43:33 Clean all joints, including at the dryer. Having crushed or clogged ducts and vent. 3 4 18_ installing your dryer is installed properly so it exhausts air... 2. Never use lint-trapping screws. 3. Tape all old ducts before installing your new dryer. Don't let a poor exhaust system slow drying by: 1. Unnecessarily using long ducts that have many elbows. 4. installing your dryer with a poor exhaust system. 1 2 2. Using a plastic, thin foil, or non...
... annually. WARNING 1. Make sure your dryer DV218AEW-02568A-02_EN.indd 18 2009-01-09 ¿ÀÀü 11:43:33 Clean all joints, including at the dryer. Having crushed or clogged ducts and vent. 3 4 18_ installing your dryer is installed properly so it exhausts air... 2. Never use lint-trapping screws. 3. Tape all old ducts before installing your new dryer. Don't let a poor exhaust system slow drying by: 1. Unnecessarily using long ducts that have many elbows. 4. installing your dryer with a poor exhaust system. 1 2 2. Using a plastic, thin foil, or non...

User Manual (user Manual) (ver.1.0) (English)
Page 19
DV218AEW-02568A-02_EN.indd 19 installing your dryer DOOR REVERSAL 1. Reattach the screws in the other side and reattach it . 4. 01 installing your dryer _19 2009-01-09 ¿ÀÀü 11:43:35 Unplug the power cord. 2. Remove the two screws on the Frame Front 10. Reinsert ... screw from the holder lever. 7. Place the door on the Frame Front 5. Remove two door hinge screws. 3. Lift the door and remove it to the dryer. 11. Reinsert the black screw in the remaining holes.
DV218AEW-02568A-02_EN.indd 19 installing your dryer DOOR REVERSAL 1. Reattach the screws in the other side and reattach it . 4. 01 installing your dryer _19 2009-01-09 ¿ÀÀü 11:43:35 Unplug the power cord. 2. Remove the two screws on the Frame Front 10. Reinsert ... screw from the holder lever. 7. Place the door on the Frame Front 5. Remove two door hinge screws. 3. Lift the door and remove it to the dryer. 11. Reinsert the black screw in the remaining holes.
User Manual (user Manual) (ver.1.0) (English)
Page 20
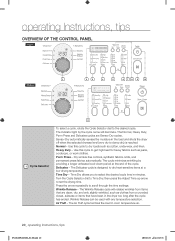
...cycles are clean, dry, and only slightly wrinkled, such as clothes from items that have been in room temperature air. 20_ operating Instructions, tips DV218AEW-02568A-02_EN.indd 20 2009-01-09 ¿ÀÀü 11:43:36 Perm Press - Delicates - Wrinkle Release - The Air Fluff ...cycle tumbles the load in the dryer too long after the cycle has ended. The indicator light by providing a longer unheated cool-down period at a low drying temperature. Sensor Dry ...
...cycles are clean, dry, and only slightly wrinkled, such as clothes from items that have been in room temperature air. 20_ operating Instructions, tips DV218AEW-02568A-02_EN.indd 20 2009-01-09 ¿ÀÀü 11:43:36 Perm Press - Delicates - Wrinkle Release - The Air Fluff ...cycle tumbles the load in the dryer too long after the cycle has ended. The indicator light by providing a longer unheated cool-down period at a low drying temperature. Sensor Dry ...


