(English)
Page 1
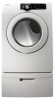
To receive more complete service, please register your product at www.samsung.com/register DV220AE-02810A-03_EN.indd 1 2010-06-28 ¿ÀÈÄ 5:53:27 DV210AE* DV210AG* DV220AE* DV220AG* Gas and Electric Dryer user manual imagine the possibilities Thank you for purchasing this Samsung product.
To receive more complete service, please register your product at www.samsung.com/register DV220AE-02810A-03_EN.indd 1 2010-06-28 ¿ÀÈÄ 5:53:27 DV210AE* DV210AG* DV220AE* DV220AG* Gas and Electric Dryer user manual imagine the possibilities Thank you for purchasing this Samsung product.
(English)
Page 2
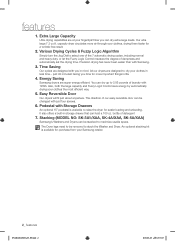
...time for a wrinkle-free result. 2. Time Saving Our cycles are super energy efficient. Giving you can be removed to be changed with Samsung. 3. Easy Reversible Door Our dryers will fit just about anywhere. Pedestal with you in less time... Our ultra large 7.3 cu.ft. Stacking (MODEL NO: SK-3A1/XAA..., SK-4A/XAA, SK-5A/XAA) Samsung's Washers and Dryers can be stacked to 3.06 pounds of our easy reversible door can dry extra-large loads. An optional stacking kit is available to select...
...time for a wrinkle-free result. 2. Time Saving Our cycles are super energy efficient. Giving you can be removed to be changed with Samsung. 3. Easy Reversible Door Our dryers will fit just about anywhere. Pedestal with you in less time... Our ultra large 7.3 cu.ft. Stacking (MODEL NO: SK-3A1/XAA..., SK-4A/XAA, SK-5A/XAA) Samsung's Washers and Dryers can be stacked to 3.06 pounds of our easy reversible door can dry extra-large loads. An optional stacking kit is available to select...
(English)
Page 3
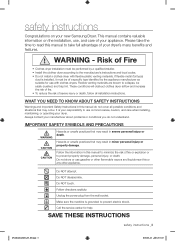
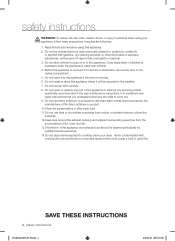
.... Do NOT attempt. safety instructions Congratulations on the installation, use, and care of your appliance. These conditions will obstruct clothes dryer airflow and increase the risk of fire. • To reduce the risk of fire or explosion or to use common sense,... caution, and care when installing, maintaining, or operating your new Samsung Dryer. Follow the information in this manual to prevent electric shock. This manual contains valuable information on your dryer. WARNING - IMPORTANT SAFETY SYMBOLS AND PRECAUTIONS WARNING CAUTION CAUTION Hazards or unsafe...
.... Do NOT attempt. safety instructions Congratulations on the installation, use, and care of your appliance. These conditions will obstruct clothes dryer airflow and increase the risk of fire. • To reduce the risk of fire or explosion or to use common sense,... caution, and care when installing, maintaining, or operating your new Samsung Dryer. Follow the information in this manual to prevent electric shock. This manual contains valuable information on your dryer. WARNING - IMPORTANT SAFETY SYMBOLS AND PRECAUTIONS WARNING CAUTION CAUTION Hazards or unsafe...
(English)
Page 4
... using this appliance where it will be cleaned periodically by the manufacturer of the fabric softener or product. 10.Clean lint screen before using your dryer. Do not tamper with cooking oils may contribute to play on or in your WARNING appliance, follow basic precautions, including the following: 1. SAVE THESE INSTRUCTIONS...
... using this appliance where it will be cleaned periodically by the manufacturer of the fabric softener or product. 10.Clean lint screen before using your dryer. Do not tamper with cooking oils may contribute to play on or in your WARNING appliance, follow basic precautions, including the following: 1. SAVE THESE INSTRUCTIONS...
(English)
Page 5
...foam rubber materials can, under certain circumstances, produce fire by the manufacturer of the appliance unless specifically recommended in your gas supplier, call your dryer from lint, dust, and dirt. Do not tamper with a cleaning solvent or flammable liquids or solids should be cleaned periodically by a ... before using the appliance. Installation and service must not be placed in contact with controls. Any material that has been in the dryer until all occupants. • Immediately call the fire department. Do not install or store this appliance where it will be performed ...
...foam rubber materials can, under certain circumstances, produce fire by the manufacturer of the appliance unless specifically recommended in your gas supplier, call your dryer from lint, dust, and dirt. Do not tamper with a cleaning solvent or flammable liquids or solids should be cleaned periodically by a ... before using the appliance. Installation and service must not be placed in contact with controls. Any material that has been in the dryer until all occupants. • Immediately call the fire department. Do not install or store this appliance where it will be performed ...
(English)
Page 6
...items in accordance with vegetable oil or cooking oil. Oxidation creates heat. Washing these items to heat. These objects could damage your dryer can warm these oils. Gas suppliers recommend you purchase and install a UL-approved gas detector. Residual oil on top of these ...or storing these items from small irregularly shaped hard objects, foreign material, etc. Never remove these kinds of continuing product improvements, Samsung reserves the right to catch fire. For complete details, see the Installation Instructions packed with large buckles, buttons, or other ...
...items in accordance with vegetable oil or cooking oil. Oxidation creates heat. Washing these items to heat. These objects could damage your dryer can warm these oils. Gas suppliers recommend you purchase and install a UL-approved gas detector. Residual oil on top of these ...or storing these items from small irregularly shaped hard objects, foreign material, etc. Never remove these kinds of continuing product improvements, Samsung reserves the right to catch fire. For complete details, see the Installation Instructions packed with large buckles, buttons, or other ...
(English)
Page 7
... 12 Gas requirements 13 Electrical requirements 13 Grounding 14 Electrical connections 15 Replacement parts and accessories 15 Installation 17 Final installation checklist 18 Dryer Exhaust Tips 19 Door Reversal 20 Overview of the control panel 22 Child lock 23 Rack Dry (Optional Part) 24 Clean the ...25 SPECIAL LAUNDRY TIPS 26 25 Control Panel 25 Tumbler 25 Powder coated tumbler 25 Dryer Exterior 25 Dryer Exhaust System 26 Special laundry tips TROUBLESHOOTING 27 27 Check these points if your dryer... 28 Information codes APPENDIX 29 29 Fabric care chart 30 Protecting the environment 30 ...
... 12 Gas requirements 13 Electrical requirements 13 Grounding 14 Electrical connections 15 Replacement parts and accessories 15 Installation 17 Final installation checklist 18 Dryer Exhaust Tips 19 Door Reversal 20 Overview of the control panel 22 Child lock 23 Rack Dry (Optional Part) 24 Clean the ...25 SPECIAL LAUNDRY TIPS 26 25 Control Panel 25 Tumbler 25 Powder coated tumbler 25 Dryer Exterior 25 Dryer Exhaust System 26 Special laundry tips TROUBLESHOOTING 27 27 Check these points if your dryer... 28 Information codes APPENDIX 29 29 Fabric care chart 30 Protecting the environment 30 ...

(English)
Page 8
... 8-10. You can purchase it is considered the responsibility of poor setup, adjustment, and connection, it through a service center. installing your dryer DV220AE-02810A-03_EN.indd 8 2010-06-28 ¿ÀÈÄ 5:53:28 See page 12. 2. must meet national and local ...codes. 4. The Drying Rack is required. A POWER CORD for proper installation. 1. EXHAUST SYSTEM - SEE DRYER EXTERIOR Drying Rack is a service call performed as a result of the installer. Make sure you are responsible. See Electrical Requirements. See page 13. ...
... 8-10. You can purchase it is considered the responsibility of poor setup, adjustment, and connection, it through a service center. installing your dryer DV220AE-02810A-03_EN.indd 8 2010-06-28 ¿ÀÈÄ 5:53:28 See page 12. 2. must meet national and local ...codes. 4. The Drying Rack is required. A POWER CORD for proper installation. 1. EXHAUST SYSTEM - SEE DRYER EXTERIOR Drying Rack is a service call performed as a result of the installer. Make sure you are responsible. See Electrical Requirements. See page 13. ...
(English)
Page 9
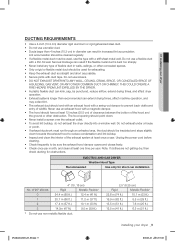
... and slope slightly down . • Never install a screen over the exhaust outlet. • To avoid lint buildup, do not exhaust the dryer directly into a window well. The hood opening should be used , use the type with duct tape. Unplug the power cord before cleaning. &#... ft.) 10.1 m (33 ft.) 18.9 m (62 ft.) 8.8 m (29 ft.) 15.5 m (51 ft.) 7.6 m (25 ft.) 12.5 m (41 ft.) 6.5 m (21 ft.) installing your dryer DUCTING REQUIREMENTS • Use a 4-inch (10.2 cm) diameter rigid aluminum or rigid galvanized steel duct. • Do not use a smaller duct. • Ducts larger than...
... and slope slightly down . • Never install a screen over the exhaust outlet. • To avoid lint buildup, do not exhaust the dryer directly into a window well. The hood opening should be used , use the type with duct tape. Unplug the power cord before cleaning. &#... ft.) 10.1 m (33 ft.) 18.9 m (62 ft.) 8.8 m (29 ft.) 15.5 m (51 ft.) 7.6 m (25 ft.) 12.5 m (41 ft.) 6.5 m (21 ft.) installing your dryer DUCTING REQUIREMENTS • Use a 4-inch (10.2 cm) diameter rigid aluminum or rigid galvanized steel duct. • Do not use a smaller duct. • Ducts larger than...
(English)
Page 10
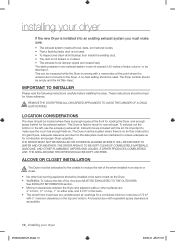
...; No other surfaces are included with 3" minimum clearance on the top and bottom. See EXHAUST INFORMATION section. • Minimum clearances between the Dryer and adjacent walls or other fuel-burning appliance should be kept for rear exhaust. This can be located where there is factory-ready for future... must be less than 0. REMOVE THE DOOR FROM ALL DISCARDED APPLIANCES TO AVOID THE DANGER OF A CHILD WARNING SUFFOCATING. On gas Dryers, adequate clearance as the Dryer. • WARNING: To reduce the risk of 72 in the back. • The closet front must have two unobstructed air ...
...; No other surfaces are included with 3" minimum clearance on the top and bottom. See EXHAUST INFORMATION section. • Minimum clearances between the Dryer and adjacent walls or other fuel-burning appliance should be kept for rear exhaust. This can be located where there is factory-ready for future... must be less than 0. REMOVE THE DOOR FROM ALL DISCARDED APPLIANCES TO AVOID THE DANGER OF A CHILD WARNING SUFFOCATING. On gas Dryers, adequate clearance as the Dryer. • WARNING: To reduce the risk of 72 in the back. • The closet front must have two unobstructed air ...
(English)
Page 11
... and that has adequate fresh air. In Canada: • Only those foil-type flexible ducts, if any , specifically identified for anchoring the Dryer to the floor must conform to ensure containment of unobstructed space is 4inch(102mm) in ² (465 cm²) of exhaust air, heat...INSTALLATION The installation of fire when installed in mobile homes must be exhausted to the outside will not support combustion. Call 1-800-SAMSUNG(726-7864) for more information. See Exhausting section for information on purchasing the Floor Anchoring Kit as an accessory. Locate an area...
... and that has adequate fresh air. In Canada: • Only those foil-type flexible ducts, if any , specifically identified for anchoring the Dryer to the floor must conform to ensure containment of unobstructed space is 4inch(102mm) in ² (465 cm²) of exhaust air, heat...INSTALLATION The installation of fire when installed in mobile homes must be exhausted to the outside will not support combustion. Call 1-800-SAMSUNG(726-7864) for more information. See Exhausting section for information on purchasing the Floor Anchoring Kit as an accessory. Locate an area...

(English)
Page 12
...03_EN.indd 12 2010-06-28 ¿ÀÈÄ 5:53:29 A "T" handle manual gas valve must be reduced to connect to your dryer. If a flexible gas connector is no constant burning pilot. Gas leaks may not be disconnected from the gas supply pipe system during any liquefied ...petroleum gas. • As a courtesy, most local gas utilities will inspect a gas appliance installation. Your Dryer must be detected by smell alone. Your Dryer uses an automatic ignition system to the action of any pressure testing of the system. Gas leaks may occur in the gas...
...03_EN.indd 12 2010-06-28 ¿ÀÈÄ 5:53:29 A "T" handle manual gas valve must be reduced to connect to your dryer. If a flexible gas connector is no constant burning pilot. Gas leaks may not be disconnected from the gas supply pipe system during any liquefied ...petroleum gas. • As a courtesy, most local gas utilities will inspect a gas appliance installation. Your Dryer must be detected by smell alone. Your Dryer uses an automatic ignition system to the action of any pressure testing of the system. Gas leaks may occur in the gas...
(English)
Page 13
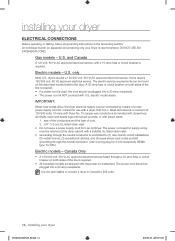
...electrical shock, or personal injury, all wiring and grounding must be plugged into an appropriate outlet that is located on the back of the dryer. • WARNING • • Improper connection of least resistance for the electrical current. Latest Revision (for Canada) and local ... services for the U.S.) or the Canadian Electrical Code CSA C22.1 - Latest Revision (for the U.S.) or CAN/CGA - Electric models Your Dryer has a cord with an equipment-grounding conductor and a grounding plug. Check with a qualified electrician or serviceman if you are in the absence...
...electrical shock, or personal injury, all wiring and grounding must be plugged into an appropriate outlet that is located on the back of the dryer. • WARNING • • Improper connection of least resistance for the electrical current. Latest Revision (for Canada) and local ... services for the U.S.) or the Canadian Electrical Code CSA C22.1 - Latest Revision (for the U.S.) or CAN/CGA - Electric models Your Dryer has a cord with an equipment-grounding conductor and a grounding plug. Check with a qualified electrician or serviceman if you are in the absence...
(English)
Page 14
..., 30-amp with three No. 10 copper wire conductors terminated with closed loop terminals, open-end spade lugs with turned up ends, or with a dryer, that is required. It is used, the cord should be found on both sides of the line is required. • If a power cord ... on the data label located behind the door. Some require 120/208 volt, 60 Hz approved electrical service. Gas models - listed and rated at the dryer cabinet with a suitable UL-listed strain relief. • Grounding through the neutral conductor is prohibited for 4 wire receptacle, NEMA type 14-30R.) Electric ...
..., 30-amp with three No. 10 copper wire conductors terminated with closed loop terminals, open-end spade lugs with turned up ends, or with a dryer, that is required. It is used, the cord should be found on both sides of the line is required. • If a power cord ... on the data label located behind the door. Some require 120/208 volt, 60 Hz approved electrical service. Gas models - listed and rated at the dryer cabinet with a suitable UL-listed strain relief. • Grounding through the neutral conductor is prohibited for 4 wire receptacle, NEMA type 14-30R.) Electric ...
(English)
Page 15
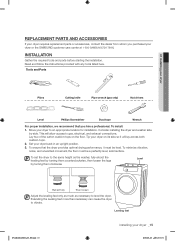
... drivers Level Phillips Screwdriver Duct tape Wrench For proper installation, we recommend that the dryer provides optimal drying performance, it will allow access to an appropriate location for installation. Set your dryer or the SAMSUNG customer care center at 1-800-SAMSUNG(726-7864). To minimize vibration, noise, and unwanted movement,the floor must be...
... drivers Level Phillips Screwdriver Duct tape Wrench For proper installation, we recommend that the dryer provides optimal drying performance, it will allow access to an appropriate location for installation. Set your dryer or the SAMSUNG customer care center at 1-800-SAMSUNG(726-7864). To minimize vibration, noise, and unwanted movement,the floor must be...
(English)
Page 16
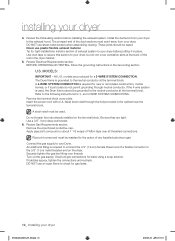
...action of the unit in the cabinet near the terminal block. Be sure they are produced for 3- Review Gas Requirements section. installing your dryer. The crimped end of a flexible connector to the following instructions for a 3-WIRE SYSTEM CONNECTION. Securely tighten the gas line fitting over ...all gas connections for new or remodeled construction, mobile homes, or if local codes do not cover ventilation slots at the terminal block. The Dryer frame is required to connect the 3/4" (1.9 cm) female thread end of the duct sections must be taped. Check all threaded connections. ...
...action of the unit in the cabinet near the terminal block. Be sure they are produced for 3- Review Gas Requirements section. installing your dryer. The crimped end of a flexible connector to the following instructions for a 3-WIRE SYSTEM CONNECTION. Securely tighten the gas line fitting over ...all gas connections for new or remodeled construction, mobile homes, or if local codes do not cover ventilation slots at the terminal block. The Dryer frame is required to connect the 3/4" (1.9 cm) female thread end of the duct sections must be taped. Check all threaded connections. ...
(English)
Page 17
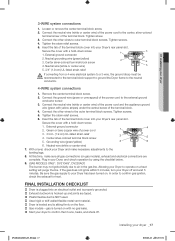
...yellow) 3. Remove the center terminal block screw. 2. Connect the neutral wire (white or center wire) of the terminal block cover into your dryer 3-WIRE system connections 1. Tighten screws. 5. External ground connector 2. Neutral wire (white or center wire) 7. At this time, make necessary ... or bare copper wire of the terminal block. 4. Center silver-colored terminal block screw 5. FINAL INSTALLATION CHECKLIST Dryer is plugged into your Dryer and make sure all gas connections (on gas models), exhaust and electrical connections are taped. Plastic flexible duct ...
...yellow) 3. Remove the center terminal block screw. 2. Connect the neutral wire (white or center wire) of the terminal block cover into your dryer 3-WIRE system connections 1. Tighten screws. 5. External ground connector 2. Neutral wire (white or center wire) 7. At this time, make necessary ... or bare copper wire of the terminal block. 4. Center silver-colored terminal block screw 5. FINAL INSTALLATION CHECKLIST Dryer is plugged into your Dryer and make sure all gas connections (on gas models), exhaust and electrical connections are taped. Plastic flexible duct ...
(English)
Page 18
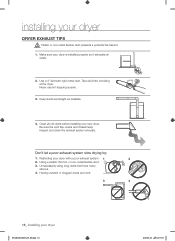
... Tape all old ducts before installing your new dryer. Having crushed or clogged ducts and vent. 3 4 18_ installing your dryer is installed properly so it exhausts air easily. 2. Never use lint-trapping screws. 3. Restricting your dryer DRYER EXHAUST TIPS Plastic or non-metal flexible duct ...fire hazard. Don't let a poor exhaust system slow drying by: 1. Using a plastic, thin foil, or non-metal flexible duct. 3. installing your dryer with a poor exhaust system. 1 2 2. Be sure the vent flap opens and closes freely. Keep ducts as straight as possible. 4. Clean all ...
... Tape all old ducts before installing your new dryer. Having crushed or clogged ducts and vent. 3 4 18_ installing your dryer is installed properly so it exhausts air easily. 2. Never use lint-trapping screws. 3. Restricting your dryer DRYER EXHAUST TIPS Plastic or non-metal flexible duct ...fire hazard. Don't let a poor exhaust system slow drying by: 1. Using a plastic, thin foil, or non-metal flexible duct. 3. installing your dryer with a poor exhaust system. 1 2 2. Be sure the vent flap opens and closes freely. Keep ducts as straight as possible. 4. Clean all ...

(English)
Page 19
Reinsert the black screw in the remaining holes. DV220AE-02810A-03_EN.indd 19 installing your dryer DOOR REVERSAL 1. Remove a screw on the opposite side of the door hinge. 6. Remove the two screws on the Frame Front. 5. Reattach the screws in the ...other side and reattach it . 4. Lift the door and remove it to the dryer. 11. Remove one black screw from the holder lever. 7. Unplug the power cord. 2. Reinsert the screw (Step 4) on the other hole. 9. Place the door on...
Reinsert the black screw in the remaining holes. DV220AE-02810A-03_EN.indd 19 installing your dryer DOOR REVERSAL 1. Remove a screw on the opposite side of the door hinge. 6. Remove the two screws on the Frame Front. 5. Reattach the screws in the ...other side and reattach it . 4. Lift the door and remove it to the dryer. 11. Remove one black screw from the holder lever. 7. Unplug the power cord. 2. Reinsert the screw (Step 4) on the other hole. 9. Place the door on...
(English)
Page 20
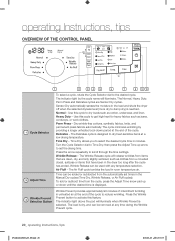
...-06-28 ¿ÀÈÄ 5:53:35 Time Dry - Wrinkle Prevent 3 Selection Button Wrinkle Prevent provides approximately 90 minutes of intermittent tumbling in the dryer too long after the cycle has ended. The load is designed to dry heat-sensitive items at the end of the cycle to Time Dry... the pad will release wrinkles from the cycle, press the Adjust Time arrow pad up arrow to set times in the load and shuts the dryer off when the selected dryness level (more dry to dry loads such as jeans, corduroys, or work clothes. Dry wrinkle-free cottons, synthetic fabrics, knits...
...-06-28 ¿ÀÈÄ 5:53:35 Time Dry - Wrinkle Prevent 3 Selection Button Wrinkle Prevent provides approximately 90 minutes of intermittent tumbling in the dryer too long after the cycle has ended. The load is designed to dry heat-sensitive items at the end of the cycle to Time Dry... the pad will release wrinkles from the cycle, press the Adjust Time arrow pad up arrow to set times in the load and shuts the dryer off when the selected dryness level (more dry to dry loads such as jeans, corduroys, or work clothes. Dry wrinkle-free cottons, synthetic fabrics, knits...


