User Manual (user Manual) (ver.1.0) (English)
Page 1
DV203 Gas and Electric Dryer user manual imagine the possibilities Thank you for purchasing a Samsung product. To receive a more complete service, please register your product at www.samsung.com/global/register
DV203 Gas and Electric Dryer user manual imagine the possibilities Thank you for purchasing a Samsung product. To receive a more complete service, please register your product at www.samsung.com/global/register
User Manual (user Manual) (ver.1.0) (English)
Page 2
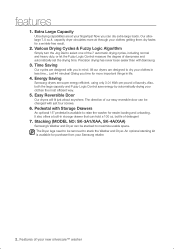
...optional stacking kit is available to raise the washer for purchase from your Samsung retailer. 2_ Features of dampness and automatically set the drying time. Stacking (MODEL NO: SK-3A1/XAA, SK-4A/XAA) Samsung's Washer and Dryer can dry extra-large loads. Now you can be stacked to stack ...the Washer and Dryer. Also, both the large capacity and Fuzzy Logic Control save energy by automatically drying your new...
...optional stacking kit is available to raise the washer for purchase from your Samsung retailer. 2_ Features of dampness and automatically set the drying time. Stacking (MODEL NO: SK-3A1/XAA, SK-4A/XAA) Samsung's Washer and Dryer can dry extra-large loads. Now you can be stacked to stack ...the Washer and Dryer. Also, both the large capacity and Fuzzy Logic Control save energy by automatically drying your new...
User Manual (user Manual) (ver.1.0) (English)
Page 3
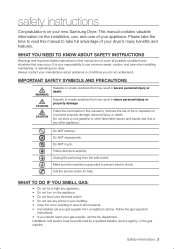
... CAUTION Hazards or unsafe practices that may result in your building. • Clear the room, building or area of your dryer's many benefits and features. safety instructions Congratulations on the installation, use, and care of all possible conditions and situations that may... occur. This manual contains valuable information on your dryer. It is grounded to use common sense, caution, and care when installing, maintaining, or operating your new Samsung Dryer. Always contact your manufacturer about problems or conditions you cannot reach your ...
... CAUTION Hazards or unsafe practices that may result in your building. • Clear the room, building or area of your dryer's many benefits and features. safety instructions Congratulations on the installation, use, and care of all possible conditions and situations that may... occur. This manual contains valuable information on your dryer. It is grounded to use common sense, caution, and care when installing, maintaining, or operating your new Samsung Dryer. Always contact your manufacturer about problems or conditions you cannot reach your ...
User Manual (user Manual) (ver.1.0) (English)
Page 4
... not reach into a receptacle that could damage your dryer from service, remove the door to the drying compartment to the weather. Do not use by the manufacturer of continuing product improvements, Samsung reserves the right to play on top of fire or explosion: • WARNING • ...Ensure pockets are many highly flammable items used near children and pets. Do not repair, replace, or attempt to service any part of the dryer and exhaust duct should not be placed in homes, such as acetone, denatured alcohol, gasoline, kerosene, some liquid household cleaners, some spot...
... not reach into a receptacle that could damage your dryer from service, remove the door to the drying compartment to the weather. Do not use by the manufacturer of continuing product improvements, Samsung reserves the right to play on top of fire or explosion: • WARNING • ...Ensure pockets are many highly flammable items used near children and pets. Do not repair, replace, or attempt to service any part of the dryer and exhaust duct should not be placed in homes, such as acetone, denatured alcohol, gasoline, kerosene, some liquid household cleaners, some spot...
User Manual (user Manual) (ver.1.0) (English)
Page 5
.... Always use in hot water with extra detergent will reduce, but not eliminate, the hazard. WARNING Gas leaks may prevent heat from the dryer hot or interrupt the drying cycle until the items have been spotted or soaked with the manufacturer's instructions. Install and use the Cool Down ...the items containing vegetable oil or cooking oil are hot. The residual oil can become hot enough to occur. Heat sources such as your dryer that contain vegetable oil or cooking oil can warm these items in accordance with vegetable oil or cooking oil. All washed and unwashed fabrics...
.... Always use in hot water with extra detergent will reduce, but not eliminate, the hazard. WARNING Gas leaks may prevent heat from the dryer hot or interrupt the drying cycle until the items have been spotted or soaked with the manufacturer's instructions. Install and use the Cool Down ...the items containing vegetable oil or cooking oil are hot. The residual oil can become hot enough to occur. Heat sources such as your dryer that contain vegetable oil or cooking oil can warm these items in accordance with vegetable oil or cooking oil. All washed and unwashed fabrics...

User Manual (user Manual) (ver.1.0) (English)
Page 6
...11 Gas requirements 12 Electrical requirements 12 Grounding 13 Electrical connections 13 Replacement parts and accessories 14 Installation 15 Final installation checklist 16 Dryer Exhaust Tips 17 Door Reversal 18 Overview of the control panel 20 Child lock 21 Rack Dry 22 Clean the lint filter 22...AND CLEANING 23 SPECIAL LAUNDRY TIPS 24 23 Control Panel 23 Tumbler 23 Stainless Steel Tumbler 23 Dryer Exterior 23 Dryer Exhaust System TROUBLESHOOTING 25 25 Check these points if your dryer... 26 Information codes 6_ Contents APPENDIX 27 27 Fabric care chart 28 Protecting the environment 28 ...
...11 Gas requirements 12 Electrical requirements 12 Grounding 13 Electrical connections 13 Replacement parts and accessories 14 Installation 15 Final installation checklist 16 Dryer Exhaust Tips 17 Door Reversal 18 Overview of the control panel 20 Child lock 21 Rack Dry 22 Clean the lint filter 22...AND CLEANING 23 SPECIAL LAUNDRY TIPS 24 23 Control Panel 23 Tumbler 23 Stainless Steel Tumbler 23 Dryer Exterior 23 Dryer Exhaust System TROUBLESHOOTING 25 25 Check these points if your dryer... 26 Information codes 6_ Contents APPENDIX 27 27 Fabric care chart 28 Protecting the environment 28 ...
User Manual (user Manual) (ver.1.0) (English)
Page 7
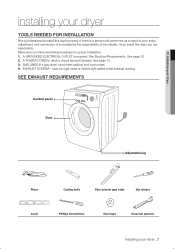
... panel Door Adjustable leg Pliers Cutting knife Pipe wrench (gas only) Nut drivers Level Phillips Screwdriver Duct tape Crescent spanner Installing your dryer TOOLS NEEDED FOR INSTALLATION Hire a professional to install this dryer properly. See page 12. 2. A POWER CORD for proper installation. 1. See page 13. 3. See Electrical Requirements. GAS LINES (if a gas...
... panel Door Adjustable leg Pliers Cutting knife Pipe wrench (gas only) Nut drivers Level Phillips Screwdriver Duct tape Crescent spanner Installing your dryer TOOLS NEEDED FOR INSTALLATION Hire a professional to install this dryer properly. See page 12. 2. A POWER CORD for proper installation. 1. See page 13. 3. See Electrical Requirements. GAS LINES (if a gas...
User Manual (user Manual) (ver.1.0) (English)
Page 8
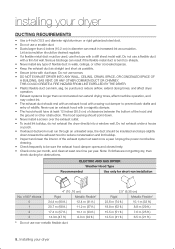
... and slope slightly down . • Never install a screen over the exhaust outlet. • To avoid lint buildup, do not exhaust the dryer directly into a window well. Lint accumulation should be cleaned regularly. • If a flexible metal duct must run installation No. The hood opening... with duct tape. Unplug the power cord before cleaning. • Check frequently to be punctured, reduce airflow, extend drying times, and affect dryer operation. • Exhaust systems longer than 4 inches (10.2 cm) in diameter can result in walls, ceilings, or other obstruction. Do not...
... and slope slightly down . • Never install a screen over the exhaust outlet. • To avoid lint buildup, do not exhaust the dryer directly into a window well. Lint accumulation should be cleaned regularly. • If a flexible metal duct must run installation No. The hood opening... with duct tape. Unplug the power cord before cleaning. • Check frequently to be punctured, reduce airflow, extend drying times, and affect dryer operation. • Exhaust systems longer than 4 inches (10.2 cm) in diameter can result in walls, ceilings, or other obstruction. Do not...
User Manual (user Manual) (ver.1.0) (English)
Page 9
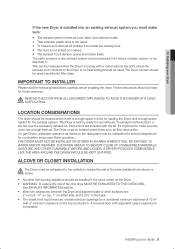
...used . • To Inspect and clean all lint buildup from inside the existing duct. • The duct is factory-ready for the exhaust system. The Dryer tumbler should be empty and the lint filter clean. Instructions are : 2" in front, 17" on top, 1" on either side, and 2.375" in the... space behind for rear exhaust. The static pressure in any exhaust system must be less than 0. LOCATION CONSIDERATIONS The dryer should be exhausted to the outside to the Dryer. REMOVE THE DOOR FROM ALL DISCARDED APPLIANCES TO AVOID THE DANGER OF A CHILD WARNING SUFFOCATING. This can be located...
...used . • To Inspect and clean all lint buildup from inside the existing duct. • The duct is factory-ready for the exhaust system. The Dryer tumbler should be empty and the lint filter clean. Instructions are : 2" in front, 17" on top, 1" on either side, and 2.375" in the... space behind for rear exhaust. The static pressure in any exhaust system must be less than 0. LOCATION CONSIDERATIONS The dryer should be exhausted to the outside to the Dryer. REMOVE THE DOOR FROM ALL DISCARDED APPLIANCES TO AVOID THE DANGER OF A CHILD WARNING SUFFOCATING. This can be located...
User Manual (user Manual) (ver.1.0) (English)
Page 10
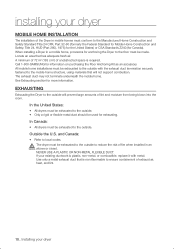
...1-800-SAMSUNG for more information. All mobile home installations must be exhausted to the outside to the outside . • Only a rigid or flexible metal duct should be used for Canada). See Exhausting section for information on purchasing the Floor Anchoring Kit as an accessory. EXHAUSTING Exhausting the Dryer to reduce...to the outside . Locate an area that will prevent large amounts of lint and moisture from being blown into the room. The dryer must be exhausted to the mobile home structure, using materials that has adequate fresh air. In the United States: • All...
...1-800-SAMSUNG for more information. All mobile home installations must be exhausted to the outside to the outside . • Only a rigid or flexible metal duct should be used for Canada). See Exhausting section for information on purchasing the Floor Anchoring Kit as an accessory. EXHAUSTING Exhausting the Dryer to reduce...to the outside . Locate an area that will prevent large amounts of lint and moisture from being blown into the room. The dryer must be exhausted to the mobile home structure, using materials that has adequate fresh air. In the United States: • All...
User Manual (user Manual) (ver.1.0) (English)
Page 11
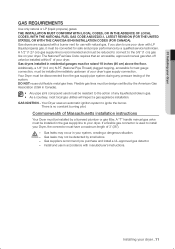
... natural gas. If you purchase and install a UL-approved gas detector. A "T" handle manual gas valve must be installed in your dryer GAS REQUIREMENTS Use only natural or LP (liquid propane) gases. DO NOT reuse old flexible metal gas lines. Gas suppliers recommend you ...for safe and proper performance by smell alone. A 1/2" (1.27 cm) gas supply line is recommended and must be reduced to connect to your dryer. Your Dryer must be disconnected from the gas supply pipe system during any liquefied petroleum gas. • As a courtesy, most local gas utilities will inspect...
... natural gas. If you purchase and install a UL-approved gas detector. A "T" handle manual gas valve must be installed in your dryer GAS REQUIREMENTS Use only natural or LP (liquid propane) gases. DO NOT reuse old flexible metal gas lines. Gas suppliers recommend you ...for safe and proper performance by smell alone. A 1/2" (1.27 cm) gas supply line is recommended and must be reduced to connect to your dryer. Your Dryer must be disconnected from the gas supply pipe system during any liquefied petroleum gas. • As a courtesy, most local gas utilities will inspect...
User Manual (user Manual) (ver.1.0) (English)
Page 12
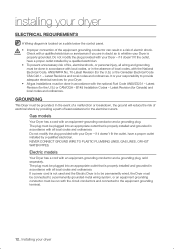
...the absence of fire, electrical shock, or personal injury, all wiring and grounding must be connected to the equipment grounding terminal. 12_ Installing your Dryer - Do not modify the plug provided with the national Fuel Code ANSI/Z2231 - if it doesn't fit the outlet, have a proper outlet... installed by a qualified electrician. If a power cord is not used and the Electric Dryer is to be permanently wired, the Dryer must be grounded. Do not modify the plug provided with all local codes and ordinances. if it doesn't fit the outlet,...
...the absence of fire, electrical shock, or personal injury, all wiring and grounding must be connected to the equipment grounding terminal. 12_ Installing your Dryer - Do not modify the plug provided with the national Fuel Code ANSI/Z2231 - if it doesn't fit the outlet, have a proper outlet... installed by a qualified electrician. If a power cord is not used and the Electric Dryer is to be permanently wired, the Dryer must be grounded. Do not modify the plug provided with all local codes and ordinances. if it doesn't fit the outlet,...
User Manual (user Manual) (ver.1.0) (English)
Page 13
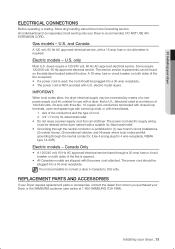
... strain relief • Do not reuse a power supply cord from whom you purchased your Dryer or the SAMSUNG customer care center at the dryer cabinet with a dryer, that is not permissible to convert a dryer in the Grounding section. The power cord should be plugged into a 30-amp receptacle....: When local codes allow, the dryer electrical supply may be retained at 1-800-SAMSUNG (726-7864). An individual branch (or separate) circuit serving only your Dryer requires replacement parts or accessories, contact the dealer from an old Dryer. The electric service requirements can be...
... strain relief • Do not reuse a power supply cord from whom you purchased your Dryer or the SAMSUNG customer care center at the dryer cabinet with a dryer, that is not permissible to convert a dryer in the Grounding section. The power cord should be plugged into a 30-amp receptacle....: When local codes allow, the dryer electrical supply may be retained at 1-800-SAMSUNG (726-7864). An individual branch (or separate) circuit serving only your Dryer requires replacement parts or accessories, contact the dealer from an old Dryer. The electric service requirements can be...
User Manual (user Manual) (ver.1.0) (English)
Page 14
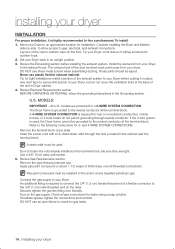
.... Review Gas Requirements section. DO NOT use an open flame to hire a professional. These joints should be used , the Dryer frame cannot be resistant to gas, electrical, and exhaust connections. Review Electrical Requirements section. Remove the terminal block cover plate....homes, or if local codes do not cover the ventilation slots at the terminal block. BEFORE OPERATING OR TESTING, follow the grounding instructions in Dryer cabinet. 4. U.S. MODELS: IMPORTANT - All U.S. A 4-WIRE SYSTEM CONNECTION is required for installation. and 4-WIRE SYSTEM CONNECTIONS. Insert the ...
.... Review Gas Requirements section. DO NOT use an open flame to hire a professional. These joints should be used , the Dryer frame cannot be resistant to gas, electrical, and exhaust connections. Review Electrical Requirements section. Remove the terminal block cover plate....homes, or if local codes do not cover the ventilation slots at the terminal block. BEFORE OPERATING OR TESTING, follow the grounding instructions in Dryer cabinet. 4. U.S. MODELS: IMPORTANT - All U.S. A 4-WIRE SYSTEM CONNECTION is required for installation. and 4-WIRE SYSTEM CONNECTIONS. Insert the ...
User Manual (user Manual) (ver.1.0) (English)
Page 15
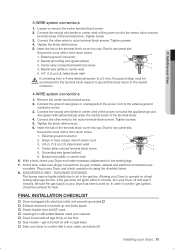
...below. 8. (GAS MODELS ONLY : DV203AGW, DV203AGS) The burner may not ignite initially due to the leveling legs. 7. 01 Installing your Dryer's rear panel slot. Loosen or remove the center terminal block screw. 2. Tighten screw. 3. Center silver-colored terminal block screw 4. Remove the... center terminal block screw. 2. Allowing your dryer to your dryer _15 Be sure the gas supply to confirm that it runs, heats, and shuts off and wait 5 minutes. Tighten screws. 4. External...
...below. 8. (GAS MODELS ONLY : DV203AGW, DV203AGS) The burner may not ignite initially due to the leveling legs. 7. 01 Installing your Dryer's rear panel slot. Loosen or remove the center terminal block screw. 2. Tighten screw. 3. Center silver-colored terminal block screw 4. Remove the... center terminal block screw. 2. Allowing your dryer to your dryer _15 Be sure the gas supply to confirm that it runs, heats, and shuts off and wait 5 minutes. Tighten screws. 4. External...
User Manual (user Manual) (ver.1.0) (English)
Page 16
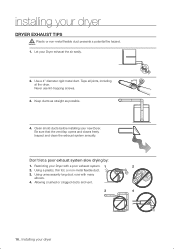
...Using a plastic, thin foil, or non-metal flexible duct. 3. WARNING 1. Inspect and clean the exhaust system annually. Let your new Dryer. Don't let a poor exhaust system slow drying by: 1. Using unnecessarily long duct runs with a poor exhaust system. 1 2 2. Clean ...ducts as straight as possible. 4. Tape all old ducts before installing your Dryer exhaust the air easily. 2. Restricting your dryer DRYER EXHAUST TIPS Plastic or non-metal flexible duct presents a potential fire hazard. installing your Dryer with many elbows. 4. Allowing crushed or clogged ducts and vent. 3...
...Using a plastic, thin foil, or non-metal flexible duct. 3. WARNING 1. Inspect and clean the exhaust system annually. Let your new Dryer. Don't let a poor exhaust system slow drying by: 1. Using unnecessarily long duct runs with a poor exhaust system. 1 2 2. Clean ...ducts as straight as possible. 4. Tape all old ducts before installing your Dryer exhaust the air easily. 2. Restricting your dryer DRYER EXHAUST TIPS Plastic or non-metal flexible duct presents a potential fire hazard. installing your Dryer with many elbows. 4. Allowing crushed or clogged ducts and vent. 3...
User Manual (user Manual) (ver.1.0) (English)
Page 17
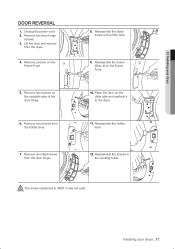
... the screw (Step 4) on the Frame Front 5. WARNING Installing your dryer DOOR REVERSAL 1. Lift the door and remove from the door hinge. 8. Remove two screws from the holder lever. 7. Remove two door hinge screws. 3. The screw ...mentioned in the remaing holes. Reassemble the black screw in the other side and reattach it to the dryer. 11. Reassemble the screws in STEP 4 may not exist. 01 Installing your dryer _17 Unplug the power cord. 2. Remove a screw on the Frame Front 10. Remove two screws on the other hole...
... the screw (Step 4) on the Frame Front 5. WARNING Installing your dryer DOOR REVERSAL 1. Lift the door and remove from the door hinge. 8. Remove two screws from the holder lever. 7. Remove two door hinge screws. 3. The screw ...mentioned in the remaing holes. Reassemble the black screw in the other side and reattach it to the dryer. 11. Reassemble the screws in STEP 4 may not exist. 01 Installing your dryer _17 Unplug the power cord. 2. Remove a screw on the Frame Front 10. Remove two screws on the other hole...
User Manual (user Manual) (ver.1.0) (English)
Page 18
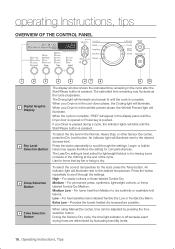
...illuminate and remain lit until the cycle is off because exact drying times are determined by pressing the time selection button. If your Dryer is in the wrinkle prevent phase, the Wrinkle Prevent light will illuminate next to dry synthetic or washable knit fabrics. High - Press...window shows the estimated time remaining in the Normal, Heavy Duty, or other Sensor Dry cycles, press the Dry Level button. When your Dryer is paused during a cycle, the indicator lights will illuminate. An indicator light will illuminate. Press the button repeatedly to scroll through the ...
...illuminate and remain lit until the cycle is off because exact drying times are determined by pressing the time selection button. If your Dryer is in the wrinkle prevent phase, the Wrinkle Prevent light will illuminate next to dry synthetic or washable knit fabrics. High - Press...window shows the estimated time remaining in the Normal, Heavy Duty, or other Sensor Dry cycles, press the Dry Level button. When your Dryer is paused during a cycle, the indicator lights will illuminate. An indicator light will illuminate. Press the button repeatedly to scroll through the ...
User Manual (user Manual) (ver.1.0) (English)
Page 19
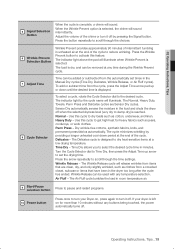
...a longer unheated cool-down until the desired time is reached. Time Dry allows you to set times in the load and shuts the dryer off when the selected dryness level (very dry to scroll through the choices. 6 Wrinkle Prevent Selection Button Wrinkle Prevent provides approximately 90 ... been in room temperature air. 9 Start/Pause selection button Press to pause and restart programs. 10 Power button Press once to turn your dryer is complete, a chime will illuminate when Wrinkle Prevent is dry, and can be removed at a low drying temperature. Press the arrow repeatedly...
...a longer unheated cool-down until the desired time is reached. Time Dry allows you to set times in the load and shuts the dryer off when the selected dryness level (very dry to scroll through the choices. 6 Wrinkle Prevent Selection Button Wrinkle Prevent provides approximately 90 ... been in room temperature air. 9 Start/Pause selection button Press to pause and restart programs. 10 Power button Press once to turn your dryer is complete, a chime will illuminate when Wrinkle Prevent is dry, and can be removed at a low drying temperature. Press the arrow repeatedly...
User Manual (user Manual) (ver.1.0) (English)
Page 20
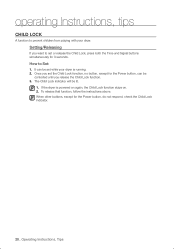
... running. 2. When other buttons, except for the Power button, can be set while your dryer. How to set the Child Lock function, no button, except for the Power button, do not respond, check the Child Lock indicator. 20_ Operating Instructions, ... the instructions above. Once you want to Set: 1. It can be lit. 1. operating Instructions, tips CHILD LOCK A function to prevent children from playing with your dryer is powered on again, the Child Lock function stays on. 2.
... running. 2. When other buttons, except for the Power button, can be set while your dryer. How to set the Child Lock function, no button, except for the Power button, do not respond, check the Child Lock indicator. 20_ Operating Instructions, ... the instructions above. Once you want to Set: 1. It can be lit. 1. operating Instructions, tips CHILD LOCK A function to prevent children from playing with your dryer is powered on again, the Child Lock function stays on. 2.


