User Manual Ver.1.0 (English)
Page 2
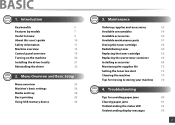
... cartridge Replacing the waste toner container Installing accessories Monitoring the supplies life Setting the toner low alert Cleaning the machine Tips for avoiding paper jams Clearing paper jams Understanding the status LED Understanding display messages 53 54 56 57 58 60 62 66 68 72 73 74 78 80 81 ...93 95 2 Troubleshooting Tips for moving & storing your machine 4. Menu Overview and Basic Setup Menu overview 25 Machine's basic settings 28 Media and tray 30 ...
... cartridge Replacing the waste toner container Installing accessories Monitoring the supplies life Setting the toner low alert Cleaning the machine Tips for avoiding paper jams Clearing paper jams Understanding the status LED Understanding display messages 53 54 56 57 58 60 62 66 68 72 73 74 78 80 81 ...93 95 2 Troubleshooting Tips for moving & storing your machine 4. Menu Overview and Basic Setup Menu overview 25 Machine's basic settings 28 Media and tray 30 ...

User Manual Ver.1.0 (English)
Page 12
... sharp edges and can damage the machine. 1. It can occur. Do not allow too many papers to the machine. Burns could result in the paper output tray. If the machine has been dropped, or if the cabinet appears damaged, unplug the machine from all interface connections and request assistance from the electrical ... the electrical outlet, do not use tweezers or sharp metal objects. Safety information Caution 5 Operating method During an electrical storm or for a period of the paper output area may get hot. Be careful not to your hand between the machine and paper tray.
... sharp edges and can damage the machine. 1. It can occur. Do not allow too many papers to the machine. Burns could result in the paper output tray. If the machine has been dropped, or if the cabinet appears damaged, unplug the machine from all interface connections and request assistance from the electrical ... the electrical outlet, do not use tweezers or sharp metal objects. Safety information Caution 5 Operating method During an electrical storm or for a period of the paper output area may get hot. Be careful not to your hand between the machine and paper tray.

User Manual Ver.1.0 (English)
Page 17
... Series 12 8 9 10 7 6 3 11 4 12 5 1 Output support 2 Output tray 3 Control panel 4 Control board cover 5 Tray 1 6 Front cover 7 Front cover release button 8 Toner cartridges 9 Toner cartridge handle 10 Intermediate Transfer Belt (ITB) 11 Paper width guides on a manual feeder 12 Manual feeder CLP-68xND Series/ CLP-68xDW Series 12 11 12 13 10 9 3 14 8 4 15 16...
... Series 12 8 9 10 7 6 3 11 4 12 5 1 Output support 2 Output tray 3 Control panel 4 Control board cover 5 Tray 1 6 Front cover 7 Front cover release button 8 Toner cartridges 9 Toner cartridge handle 10 Intermediate Transfer Belt (ITB) 11 Paper width guides on a manual feeder 12 Manual feeder CLP-68xND Series/ CLP-68xDW Series 12 11 12 13 10 9 3 14 8 4 15 16...

User Manual Ver.1.0 (English)
Page 25
... Graphic Resolution Configuration Supplies Info. Duplexc Off Long Edge Short Edge Manual Feederb Paper Size Paper Type MP Trayc Paper Size Paper Type Tray 1 Paper Size Paper Type Paper Source Auto Tray 1 Tray 2d MP Trayc Manual Feederb Normal Best Clear Text Off Minimum Normal Maximum Edge Enhance Off...Normal High 1 High 2 High 3 Humidity Normal High 1 High 2 High 3 System Setup Auto Continue Auto CR Auto Tray Swi.c Paper Substit. d. e. CLP-41xN Series/CLP-41xNW Series only. This is left in the cartridge. This is used only available when Job Accounting is enabled from the ...
... Graphic Resolution Configuration Supplies Info. Duplexc Off Long Edge Short Edge Manual Feederb Paper Size Paper Type MP Trayc Paper Size Paper Type Tray 1 Paper Size Paper Type Paper Source Auto Tray 1 Tray 2d MP Trayc Manual Feederb Normal Best Clear Text Off Minimum Normal Maximum Edge Enhance Off...Normal High 1 High 2 High 3 Humidity Normal High 1 High 2 High 3 System Setup Auto Continue Auto CR Auto Tray Swi.c Paper Substit. d. e. CLP-41xN Series/CLP-41xNW Series only. This is left in the cartridge. This is used only available when Job Accounting is enabled from the ...

User Manual Ver.1.0 (English)
Page 29
... the inkjet photo paper with this machine. CLP-41xN Series/CLP-41xNW Series CLP-68xND Series/ CLP-68xDW Series 21 21 The use of inflammable media or foreign materials left in the printer may lead to overheating of the unit and, in rare cases may cause a fire. 4 3 3 1 Tray extend lever 2 Paper length guide 3 Paper width guide 4 Paper width guides...
... the inkjet photo paper with this machine. CLP-41xN Series/CLP-41xNW Series CLP-68xND Series/ CLP-68xDW Series 21 21 The use of inflammable media or foreign materials left in the printer may lead to overheating of the unit and, in rare cases may cause a fire. 4 3 3 1 Tray extend lever 2 Paper length guide 3 Paper width guide 4 Paper width guides...

User Manual Ver.1.0 (English)
Page 30
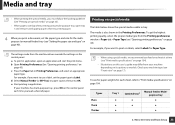
Media and tray For Legal-sized paper: Push button as shown and pull out the tray. 3 Loading paper in the tray Illustrations on this user's guide may cause paper registration, image skew, or jamming of the paper. 2. Check your machine type (see "Front view" on page 30). If you do not ...adjust the guide, it may differ from your machine type (see "Tray overview" on page 17). LGL Illustrations on its options or models. Tray 1 / optional tray 1 Pull out the paper tray. Check your machine depending on this user's guide may differ from your machine depending on...
Media and tray For Legal-sized paper: Push button as shown and pull out the tray. 3 Loading paper in the tray Illustrations on this user's guide may cause paper registration, image skew, or jamming of the paper. 2. Check your machine type (see "Front view" on page 30). If you do not ...adjust the guide, it may differ from your machine type (see "Tray overview" on page 17). LGL Illustrations on its options or models. Tray 1 / optional tray 1 Pull out the paper tray. Check your machine depending on this user's guide may differ from your machine depending on...

User Manual Ver.1.0 (English)
Page 31
... (see "Tray overview" on page 30). 4 After inserting paper into the tray, squeeze the paper width guides and paper length guide. 2 2 CLP-41xN Series/CLP-41xNW Series CLP-68xND Series/ CLP-68xDW Series 3 Flex or fan the edge of the paper stack to separate the pages before loading papers. 1 CLP-41xN Series/CLP-41xNW Series 1 Paper length guide 2 Paper width guide 1 CLP-68xND Series/ CLP-68xDW Series...
... (see "Tray overview" on page 30). 4 After inserting paper into the tray, squeeze the paper width guides and paper length guide. 2 2 CLP-41xN Series/CLP-41xNW Series CLP-68xND Series/ CLP-68xDW Series 3 Flex or fan the edge of the paper stack to separate the pages before loading papers. 1 CLP-41xN Series/CLP-41xNW Series 1 Paper length guide 2 Paper width guide 1 CLP-68xND Series/ CLP-68xDW Series...

User Manual Ver.1.0 (English)
Page 32
.... 2. Tips on page 40). The settings made from the machine driver override the settings on page 104). c Press the Paper tab in application. 5 Insert the tray back into the machine. b Open Printing Preferences (see "Print media specifications" on the control panel. e Start printing in Printing... time in the multipurpose (or manual feeder) tray. • To prevent paper jams, do not adjust the paper width guide, it may cause paper jams. • Do not use a paper with a leading-edge curl, it may cause a paper jam or the paper can hold special sizes and types of print material...
.... 2. Tips on page 40). The settings made from the machine driver override the settings on page 104). c Press the Paper tab in application. 5 Insert the tray back into the machine. b Open Printing Preferences (see "Print media specifications" on the control panel. e Start printing in Printing... time in the multipurpose (or manual feeder) tray. • To prevent paper jams, do not adjust the paper width guide, it may cause paper jams. • Do not use a paper with a leading-edge curl, it may cause a paper jam or the paper can hold special sizes and types of print material...

User Manual Ver.1.0 (English)
Page 33
... loading them into the multi-purpose (or manual feeder) tray. 1 Pull out the paper tray for manual feeding. OR Press the push-release of the paper. Menu Overview and Basic Setup 34 CLP-41xN Series/CLP-41xNW Series CLP-68xND Series/ CLP-68xDW Series CLP-41xN Series/CLP-41xNW Series CLP-68xND Series/ CLP-68xDW Series 3 Squeeze the multi-purpose (or manual...
... loading them into the multi-purpose (or manual feeder) tray. 1 Pull out the paper tray for manual feeding. OR Press the push-release of the paper. Menu Overview and Basic Setup 34 CLP-41xN Series/CLP-41xNW Series CLP-68xND Series/ CLP-68xDW Series CLP-41xN Series/CLP-41xNW Series CLP-68xND Series/ CLP-68xDW Series 3 Squeeze the multi-purpose (or manual...
User Manual Ver.1.0 (English)
Page 34
...want to use a label, set the paper type and size for the multipurpose (or manual feeder) tray (see for paper weights for Paper Type. • When using multi-purpose tray, open an application and start the print menu. To see "Setting the paper size and type" on the control panel.... Types Plain Thick Thicker Tray 1 ● ● ● Optional...
...want to use a label, set the paper type and size for the multipurpose (or manual feeder) tray (see for paper weights for Paper Type. • When using multi-purpose tray, open an application and start the print menu. To see "Setting the paper size and type" on the control panel.... Types Plain Thick Thicker Tray 1 ● ● ● Optional...
User Manual Ver.1.0 (English)
Page 36
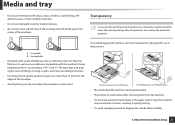
...than mono printing when the printouts are used on a flat surface after removing them carefully. 2. CLP-41xN Series/CLP-41xNW Series CLP-68xND Series/ CLP-68xDW Series • Must withstand the machine's fusing temperature. • Place them on the ...overhead projector. Dust and dirt may even damage the fuser. • For the best print quality, position margins no closer than 15 mm from the machine. • Do not leave unused transparencies in the paper tray...
...than mono printing when the printouts are used on a flat surface after removing them carefully. 2. CLP-41xN Series/CLP-41xNW Series CLP-68xND Series/ CLP-68xDW Series • Must withstand the machine's fusing temperature. • Place them on the ...overhead projector. Dust and dirt may even damage the fuser. • For the best print quality, position margins no closer than 15 mm from the machine. • Do not leave unused transparencies in the paper tray...

User Manual Ver.1.0 (English)
Page 38
... and Basic Setup 39 Media and tray • Make sure that print quality is not guaranteed. If you load preprinted paper, verify that the ink on the paper is dry. Card stock/ Custom-sized paper AAAAA CLP-41xN Series/CLP-41xNW Series CLP-68xND Series/ CLP-68xDW Series • In the ...'s fusing temperature for only a single pass through the machine more than once. CLP-41xN Series/CLP-41xNW Series CLP-68xND Series/ CLP-68xDW Series • Must be facing up with paper feeding, turn the paper around. The adhesive backing is no exposed adhesive material between labels. Note that...
... and Basic Setup 39 Media and tray • Make sure that print quality is not guaranteed. If you load preprinted paper, verify that the ink on the paper is dry. Card stock/ Custom-sized paper AAAAA CLP-41xN Series/CLP-41xNW Series CLP-68xND Series/ CLP-68xDW Series • In the ...'s fusing temperature for only a single pass through the machine more than once. CLP-41xN Series/CLP-41xNW Series CLP-68xND Series/ CLP-68xDW Series • Must be facing up with paper feeding, turn the paper around. The adhesive backing is no exposed adhesive material between labels. Note that...

User Manual Ver.1.0 (English)
Page 39
... users, you set from Samsung Easy Printer Manager > (Switch to advanced mode) > Device Settings, see "Opening printing preferences" on the control panel. 2 Press Paper and select the tray you want to use special-sized paper such as billing paper, select the Paper tab > Size > Edit... c Press the Paper tab and select an appropriate paper. • If you want...
... users, you set from Samsung Easy Printer Manager > (Switch to advanced mode) > Device Settings, see "Opening printing preferences" on the control panel. 2 Press Paper and select the tray you want to use special-sized paper such as billing paper, select the Paper tab > Size > Edit... c Press the Paper tab and select an appropriate paper. • If you want...
User Manual Ver.1.0 (English)
Page 55
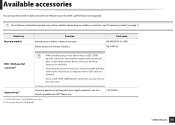
... the machine's status or set the settings, connect the machine to use the USB cable. Plain paper 80 g/m2 (20 lb bond). Maintenance 56 b. Allows you can attach an additional 520 bsheets tray. Part name ML-MEM370: 512 MB ML-PAR100 IEEE 1284B parallel connectora • When installing the... 7). Some features and optional goods may not be found and after installing the printer driver, only basic printing features are experiencing frequent paper supply problems, you can not use various interface. Accessory Memory module Function Extends your machine's performance and capacity...
... the machine's status or set the settings, connect the machine to use the USB cable. Plain paper 80 g/m2 (20 lb bond). Maintenance 56 b. Allows you can attach an additional 520 bsheets tray. Part name ML-MEM370: 512 MB ML-PAR100 IEEE 1284B parallel connectora • When installing the... 7). Some features and optional goods may not be found and after installing the printer driver, only basic printing features are experiencing frequent paper supply problems, you can not use various interface. Accessory Memory module Function Extends your machine's performance and capacity...

User Manual Ver.1.0 (English)
Page 68
The Properties window may not appear in the control panel or SyncThru™ Web Service. • Custom Paper Size Settings: You can specify custom paper size. 7 Click OK until you exit the Properties or Printer properties window. 3. Some menus may differ depending on page ...Admin Job Accounting: Allows you to associate user and account identification information with group permission can start a print job. - You can select the tray. • Storage Options: Select the optional memory you installed. Group permission: If you check this option, only groups with each document you print...
The Properties window may not appear in the control panel or SyncThru™ Web Service. • Custom Paper Size Settings: You can specify custom paper size. 7 Click OK until you exit the Properties or Printer properties window. 3. Some menus may differ depending on page ...Admin Job Accounting: Allows you to associate user and account identification information with group permission can start a print job. - You can select the tray. • Storage Options: Select the optional memory you installed. Group permission: If you check this option, only groups with each document you print...

User Manual Ver.1.0 (English)
Page 79
Troubleshooting 80 To avoid paper jams, refer to the following guidelines: • Ensure that the adjustable guides are positioned correctly (see "Tray overview" on page 30). • Do not remove paper from the tray while your machine is printing. • Flex, fan, and straighten paper before loading. • Do not use creased, damp, or highly curled paper. • Do not mix papers in a tray. • Use only recommended print media (see "Print media specifications" on page 104). 4. Tips for avoiding paper jams By selecting the correct media s, most paper jams can be avoided.
Troubleshooting 80 To avoid paper jams, refer to the following guidelines: • Ensure that the adjustable guides are positioned correctly (see "Tray overview" on page 30). • Do not remove paper from the tray while your machine is printing. • Flex, fan, and straighten paper before loading. • Do not use creased, damp, or highly curled paper. • Do not mix papers in a tray. • Use only recommended print media (see "Print media specifications" on page 104). 4. Tips for avoiding paper jams By selecting the correct media s, most paper jams can be avoided.

User Manual Ver.1.0 (English)
Page 80
Troubleshooting 81 Check your machine depending on page 17). 4. Clearing paper jams To avoid tearing the paper, pull the jammed paper out slowly and gently. 1 In tray 1 Illustrations on this user's guide may differ from your machine type (see "Front view" on its options or models.
Troubleshooting 81 Check your machine depending on page 17). 4. Clearing paper jams To avoid tearing the paper, pull the jammed paper out slowly and gently. 1 In tray 1 Illustrations on this user's guide may differ from your machine type (see "Front view" on its options or models.

User Manual Ver.1.0 (English)
Page 81
Troubleshooting 82 Clearing paper jams 2 In optional tray (CLP-68xND Series/CLP-68xDW Series only) 4.
Troubleshooting 82 Clearing paper jams 2 In optional tray (CLP-68xND Series/CLP-68xDW Series only) 4.

User Manual Ver.1.0 (English)
Page 179
...to the binding will be the same as side B's margin closest to your machine (see "Menu overview" on options or models. Sets the paper margins for the paper trays. • Simplex: Sets the margin for one-sided printing. • Duplex: Sets the margins for emulation print page. • Top... Margin: Sets the top margin. • Left Margin: Sets the left margin. 3. Sets the paper margins in the display depending on page 25). ...
...to the binding will be the same as side B's margin closest to your machine (see "Menu overview" on options or models. Sets the paper margins for the paper trays. • Simplex: Sets the margin for one-sided printing. • Duplex: Sets the margins for emulation print page. • Top... Margin: Sets the top margin. • Left Margin: Sets the left margin. 3. Sets the paper margins in the display depending on page 25). ...

User Manual Ver.1.0 (English)
Page 181
... the menu options: • Press (Menu) > Paper on options or models. If so, it is empty. 3. Sets the default paper tray to use is not applicable to the tray with the same sized paper when the tray in use . MP Tray/ [Tray ] • Paper Size: Selects the default paper size. • Paper Type: Selects the paper type currently loaded in the display...
... the menu options: • Press (Menu) > Paper on options or models. If so, it is empty. 3. Sets the default paper tray to use is not applicable to the tray with the same sized paper when the tray in use . MP Tray/ [Tray ] • Paper Size: Selects the default paper size. • Paper Type: Selects the paper type currently loaded in the display...


