
User Manual (user Manual) (ver.1.0) (English)
Page 3
...Remote Control 7 Installing Batteries in the Remote Control 8 CONNECTIONS Connecting VHF and UHF Antennas 8 Connecting Cable TV 9 Connecting a VCR 10 Connecting an S-VHS VCR 10 Connecting a Second VCR to Record from the TV 11 Connecting a Camcorder 11 Connecting a DVD Player/Set-Top Box 12 Connecting an Amplifier/DVD Home ...Theater 12 OPERATION Turning the TV On and Off 13 Plug & Play Feature 13 Changing Channels 14 Adjusting the Volume 15 Viewing the Display 15 Viewing the Menus...
...Remote Control 7 Installing Batteries in the Remote Control 8 CONNECTIONS Connecting VHF and UHF Antennas 8 Connecting Cable TV 9 Connecting a VCR 10 Connecting an S-VHS VCR 10 Connecting a Second VCR to Record from the TV 11 Connecting a Camcorder 11 Connecting a DVD Player/Set-Top Box 12 Connecting an Amplifier/DVD Home ...Theater 12 OPERATION Turning the TV On and Off 13 Plug & Play Feature 13 Changing Channels 14 Adjusting the Volume 15 Viewing the Display 15 Viewing the Menus...
User Manual (user Manual) (ver.1.0) (English)
Page 4
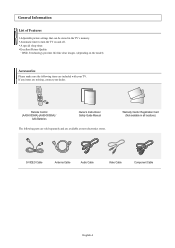
...Owner's Instructions / Safety Guide Manual The following items are included with your dealer. Warranty Cards / Registration Card (Not available in the TV's memory. Excellent Picture Quality - Automatic timer to turn the TV on the model) Accessories Please make sure the following parts are sold separately and are missing, contact your... TV. DNIe Jr technology provides life-like clear images. (depending on and off. A special sleep timer. If any items are available at ...
...Owner's Instructions / Safety Guide Manual The following items are included with your dealer. Warranty Cards / Registration Card (Not available in the TV's memory. Excellent Picture Quality - Automatic timer to turn the TV on the model) Accessories Please make sure the following parts are sold separately and are missing, contact your... TV. DNIe Jr technology provides life-like clear images. (depending on and off. A special sleep timer. If any items are available at ...

User Manual (user Manual) (ver.1.0) (English)
Page 5
.... Press to see an on -screen menu. and † button on -screen menu, use the œ and √ buttons or ENTER ( ) button on the TV. 4 MENU Press to increase or decrease the volume. To use the more advanced features, you would use the remote control. buttons as you must use... the ... In the on the remote control. 7 SOURCE Toggles between all the available input sources (TV, AV1, AV2, S-Video, Component). Viewing the Control Panel Buttons on the Lower-Right Part of the Panel The buttons on the lower-right panel control...
.... Press to see an on -screen menu. and † button on -screen menu, use the œ and √ buttons or ENTER ( ) button on the TV. 4 MENU Press to increase or decrease the volume. To use the more advanced features, you would use the remote control. buttons as you must use... the ... In the on the remote control. 7 SOURCE Toggles between all the available input sources (TV, AV1, AV2, S-Video, Component). Viewing the Control Panel Buttons on the Lower-Right Part of the Panel The buttons on the lower-right panel control...

User Manual (user Manual) (ver.1.0) (English)
Page 6
... output. 2 AV IN 2 Video and audio inputs for external devices. Side Panel Jacks Use the left side panel jacks to an antenna(air) or cable TV system. English-6 For more information on connecting equipment, see pages 8-12. 1 AV IN 1, 2 Connect to the video output jacks of VCRs, DVD players and similar...
... output. 2 AV IN 2 Video and audio inputs for external devices. Side Panel Jacks Use the left side panel jacks to an antenna(air) or cable TV system. English-6 For more information on connecting equipment, see pages 8-12. 1 AV IN 1, 2 Connect to the video output jacks of VCRs, DVD players and similar...
User Manual (user Manual) (ver.1.0) (English)
Page 7
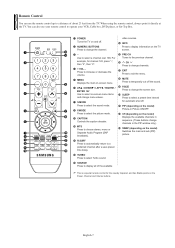
...decrease the volume. 5 MENU Displays the main on-screen menu. 6 UP... / DOWN† / LEFTœ / RIGHT√ / ENTER Use to select on the TV screen. 3- b CH (depending on the model) Displays the available channels in sequence. (These buttons change channels. & EXIT Press to exit the menu. * MUTE Press...has Braille points on and off the sound. ( P.SIZE Press to change the channel. When using the remote control, always point it directly at the TV. video sources. $ INFO Press to change the screen size. ) SLEEP Press to a distance of the available ➢ This is a special remote ...
...decrease the volume. 5 MENU Displays the main on-screen menu. 6 UP... / DOWN† / LEFTœ / RIGHT√ / ENTER Use to select on the TV screen. 3- b CH (depending on the model) Displays the available channels in sequence. (These buttons change channels. & EXIT Press to exit the menu. * MUTE Press...has Braille points on and off the sound. ( P.SIZE Press to change the channel. When using the remote control, always point it directly at the TV. video sources. $ INFO Press to change the screen size. ) SLEEP Press to a distance of the available ➢ This is a special remote ...
User Manual (user Manual) (ver.1.0) (English)
Page 8
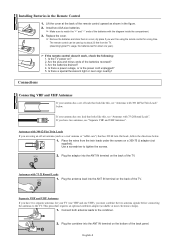
... ANT IN 2. Connect both antenna leads to tighten the screws. Connections Connecting VHF and UHF Antennas If your antenna has a set of the TV. Antennas with the diagram inside the compartment. 3. The remote control can be using an off-air antenna (such as shown in the Remote Control... like this , see "Antennas with 300 Ω Flat Twin Leads If you must combine the two antenna signals before connecting the antennas to the TV. Installing Batteries in the figure. 2. Lift the cover at most electronics shops). 1. Are the batteries drained? 4. Is there a power outage, ...
... ANT IN 2. Connect both antenna leads to tighten the screws. Connections Connecting VHF and UHF Antennas If your antenna has a set of the TV. Antennas with the diagram inside the compartment. 3. The remote control can be using an off-air antenna (such as shown in the Remote Control... like this , see "Antennas with 300 Ω Flat Twin Leads If you must combine the two antenna signals before connecting the antennas to the TV. Installing Batteries in the figure. 2. Lift the cover at most electronics shops). 1. Are the batteries drained? 4. Is there a power outage, ...
User Manual (user Manual) (ver.1.0) (English)
Page 9
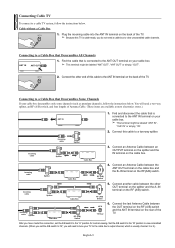
...(A/B) switch and the ANT IN terminal on the RF (A/B) switch. RF (A/B) Switch Incoming cable Splitter Cable Box RF (A/B) Switch ANT IN TV Rear 6. Incoming cable Splitter Incoming cable Splitter Cable Box 3. RF (A/B) Switch Incoming cable Splitter Cable Box 5. After you do not need... a two-way splitter, an RF (A/B) switch, and four lengths of the TV. Cable without a Cable Box ANT IN 1. Connecting to a two-way splitter. Incoming cable Splitter Cable Box 4. Find the cable that is usually...
...(A/B) switch and the ANT IN terminal on the RF (A/B) switch. RF (A/B) Switch Incoming cable Splitter Cable Box RF (A/B) Switch ANT IN TV Rear 6. Incoming cable Splitter Incoming cable Splitter Cable Box 3. RF (A/B) Switch Incoming cable Splitter Cable Box 5. After you do not need... a two-way splitter, an RF (A/B) switch, and four lengths of the TV. Cable without a Cable Box ANT IN 1. Connecting to a two-way splitter. Incoming cable Splitter Cable Box 4. Find the cable that is usually...

User Manual (user Manual) (ver.1.0) (English)
Page 10
...cable or ANT IN antenna from an S-VHS VCR. (This connection delivers a better picture as compared to a standard VHS VCR.) VCR Rear Panel TV Side Panel TV Rear Panel 3 Audio Cable (Not supplied) 2 S-Video Cable (Not supplied) 1 Antenna Cable (Not supplied) An S-Video cable is stereo, ...you must connect two cables. Connecting an S-VHS VCR Your Samsung TV can connect to "AV IN 2" on the side panel of TV. 5. Skip step 1 if you have already connected your TV to an antenna or a cable TV system (according to the instructions on pages 8-9). Connect a Video Cable between...
...cable or ANT IN antenna from an S-VHS VCR. (This connection delivers a better picture as compared to a standard VHS VCR.) VCR Rear Panel TV Side Panel TV Rear Panel 3 Audio Cable (Not supplied) 2 S-Video Cable (Not supplied) 1 Antenna Cable (Not supplied) An S-Video cable is stereo, ...you must connect two cables. Connecting an S-VHS VCR Your Samsung TV can connect to "AV IN 2" on the side panel of TV. 5. Skip step 1 if you have already connected your TV to an antenna or a cable TV system (according to the instructions on pages 8-9). Connect a Video Cable between...
User Manual (user Manual) (ver.1.0) (English)
Page 11
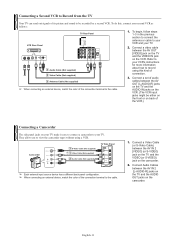
... external device, match the color of the connection terminal to the cable. 1. Connect a video cable between the AV IN 2 [L-AUDIO-R] jacks on the TV and the AUDIO OUT jacks on the camcorder. 2. Connect a set of connection. 3. English-11 To do this kind of audio cables between the AV... begin, follow steps 1-3 in the previous section to connect the antenna or cable to your VCR and your second VCR as follows: VCR Rear Panel TV Rear Panel 3 Audio Cable (Not supplied) 2 Video Cable (Not supplied) 1 Antenna Cable (Not supplied) ➢ When connecting an external device, match the...
... external device, match the color of the connection terminal to the cable. 1. Connect a video cable between the AV IN 2 [L-AUDIO-R] jacks on the TV and the AUDIO OUT jacks on the camcorder. 2. Connect a set of connection. 3. English-11 To do this kind of audio cables between the AV... begin, follow steps 1-3 in the previous section to connect the antenna or cable to your VCR and your second VCR as follows: VCR Rear Panel TV Rear Panel 3 Audio Cable (Not supplied) 2 Video Cable (Not supplied) 1 Antenna Cable (Not supplied) ➢ When connecting an external device, match the...

User Manual (user Manual) (ver.1.0) (English)
Page 12
...) ➢ Each external input source device has a different back panel configuration. ➢ When connecting an external device, match the color of the TV, and adjust the volume level with the Amplifier's volume control. When an audio amplifier is connected to the cable. Connecting a DVD Player/Set-Top... Component video separates the video into Y (Luminance (brightness)), PB (Blue) and PR (Red) for enhanced video quality. DVD Player/Set-Top Box TV Rear Panel 2 Audio Cable (Not supplied) 1 Component Cable (Not supplied) 1. Connect Audio Cables between the AV OUT [L-AUDIO-R] on the...
...) ➢ Each external input source device has a different back panel configuration. ➢ When connecting an external device, match the color of the TV, and adjust the volume level with the Amplifier's volume control. When an audio amplifier is connected to the cable. Connecting a DVD Player/Set-Top... Component video separates the video into Y (Luminance (brightness)), PB (Blue) and PR (Red) for enhanced video quality. DVD Player/Set-Top Box TV Rear Panel 2 Audio Cable (Not supplied) 1 Component Cable (Not supplied) 1. Connect Audio Cables between the AV OUT [L-AUDIO-R] on the...
User Manual (user Manual) (ver.1.0) (English)
Page 13
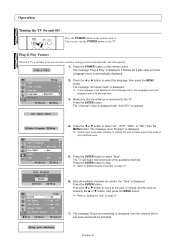
...Press the œ or √ button to "Setting the Time" on page 27. 7. Enjoy your watching" is displayed. ➢ Contact your particular area. 5. TV Time Setup √ Plug & Play √ Caption √ Language : English √ † More œ √ Adjust Skip 2. The message "Ant ...message "Plug & Play" is displayed. Press the ENTER button to stop. ➢ Refer to the hour or minute. Ant input check Auto Program Skip TV Auto Program Channel √ Add/Delete : Deleted √ Air/CATV : Air Name LNA : ---- : Off √ œ √ Adjust ...
...Press the œ or √ button to "Setting the Time" on page 27. 7. Enjoy your watching" is displayed. ➢ Contact your particular area. 5. TV Time Setup √ Plug & Play √ Caption √ Language : English √ † More œ √ Adjust Skip 2. The message "Ant ...message "Plug & Play" is displayed. Press the ENTER button to stop. ➢ Refer to the hour or minute. Ant input check Auto Program Skip TV Auto Program Channel √ Add/Delete : Deleted √ Air/CATV : Air Name LNA : ---- : Off √ œ √ Adjust ...
User Manual (user Manual) (ver.1.0) (English)
Page 14
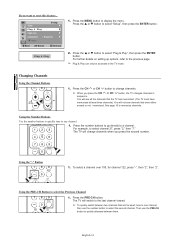
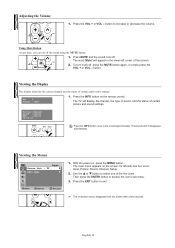
...PRE-CH button to select "Plug & Play", then press the ENTER button. You will change channels. ➢ When you press the second number. The TV will not see all the channels that were either erased or not memorized. To select a channel over 100, for channel 122, press "-", then "2", ...then "2". The TV will see channels that the TV has memorized. (The TV must have memorized at least three channels). Using the PRE-CH Button to select the second channel. English-14 If you...
...PRE-CH button to select "Plug & Play", then press the ENTER button. You will change channels. ➢ When you press the second number. The TV will not see all the channels that were either erased or not memorized. To select a channel over 100, for channel 122, press "-", then "2", ...then "2". The TV will see channels that the TV has memorized. (The TV must have memorized at least three channels). Using the PRE-CH Button to select the second channel. English-14 If you...
User Manual (user Manual) (ver.1.0) (English)
Page 15
..., Sound, Channel, Setup. 2. Use the ... With the power on the screen. Its left corner of certain picture and sound settings. Viewing the Menus TV Input Source List : TV √ Edit Name √ Move Enter Return 1. Press MUTE and the sound cuts off , press the MUTE button again, or simply press the VOL...
..., Sound, Channel, Setup. 2. Use the ... With the power on the screen. Its left corner of certain picture and sound settings. Viewing the Menus TV Input Source List : TV √ Edit Name √ Move Enter Return 1. Press MUTE and the sound cuts off , press the MUTE button again, or simply press the VOL...
User Manual (user Manual) (ver.1.0) (English)
Page 16
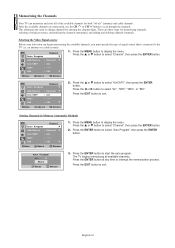
...then press the ENTER button. Press the ENTER button to select "Channel", then press the ENTER button. 2. Auto Program Air 13 Start Enter Return 3. TV Auto Program Channel √ 1. Press the œ or √ button to display the menu. Press the MENU button to select "Air", "STD... and cable channels. This eliminates the need to interrupt the memorization process. There are memorized, use the CH or CH button to the TV (i.e. Selecting the Video Signal-source Before your television can memorize and store all available channels. Press the MENU button to exit. Press the...
...then press the ENTER button. Press the ENTER button to select "Channel", then press the ENTER button. 2. Auto Program Air 13 Start Enter Return 3. TV Auto Program Channel √ 1. Press the œ or √ button to display the menu. Press the MENU button to select "Air", "STD... and cable channels. This eliminates the need to interrupt the memorization process. There are memorized, use the CH or CH button to the TV (i.e. Selecting the Video Signal-source Before your television can memorize and store all available channels. Press the MENU button to exit. Press the...

User Manual (user Manual) (ver.1.0) (English)
Page 17
...---- √ : ---- √ : ---- √ 2. Press the ... English-17 Move Enter Return TV TV AV1 AV2 S-Video Component Source List Move Enter Return 2. Press the SOURCE button on the TV's side panel. Move Enter Return TV Edit Name AV1 AV2 S-Video Component : -------VCR : D-V-D-Cable STB : S-a-t-.- STB AV Recv. : D-V-D--...or † button to select signal source, then press the ENTER button. ➢ When you connect equipment to the TV, you can choose between the following sets of your input source selection easier. Press the EXIT button to select "Edit ...
...---- √ : ---- √ : ---- √ 2. Press the ... English-17 Move Enter Return TV TV AV1 AV2 S-Video Component Source List Move Enter Return 2. Press the SOURCE button on the TV's side panel. Move Enter Return TV Edit Name AV1 AV2 S-Video Component : -------VCR : D-V-D-Cable STB : S-a-t-.- STB AV Recv. : D-V-D--...or † button to select signal source, then press the ENTER button. ➢ When you connect equipment to the TV, you can choose between the following sets of your input source selection easier. Press the EXIT button to select "Edit ...

User Manual (user Manual) (ver.1.0) (English)
Page 18
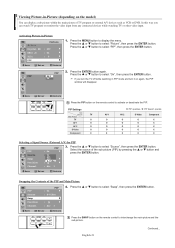
...65 color : 43 Tint : G 50 R 50 Move Enter Return 2. Press the ... Customizing the Picture You can use one of the "Automatic" setting.) TV Mode Picture : Dynamic √ Custom √ Color Tone : Normal √ Size : Normal √ † More 1. Press the MENU button to...Movie, or Custom by making a selection from the menu. Press the ... or † button to exit. Press the ... Move Enter Return TV Picture Mode : DDyynnaammiicc √ Custom Standard Movie √ Custom Color Tone : Normal √ Size : Normal √ † More ...
...65 color : 43 Tint : G 50 R 50 Move Enter Return 2. Press the ... Customizing the Picture You can use one of the "Automatic" setting.) TV Mode Picture : Dynamic √ Custom √ Color Tone : Normal √ Size : Normal √ † More 1. Press the MENU button to...Movie, or Custom by making a selection from the menu. Press the ... or † button to exit. Press the ... Move Enter Return TV Picture Mode : DDyynnaammiicc √ Custom Standard Movie √ Custom Color Tone : Normal √ Size : Normal √ † More ...

User Manual (user Manual) (ver.1.0) (English)
Page 19
... the ENTER button. 3. Press the MENU button to exit. Press the EXIT button to display the menu. Press the ... Press the ... TV Mode Custom Picture : Dynamic √ √ Color Tone : CWoaorla2m1 Size Cool1 : NNoorrmmaall √ † More Warm1 Warm2 Move Enter... Return 3. Press the EXIT button to display the menu. TV Mode Picture : Dynamic √ Custom √ Color Tone : Normal √ Size : Normal √ † More Move Enter Return 1. Press ...
... the ENTER button. 3. Press the MENU button to exit. Press the EXIT button to display the menu. Press the ... Press the ... TV Mode Custom Picture : Dynamic √ √ Color Tone : CWoaorla2m1 Size Cool1 : NNoorrmmaall √ † More Warm1 Warm2 Move Enter... Return 3. Press the EXIT button to display the menu. TV Mode Picture : Dynamic √ Custom √ Color Tone : Normal √ Size : Normal √ † More Move Enter Return 1. Press ...

User Manual (user Manual) (ver.1.0) (English)
Page 20
... then press the ENTER button. 2. or † button to display the menu. Press the ... DNIe Jr(Digital Natural Image engine Junior) (depending on the TV's location. More Digital NR : Off √ DNIe Jr : On √ Tilt : 0 √ PIP √ 1. or † button to ... Press the EXIT button to exit. œ √ Adjust Enter Return Tilt (depending on the model) Due to display the menu. TV Picture ... or † button to exit. When this occurs, follow the steps below. Press the ... New image compensation algorithm gives brighter...
... then press the ENTER button. 2. or † button to display the menu. Press the ... DNIe Jr(Digital Natural Image engine Junior) (depending on the TV's location. More Digital NR : Off √ DNIe Jr : On √ Tilt : 0 √ PIP √ 1. or † button to ... Press the EXIT button to exit. œ √ Adjust Enter Return Tilt (depending on the model) Due to display the menu. TV Picture ... or † button to exit. When this occurs, follow the steps below. Press the ... New image compensation algorithm gives brighter...
User Manual (user Manual) (ver.1.0) (English)
Page 21
... the SWAP button on the remote control to select "PIP", then press the ENTER button. Press the ENTER button again. PIP Settings Sub Picture TV Main Picture TV O AV 1 O AV 2 O S-Video O Component X O: PIP operates / X: PIP doesn't operate AV 1 AV 2 S-Video Component O O O X O O O X O O O X O O O X X X... : Air 3 Move Enter Return Swapping the Contents of the sub picture (PIP) by pressing the ... English-21 Continued... TV PIP PIP : Off On 2. or † button to interchange the main picture and the sub picture. More Digital NR ...
... the SWAP button on the remote control to select "PIP", then press the ENTER button. Press the ENTER button again. PIP Settings Sub Picture TV Main Picture TV O AV 1 O AV 2 O S-Video O Component X O: PIP operates / X: PIP doesn't operate AV 1 AV 2 S-Video Component O O O X O O O X O O O X O O O X X X... : Air 3 Move Enter Return Swapping the Contents of the sub picture (PIP) by pressing the ... English-21 Continued... TV PIP PIP : Off On 2. or † button to interchange the main picture and the sub picture. More Digital NR ...
User Manual (user Manual) (ver.1.0) (English)
Page 22
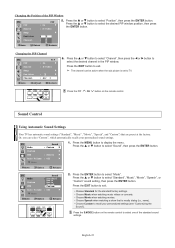
...concerts. • Choose Movie when watching movies. • Choose Speech when watching a show that are preset at the factory. Move Enter Return TV Mode Custom MTS Sound : CSutsatnodmard √ Music Movie √ Speech : SCtuesrteoom √ Auto Volume : Off √ † More ...Move Enter Return 2. Or, you can be active when the sub picture is mostly dialog (i.e., news). • Choose Custom to TV. or † button to select "Standard", "Music", "Movie", "Speech", or "Custom" sound setting, then press the ENTER button. or †...
...concerts. • Choose Movie when watching movies. • Choose Speech when watching a show that are preset at the factory. Move Enter Return TV Mode Custom MTS Sound : CSutsatnodmard √ Music Movie √ Speech : SCtuesrteoom √ Auto Volume : Off √ † More ...Move Enter Return 2. Or, you can be active when the sub picture is mostly dialog (i.e., news). • Choose Custom to TV. or † button to select "Standard", "Music", "Movie", "Speech", or "Custom" sound setting, then press the ENTER button. or †...


