Quick Guide (ENGLISH)
Page 9
...that do not comply with the VESA standard screw specifications. Samsung Electronics will not be responsible for damages caused by using a base other than those specified. • Please use screws that allows you to mount the monitor at least 10 cm away from the wall surface...instructions. • To mount the monitor on their specifications. • Do not use Wall Mount according to the International standards. Connections • For wall mounts that do not comply with VESA standard screw specifications, the length of accidents. • Samsung is not liable for more information....
...that do not comply with the VESA standard screw specifications. Samsung Electronics will not be responsible for damages caused by using a base other than those specified. • Please use screws that allows you to mount the monitor at least 10 cm away from the wall surface...instructions. • To mount the monitor on their specifications. • Do not use Wall Mount according to the International standards. Connections • For wall mounts that do not comply with VESA standard screw specifications, the length of accidents. • Samsung is not liable for more information....

User Manual (ENGLISH)
Page 15
... purchase the wall mounting kit that do not comply with the VESA standard screw specifications. A. Lay the LCD monitor face-down on a wall, you to mount the monitor at least 10 cm away from the wall surface. • Contact the nearest Samsung Service Center for damages caused by using a base other base. • Do not...
... purchase the wall mounting kit that do not comply with the VESA standard screw specifications. A. Lay the LCD monitor face-down on a wall, you to mount the monitor at least 10 cm away from the wall surface. • Contact the nearest Samsung Service Center for damages caused by using a base other base. • Do not...
User Manual (ENGLISH)
Page 22
...for this device so that I can see the "Digital Signature Not Found" window then click the "Yes" button. If you can choose a specific driver" then click "Next" and then click "Have disk". 7. Double click the "Display" icon. 3. Select the "Settings" tab and click... "Advanced Properties" button. 20 Using the Software 10. Select the "Settings" tab and click "Advanced Properties" button. 4. Choose "Monitor". Click the "Browse" button then choose A:(D:\Driver). 8. Click the "Finish" button then the "Close" button. Double click the "Display" icon. 3. Choose...
...for this device so that I can see the "Digital Signature Not Found" window then click the "Yes" button. If you can choose a specific driver" then click "Next" and then click "Have disk". 7. Double click the "Display" icon. 3. Select the "Settings" tab and click... "Advanced Properties" button. 20 Using the Software 10. Select the "Settings" tab and click "Advanced Properties" button. 4. Choose "Monitor". Click the "Browse" button then choose A:(D:\Driver). 8. Click the "Finish" button then the "Close" button. Double click the "Display" icon. 3. Choose...
User Manual (ENGLISH)
Page 23
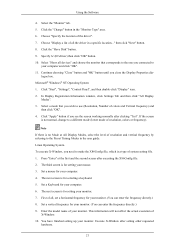
.... 2. Set a mouse for setting your mouse. 3. Enter the model name of your monitor. Choose "Display a list of all the driver in a specific location..." If the screen is for your monitor. (You can enter the frequency directly.) 9. First of all , set a horizontal frequency... for your monitor. (You can enter the frequency directly.) 8. This information will not affect the actual execution...
.... 2. Set a mouse for setting your mouse. 3. Enter the model name of your monitor. Choose "Display a list of all the driver in a specific location..." If the screen is for your monitor. (You can enter the frequency directly.) 9. First of all , set a horizontal frequency... for your monitor. (You can enter the frequency directly.) 8. This information will not affect the actual execution...
User Manual (ENGLISH)
Page 25
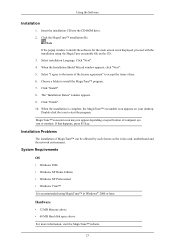
... proceed with the installation using MagicTune™ in Windows® 2000 or later. Installation Problems The installation of computer system or monitor. The "Installation Status" window appears. 9. Note If the popup window to accept the terms of the license agreement" to install...8226; Windows XP Home Edition • Windows XP Professional • Windows Vista™ It is recommended using the MagicTune executable file on specification of MagicTune™ can be affected by such factors as the video card, motherboard and the network environment. Click "Install". 8. Hardware ...
... proceed with the installation using MagicTune™ in Windows® 2000 or later. Installation Problems The installation of computer system or monitor. The "Installation Status" window appears. 9. Note If the popup window to accept the terms of the license agreement" to install...8226; Windows XP Home Edition • Windows XP Professional • Windows Vista™ It is recommended using the MagicTune executable file on specification of MagicTune™ can be affected by such factors as the video card, motherboard and the network environment. Click "Install". 8. Hardware ...
User Manual (ENGLISH)
Page 55
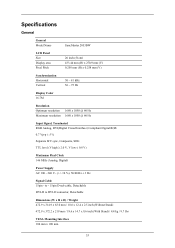
Specifications General General Model Name SyncMaster 2053BW LCD Panel Size Display area Pixel Pitch 20 inch (51cm) 433.44 mm (H) x 270.9 mm (V) 0.258 mm (H) x 0.258 mm (V) Synchronization Horizontal Vertical 30 ~ 81 kHz 56 ~ ...
Specifications General General Model Name SyncMaster 2053BW LCD Panel Size Display area Pixel Pitch 20 inch (51cm) 433.44 mm (H) x 270.9 mm (V) 0.258 mm (H) x 0.258 mm (V) Synchronization Horizontal Vertical 30 ~ 81 kHz 56 ~ ...

User Manual (ENGLISH)
Page 56
... conditions and monitor settings. This system saves energy by using advanced semiconductor technology with the Electromagnetic Compatibility Directives for this feature. The PowerSaver system operates with VESA DPM functionality. As an ENERGY STAR® Partner, SAMSUNG has determined that this product are subject to change without any Plug & Play compatible system. Specifications Environmental...
... conditions and monitor settings. This system saves energy by using advanced semiconductor technology with the Electromagnetic Compatibility Directives for this feature. The PowerSaver system operates with VESA DPM functionality. As an ENERGY STAR® Partner, SAMSUNG has determined that this product are subject to change without any Plug & Play compatible system. Specifications Environmental...

User Manual (ENGLISH)
Page 57
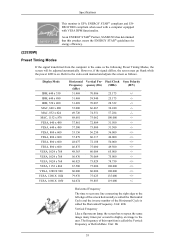
... 108.000 108.000 135.000 119.000 Sync Polarity (H/V) Horizontal Frequency The time to scan one line connecting the right edge to the user. Specifications Preset Timing Modes If the signal transferred from the computer is called the Vertical Frequency or Refresh Rate. The frequency of the Horizontal Cycle is...
... 108.000 108.000 135.000 119.000 Sync Polarity (H/V) Horizontal Frequency The time to scan one line connecting the right edge to the user. Specifications Preset Timing Modes If the signal transferred from the computer is called the Vertical Frequency or Refresh Rate. The frequency of the Horizontal Cycle is...

User Manual (ENGLISH)
Page 59
This is recommended. • Set the Monitor to protect your display system program as below to power off with the PC Display Properties Power Scheme. Ex) Rotate the Color Information with Logo ... a Display Logo or moving image is not a product defect. All display products, including LCD, are subject to a new video image. Please follow set up of characters and background color with little difference in one color or a moving image for specific applications Ex) Airports, Transit Stations, Stock Markets, Banks, and Controlling Systems We...
This is recommended. • Set the Monitor to protect your display system program as below to power off with the PC Display Properties Power Scheme. Ex) Rotate the Color Information with Logo ... a Display Logo or moving image is not a product defect. All display products, including LCD, are subject to a new video image. Please follow set up of characters and background color with little difference in one color or a moving image for specific applications Ex) Airports, Transit Stations, Stock Markets, Banks, and Controlling Systems We...
Quick Guide (ENGLISH)
Page 7
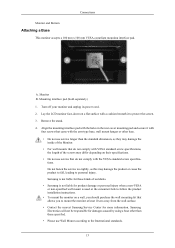
... the product or cause the product to fall, leading to protect the screen. 3. Lay the LCD monitor face-down on a wall, you should purchase the wall mounting kit that do not comply with the VESA standard screw specifications. Samsung is not liable for more information. Align the mounting interface pad with the holes in...
... the product or cause the product to fall, leading to protect the screen. 3. Lay the LCD monitor face-down on a wall, you should purchase the wall mounting kit that do not comply with the VESA standard screw specifications. Samsung is not liable for more information. Align the mounting interface pad with the holes in...
User Manual (ENGLISH)
Page 3
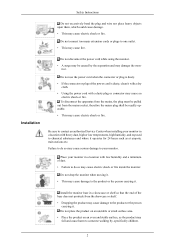
...protrude from the mains socket, therefore the mains plug shall be caused by , specifically children. 2 Do not drop the monitor when moving it. • This may cause fire. Installation Do not disconnect the power cord while using the monitor. • A surge may be readily operable. • This may damage ... a location with heavy dust, high or low temperatures, high humidity, and exposed to contact an authorized Service Center when installing your monitor. Install the monitor base in a showcase or shelf so that the end of dust. • Failure to do so may cause serious damage to ...
...protrude from the mains socket, therefore the mains plug shall be caused by , specifically children. 2 Do not drop the monitor when moving it. • This may cause fire. Installation Do not disconnect the power cord while using the monitor. • A surge may be readily operable. • This may damage ... a location with heavy dust, high or low temperatures, high humidity, and exposed to contact an authorized Service Center when installing your monitor. Install the monitor base in a showcase or shelf so that the end of dust. • Failure to do so may cause serious damage to ...

User Manual (ENGLISH)
Page 4
...Do not spray water or detergent directly onto the monitor. • This may cause electric shock or fire. Clean Safety Instructions Do not place the product on the floor. • Take care, as someone, specifically children may damage the TFT-LCD surface. Do not install the product in the ...owner's manual. Do not place the monitor face down the monitor carefully. • Failing to keep it . When installing the product, make ...
...Do not spray water or detergent directly onto the monitor. • This may cause electric shock or fire. Clean Safety Instructions Do not place the product on the floor. • Take care, as someone, specifically children may damage the TFT-LCD surface. Do not install the product in the ...owner's manual. Do not place the monitor face down the monitor carefully. • Failing to keep it . When installing the product, make ...

User Manual (ENGLISH)
Page 14
... mount hanger or other than the standard dimension, as this may differ depending on their specifications. • Do not use Wall Mount according to personal injury. Lay the LCD monitor face-down on a wall, you should purchase the wall mounting kit that do not comply... with VESA standard screw specifications, the length of the screws may damage the product or cause the product to fall, leading to the International standards. 13 Mounting interface pad (Sold separately) 1. Samsung...
... mount hanger or other than the standard dimension, as this may differ depending on their specifications. • Do not use Wall Mount according to personal injury. Lay the LCD monitor face-down on a wall, you should purchase the wall mounting kit that do not comply... with VESA standard screw specifications, the length of the screws may damage the product or cause the product to fall, leading to the International standards. 13 Mounting interface pad (Sold separately) 1. Samsung...

User Manual (ENGLISH)
Page 21
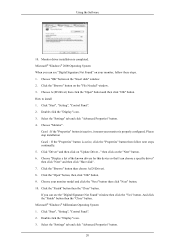
Microsoft® Windows® 2000 Operating System When you can choose a specific driver" then click "Next" and then click "Have disk". 7. Choose "Monitor". Choose your monitor is inactive, it means your monitor model and click the "Next" button then click "Next" button. 10. And click the "... then click on the "Insert disk" window. 2. Select the "Settings" tab and click "Advanced Properties" button. 20 Using the Software 10. Monitor driver installation is active, click the "Properties" button then follow these steps. 1. How to install 1. Double click the "Display" icon. 3. ...
Microsoft® Windows® 2000 Operating System When you can choose a specific driver" then click "Next" and then click "Have disk". 7. Choose "Monitor". Choose your monitor is inactive, it means your monitor model and click the "Next" button then click "Next" button. 10. And click the "... then click on the "Insert disk" window. 2. Select the "Settings" tab and click "Advanced Properties" button. 20 Using the Software 10. Monitor driver installation is active, click the "Properties" button then follow these steps. 1. How to install 1. Double click the "Display" icon. 3. ...

User Manual (ENGLISH)
Page 22
... Properties dia- Note If there is for setting your computer. 6. Set a mouse for your monitor. 7. The next screen is no Mode at the first and the second screen after executing the X86Config file. 2. Click the "Change" button in a specific location..." Click "Start", "Settings", "Control Panel", and then double-click "Display" icon. 2. Select...
... Properties dia- Note If there is for setting your computer. 6. Set a mouse for your monitor. 7. The next screen is no Mode at the first and the second screen after executing the X86Config file. 2. Click the "Change" button in a specific location..." Click "Start", "Settings", "Control Panel", and then double-click "Display" icon. 2. Select...

User Manual (ENGLISH)
Page 24
...; It is complete, the MagicTune™ executable icon appears on your desktop. When the installation is recommended using the MagicTune executable file on specification of computer system or monitor. MagicTune™ execution icon may not appear depending on the CD. 3. Click "Finish". 10. If that happens, press F5 Key. Double-click the...
...; It is complete, the MagicTune™ executable icon appears on your desktop. When the installation is recommended using the MagicTune executable file on specification of computer system or monitor. MagicTune™ execution icon may not appear depending on the CD. 3. Click "Finish". 10. If that happens, press F5 Key. Double-click the...
User Manual (ENGLISH)
Page 54
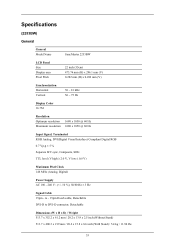
....2 mm / 20.2 x 13.9 x 2.5 inch (Without Stand) 513.7 x 400.3 x 219 mm / 20.2 x 15.8 x 8.6 inch (With Stand) / 5.4 kg / 11.96 Ibs 53 Specifications (2253BW) General General Model Name SyncMaster 2253BW LCD Panel Size Display area Pixel Pitch 22 inch (55cm) 473.76 mm (H) x 296.1 mm (V) 0.282 mm (H) x 0.282 mm (V) Synchronization Horizontal Vertical 30 ~ 81 kHz 56 ~ 75 Hz...
....2 mm / 20.2 x 13.9 x 2.5 inch (Without Stand) 513.7 x 400.3 x 219 mm / 20.2 x 15.8 x 8.6 inch (With Stand) / 5.4 kg / 11.96 Ibs 53 Specifications (2253BW) General General Model Name SyncMaster 2253BW LCD Panel Size Display area Pixel Pitch 22 inch (55cm) 473.76 mm (H) x 296.1 mm (V) 0.282 mm (H) x 0.282 mm (V) Synchronization Horizontal Vertical 30 ~ 81 kHz 56 ~ 75 Hz...
User Manual (ENGLISH)
Page 55
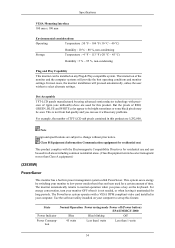
...LCD panels manufactured by switching your computer. Note Design and specifications are 5,292,000. State Normal Operation Power saving mode Power off (Power button) EPA/ENERGY 2000 Power Indicator Blue Blue blinking Off Power Consumption 45 watts Less than1 watts Less than Class A equipment.) (2253BW) PowerSaver This monitor... has a built-in this feature. Specifications VESA Mounting Interface 100 mm x 100 mm Environmental considerations Operating Temperature : 50 ...
...LCD panels manufactured by switching your computer. Note Design and specifications are 5,292,000. State Normal Operation Power saving mode Power off (Power button) EPA/ENERGY 2000 Power Indicator Blue Blue blinking Off Power Consumption 45 watts Less than1 watts Less than Class A equipment.) (2253BW) PowerSaver This monitor... has a built-in this feature. Specifications VESA Mounting Interface 100 mm x 100 mm Environmental considerations Operating Temperature : 50 ...
User Manual (ENGLISH)
Page 56
Specifications This monitor is on. Unit: kHz Vertical Frequency Like a fluorescent lamp, the screen has to repeat the same ...is called the Horizontal Cycle and the inverse number of this product meets the ENERGY STAR® guidelines for energy efficiency. (2253BW) Preset Timing Modes If the signal transferred from the computer is called the Horizontal Frequency. Unit: Hz 55 However, if the...ENERGY2000 compliant when used with a computer equipped with VESA DPM functionality. As an ENERGY STAR® Partner, SAMSUNG has determined that this repetition is the same as follows.
Specifications This monitor is on. Unit: kHz Vertical Frequency Like a fluorescent lamp, the screen has to repeat the same ...is called the Horizontal Cycle and the inverse number of this product meets the ENERGY STAR® guidelines for energy efficiency. (2253BW) Preset Timing Modes If the signal transferred from the computer is called the Horizontal Frequency. Unit: Hz 55 However, if the...ENERGY2000 compliant when used with a computer equipped with VESA DPM functionality. As an ENERGY STAR® Partner, SAMSUNG has determined that this repetition is the same as follows.

User Manual (ENGLISH)
Page 57
Specifications (2253LW) General General Model Name SyncMaster 2253LW LCD Panel Size Display area Pixel Pitch 21.6 inch (54 cm) 464.94 mm (H) x 290.58 mm (V) 0.258 mm (H) x 0.258 mm (W) Synchronization Horizontal Vertical 30 ~ 81 ...
Specifications (2253LW) General General Model Name SyncMaster 2253LW LCD Panel Size Display area Pixel Pitch 21.6 inch (54 cm) 464.94 mm (H) x 290.58 mm (V) 0.258 mm (H) x 0.258 mm (W) Synchronization Horizontal Vertical 30 ~ 81 ...