

English Manual
Page 2
...warranties granted under this warranty. One World Technologies, Inc. TABLE OF CONTENTS Introduction...2 Warranty...2 General Safety Rules...3-4 Specific Safety Rules...4-5 Symbols...6-7 Electrical...8 Glossary of Terms...9 Features...10-12 Tools Needed...12 ... return all defects in workmanship or materials in your RYOBI® power tool for a period of two years from the date of this product making its power tools other than those specifically stated in any defective part, at our option. ...
...warranties granted under this warranty. One World Technologies, Inc. TABLE OF CONTENTS Introduction...2 Warranty...2 General Safety Rules...3-4 Specific Safety Rules...4-5 Symbols...6-7 Electrical...8 Glossary of Terms...9 Features...10-12 Tools Needed...12 ... return all defects in workmanship or materials in your RYOBI® power tool for a period of two years from the date of this product making its power tools other than those specifically stated in any defective part, at our option. ...

English Manual
Page 3
... is in damp or wet locations or expose to operate the tool. DO NOT OVERREACH. Learn the applications and limitations as well as the specific potential hazards related to a complete stop. PROTECT YOUR LUNGS. Do not use the next heavier gauge. Feed work when practical, it is damaged should...
... is in damp or wet locations or expose to operate the tool. DO NOT OVERREACH. Learn the applications and limitations as well as the specific potential hazards related to a complete stop. PROTECT YOUR LUNGS. Do not use the next heavier gauge. Feed work when practical, it is damaged should...
English Manual
Page 4
... the outlet, reverse the plug. Use of your saw with the accessory. DOUBLE CHECK ALL SETUPS. Instructions for safe use a clamp to a live terminal. SPECIFIC SAFETY RULES FIRMLY CLAMP OR BOLT your hands and fingers for and remove all adjustments are secure. BE SURE BLADE PATH IS FREE...
... the outlet, reverse the plug. Use of your saw with the accessory. DOUBLE CHECK ALL SETUPS. Instructions for safe use a clamp to a live terminal. SPECIFIC SAFETY RULES FIRMLY CLAMP OR BOLT your hands and fingers for and remove all adjustments are secure. BE SURE BLADE PATH IS FREE...
English Manual
Page 5
... the saw) to perform properly, shut off the power switch, remove the miter saw . ALWAYS TURN OFF THE SAW before changing blade or servicing. SPECIFIC SAFETY RULES NEVER reach behind, under, or within three inches of the blade and its cutting path with hands and fingers for any reason...
... the saw) to perform properly, shut off the power switch, remove the miter saw . ALWAYS TURN OFF THE SAW before changing blade or servicing. SPECIFIC SAFETY RULES NEVER reach behind, under, or within three inches of the blade and its cutting path with hands and fingers for any reason...
English Manual
Page 10
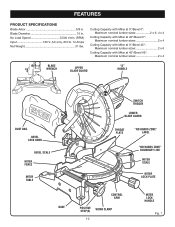
FEATURES PRODUCT SPECIFICATIONS Blade Arbor 5/8 in . No Load Speed 5,500 r/min. (RPM) Input 120 V, AC only, 60 Hz, 14 Amps Net Weight 31 lbs. Blade Diameter 10 in . ...
FEATURES PRODUCT SPECIFICATIONS Blade Arbor 5/8 in . No Load Speed 5,500 r/min. (RPM) Input 120 V, AC only, 60 Hz, 14 Amps Net Weight 31 lbs. Blade Diameter 10 in . ...
English Manual
Page 13
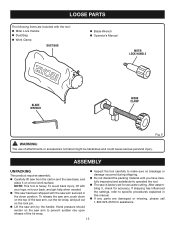
... position. Hand pressure should remain on the saw arm to prevent sudden rise upon release of the tie wrap. Inspect the tool carefully to specific procedures explained in the down on a level work surface. LOOSE PARTS The following items are damaged or missing, please call 1-800-525-2579 for assistance...
... position. Hand pressure should remain on the saw arm to prevent sudden rise upon release of the tie wrap. Inspect the tool carefully to specific procedures explained in the down on a level work surface. LOOSE PARTS The following items are damaged or missing, please call 1-800-525-2579 for assistance...
