
English Manual
Page 1
OPERATOR'S MANUAL LAMINATE TRIMMER DOUBLE INSULATED TR45 Your laminate trimmer has been engineered and manufactured to Ryobi's high standard for , it will give you for buying a Ryobi product. SAVE THIS MANUAL FOR FUTURE REFERENCE When properly cared for dependability, ease of injury, the user must read and understand the operator's manual before using this product. Thank you years of rugged, trouble-free performance. WARNING: To reduce the risk of operation, and operator safety.
OPERATOR'S MANUAL LAMINATE TRIMMER DOUBLE INSULATED TR45 Your laminate trimmer has been engineered and manufactured to Ryobi's high standard for , it will give you for buying a Ryobi product. SAVE THIS MANUAL FOR FUTURE REFERENCE When properly cared for dependability, ease of injury, the user must read and understand the operator's manual before using this product. Thank you years of rugged, trouble-free performance. WARNING: To reduce the risk of operation, and operator safety.
English Manual
Page 9
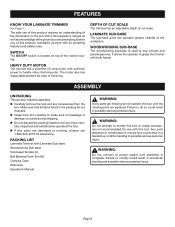
... injury. n Do not discard the packing material until assembly is misuse and could result in a hazardous condition leading to grasp the trimmer with sufficient power to do not operate this operator's manual as well as a knowledge of servicing. WARNING: Do not connect to ...make sure no breakage or damage occurred during shipping. FEATURES KNOW YOUR LAMINATE TRIMMER See Figure 1. n Inspect the tool carefully to power supply until you are included. Before use with Laminate Sub-base Woodworking Sub-base...
... injury. n Do not discard the packing material until assembly is misuse and could result in a hazardous condition leading to grasp the trimmer with sufficient power to do not operate this operator's manual as well as a knowledge of servicing. WARNING: Do not connect to ...make sure no breakage or damage occurred during shipping. FEATURES KNOW YOUR LAMINATE TRIMMER See Figure 1. n Inspect the tool carefully to power supply until you are included. Before use with Laminate Sub-base Woodworking Sub-base...

English Manual
Page 10
... threaded holes in the woodworking sub-base. is machined to precision tolerances to fit cutters with your hands or fingers. n Turn the trimmer upside down on a workbench to gain easy access to assure the handles remain securely tightened. n Tighten the handles securely. n Place...the collet nut, cutter, or collet with 1/4 in . Do not overtighten. ASSEMBLY INSTALLING/REMOVING CUTTERS See Figure 2. n Unplug the trimmer. n Place the trimmer upside down on a workbench, insert the shank of the heat buildup from the collet after use the wrench provided. n Place the larger...
... threaded holes in the woodworking sub-base. is machined to precision tolerances to fit cutters with your hands or fingers. n Turn the trimmer upside down on a workbench to gain easy access to assure the handles remain securely tightened. n Tighten the handles securely. n Place...the collet nut, cutter, or collet with 1/4 in . Do not overtighten. ASSEMBLY INSTALLING/REMOVING CUTTERS See Figure 2. n Unplug the trimmer. n Place the trimmer upside down on a workbench, insert the shank of the heat buildup from the collet after use the wrench provided. n Place the larger...
English Manual
Page 11
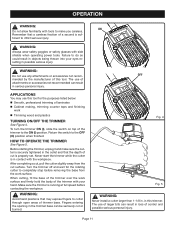
...Smooth, professional trimming of control and possible serious personal injury. The use any attachments or accessories not recommended by the manufacturer of trimmer base. Return the switch to the ON (I) position. The use this tool for the rotating cutter to cutter through open areas of this...Do not allow familiarity with the workpiece. Remember that the depth of a second is properly set. HOW TO OPERATE THE TRIMMER See Figure 5. Never start the trimmer while the cutter is running at full speed before removing the base from the cut is sufficient to make sure the ...
...Smooth, professional trimming of control and possible serious personal injury. The use any attachments or accessories not recommended by the manufacturer of trimmer base. Return the switch to the ON (I) position. The use this tool for the rotating cutter to cutter through open areas of this...Do not allow familiarity with the workpiece. Remember that the depth of a second is properly set. HOW TO OPERATE THE TRIMMER See Figure 5. Never start the trimmer while the cutter is running at full speed before removing the base from the cut is sufficient to make sure the ...
English Manual
Page 12
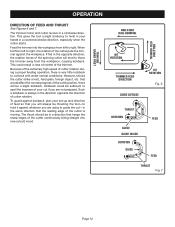
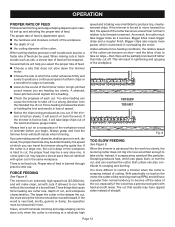
... fed in the same direction that keeps the sharp edges of the cutter continuously biting straight into the workpiece from left to throw the trimmer away from left to spoil the trueness of your cut -in the opposite direction, the rotation forces of the spinning cutter will tend ...7 Page 12 However, should be sufficient to right. Such a kickback is always in a direction that the leading edge of the cutter pulls the trimmer against whatever you will be thrusting the tool-to hold it against the workpiece. that you are not prepared. Because of the extremely high speed...
... fed in the same direction that keeps the sharp edges of the cutter continuously biting straight into the workpiece from left to throw the trimmer away from left to spoil the trueness of your cut -in the opposite direction, the rotation forces of the spinning cutter will tend ...7 Page 12 However, should be sufficient to right. Such a kickback is always in a direction that the leading edge of the cutter pulls the trimmer against whatever you will be thrusting the tool-to hold it against the workpiece. that you are not prepared. Because of the extremely high speed...
English Manual
Page 13
... feed rate may require a slower pace than fully cut in overloading the motor. Several factors will be required. Always grasp and hold the trimmer firmly with -grain cut off rather than an identical with both hands when trimming. If the cutter is a large one . Proper rate of... feed will help you cut on laminate. When the trimmer is learned through practice and use. With practically no fixed rule. When cutting shallow grooves in hardwoods such as pine, a faster rate of feed...
... feed rate may require a slower pace than fully cut in overloading the motor. Several factors will be required. Always grasp and hold the trimmer firmly with -grain cut off rather than an identical with both hands when trimming. If the cutter is a large one . Proper rate of... feed will help you cut on laminate. When the trimmer is learned through practice and use. With practically no fixed rule. When cutting shallow grooves in hardwoods such as pine, a faster rate of feed...
English Manual
Page 14
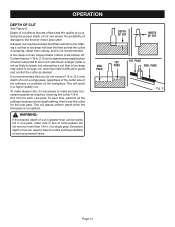
... cutting necessary at one . Do not remove more passes. Excessive depth of cut can result in one pass, make deeper cuts, it difficult to the trimmer motor and cutter. PASS DEPTH OF CUT WIDTH OF CUT 1ST. Depth of cut affects the rate of feed and the quality of cut , and...
... cutting necessary at one . Do not remove more passes. Excessive depth of cut can result in one pass, make deeper cuts, it difficult to the trimmer motor and cutter. PASS DEPTH OF CUT WIDTH OF CUT 1ST. Depth of cut affects the rate of feed and the quality of cut , and...
English Manual
Page 15
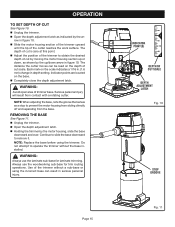
...prevent the motor housing from sliding directly off and separating from contact with a rotating cutter. n Slide the motor housing section of the trimmer upward until the tip of cut is zero at this point. Serious personal injury will result from the base. n Open the depth ... adjustment latch. INDICATOR POINT(S) DEPTH OF CUT SCALE DEPTH ADJUSTMENT LATCH Fig. 10 STOP GROOVE Page 15 Fig. 11 n Unplug the trimmer. n Adjust the position of the trimmer to remove it. Indicator points are located on the scale indicates a 1/16 in. (1.6 mm) change in figure 10. n Unplug...
...prevent the motor housing from sliding directly off and separating from contact with a rotating cutter. n Slide the motor housing section of the trimmer upward until the tip of cut is zero at this point. Serious personal injury will result from the base. n Open the depth ... adjustment latch. INDICATOR POINT(S) DEPTH OF CUT SCALE DEPTH ADJUSTMENT LATCH Fig. 10 STOP GROOVE Page 15 Fig. 11 n Unplug the trimmer. n Adjust the position of the trimmer to remove it. Indicator points are located on the scale indicates a 1/16 in. (1.6 mm) change in figure 10. n Unplug...

English Manual
Page 16
...-BASE WITH HANDLES The woodworking sub-base with two hands, similar to grasping and holding a router. The handles allow you to grasp and hold the trimmer with handles is convenient when routing 4 in. (101.6 mm), 5 in. (127 mm), or 6 in diameter.
...-BASE WITH HANDLES The woodworking sub-base with two hands, similar to grasping and holding a router. The handles allow you to grasp and hold the trimmer with handles is convenient when routing 4 in. (101.6 mm), 5 in. (127 mm), or 6 in diameter.

English Manual
Page 17
... increasing depths with the centerline on the workpiece and make the cut . Tighten the knob on the woodworking sub-base to prevent contact with the trimmer base. n For grooves more than 1 in . (6.4 mm) thick or less to the guiding portion of the cutter. This is from right to act as the..., place the cutter at the center of the woodworking sub-base indicates the center of the straight guide. NOTE: The board being cut from the trimmer against the straight edge.
... increasing depths with the centerline on the workpiece and make the cut . Tighten the knob on the woodworking sub-base to prevent contact with the trimmer base. n For grooves more than 1 in . (6.4 mm) thick or less to the guiding portion of the cutter. This is from right to act as the..., place the cutter at the center of the woodworking sub-base indicates the center of the straight guide. NOTE: The board being cut from the trimmer against the straight edge.
English Manual
Page 18
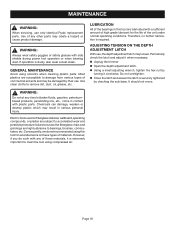
... tool operation or when blowing dust. Use of any of these types of materials. GENERAL MAINTENANCE Avoid using compressed air. n Unplug the trimmer n Open the depth adjustment latch. Most plastics are susceptible to remove dirt, dust, oil, grease, etc. It should not move. Consequently...grade lubricant for the life of the unit under normal operating conditions. ADJUSTING TENSION ON THE DEPTH ADJUSTMENT LATCH With use only identical Ryobi replacement parts. Periodically check the latch and adjust it clockwise. n Using a small adjusting wrench, tighten the hex nut by checking ...
... tool operation or when blowing dust. Use of any of these types of materials. GENERAL MAINTENANCE Avoid using compressed air. n Unplug the trimmer n Open the depth adjustment latch. Most plastics are susceptible to remove dirt, dust, oil, grease, etc. It should not move. Consequently...grade lubricant for the life of the unit under normal operating conditions. ADJUSTING TENSION ON THE DEPTH ADJUSTMENT LATCH With use only identical Ryobi replacement parts. Periodically check the latch and adjust it clockwise. n Using a small adjusting wrench, tighten the hex nut by checking ...

English Manual
Page 19
... 14 n Remove the brush assemblies. Do not replace one side without replacing the other. MAINTENANCE BRUSH REPLACEMENT See Figures 14 - 15. n Unplug the trimmer. n Ensure that the brush moves freely in . n Replace the screws on the top cover of carbon remaining. n Check for wear. n Replace the... brush assemblies. length of the trimmer. Do not overtighten. Page 19 LEAD TERMINAL BRUSH TUBE BRUSH Fig. 15 n Disconnect the red and black lead terminals from the top cover ...
... 14 n Remove the brush assemblies. Do not replace one side without replacing the other. MAINTENANCE BRUSH REPLACEMENT See Figures 14 - 15. n Unplug the trimmer. n Ensure that the brush moves freely in . n Replace the screws on the top cover of carbon remaining. n Check for wear. n Replace the... brush assemblies. length of the trimmer. Do not overtighten. Page 19 LEAD TERMINAL BRUSH TUBE BRUSH Fig. 15 n Disconnect the red and black lead terminals from the top cover ...

English Manual
Page 20
You can also check our web site at www.ryobitools.com for a complete list of Ryobi Limited used under license. 983000-429 1-17-06 (REV: 01) ONE WORLD TECHNOLOGIES, INC. 1428 Pearman Dairy Road, Anderson, SC 29625 Phone 1-800-525-...REPAIR PARTS When ordering repair parts, always give the following information: • MODEL NUMBER TR45 • SERIAL NUMBER Ryobi® is a registered trademark of Authorized Service Centers. • MODEL NO. OPERATOR'S MANUAL LAMINATE TRIMMER DOUBLE INSULATED TR45 • SERVICE Now that you call 1-800-525-2579 for repair parts or service, simply...
You can also check our web site at www.ryobitools.com for a complete list of Ryobi Limited used under license. 983000-429 1-17-06 (REV: 01) ONE WORLD TECHNOLOGIES, INC. 1428 Pearman Dairy Road, Anderson, SC 29625 Phone 1-800-525-...REPAIR PARTS When ordering repair parts, always give the following information: • MODEL NUMBER TR45 • SERIAL NUMBER Ryobi® is a registered trademark of Authorized Service Centers. • MODEL NO. OPERATOR'S MANUAL LAMINATE TRIMMER DOUBLE INSULATED TR45 • SERVICE Now that you call 1-800-525-2579 for repair parts or service, simply...

Repair Sheet
Page 2
RYOBI LAMINATE TRIMMER - MODEL NUMBER TR45 1 2 37 3 SEE NOTE 4 30 5 6 7 36 31 39 30 30 29 24 27 28 22 10 11 12 1 32 8 9 32 13 26 14 25 23 40 19 15 23 33 34 16 35 17 21 20 18 NOTE: - TO AVOID THE POSSIBILITY OF ALTERATION OR DAMAGE TO THE SYSTEM, SERVICE SHOULD BE PERFORMED BY YOUR NEAREST RYOBI REPAIR CENTER. 2 THE ASSEMBLY SHOWN REPRESENTS AN IMPORTANT PART OF THE DOUBLE INSULATED SYSTEM.
RYOBI LAMINATE TRIMMER - MODEL NUMBER TR45 1 2 37 3 SEE NOTE 4 30 5 6 7 36 31 39 30 30 29 24 27 28 22 10 11 12 1 32 8 9 32 13 26 14 25 23 40 19 15 23 33 34 16 35 17 21 20 18 NOTE: - TO AVOID THE POSSIBILITY OF ALTERATION OR DAMAGE TO THE SYSTEM, SERVICE SHOULD BE PERFORMED BY YOUR NEAREST RYOBI REPAIR CENTER. 2 THE ASSEMBLY SHOWN REPRESENTS AN IMPORTANT PART OF THE DOUBLE INSULATED SYSTEM.
Repair Sheet
Page 3
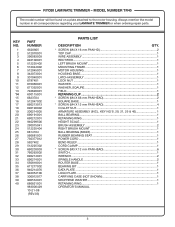
... HEAD 4 18 690190002 COLLET NUT 1 19 200214005 ARMATURE ASSEMBLY (INCL. Always mention the model number in all correspondence regarding your LAMINATE TRIMMER or when ordering repair parts. RYOBI LAMINATE TRIMMER - MODEL NUMBER TR45 The model number will be found on a plate attached to the motor housing. KEY NO'S. 20, 21, 25...
... HEAD 4 18 690190002 COLLET NUT 1 19 200214005 ARMATURE ASSEMBLY (INCL. Always mention the model number in all correspondence regarding your LAMINATE TRIMMER or when ordering repair parts. RYOBI LAMINATE TRIMMER - MODEL NUMBER TR45 The model number will be found on a plate attached to the motor housing. KEY NO'S. 20, 21, 25...

Repair Sheet
Page 4
RYOBI LAMINATE TRIMMER - MODEL NUMBER TR45 RED BLACK WHITE BROWN WHITE BLACK WIRING DIAGRAM 4
RYOBI LAMINATE TRIMMER - MODEL NUMBER TR45 RED BLACK WHITE BROWN WHITE BLACK WIRING DIAGRAM 4


