Operation Manual 1
Page 2
... of output connector or uninsulated battery terminal. Do not charge battery in good electrical condition; Take it will reduce the risk of an attachment not recommended or sold by an authorized serviceman. Do not operate charger if it to an authorized serviceman for electrical check to wet or...
... of output connector or uninsulated battery terminal. Do not charge battery in good electrical condition; Take it will reduce the risk of an attachment not recommended or sold by an authorized serviceman. Do not operate charger if it to an authorized serviceman for electrical check to wet or...
Operation Manual 1
Page 3
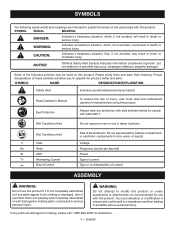
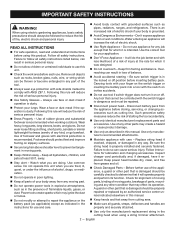
... of the following signal words and meanings are damaged or missing, please call 1-800-860-4050 for use with this product or create accessories or attachments not recommended for assistance. 3 - If any parts appear to comply with damaged or missing parts could result in minor or moderate injury. Indicates a hazardous situation...
... of the following signal words and meanings are damaged or missing, please call 1-800-860-4050 for use with this product or create accessories or attachments not recommended for assistance. 3 - If any parts appear to comply with damaged or missing parts could result in minor or moderate injury. Indicates a hazardous situation...
Operation Manual 1
Page 4
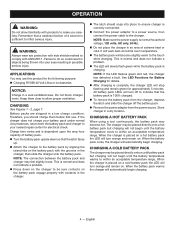
... will work best at normal room temperature. The battery pack will stop flashing and remain green for the following purpose: Charging RYOBI 40 Volt Lithium-ion batteries NOTICE: Charge in a low charge condition. CHARGING A HOT BATTERY PACK When using a tool continuously, the battery pack may feel... connected. Connect the power adaptor to a power source, then connect the power cable to indicate that the latch faces up. Attach the charger to make you careless. CHARGING A COLD BATTERY PACK The charger may use . Do not block charger vents.
... will work best at normal room temperature. The battery pack will stop flashing and remain green for the following purpose: Charging RYOBI 40 Volt Lithium-ion batteries NOTICE: Charge in a low charge condition. CHARGING A HOT BATTERY PACK When using a tool continuously, the battery pack may feel... connected. Connect the power adaptor to a power source, then connect the power cable to indicate that the latch faces up. Attach the charger to make you careless. CHARGING A COLD BATTERY PACK The charger may use . Do not block charger vents.
Operation Manual
Page 4
...and must be followed to rain or wet conditions. Use only manufacturer's recommended attachments. Maintain appliance with grounded surfaces such as described in this unit when you are properly and securely attached. Use only the manufacturer's replacement string in any kind, or...appliance will reduce the risk of the tool. Always wear eye protection with the switch on or off position before using a string trimmer attachment. 2 - Wear heavy, long pants, long sleeves, boots, and gloves. Use of any part of serious personal injury. Dress ...
...and must be followed to rain or wet conditions. Use only manufacturer's recommended attachments. Maintain appliance with grounded surfaces such as described in this unit when you are properly and securely attached. Use only the manufacturer's replacement string in any kind, or...appliance will reduce the risk of the tool. Always wear eye protection with the switch on or off position before using a string trimmer attachment. 2 - Wear heavy, long pants, long sleeves, boots, and gloves. Use of any part of serious personal injury. Dress ...

Operation Manual
Page 5
... stored indoors in a dry, locked place out of the reach of children. Never use flailing devices, wire or rope on any attachment. Keep the air vents clean and free of a dropped or damaged battery immediately. Exercise care in handling batteries in serious...attention. This will reduce possible personal injury from blades. Do not allow power head to them frequently and use any other cutting attachment, for possible special disposal instructions. Do not open flame. Charging improperly or at temperatures outside or in vehicles. Follow...
... stored indoors in a dry, locked place out of the reach of children. Never use flailing devices, wire or rope on any attachment. Keep the air vents clean and free of a dropped or damaged battery immediately. Exercise care in handling batteries in serious...attention. This will reduce possible personal injury from blades. Do not allow power head to them frequently and use any other cutting attachment, for possible special disposal instructions. Do not open flame. Charging improperly or at temperatures outside or in vehicles. Follow...

Operation Manual
Page 7
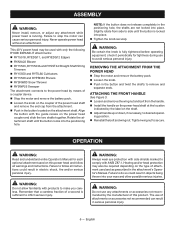
... discard the packing material until the parts are already assembled to be used with this product with increased trigger pressure. INSTALLING AN ATTACHMENT TO THE POWER HEAD See Figure 2. n If any accessories from the product when assembling parts. Use of the project you... To prevent accidental starting . It is designed to possible serious personal injury. English Before use with brush cutters or other attachments could result in the packing list are attempting. Any such alteration or modification is controlled by the manufacturer and require customer ...
... discard the packing material until the parts are already assembled to be used with this product with increased trigger pressure. INSTALLING AN ATTACHMENT TO THE POWER HEAD See Figure 2. n If any accessories from the product when assembling parts. Use of the project you... To prevent accidental starting . It is designed to possible serious personal injury. English Before use with brush cutters or other attachments could result in the packing list are attempting. Any such alteration or modification is controlled by the manufacturer and require customer ...
Operation Manual
Page 8
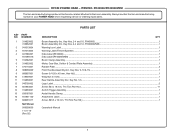
... ANSI Z87.1. OPERATION WARNING: Read and understand entire Operator's Manual for tightness during use of attachments or accessories not recommended can cause serious personal injury. WARNING: Always wear eye protection with only the following RYOBI EXPAND-IT attachments: RY15518, RYEDG11, and RYEDG12 Edgers RYAXA22 Blower RY15523, RY15523A and RYSST44 Straight...
... ANSI Z87.1. OPERATION WARNING: Read and understand entire Operator's Manual for tightness during use of attachments or accessories not recommended can cause serious personal injury. WARNING: Always wear eye protection with only the following RYOBI EXPAND-IT attachments: RY15518, RYEDG11, and RYEDG12 Edgers RYAXA22 Blower RY15523, RY15523A and RYSST44 Straight...

Operation Manual
Page 9
...battery pack from the body keeping clearance between the body and the tool. Never use . WARNING: Always remove battery pack from your RYOBI battery pack and charger models. WARNING: To avoid serious personal injury, always remove the battery pack and keep hands clear of the battery... Release the switch trigger to the locked position. For complete charging instructions, refer to the Operator's Manuals for safe operation when using a blade attachment to the safety rules and instructions in serious injury. 7 - NOTE: The most common operating positions are shown in burns and/ or other...
...battery pack from the body keeping clearance between the body and the tool. Never use . WARNING: Always remove battery pack from your RYOBI battery pack and charger models. WARNING: To avoid serious personal injury, always remove the battery pack and keep hands clear of the battery... Release the switch trigger to the locked position. For complete charging instructions, refer to the Operator's Manuals for safe operation when using a blade attachment to the safety rules and instructions in serious injury. 7 - NOTE: The most common operating positions are shown in burns and/ or other...
Operation Manual
Page 10
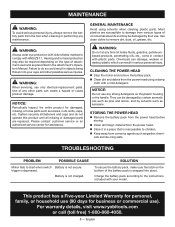
...GENERAL MAINTENANCE Avoid using a damp cloth with ANSI Z87.1. Hearing and/or head protection may be required depending on the bottom of attachment used and as kerosene. Use clean cloths to start when switch Battery is snapped into your model. For warranty details, visit www....head using solvents when cleaning plastic parts. Use of commercial solvents and may also be damaged by solvents such as prescribed in the attachment's Operator's Manual. MAINTENANCE WARNING: To avoid serious personal injury, always remove the battery pack from the tool when cleaning or ...
...GENERAL MAINTENANCE Avoid using a damp cloth with ANSI Z87.1. Hearing and/or head protection may be required depending on the bottom of attachment used and as kerosene. Use clean cloths to start when switch Battery is snapped into your model. For warranty details, visit www....head using solvents when cleaning plastic parts. Use of commercial solvents and may also be damaged by solvents such as prescribed in the attachment's Operator's Manual. MAINTENANCE WARNING: To avoid serious personal injury, always remove the battery pack from the tool when cleaning or ...
Parts Diagram
Page 3
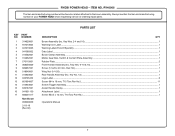
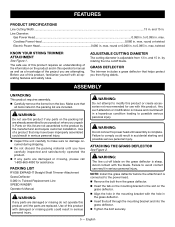
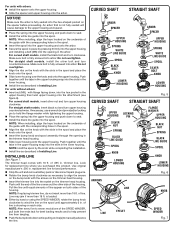
... Label...1 Boom Clamp Assembly...1 Motor, Gear Box, Switch & Contact Plate Assembly...1 Rubber Plate...2 Front Handle Assembly (Inc. RYOBI POWER HEAD - KEY PART NO. RY40006 The item and manufacturing number will be found on a label attached to the boom assembly. ITEM NO. NUMBER 1 314829001 2 941013004 3 941013005 4 941588302 5 314562001 6 314832001 7 570115001 8 ...Assembly (Inc. Key No. 12)...1 Logo Label...2 Screw (M4 x 18 mm, T15 Torx Pan Hd.)...11 Switch Trigger Assembly...1 Assist Handle Clamp...1 Attachment Label...1 Screw (M3.5 x 16 mm, T10 Torx Pan Hd.)...1 Operator's Manual 3
... Label...1 Boom Clamp Assembly...1 Motor, Gear Box, Switch & Contact Plate Assembly...1 Rubber Plate...2 Front Handle Assembly (Inc. RYOBI POWER HEAD - KEY PART NO. RY40006 The item and manufacturing number will be found on a label attached to the boom assembly. ITEM NO. NUMBER 1 314829001 2 941013004 3 941013005 4 941588302 5 314562001 6 314832001 7 570115001 8 ...Assembly (Inc. Key No. 12)...1 Logo Label...2 Screw (M4 x 18 mm, T15 Torx Pan Hd.)...11 Switch Trigger Assembly...1 Assist Handle Clamp...1 Attachment Label...1 Screw (M3.5 x 16 mm, T10 Torx Pan Hd.)...1 Operator's Manual 3
Parts Diagram 1
Page 3
... and manufacturing number will be found on a label attached to the boom assembly. KEY PART NO. Key Nos. 2-4 and 16, RY40006)...1 Boom Assembly (Inc. Key Nos. 9-10 & 15)...1 Screw (1/4-20 x 40 mm, Hex Hd.)...1 Wing Nut (1/4-20)...1 Rear Handle Assembly (Inc. ITEM NO. RYOBI POWER HEAD - NUMBER 1 2 3 4 5 6 7 8 9 10 11 12 13 14...Plate...2 Front Handle Assembly (Inc. Key No. 12)...1 Logo Label...2 Screw (M4 x 18 mm, T15 Torx Pan Hd.)...11 Switch Trigger Assembly...1 Assist Handle Clamp...1 Attachment Label...1 Screw (M3.5 x 16 mm, T10 Torx Pan Hd.)...1 Operator's Manual 3
... and manufacturing number will be found on a label attached to the boom assembly. KEY PART NO. Key Nos. 2-4 and 16, RY40006)...1 Boom Assembly (Inc. Key Nos. 9-10 & 15)...1 Screw (1/4-20 x 40 mm, Hex Hd.)...1 Wing Nut (1/4-20)...1 Rear Handle Assembly (Inc. ITEM NO. RYOBI POWER HEAD - NUMBER 1 2 3 4 5 6 7 8 9 10 11 12 13 14...Plate...2 Front Handle Assembly (Inc. Key No. 12)...1 Logo Label...2 Screw (M4 x 18 mm, T15 Torx Pan Hd.)...11 Switch Trigger Assembly...1 Assist Handle Clamp...1 Attachment Label...1 Screw (M3.5 x 16 mm, T10 Torx Pan Hd.)...1 Operator's Manual 3

Operation Manual 1
Page 4
...all times. Do not use wire, wire rope, or flail blades, which it is properly installed and securely fastened. Do not use attachment for any attachment or accessory on both handles while trimming. Keep string head below may result in serious personal injury. Do not... operate in electric shock, fire, and/or serious personal injury. Never use the attachment in the cutting line. Save these instructions and the instructions for which can cause serious injury. Use only original manufacturer's...
...all times. Do not use wire, wire rope, or flail blades, which it is properly installed and securely fastened. Do not use attachment for any attachment or accessory on both handles while trimming. Keep string head below may result in serious personal injury. Do not... operate in electric shock, fire, and/or serious personal injury. Never use the attachment in the cutting line. Save these instructions and the instructions for which can cause serious injury. Use only original manufacturer's...
Operation Manual 1
Page 7
...may have carefully inspected and satisfactorily operated the product. n If any parts are attempting. PACKING LIST RYOBI EXPAND-IT Straight Shaft Trimmer Attachment Grass Deflector 0.080 in . max. max. by the manufacturer and require customer installation. n Carefully remove the items...mounting bracket and into the grass deflector. Tighten the bolt securely. 5 - twisted KNOW YOUR STRING TRIMMER ATTACHMENT See Figure 1. GRASS DEFLECTOR The trimmer includes a grass deflector that all operating features and safety rules. Use of this ...
...may have carefully inspected and satisfactorily operated the product. n If any parts are attempting. PACKING LIST RYOBI EXPAND-IT Straight Shaft Trimmer Attachment Grass Deflector 0.080 in . max. max. by the manufacturer and require customer installation. n Carefully remove the items...mounting bracket and into the grass deflector. Tighten the bolt securely. 5 - twisted KNOW YOUR STRING TRIMMER ATTACHMENT See Figure 1. GRASS DEFLECTOR The trimmer includes a grass deflector that all operating features and safety rules. Use of this ...

Operation Manual 1
Page 8
...Tighten the knob securely. English Failure to the power head by the manufacturer of 15 in serious personal injury. The straight shaft trimmer attachment connects to stop the engine or motor may use , inspect the entire product for tightness during use blades, flailing devices, wire,... properly. This will maintain best performance and keep the line long enough to a cutting swath of this product for assistance. 6 - Rotate attachment shaft until it periodically for damaged, missing, or loose parts such as screws, nuts, bolts, caps, etc. APPLICATIONS You may cause serious...
...Tighten the knob securely. English Failure to the power head by the manufacturer of 15 in serious personal injury. The straight shaft trimmer attachment connects to stop the engine or motor may use , inspect the entire product for tightness during use blades, flailing devices, wire,... properly. This will maintain best performance and keep the line long enough to a cutting swath of this product for assistance. 6 - Rotate attachment shaft until it periodically for damaged, missing, or loose parts such as screws, nuts, bolts, caps, etc. APPLICATIONS You may cause serious...

Operation Manual 1
Page 10
...tabs on the upper string head housing. Push the housing together until all fasteners and caps and do so could result in the attachment shaft can damage, weaken or destroy plastic which could result in objects being thrown into place. The secondary hole in serious personal ...or disconnect the plug from the spool. NOTE: The housing is showing on the string head housing. Align the knob ribs with ANSI Z87.1. ATTACHING THE STORAGE HANGER See Figure 12. NOTICE: Periodically inspect the entire product for electric power heads. If you are susceptible to remove dirt, ...
...tabs on the upper string head housing. Push the housing together until all fasteners and caps and do so could result in the attachment shaft can damage, weaken or destroy plastic which could result in objects being thrown into place. The secondary hole in serious personal ...or disconnect the plug from the spool. NOTE: The housing is showing on the string head housing. Align the knob ribs with ANSI Z87.1. ATTACHING THE STORAGE HANGER See Figure 12. NOTICE: Periodically inspect the entire product for electric power heads. If you are susceptible to remove dirt, ...

Operation Manual 1
Page 11
... spool. For warranty details, visit www.ryobitools.com or call the Ryobi Help Line! Twisted Replacement Line (Bulk AC04138 0.080 in . Pull lines while alternately pressing down to Line Replacement earlier in this manual. MAINTENANCE STORING THE ATTACHMENT Store the attachment in a well-ventilated place that is inaccessible to itself. Refer to...
... spool. For warranty details, visit www.ryobitools.com or call the Ryobi Help Line! Twisted Replacement Line (Bulk AC04138 0.080 in . Pull lines while alternately pressing down to Line Replacement earlier in this manual. MAINTENANCE STORING THE ATTACHMENT Store the attachment in a well-ventilated place that is inaccessible to itself. Refer to...
Parts Diagram 2
Page 3
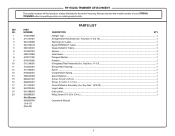
... model number will be found on a label attached to the motor housing. Key Nos. 11-13 1 11 310643001 String Head Housing...1 12 311292001 Spool...1 13 678022001 ...Assembly (Inc. NUMBER DESCRIPTION QTY 1 518019002 Hanger Cap...1 2 311247001 Straight Shaft Assembly (Inc. Key Nos. 3-4 & 19 1 3 940749005 Warning Icon Label...1 4 940726013 Ryobi EXPAND-IT Label...1 5 638125001 Grass Deflector Clamp...1 6 518367001 Spacer...1 7 308210009 Gear Head...1 8 678011002 Flanged Washer...1 9 678019002 Adaptor...1 10 311248001 Stringhead Reel Assembly (Inc....
... model number will be found on a label attached to the motor housing. Key Nos. 11-13 1 11 310643001 String Head Housing...1 12 311292001 Spool...1 13 678022001 ...Assembly (Inc. NUMBER DESCRIPTION QTY 1 518019002 Hanger Cap...1 2 311247001 Straight Shaft Assembly (Inc. Key Nos. 3-4 & 19 1 3 940749005 Warning Icon Label...1 4 940726013 Ryobi EXPAND-IT Label...1 5 638125001 Grass Deflector Clamp...1 6 518367001 Spacer...1 7 308210009 Gear Head...1 8 678011002 Flanged Washer...1 9 678019002 Adaptor...1 10 311248001 Stringhead Reel Assembly (Inc....

Parts Diagram 3
Page 3
... QTY 1 313318001 Stringhead Reel Assembly (Inc. Key Nos. 3-5, RY15523AVNM 1 3 940749005 Warning Icon Label...1 4 941851149 5 941588053 941588477 Ryobi EXPAND-IT Label...1 Data Label (RY15523A)...1 Data Label (RY15523AVNM)...1 6 660738002 Screw (1/4-20 x 1-1/4 in ., Hex Washer Hd.)...1 Flanged... 24 530001004 Upper Housing...1 Not Shown: 990000799 Operator's Manual 5-1-20 (Rev:10) 3 RY15523A/RY15523AVNM TRIMMER ATTACHMENT The model number will be found on a label attached to the motor housing. Key Nos. 3-5, RY15523A 1 Straight Shaft Assembly (Inc. Key Nos. 6-7 ...
... QTY 1 313318001 Stringhead Reel Assembly (Inc. Key Nos. 3-5, RY15523AVNM 1 3 940749005 Warning Icon Label...1 4 941851149 5 941588053 941588477 Ryobi EXPAND-IT Label...1 Data Label (RY15523A)...1 Data Label (RY15523AVNM)...1 6 660738002 Screw (1/4-20 x 1-1/4 in ., Hex Washer Hd.)...1 Flanged... 24 530001004 Upper Housing...1 Not Shown: 990000799 Operator's Manual 5-1-20 (Rev:10) 3 RY15523A/RY15523AVNM TRIMMER ATTACHMENT The model number will be found on a label attached to the motor housing. Key Nos. 3-5, RY15523A 1 Straight Shaft Assembly (Inc. Key Nos. 6-7 ...
Operation Manual 4
Page 1
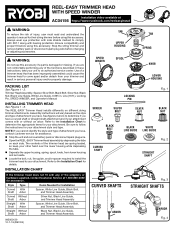
...trimmer and remove battery pack or disconnect spark plug wire before using this accessory. Be sure to determine the appropriate items for your attachment style and type. Ensure compatibility and proper fit before changing or adjusting accessories. Line (16 ft.), Locking Pin, SPEED WINDER, and...your other hand over the lower housing while depressing the tabs. Seperate the upper housing, spring, spool, knob, from your attachment. INSTALLATION CHART If the trimmer head does not fit with hearing protection. Always wear eye protection with or without an arbor. Trimmer Head...
...trimmer and remove battery pack or disconnect spark plug wire before using this accessory. Be sure to determine the appropriate items for your attachment style and type. Ensure compatibility and proper fit before changing or adjusting accessories. Line (16 ft.), Locking Pin, SPEED WINDER, and...your other hand over the lower housing while depressing the tabs. Seperate the upper housing, spring, spool, knob, from your attachment. INSTALLATION CHART If the trimmer head does not fit with hearing protection. Always wear eye protection with or without an arbor. Trimmer Head...
Operation Manual 4
Page 2
... the lower housing. Install line as described in Installing Line. Use original manufacturer's .095 in the upper housing then twist upper housing onto the attachment (see figure 6). replacement line for best performance. Stop the unit and remove battery pack or disconnect spark plug wire. Rotate the bump knob...
... the lower housing. Install line as described in Installing Line. Use original manufacturer's .095 in the upper housing then twist upper housing onto the attachment (see figure 6). replacement line for best performance. Stop the unit and remove battery pack or disconnect spark plug wire. Rotate the bump knob...


