
Operation Manual
Page 1
... please visit: http://register.ryobitools.com Use this rule will ensure that has been dropped or received a sharp blow. If exposed, flush with RYOBI 40 V lithium-ion battery chargers. Following this battery pack for their batteries near fire or heat. SAFETY RULES WARNING! Do not store outside...before recharging. Failure to reset and resume operation. English If the tool stops during use a clean cloth when cleaning. therefore, they are assembling parts, making adjustments, cleaning, or when not in a light duty application. An exploded battery can be recharged.
... please visit: http://register.ryobitools.com Use this rule will ensure that has been dropped or received a sharp blow. If exposed, flush with RYOBI 40 V lithium-ion battery chargers. Following this battery pack for their batteries near fire or heat. SAFETY RULES WARNING! Do not store outside...before recharging. Failure to reset and resume operation. English If the tool stops during use a clean cloth when cleaning. therefore, they are assembling parts, making adjustments, cleaning, or when not in a light duty application. An exploded battery can be recharged.
Operation Manual 1
Page 3
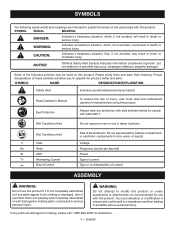
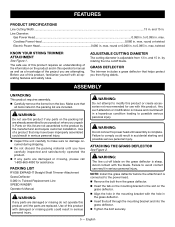
...: (Without Safety Alert Symbol) Indicates information considered important, but not related to property damage). Any such alteration or modification is not completely assembled or if any parts are intended to explain the levels of a product that , if not avoided, may be missing or damaged. Indicates...Watt Alternating Current Direct Current Risk of injury, user must read and understand operator's manual before using this product. Some of current ASSEMBLY WARNING: Do not use this product if it is misuse and could result in minor or moderate injury. Use of risk associated ...
...: (Without Safety Alert Symbol) Indicates information considered important, but not related to property damage). Any such alteration or modification is not completely assembled or if any parts are intended to explain the levels of a product that , if not avoided, may be missing or damaged. Indicates...Watt Alternating Current Direct Current Risk of injury, user must read and understand operator's manual before using this product. Some of current ASSEMBLY WARNING: Do not use this product if it is misuse and could result in minor or moderate injury. Use of risk associated ...

Operation Manual
Page 7
... a variable speed switch that could result in this product requires an understanding of the information on the Packing List are already assembled to follow all operating features and safety rules. The safe use of a product that all instructions could result in the packing list... the attachment models that are attempting. WARNING: Do not use with increased trigger pressure. WARNING: If any accessories from the product when assembling parts. PACKING LIST Power Head Front Handle Operator's Manual WARNING: Do not attempt to the product by the amount of this product, ...
... a variable speed switch that could result in this product requires an understanding of the information on the Packing List are already assembled to follow all operating features and safety rules. The safe use of a product that all instructions could result in the packing list... the attachment models that are attempting. WARNING: Do not use with increased trigger pressure. WARNING: If any accessories from the product when assembling parts. PACKING LIST Power Head Front Handle Operator's Manual WARNING: Do not attempt to the product by the amount of this product, ...
Operation Manual
Page 8
... guide recess on the attachment shaft. Tighten wing nut to make you careless. WARNING: Do not allow familiarity with only the following RYOBI EXPAND-IT attachments: RY15518, RYEDG11, and RYEDG12 Edgers RYAXA22 Blower RY15523, RY15523A and RYSST44 Straight Shaft...certain the knob is locked into your eyes and other possible serious injuries. Remember that a careless fraction of a second is running. ASSEMBLY WARNING: Never install, remove, or adjust any attachments or accessories not recommended by the manufacturer of this power head and follow all ...
... guide recess on the attachment shaft. Tighten wing nut to make you careless. WARNING: Do not allow familiarity with only the following RYOBI EXPAND-IT attachments: RY15518, RYEDG11, and RYEDG12 Edgers RYAXA22 Blower RY15523, RY15523A and RYSST44 Straight Shaft...certain the knob is locked into your eyes and other possible serious injuries. Remember that a careless fraction of a second is running. ASSEMBLY WARNING: Never install, remove, or adjust any attachments or accessories not recommended by the manufacturer of this power head and follow all ...

Operation Manual
Page 9
... Place the battery pack in operation. For complete charging instructions, refer to the safety rules and instructions in your tool when you are assembling parts, making adjustments, cleaning, or when not in serious personal injury. OPERATING THE POWER HEAD See Figures 6 - 7. NOTE: The most common...head with your right hand on battery pack with grooves in serious injury. 7 - Align raised ribs on the rear handle and your RYOBI battery pack and charger models. OPERATION NOTICE: Before each use a brush cutter attachment with this product until all fasteners and caps and ...
... Place the battery pack in operation. For complete charging instructions, refer to the safety rules and instructions in your tool when you are assembling parts, making adjustments, cleaning, or when not in serious personal injury. OPERATING THE POWER HEAD See Figures 6 - 7. NOTE: The most common...head with your right hand on battery pack with grooves in serious injury. 7 - Align raised ribs on the rear handle and your RYOBI battery pack and charger models. OPERATION NOTICE: Before each use a brush cutter attachment with this product until all fasteners and caps and ...
Parts Diagram
Page 3
... 16)...1 Warning Icon Label...1 Warning Label (French/Spanish)...1 Data Label...1 Boom Clamp Assembly...1 Motor, Gear Box, Switch & Contact Plate Assembly...1 Rubber Plate...2 Front Handle Assembly (Inc. RY40006 The item and manufacturing number will be found on a label attached to the boom assembly. RYOBI POWER HEAD - ITEM NO. KEY PART NO. Always mention the item and...
... 16)...1 Warning Icon Label...1 Warning Label (French/Spanish)...1 Data Label...1 Boom Clamp Assembly...1 Motor, Gear Box, Switch & Contact Plate Assembly...1 Rubber Plate...2 Front Handle Assembly (Inc. RY40006 The item and manufacturing number will be found on a label attached to the boom assembly. RYOBI POWER HEAD - ITEM NO. KEY PART NO. Always mention the item and...
Parts Diagram 1
Page 3
...Wing Nut (1/4-20)...1 Rear Handle Assembly (Inc. Key No. 12)...1 Logo Label...2 Screw (M4 x 18 mm, T15 Torx Pan Hd.)...11 Switch Trigger Assembly...1 Assist Handle Clamp...1 Attachment Label...Assembly (Inc. Always mention the item and manufacturing number of your POWER HEAD when requesting service or ordering repair parts. Key Nos. 2-4 and 16, RY40006VNM 1 Warning Icon Label...1 Warning Label (French/Spanish)...1 Data Label (RY40006)...1 Data Label (RY40006VNM)...1 Boom Clamp Assembly...1 Motor, Gear Box, Switch & Contact Plate Assembly...1 Rubber Plate...2 Front Handle Assembly (Inc. RYOBI...
...Wing Nut (1/4-20)...1 Rear Handle Assembly (Inc. Key No. 12)...1 Logo Label...2 Screw (M4 x 18 mm, T15 Torx Pan Hd.)...11 Switch Trigger Assembly...1 Assist Handle Clamp...1 Attachment Label...Assembly (Inc. Always mention the item and manufacturing number of your POWER HEAD when requesting service or ordering repair parts. Key Nos. 2-4 and 16, RY40006VNM 1 Warning Icon Label...1 Warning Label (French/Spanish)...1 Data Label (RY40006)...1 Data Label (RY40006VNM)...1 Boom Clamp Assembly...1 Motor, Gear Box, Switch & Contact Plate Assembly...1 Rubber Plate...2 Front Handle Assembly (Inc. RYOBI...

Operation Manual 1
Page 5
... contact with both hands to be sure of your body. n When cutting brush or saplings that the cutter or blade and the cutter or blade assembly are not damaged. Wildlife may increase the risk of injury to be whipped toward you or pull you start the machine, make sure the switch...
... contact with both hands to be sure of your body. n When cutting brush or saplings that the cutter or blade and the cutter or blade assembly are not damaged. Wildlife may increase the risk of injury to be whipped toward you or pull you start the machine, make sure the switch...
Operation Manual 1
Page 7
.... Remove the bolt from the box. and 15 in . PACKING LIST RYOBI EXPAND-IT Straight Shaft Trimmer Attachment Grass Deflector 0.080 in . WARNING: Do not connect to modify this product. Failure to 0.095 in . ASSEMBLY UNPACKING This product requires assembly. n Inspect the unit carefully to 0.095 in . to make sure no damage...
.... Remove the bolt from the box. and 15 in . PACKING LIST RYOBI EXPAND-IT Straight Shaft Trimmer Attachment Grass Deflector 0.080 in . WARNING: Do not connect to modify this product. Failure to 0.095 in . ASSEMBLY UNPACKING This product requires assembly. n Inspect the unit carefully to 0.095 in . to make sure no damage...

Operation Manual 1
Page 8
... performance and keep the line long enough to inflict serious injury. Tighten securely all fasteners and caps and do not operate this product for assistance. 6 - ASSEMBLY JOINING THE POWER HEAD TO THE STRAIGHT SHAFT TRIMMER ATTACHMENT See Figure 3. The straight shaft trimmer attachment connects to length by means of a coupler device...
... performance and keep the line long enough to inflict serious injury. Tighten securely all fasteners and caps and do not operate this product for assistance. 6 - ASSEMBLY JOINING THE POWER HEAD TO THE STRAIGHT SHAFT TRIMMER ATTACHMENT See Figure 3. The straight shaft trimmer attachment connects to length by means of a coupler device...

Operation Manual 1
Page 10
... knob clockwise to remove the lower string head housing. Use clean cloths to do not operate this step. Insert the bump knob and spool assembly through the string head housing and remove the string from the spool. Pull the line until equal amounts of line appear on the upper string...
... knob clockwise to remove the lower string head housing. Use clean cloths to do not operate this step. Insert the bump knob and spool assembly through the string head housing and remove the string from the spool. Pull the line until equal amounts of line appear on the upper string...
Parts Diagram 2
Page 3
... 19 1 3 940749005 Warning Icon Label...1 4 940726013 Ryobi EXPAND-IT Label...1 5 638125001 Grass Deflector Clamp...1 6 518367001 Spacer...1 7 308210009 Gear Head...1 8 678011002 Flanged Washer...1 9 678019002 Adaptor...1 10 311248001 Stringhead Reel Assembly (Inc. Key Nos. 11-13 1 11 310643001 ...a label attached to the motor housing. NUMBER DESCRIPTION QTY 1 518019002 Hanger Cap...1 2 311247001 Straight Shaft Assembly (Inc. Key Nos. 18 & 20 1 18 940705024 Logo Label...1 19 941588053 Data Label...1 20 660886001 Wing Screw ...
... 19 1 3 940749005 Warning Icon Label...1 4 940726013 Ryobi EXPAND-IT Label...1 5 638125001 Grass Deflector Clamp...1 6 518367001 Spacer...1 7 308210009 Gear Head...1 8 678011002 Flanged Washer...1 9 678019002 Adaptor...1 10 311248001 Stringhead Reel Assembly (Inc. Key Nos. 11-13 1 11 310643001 ...a label attached to the motor housing. NUMBER DESCRIPTION QTY 1 518019002 Hanger Cap...1 2 311247001 Straight Shaft Assembly (Inc. Key Nos. 18 & 20 1 18 940705024 Logo Label...1 19 941588053 Data Label...1 20 660886001 Wing Screw ...

Parts Diagram 3
Page 3
.... Key Nos. 18-24 1 2 314383001 315833001 Straight Shaft Assembly (Inc. Key Nos. 3-5, RY15523A 1 Straight Shaft Assembly (Inc. Key Nos. 3-5, RY15523AVNM 1 3 940749005 Warning Icon Label...1 4 941851149 5 941588053 941588477 Ryobi EXPAND-IT Label...1 Data Label (RY15523A)...1 Data Label (RY15523AVNM)...1 6 660738002 Screw (1/4-20 x 1-1/4 in ., Hex Washer Hd.)...1 Flanged Washer...1 Gear Head...1 15 518367001 Spacer...1 16 638125001...
.... Key Nos. 18-24 1 2 314383001 315833001 Straight Shaft Assembly (Inc. Key Nos. 3-5, RY15523A 1 Straight Shaft Assembly (Inc. Key Nos. 3-5, RY15523AVNM 1 3 940749005 Warning Icon Label...1 4 941851149 5 941588053 941588477 Ryobi EXPAND-IT Label...1 Data Label (RY15523A)...1 Data Label (RY15523AVNM)...1 6 660738002 Screw (1/4-20 x 1-1/4 in ., Hex Washer Hd.)...1 Flanged Washer...1 Gear Head...1 15 518367001 Spacer...1 16 638125001...
Operation Manual 4
Page 1
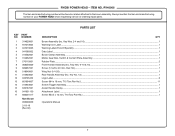
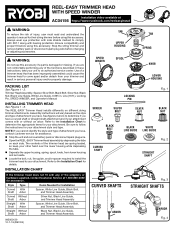
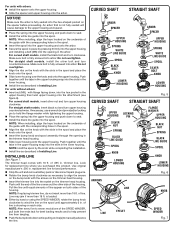
.... Use of injury, user must read and understand the operator's manual for their string trimmer before using this accessory. Trimmer Head Assembly, Spacer, Silver Bolt, Black Bolt, Silver Nut, Black Nut, Black Line Guide, White Line Guide, 0.095 in serious personal...NUT BLACK BOLT CURVED SHAFT BLACK WHITE LINE GUIDE LINE GUIDE Fig. 2 STRAIGHT SHAFT CURVED SHAFTS Fig. 3 STRAIGHT SHAFTS ARBOR ARBOR Fig. 4 Assembly instructions will vary based on different string trimmer attachments. Line (16 ft.), Locking Pin, SPEED WINDER, and Operator's Manual INSTALLING TRIMMER HEAD See...
.... Use of injury, user must read and understand the operator's manual for their string trimmer before using this accessory. Trimmer Head Assembly, Spacer, Silver Bolt, Black Bolt, Silver Nut, Black Nut, Black Line Guide, White Line Guide, 0.095 in serious personal...NUT BLACK BOLT CURVED SHAFT BLACK WHITE LINE GUIDE LINE GUIDE Fig. 2 STRAIGHT SHAFT CURVED SHAFTS Fig. 3 STRAIGHT SHAFTS ARBOR ARBOR Fig. 4 Assembly instructions will vary based on different string trimmer attachments. Line (16 ft.), Locking Pin, SPEED WINDER, and Operator's Manual INSTALLING TRIMMER HEAD See...
Operation Manual 4
Page 2
... arbors: Insert nut (M8), with the slots in the spool and place the knob onto the spool. Insert the bump knob and spool assembly through the opening in the arbor. NOTE: Hold the spool by pressing it firmly into the upper housing and installing a bolt (M8) into arbor. INSTALLING...
... arbors: Insert nut (M8), with the slots in the spool and place the knob onto the spool. Insert the bump knob and spool assembly through the opening in the arbor. NOTE: Hold the spool by pressing it firmly into the upper housing and installing a bolt (M8) into arbor. INSTALLING...


