
User Manual
Page 3
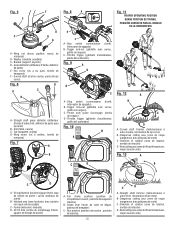
... UNIT STARTS 6. Full choke position (position de complètement ouvert, posición de anegación máxima) B - Choke lever (levier de volet de départ, palanca del anegador) C - Direction of rotation (sens de rotation, sentido de rotación) D - Oil cap/dipstick (bouchon/jauge d'huile, tapa de relleno de aceite / varilla...
... UNIT STARTS 6. Full choke position (position de complètement ouvert, posición de anegación máxima) B - Choke lever (levier de volet de départ, palanca del anegador) C - Direction of rotation (sens de rotation, sentido de rotación) D - Oil cap/dipstick (bouchon/jauge d'huile, tapa de relleno de aceite / varilla...

User Manual
Page 7
...follow all instructions before transporting in certain individuals. b) After each use. d) Keep the tool well maintained, fasteners tightened, and worn parts replaced. Slowly remove the fuel cap after stopping engine. Do not smoke when refueling. Stop the engine and allow children...61550; The cutting attachment should be encouraged to a condition called Raynaud's Syndrome in a vehicle. 3 - away from moving parts. Keep all parts of your physician about these symptoms. It is the added risk of injury to bystanders from any kind. Heavy ...
...follow all instructions before transporting in certain individuals. b) After each use. d) Keep the tool well maintained, fasteners tightened, and worn parts replaced. Slowly remove the fuel cap after stopping engine. Do not smoke when refueling. Stop the engine and allow children...61550; The cutting attachment should be encouraged to a condition called Raynaud's Syndrome in a vehicle. 3 - away from moving parts. Keep all parts of your physician about these symptoms. It is the added risk of injury to bystanders from any kind. Heavy ...

User Manual
Page 8
... off make sure the cutting attachment has stopped before use , it may be sure the cutting attachment stops turning when the engine idles. Replace damaged parts. Make sure fasteners are properly and securely attached. Never use blades, flailing devices, wire, or rope. Failure to do so can cause serious injury...
... off make sure the cutting attachment has stopped before use , it may be sure the cutting attachment stops turning when the engine idles. Replace damaged parts. Make sure fasteners are properly and securely attached. Never use blades, flailing devices, wire, or rope. Failure to do so can cause serious injury...

User Manual
Page 10
...this operator's manual as well as a knowledge of a product that helps protect you from the box. ASSEMBLY UNPACKING This product requires assembly. Parts on the tool and in different positions and at different angles. FEATURES PRODUCT SPECIFICATIONS Weight - (without fuel) C430...10.7 lbs. S430......assembled to your product when you have been improperly assembled could result in . The safe use of this product if any parts on the packing list are already assembled to the product by the manufacturer and require customer installation. GRASS DEFLECTOR The trimmer includes...
...this operator's manual as well as a knowledge of a product that helps protect you from the box. ASSEMBLY UNPACKING This product requires assembly. Parts on the tool and in different positions and at different angles. FEATURES PRODUCT SPECIFICATIONS Weight - (without fuel) C430...10.7 lbs. S430......assembled to your product when you have been improperly assembled could result in . The safe use of this product if any parts on the packing list are already assembled to the product by the manufacturer and require customer installation. GRASS DEFLECTOR The trimmer includes...

User Manual
Page 11
...purposes as shown. Insert the hex screw through the front handle. Align the button with the blade. Rotate the attachment shaft until the parts are not locked into place. The secondary hole in the button and twist the shafts to avoid serious personal injury. WARNING: ...the engine and disconnect the spark plug wire. Loosen the knob on the attachment shaft. Slightly rotate from the spark plug when assembling parts. NOTE: The open side of the handle should face the operator. Place the bolt through the grass deflector and the bracket on ...
...purposes as shown. Insert the hex screw through the front handle. Align the button with the blade. Rotate the attachment shaft until the parts are not locked into place. The secondary hole in the button and twist the shafts to avoid serious personal injury. WARNING: ...the engine and disconnect the spark plug wire. Loosen the knob on the attachment shaft. Slightly rotate from the spark plug when assembling parts. NOTE: The open side of the handle should face the operator. Place the bolt through the grass deflector and the bracket on ...
User Manual
Page 13
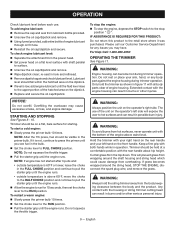
... To check engine lubricant level: Separate the attachment from the top down. Please call our Customer Service Department for any body part against the engine housing during trimmer operation. NOTE: After the 7th press, fuel should be on the dipstick. Replace and ... 10 times. Set the choke lever to the stop position " ". Lubricant level should be held at a comfortable position with all body parts clear of engine lubricant through oil fill hole. Reinstall the oil cap/dipstick and secure. STARTING AND STOPPING See Figures 8 - 10. ...
... To check engine lubricant level: Separate the attachment from the top down. Please call our Customer Service Department for any body part against the engine housing during trimmer operation. NOTE: After the 7th press, fuel should be on the dipstick. Replace and ... 10 times. Set the choke lever to the stop position " ". Lubricant level should be held at a comfortable position with all body parts clear of engine lubricant through oil fill hole. Reinstall the oil cap/dipstick and secure. STARTING AND STOPPING See Figures 8 - 10. ...
User Manual
Page 15
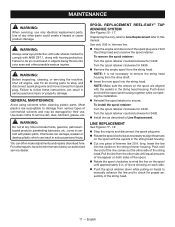
...arrows on the spool are susceptible to remove dirt, dust, lubricant, grease, etc. NOTE: Make sure the arrows on the spool with plastic parts. English WARNING: Before inspecting, cleaning, or servicing the machine, shut off engine, wait for S430. Install line as necessary to... Line Replacement later in the string head housing. GENERAL MAINTENANCE Avoid using solvents when cleaning plastic parts. You can often make adjustments and repairs described here. trimmer line. Stop the engine and disconnect the spark plug wire. Hold...
...arrows on the spool are susceptible to remove dirt, dust, lubricant, grease, etc. NOTE: Make sure the arrows on the spool with plastic parts. English WARNING: Before inspecting, cleaning, or servicing the machine, shut off engine, wait for S430. Install line as necessary to... Line Replacement later in the string head housing. GENERAL MAINTENANCE Avoid using solvents when cleaning plastic parts. You can often make adjustments and repairs described here. trimmer line. Stop the engine and disconnect the spark plug wire. Hold...

User Manual
Page 16
... pets at idle speed, contact a service dealer for adjustment and discontinue use until the repair is made . For proper performance and long life, keep all parts of your body away from the bottom of the cover and gently pull the cover up on the housing, then push the cover down until...
... pets at idle speed, contact a service dealer for adjustment and discontinue use until the repair is made . For proper performance and long life, keep all parts of your body away from the bottom of the cover and gently pull the cover up on the housing, then push the cover down until...
User Manual
Page 17
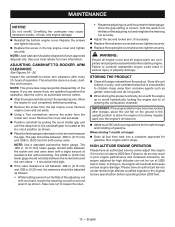
... service center adjust this operation, take the unit to slowly migrate back into a container approved for more information. STORING THE PRODUCT Clean all engine parts are qualified to do so with a slight amount of operation. Keep away from the rocker arm cover. English IMPORTANT: If the engine/starter rope becomes...
... service center adjust this operation, take the unit to slowly migrate back into a container approved for more information. STORING THE PRODUCT Clean all engine parts are qualified to do so with a slight amount of operation. Keep away from the rocker arm cover. English IMPORTANT: If the engine/starter rope becomes...

User Manual
Page 18
... or maintaining your complete satisfaction. 14 - Your product has been fully tested prior to shipment to ensure your product, call the Ryobi® Help Line! English MAINTENANCE MAINTENANCE SCHEDULE Maintenance Part Inspect For Damage Before Each Use Clean Every 5 Hours Replace Every 25 Hours or Yearly Replace Every 50 Hours * AIR FILTER...
... or maintaining your complete satisfaction. 14 - Your product has been fully tested prior to shipment to ensure your product, call the Ryobi® Help Line! English MAINTENANCE MAINTENANCE SCHEDULE Maintenance Part Inspect For Damage Before Each Use Clean Every 5 Hours Replace Every 25 Hours or Yearly Replace Every 50 Hours * AIR FILTER...

User Manual
Page 20
damaged. Cut tall grass from the top down to turn POSSIBLE CAUSE SOLUTION Screw threads are dirty or Clean threads and lubricate with grease - TROUBLESHOOTING IF THESE SOLUTIONS DO NOT SOLVE THE PROBLEM CONTACT YOUR AUTHORIZED SERVICE DEALER. PROBLEM Spool retainer hard to prevent wrapping. if no im- Operate trimmer at part throttle. English housing and string head Operating trimmer at full throttle. 16 - Grass wraps around driveshaft Cutting tall grass at ground level. provement, replace the spool retainer.
damaged. Cut tall grass from the top down to turn POSSIBLE CAUSE SOLUTION Screw threads are dirty or Clean threads and lubricate with grease - TROUBLESHOOTING IF THESE SOLUTIONS DO NOT SOLVE THE PROBLEM CONTACT YOUR AUTHORIZED SERVICE DEALER. PROBLEM Spool retainer hard to prevent wrapping. if no im- Operate trimmer at part throttle. English housing and string head Operating trimmer at full throttle. 16 - Grass wraps around driveshaft Cutting tall grass at ground level. provement, replace the spool retainer.

User Manual
Page 21
... such as specified in this operator's manual. The product, including any RYOBI® brand outdoor product without charge for parts and labor by an authorized service center for RYOBI® brand outdoor products (Authorized Ryobi Service Center). Bump Knobs, Outer Spools, Cutting Lines, Inner Reels, ...purchase. English This warranty does not apply to any warranty claim. Spark Plugs, Carburetor, Carburetor Adjustments, Ignition, Filters B. Any part of this warranty does not cover: A. Proof of improper maintenance or to substantiate any damage to the product that has been ...
... such as specified in this operator's manual. The product, including any RYOBI® brand outdoor product without charge for parts and labor by an authorized service center for RYOBI® brand outdoor products (Authorized Ryobi Service Center). Bump Knobs, Outer Spools, Cutting Lines, Inner Reels, ...purchase. English This warranty does not apply to any warranty claim. Spark Plugs, Carburetor, Carburetor Adjustments, Ignition, Filters B. Any part of this warranty does not cover: A. Proof of improper maintenance or to substantiate any damage to the product that has been ...

User Manual 2
Page 3
... (Inc. T.F 1 31 660697002 Bolt (M6 x 20 mm, T27 Torx Button Hd 1 32 570234002 Rear Handle 1 33 690140011 Compression Spring 1 34 120950028 Upper Boom Assembly (Inc. Ryobi 30cc String Trimmers Model Numbers - RY34426, RY34446 KEY NO. 1 2 3 4 5 6 7 8 9 10 11 12 13 14 15 16 17 18 19 20 21...
... (Inc. T.F 1 31 660697002 Bolt (M6 x 20 mm, T27 Torx Button Hd 1 32 570234002 Rear Handle 1 33 690140011 Compression Spring 1 34 120950028 Upper Boom Assembly (Inc. Ryobi 30cc String Trimmers Model Numbers - RY34426, RY34446 KEY NO. 1 2 3 4 5 6 7 8 9 10 11 12 13 14 15 16 17 18 19 20 21...

User Manual 2
Page 5
...570400002 O-Ring 1 638692001 Cam Cover 1 901705001 Cam Cover Gasket 1 678850001 Wire Clamp 1 570401001 Breather Fitting 1 570710015 Breather Hose (120 mm 1 KEY PART NO. Hd 4 660970001 Screw (M4 x 16 mm, T20 Torx Soc. Hd 4 310304001 Starter Housing Assembly 1 300960002 Clutch Assembly 1 638090001 Washer (...Hd 2 47 526450001 Throttle Cable Guide 1 48 660970008 Shoulder Screw (M4 x 19 mm, T25 Torx Truss Hd 1 5 Ryobi 30cc String Trimmers Model Numbers - RY34426, RY34446 PARTS LIST (FIGURE B) KEY NO. 1 2 3 4 5 6 7 8 9 10 11 12 13 14 15 16 17 ...
...570400002 O-Ring 1 638692001 Cam Cover 1 901705001 Cam Cover Gasket 1 678850001 Wire Clamp 1 570401001 Breather Fitting 1 570710015 Breather Hose (120 mm 1 KEY PART NO. Hd 4 660970001 Screw (M4 x 16 mm, T20 Torx Soc. Hd 4 310304001 Starter Housing Assembly 1 300960002 Clutch Assembly 1 638090001 Washer (...Hd 2 47 526450001 Throttle Cable Guide 1 48 660970008 Shoulder Screw (M4 x 19 mm, T25 Torx Truss Hd 1 5 Ryobi 30cc String Trimmers Model Numbers - RY34426, RY34446 PARTS LIST (FIGURE B) KEY NO. 1 2 3 4 5 6 7 8 9 10 11 12 13 14 15 16 17 ...

User Manual 2
Page 6
... 1 Wing Screw (1/4-20 x 1-1/4 in 1 Grass Deflector Assembly 1 Main Housing 1 Compression Spring 1 Cutting Line 1 Cover-Spool 1 Spool 1 Reel Easy String Cutting Head Assembly (Inc. 15-19).....1 6 Ryobi 30cc String Trimmers Model Numbers - RY34426, RY34446 Figure C Model RY34426 1 7 2 Figure C Model RY34446 3 4 5 1 12 2 3 5 8 9 13 10 11 12 4 6 7 15 8 6 13 20 16 17...
... 1 Wing Screw (1/4-20 x 1-1/4 in 1 Grass Deflector Assembly 1 Main Housing 1 Compression Spring 1 Cutting Line 1 Cover-Spool 1 Spool 1 Reel Easy String Cutting Head Assembly (Inc. 15-19).....1 6 Ryobi 30cc String Trimmers Model Numbers - RY34426, RY34446 Figure C Model RY34426 1 7 2 Figure C Model RY34446 3 4 5 1 12 2 3 5 8 9 13 10 11 12 4 6 7 15 8 6 13 20 16 17...


