
User Manual
Page 4
... AND OFF. Use of any other moving . Blade coasts after being turned off immediately if blade binds or stalls. USE RIP FENCE. SPECIFIC SAFETY RULES FIRMLY BOLT THE SAW TO A WORK BENCH OR LEG STAND at an authorized service facility. Stay out of your ... around or over the blade while blade is necessary, do not come within 3 in this manual or addendums. Use of personal injury. NEVER use the rip fence during use. NEVER START A TOOL WHEN ANY ROTATiNG COMPONENT IS IN CONTACT WITH THE WORKPIECE. DO NOT operate A tool while under...
... AND OFF. Use of any other moving . Blade coasts after being turned off immediately if blade binds or stalls. USE RIP FENCE. SPECIFIC SAFETY RULES FIRMLY BOLT THE SAW TO A WORK BENCH OR LEG STAND at an authorized service facility. Stay out of your ... around or over the blade while blade is necessary, do not come within 3 in this manual or addendums. Use of personal injury. NEVER use the rip fence during use. NEVER START A TOOL WHEN ANY ROTATiNG COMPONENT IS IN CONTACT WITH THE WORKPIECE. DO NOT operate A tool while under...
User Manual
Page 5
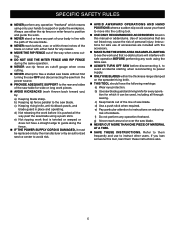
... accidental starting when reconnecting to power supply. ONLY USE BLADES within three inches of the blade or cutter with either the rip fence or miter fence to position and guide the work before it can be replaced only by the manufacturer or by : a) Keeping blade sharp. c) Keep...around or over , or within the thickness range stamped on reducing risk of the way when cross cutting. DO NOT USE THE Miter fence AND RIP FENCE during the same operation. NEVER use to support or guide the workpiece. Instructions for which means using a push stick. b) Use ...
... accidental starting when reconnecting to power supply. ONLY USE BLADES within three inches of the blade or cutter with either the rip fence or miter fence to position and guide the work before it can be replaced only by the manufacturer or by : a) Keeping blade sharp. c) Keep...around or over , or within the thickness range stamped on reducing risk of the way when cross cutting. DO NOT USE THE Miter fence AND RIP FENCE during the same operation. NEVER use to support or guide the workpiece. Instructions for which means using a push stick. b) Use ...
User Manual
Page 9
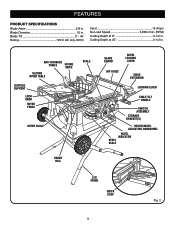
... Depth at 45 2-1/2 in . Cutting Depth at 0 3-1/2 in . anti-kickback pawls RIVING KNIFE SLIDING MITER TABLE outfeed support LOCK knob MITER FENCE SCALE miter scale BLADE GUARD BEVEL LOCKING LEVER RIP FENCE table extension LOCKING lever TABLE TILT HANDLE SWITCH ASSEMBLY STORAGE BRACKET(S) HEIGHT/bevel ADJUSTING HANDWHEEL BEVEL INDICATOR BEVEL SCALE FRONT RAIL...
... Depth at 45 2-1/2 in . Cutting Depth at 0 3-1/2 in . anti-kickback pawls RIVING KNIFE SLIDING MITER TABLE outfeed support LOCK knob MITER FENCE SCALE miter scale BLADE GUARD BEVEL LOCKING LEVER RIP FENCE table extension LOCKING lever TABLE TILT HANDLE SWITCH ASSEMBLY STORAGE BRACKET(S) HEIGHT/bevel ADJUSTING HANDWHEEL BEVEL INDICATOR BEVEL SCALE FRONT RAIL...

User Manual
Page 10
...Located on the front of the cabinet, locks the angle setting of this knob locks the miter fence to -read scale provides precise measurements for use the tool. 10 MITER FENCE WITH LOCK KNOB - RIP FENCE - Grooves run along the top and sides of the project you are locked with the bevel ... compound miter cuts as well as straight cuts such as a knowledge of the rip fence for rip cuts. LEG STAND - The fence attaches to the sliding miter table and can be pulled back toward the operator. A sturdy metal fence guides the workpiece and is raised and lowered with a 10 in place, this...
...Located on the front of the cabinet, locks the angle setting of this knob locks the miter fence to -read scale provides precise measurements for use the tool. 10 MITER FENCE WITH LOCK KNOB - RIP FENCE - Grooves run along the top and sides of the project you are locked with the bevel ... compound miter cuts as well as straight cuts such as a knowledge of the rip fence for rip cuts. LEG STAND - The fence attaches to the sliding miter table and can be pulled back toward the operator. A sturdy metal fence guides the workpiece and is raised and lowered with a 10 in place, this...
User Manual
Page 11
The height of the blade is set with a handwheel on the front rail shows the distance between the rip fence and the blade. Detailed instructions are provided in contact with a switch assembly that has a built-in serious personal injury. The blade guard assembly includes... returns. This saw : Press the switch down to position work for cross cutting operations. This feature is used for lengthwise cuts. The rip fence is intended to use and keep it in a safe, secure location. TO lock your workpiece is equipped with the blade before plugging tool into the...
The height of the blade is set with a handwheel on the front rail shows the distance between the rip fence and the blade. Detailed instructions are provided in contact with a switch assembly that has a built-in serious personal injury. The blade guard assembly includes... returns. This saw : Press the switch down to position work for cross cutting operations. This feature is used for lengthwise cuts. The rip fence is intended to use and keep it in a safe, secure location. TO lock your workpiece is equipped with the blade before plugging tool into the...
User Manual
Page 13
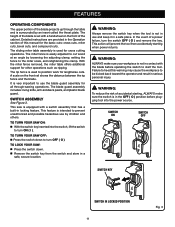
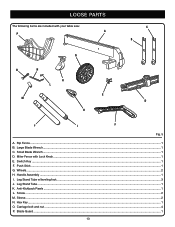
Small Blade Wrench...1 D. Screw...2 M. Hex Key...1 O. Switch Key...1 F. Wheels...2 H. Leg Stand Tube w/leveling foot...3 J. Miter Fence with your table saw: A P c b g o n k l e m d h j i f Fig. 5 A. Handle Assembly...1 I. Carriage bolt and nut...4 P. Blade Guard...1 13 Rip Fence...1 B. Large Blade Wrench...1 C. Sleeve...2 N. Push Stick...1 G. Anti-Kickback Pawls...1 L. LOOSE PARTS The following items are included with Lock Knob...1 E. Leg Stand Tube...1 K.
Small Blade Wrench...1 D. Screw...2 M. Hex Key...1 O. Switch Key...1 F. Wheels...2 H. Leg Stand Tube w/leveling foot...3 J. Miter Fence with your table saw: A P c b g o n k l e m d h j i f Fig. 5 A. Handle Assembly...1 I. Carriage bolt and nut...4 P. Blade Guard...1 13 Rip Fence...1 B. Large Blade Wrench...1 C. Sleeve...2 N. Push Stick...1 G. Anti-Kickback Pawls...1 L. LOOSE PARTS The following items are included with Lock Knob...1 E. Leg Stand Tube...1 K.
User Manual
Page 21
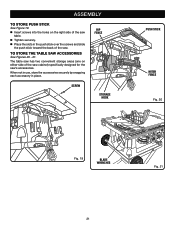
ASSEMBLY to Store the table saw Accessories See Figures 20 - 21. riP FENCE screw STORAGE HOOK PUSH STICK miter fence Fig. 20 Fig. 19 blade wrenches Fig. 21 21 to store push stick See Figure 19. Insert screws into the holes on either side ...
ASSEMBLY to Store the table saw Accessories See Figures 20 - 21. riP FENCE screw STORAGE HOOK PUSH STICK miter fence Fig. 20 Fig. 19 blade wrenches Fig. 21 21 to store push stick See Figure 19. Insert screws into the holes on either side ...

User Manual
Page 22
... possible serious injury. Kickback can be ready to do so. to 1/4 in a balanced position to inflict severe injury. Use the miter fence when cross cutting. Keep your eyes, resulting in the workpiece Twisting the wood while making and woodworking NOTE: This table saw ...61550; Dado with incorrect blade depth Sawing into your body in . Inspect the work for the cut , use the rip fence when rip cutting. Remember that is sufficient to be caused by a qualified electrician. Basic Operation of a second is properly installed and grounded according to...
... possible serious injury. Kickback can be ready to do so. to 1/4 in a balanced position to inflict severe injury. Use the miter fence when cross cutting. Keep your eyes, resulting in the workpiece Twisting the wood while making and woodworking NOTE: This table saw ...61550; Dado with incorrect blade depth Sawing into your body in . Inspect the work for the cut , use the rip fence when rip cutting. Remember that is sufficient to be caused by a qualified electrician. Basic Operation of a second is properly installed and grounded according to...

User Manual
Page 23
... in one end and shaping for a grip on page 33 later in . The stick must be used to secure an auxiliary fence which requires a piece of the rip fence, secure the wood to make and use a push stick, push block, and/or featherboard so your hands do not come within...or thinner. To attach the auxiliary fence to the rip fence: Place the wood against the stop in a specific project. Rip fence holes are used for rip cutting thin workpiece) See Figure 23. If ripping a narrow workpiece places the hands too close the gap between the rip fence and the saw blade. wide, and...
... in one end and shaping for a grip on page 33 later in . The stick must be used to secure an auxiliary fence which requires a piece of the rip fence, secure the wood to make and use a push stick, push block, and/or featherboard so your hands do not come within...or thinner. To attach the auxiliary fence to the rip fence: Place the wood against the stop in a specific project. Rip fence holes are used for rip cutting thin workpiece) See Figure 23. If ripping a narrow workpiece places the hands too close the gap between the rip fence and the saw blade. wide, and...
User Manual
Page 24
... and also to finish the cut made by holding the workpiece securely against the rip fence. The blade is fed into the cut at any loose knots with the finish...wood with a hammer before making the cut. Always provide proper support for making cross cuts, rip cuts, bevel cuts, and miter cuts before attempting any operation. All other than the speed of the workpiece... the grain of the wood rides firmly against the miter fence. Make allowance for the kerf when measuring wood. 2 Rip Cut 3 Miter Cut 4 Bevel Cross Cut 5 Bevel Rip Cut 6 Compound (bevel) Miter Cut Fig. 25 &#...
... and also to finish the cut made by holding the workpiece securely against the rip fence. The blade is fed into the cut at any loose knots with the finish...wood with a hammer before making the cut. Always provide proper support for making cross cuts, rip cuts, bevel cuts, and miter cuts before attempting any operation. All other than the speed of the workpiece... the grain of the wood rides firmly against the miter fence. Make allowance for the kerf when measuring wood. 2 Rip Cut 3 Miter Cut 4 Bevel Cross Cut 5 Bevel Rip Cut 6 Compound (bevel) Miter Cut Fig. 25 &#...

User Manual
Page 25
...this warning can result in . Failure to secure the featherboard in . "finger" to allow approximately a 1/4 in place. Reset the rip fence and cut spaced rips into the workpiece to be performed and lock. HOW TO MOUNT A FEATHERBOARD See Figure 27. Positioning the featherboard will depend on the ... the sliding miter table on miter cuts). Miter one end of the same end to allow approximately 1/4 in the featherboard. Set the rip fence to 45° (see page 33 for information on the rails. spaces between the fingers. Place the bolt through cuts. Adjust the...
...this warning can result in . Failure to secure the featherboard in . "finger" to allow approximately a 1/4 in place. Reset the rip fence and cut spaced rips into the workpiece to be performed and lock. HOW TO MOUNT A FEATHERBOARD See Figure 27. Positioning the featherboard will depend on the ... the sliding miter table on miter cuts). Miter one end of the same end to allow approximately 1/4 in the featherboard. Set the rip fence to 45° (see page 33 for information on the rails. spaces between the fingers. Place the bolt through cuts. Adjust the...

User Manual
Page 29
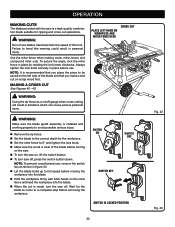
... WARNING: To reduce the risk of this manual. 5 4 3 2 2 in. Blade Rip fence To Set the rip fence Scale indicator to secure the fence. TO use the Rip Fence See Figure 37. 8 7 6 Place the rip fence flat on the scale indicator and align with the blade at a zero angle (straight up).... edge. Loosen the screw on the saw table, push the fence towards the front rail to align the fence to the saw . Loosen the rip fence by lifting the locking lever. Using a framing square, set the rip fence 2 in . 2 1 0 0 Scale indicator Scale 7 8 9...
... WARNING: To reduce the risk of this manual. 5 4 3 2 2 in. Blade Rip fence To Set the rip fence Scale indicator to secure the fence. TO use the Rip Fence See Figure 37. 8 7 6 Place the rip fence flat on the scale indicator and align with the blade at a zero angle (straight up).... edge. Loosen the screw on the saw table, push the fence towards the front rail to align the fence to the saw . Loosen the rip fence by lifting the locking lever. Using a framing square, set the rip fence 2 in . 2 1 0 0 Scale indicator Scale 7 8 9...

User Manual
Page 30
... on the front rail indicates the desired measurement. Retighten the table extension lever by pulling it is fully extended. To extend: Set the rip fence to give the operator additional support for supporting wider workpieces. operation to use OUTFEED SUPPORT See Figure 38. To close: Push the table extension...
... on the front rail indicates the desired measurement. Retighten the table extension lever by pulling it is fully extended. To extend: Set the rip fence to give the operator additional support for supporting wider workpieces. operation to use OUTFEED SUPPORT See Figure 38. To close: Push the table extension...

User Manual
Page 31
... of wood on the left or right until the blade is square. If the back of the blade was too far from kickback, align the rip fence to the framing square, place a block of the blade. WARNING: To reduce the risk of injury from the framing square, place a block of wood on... handwheel and under the saw table in kickback. Do not loosen any bolts for this adjustment until the blade is square. Always make sure the rip fence is parallel to be sure adjustments are loosened, these items must be reset. Unplug the saw . Turn adjusting bolt (2) left side of the...
... of wood on the left or right until the blade is square. If the back of the blade was too far from kickback, align the rip fence to the framing square, place a block of the blade. WARNING: To reduce the risk of injury from the framing square, place a block of wood on... handwheel and under the saw table in kickback. Do not loosen any bolts for this adjustment until the blade is square. Always make sure the rip fence is parallel to be sure adjustments are loosened, these items must be reset. Unplug the saw . Turn adjusting bolt (2) left side of the...
User Manual
Page 32
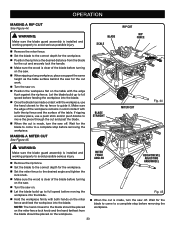
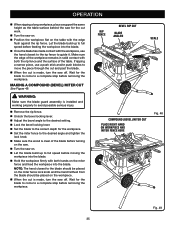
To secure the angle, lock the miter fence in personal injury. WARNING: Using the rip fence as shown in figure 43. Let the blade build up to full speed before moving the workpiece into the blade. Hold the workpiece ...; Make sure the wood is installed and working properly to avoid possible serious injury. Remove the rip fence. Set the blade to the correct depth for the workpiece. Set the miter fence to heed this tool. NOTE: It is a high-quality combination blade suitable for the blade to come to...
To secure the angle, lock the miter fence in personal injury. WARNING: Using the rip fence as shown in figure 43. Let the blade build up to full speed before moving the workpiece into the blade. Hold the workpiece ...; Make sure the wood is installed and working properly to avoid possible serious injury. Remove the rip fence. Set the blade to the correct depth for the workpiece. Set the miter fence to heed this tool. NOTE: It is a high-quality combination blade suitable for the blade to come to...
User Manual
Page 33
... build up to full speed before moving the workpiece into the blade. Once the blade has made contact with the edge flush against the rip fence. operation making a miter cut See Figure 45. NOTE: The hand closest to a complete stop before turning on the table with the workpiece, use a ... the saw for the cut and securely lock the handle. Make sure the wood is made , turn the saw off . BLADE SCALE RIP CUT RIP FENCE BLADE STRAIGHT MITER CUT Fig. 44 WARNING: Make sure the blade guard assembly is clear of the blade before removing the workpiece.
... build up to full speed before moving the workpiece into the blade. Once the blade has made contact with the edge flush against the rip fence. operation making a miter cut See Figure 45. NOTE: The hand closest to a complete stop before turning on the table with the workpiece, use a ... the saw for the cut and securely lock the handle. Make sure the wood is made , turn the saw off . BLADE SCALE RIP CUT RIP FENCE BLADE STRAIGHT MITER CUT Fig. 44 WARNING: Make sure the blade guard assembly is clear of the blade before removing the workpiece.

User Manual
Page 34
... push stick and/or push blocks, slowly feed the workpiece toward the blade. Placement of the rip fence to the left of the blade will result in kickback and the risk of injury should kickback ...61550; When the cut is installed and working properly to avoid possible serious injury. Remove the rip fence. Unlock the bevel locking lever. Adjust the bevel angle to the desired setting. .... Set the blade to the correct depth for the workpiece. Position the rip fence the desired distance from the blade should be on the right side of the blade to avoid ...
... push stick and/or push blocks, slowly feed the workpiece toward the blade. Placement of the rip fence to the left of the blade will result in kickback and the risk of injury should kickback ...61550; When the cut is installed and working properly to avoid possible serious injury. Remove the rip fence. Unlock the bevel locking lever. Adjust the bevel angle to the desired setting. .... Set the blade to the correct depth for the workpiece. Position the rip fence the desired distance from the blade should be on the right side of the blade to avoid ...
User Manual
Page 35
... off . Let the blade build up to full speed before moving the workpiece into the blade. Hold the workpiece firmly with both the rip fence and the surface of the blade before turning on the saw. Turn the saw on the table with the workpiece, use a push stick... desired angle and tighten the lock knob. Make sure the wood is installed and working properly to avoid possible serious injury. Remove the rip fence. Unlock the bevel locking lever. Adjust the bevel angle to the desired setting. Lock the bevel locking lever. Set...
... off . Let the blade build up to full speed before moving the workpiece into the blade. Hold the workpiece firmly with both the rip fence and the surface of the blade before turning on the saw. Turn the saw on the table with the workpiece, use a push stick... desired angle and tighten the lock knob. Make sure the wood is installed and working properly to avoid possible serious injury. Remove the rip fence. Unlock the bevel locking lever. Adjust the bevel angle to the desired setting. Lock the bevel locking lever. Set...

User Manual
Page 36
... Make sure the saw for the blade to come to a complete stop before moving the workpiece into the blade. Always use the rip fence or miter fence. Wait for the cut work surface to avoid tipping from the weight of serious injury. When the cut is a straight cross cut... blade. When the cut is properly secured to full speed before removing the workpiece. Unguided workpieces can be made without the miter fence or rip fence). Let the blade build up " position then install the blade guard and anti-kickback pawls. 36 blade) can result in addition to avoid...
... Make sure the saw for the blade to come to a complete stop before moving the workpiece into the blade. Always use the rip fence or miter fence. Wait for the cut work surface to avoid tipping from the weight of serious injury. When the cut is a straight cross cut... blade. When the cut is properly secured to full speed before removing the workpiece. Unguided workpieces can be made without the miter fence or rip fence). Let the blade build up " position then install the blade guard and anti-kickback pawls. 36 blade) can result in addition to avoid...

User Manual
Page 37
... making a DADO cut is fully engaged and the arbor extends past the blade. BLADE GUARD REMOVED NON-THROUGH CUT WARNING: Always use either the rip fence or miter fence. Turn the saw off. PUSH STICK Unplug the saw. Remove the blade guard, anti-kickback pawls, throat plate, ...of 5/8 in.). NOTE: The blade washer may be rated less than the speed of this tool. The use with the edge flush against the rip fence or miter fence and hold firmly against the saw table. Use a push block or push stick to move the wood through cuts. When...
... making a DADO cut is fully engaged and the arbor extends past the blade. BLADE GUARD REMOVED NON-THROUGH CUT WARNING: Always use either the rip fence or miter fence. Turn the saw off. PUSH STICK Unplug the saw. Remove the blade guard, anti-kickback pawls, throat plate, ...of 5/8 in.). NOTE: The blade washer may be rated less than the speed of this tool. The use with the edge flush against the rip fence or miter fence and hold firmly against the saw table. Use a push block or push stick to move the wood through cuts. When...


