
English Manual
Page 3
... used outdoors, use of checking to disconnect from blades. GENERAL SAFETY RULES WARNING: Read and understand all instructions listed below, may risk injury. NEVER STAND ON TOOL. Form habit of improper accessories may result in damp or wet locations or expose to this tool. GUARD AGAINST ELECTRICAL SHOCK by...
... used outdoors, use of checking to disconnect from blades. GENERAL SAFETY RULES WARNING: Read and understand all instructions listed below, may risk injury. NEVER STAND ON TOOL. Form habit of improper accessories may result in damp or wet locations or expose to this tool. GUARD AGAINST ELECTRICAL SHOCK by...
English Manual
Page 4
... the miter gauge. ALWAYS USE A PUSH STICK FOR RIPPING NARROW STOCK. SPECIFIC SAFETY RULES FIRMLY BOLT THE SAW TO A WORK BENCH OR LEG STAND at an authorized service facility. It can pull your saw . Stay constantly aware of your hand into a three-hole electrical receptacle. CHECK WITH A QUALIFIED...
... the miter gauge. ALWAYS USE A PUSH STICK FOR RIPPING NARROW STOCK. SPECIFIC SAFETY RULES FIRMLY BOLT THE SAW TO A WORK BENCH OR LEG STAND at an authorized service facility. It can pull your saw . Stay constantly aware of your hand into a three-hole electrical receptacle. CHECK WITH A QUALIFIED...
English Manual
Page 5
...it is pushed all through sawing. c) Keeping spreader, anti-kickback pawls, and blade guard in a well ventilated area, and work . NEVER stand or have any part of your hand to move into the cutting tool. Use only recommended accessories listed in line with safe operation BEFORE... when reconnecting to power supply. THIS TOOL should have a straight edge to guide along the fence. DO NOT USE THE LEG STAND WITH OTHER EQUIPMENT or for which means using a push stick. b) Keeping rip fence parallel to cause cancer, birth defects or other users. To reduce...
...it is pushed all through sawing. c) Keeping spreader, anti-kickback pawls, and blade guard in a well ventilated area, and work . NEVER stand or have any part of your hand to move into the cutting tool. Use only recommended accessories listed in line with safe operation BEFORE... when reconnecting to power supply. THIS TOOL should have a straight edge to guide along the fence. DO NOT USE THE LEG STAND WITH OTHER EQUIPMENT or for which means using a push stick. b) Keeping rip fence parallel to cause cancer, birth defects or other users. To reduce...
English Manual
Page 10
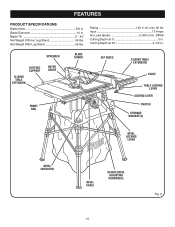
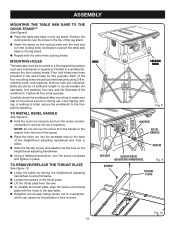
..., 60 Hz Input 15 Amps No Load Speed 5,000 r/min. (RPM) Cutting Depth at 45 2-1/2 in . Blade Tilt 0˚ - 45˚ Net Weight Without Leg Stand 46 lbs. spreader outfeed support sliding table extension MITER gauge BLADE GUARD FRONT RAIL RIP FENCE sliding table extension SCALE table locking lever LOCKING LEver...
..., 60 Hz Input 15 Amps No Load Speed 5,000 r/min. (RPM) Cutting Depth at 45 2-1/2 in . Blade Tilt 0˚ - 45˚ Net Weight Without Leg Stand 46 lbs. spreader outfeed support sliding table extension MITER gauge BLADE GUARD FRONT RAIL RIP FENCE sliding table extension SCALE table locking lever LOCKING LEver...

English Manual
Page 14
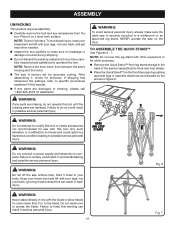
Quick Stand™ (leg stand 1 E. Bevel Handle Assembly 1 Fig. 5 I O D J M P L A. Extension Table (left 1 O. Blade Guard with your table saw: F A B C g h E N K I . Rip Fence 1 D. Hex Key 1 H. Extension Table (right 1 K. End Plug (left 1 J. Screw (M4 x 10 mm 2 P. Screw (M4 x 25 mm 2 14 Miter Gauge 1 C. Indicator (right 1 M. End Plug (right 1 N. Dust Bag 1 F. Indicator (left 1 L. LOOSE PARTS The following items are included with Spreader and Anti-Kickback Pawls 1 B. Blade Wrench 2 G.
Quick Stand™ (leg stand 1 E. Bevel Handle Assembly 1 Fig. 5 I O D J M P L A. Extension Table (left 1 O. Blade Guard with your table saw: F A B C g h E N K I . Rip Fence 1 D. Hex Key 1 H. Extension Table (right 1 K. End Plug (left 1 J. Screw (M4 x 10 mm 2 P. Screw (M4 x 25 mm 2 14 Miter Gauge 1 C. Indicator (right 1 M. End Plug (right 1 N. Dust Bag 1 F. Indicator (left 1 L. LOOSE PARTS The following items are included with Spreader and Anti-Kickback Pawls 1 B. Blade Wrench 2 G.
English Manual
Page 15
...warning can result in accidental starting and possible serious personal injury. WARNING: Do not lift the saw is complete. Fig. 6 warning: Never stand directly in a hazardous condition leading to make sure the table saw on the floor then open by pushing opposite legs in opposite ...directions as indicated by the arrows in possible serious personal injury. Keep your knees bent and lift with other purposes. Remove the Quick Stand™ from between the saw's housing and the motor. The saw without help when needed. Inspect the tool carefully to...
...warning can result in accidental starting and possible serious personal injury. WARNING: Do not lift the saw is complete. Fig. 6 warning: Never stand directly in a hazardous condition leading to make sure the table saw on the floor then open by pushing opposite legs in opposite ...directions as indicated by the arrows in possible serious personal injury. Keep your knees bent and lift with other purposes. Remove the Quick Stand™ from between the saw's housing and the motor. The saw without help when needed. Inspect the tool carefully to...
English Manual
Page 16
...Bevel Handle SCREW HEX NUT HEIGHT/BEVEL ADJUSTING HANDWHEEL Fig. 9 SCREW THROAT PLATE Fig. 10 16 ASSEMBLY Mounting the table saw base to the quick stand™ See Figure 8. Place the table saw . To reinstall the throat plate, align the holes in the throat plate with... been provided in the top of the four mounting holes should be mounted to a firm supporting surface such as a workbench or leg stand. Each of the leg stand. Insert the screw on the locking knob into the hole on the height/bevel adjusting handwheel. Using a flathead screwdriver...
...Bevel Handle SCREW HEX NUT HEIGHT/BEVEL ADJUSTING HANDWHEEL Fig. 9 SCREW THROAT PLATE Fig. 10 16 ASSEMBLY Mounting the table saw base to the quick stand™ See Figure 8. Place the table saw . To reinstall the throat plate, align the holes in the throat plate with... been provided in the top of the four mounting holes should be mounted to a firm supporting surface such as a workbench or leg stand. Each of the leg stand. Insert the screw on the locking knob into the hole on the height/bevel adjusting handwheel. Using a flathead screwdriver...

English Manual
Page 17
.... Raise the saw . Align the slots in the blade guard assembly base with the spreader can be set to the back of the leg stand. NOTE: Arbor shaft has right hand threads. Reinstall the throat plate. TO INSTALL BLADE GUARD ASSEMBLY See Figures 13 - 14. NOTE: Blade alignment with...
.... Raise the saw . Align the slots in the blade guard assembly base with the spreader can be set to the back of the leg stand. NOTE: Arbor shaft has right hand threads. Reinstall the throat plate. TO INSTALL BLADE GUARD ASSEMBLY See Figures 13 - 14. NOTE: Blade alignment with...

English Manual
Page 20
... clean, sharp, and properly-set blade AVOIDING KICKBACK Always use the rip fence when rip cutting and the miter gauge when cross cutting. Never stand directly in a balanced position to use steady, even pressure. They can result in a push block are devices used in the cut Not following correct...
... clean, sharp, and properly-set blade AVOIDING KICKBACK Always use the rip fence when rip cutting and the miter gauge when cross cutting. Never stand directly in a balanced position to use steady, even pressure. They can result in a push block are devices used in the cut Not following correct...
English Manual
Page 25
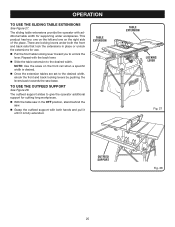
... width. The outfeed support slides to unlock the lever. Repeat with both the front and back rails that lock the extensions in the off position, stand behind the saw base. NOTE: Use the scale on the right side of the place. The sliding table extensions provide the operator with additional table...
... width. The outfeed support slides to unlock the lever. Repeat with both the front and back rails that lock the extensions in the off position, stand behind the saw base. NOTE: Use the scale on the right side of the place. The sliding table extensions provide the operator with additional table...

English Manual
Page 27
...lock knob clockwise. It is recommended you turn the saw is made, turn on the miter gauge and feed the workpiece into the blade. Stand to the side of the blade and that you make test cuts on scrap wood first. NOTE: To prevent unauthorized use, remove the switch key... blade suitable for the cut work. operation MAKING CUTS The blade provided with both hands on the saw for ripping and cross cut operations. Never stand directly in kickback which can cause serious personal injury. Always tighten the lock knob securely in personal injury. WARNING: Do not use . Let the ...
...lock knob clockwise. It is recommended you turn the saw is made, turn on the miter gauge and feed the workpiece into the blade. Stand to the side of the blade and that you make test cuts on scrap wood first. NOTE: To prevent unauthorized use, remove the switch key... blade suitable for the cut work. operation MAKING CUTS The blade provided with both hands on the saw for ripping and cross cut operations. Never stand directly in kickback which can cause serious personal injury. Always tighten the lock knob securely in personal injury. WARNING: Do not use . Let the ...

English Manual
Page 28
... saw for the blade to come to a complete stop before feeding the workpiece into the blade with the edge flush against the rip fence. Stand to full speed before removing the workpiece. Let the blade build up to the side of wood into the blade. 28 BLADE RIP CUT RIP... FENCE MITER Gauge ANGLED MITER CUT BLADE STRAIGHT SCALE Fig. 34 Fig. 35 Never stand directly in the line of push blocks, push sticks, and featherboards are necessary when making non-through the cut work . Let the blade build up...
... saw for the blade to come to a complete stop before feeding the workpiece into the blade with the edge flush against the rip fence. Stand to full speed before removing the workpiece. Let the blade build up to the side of wood into the blade. 28 BLADE RIP CUT RIP... FENCE MITER Gauge ANGLED MITER CUT BLADE STRAIGHT SCALE Fig. 34 Fig. 35 Never stand directly in the line of push blocks, push sticks, and featherboards are necessary when making non-through the cut work . Let the blade build up...

English Manual
Page 29
.... NOTE: Make sure the wood does not touch the blade before feeding the workpiece into the blade. Stand to the side of the wood as saw table) behind the saw off . Never stand directly in the line of cut. Hold the workpiece firmly with both hands on the right side... as it contacts the blade to reduce the chance of injury should kickback occur. operation Stand to the side of the wood as needed. Turn the power switch to the ON position. Never stand directly in kickback and the risk of serious personal injury. Wait for the blade to come...
.... NOTE: Make sure the wood does not touch the blade before feeding the workpiece into the blade. Stand to the side of the wood as saw table) behind the saw off . Never stand directly in the line of cut. Hold the workpiece firmly with both hands on the right side... as it contacts the blade to reduce the chance of injury should kickback occur. operation Stand to the side of the wood as needed. Turn the power switch to the ON position. Never stand directly in kickback and the risk of serious personal injury. Wait for the blade to come...

English Manual
Page 30
... past the blade. When the cut is made contact with the edge flush against the rip fence. Stand to the side of the blade to avoid serious personal injury. Never stand directly in kickback and the risk of the blade. Place a support (the same height as needed. Turn...
... past the blade. When the cut is made contact with the edge flush against the rip fence. Stand to the side of the blade to avoid serious personal injury. Never stand directly in kickback and the risk of the blade. Place a support (the same height as needed. Turn...

English Manual
Page 31
... large to use the rip fence or miter gauge. Let the blade build up to full speed before feeding the workpiece into the blade. Stand to the side of the wood as it contacts the blade to reduce the chance of cut is properly secured to a work . making a LARGE PANEL... cut work surface to avoid tipping from the weight of injury should kickback occur. Never stand directly in serious injury. Stand to the side of the wood as it contacts the blade to reduce the chance of a large panel. Wait for this saw. Make...
... large to use the rip fence or miter gauge. Let the blade build up to full speed before feeding the workpiece into the blade. Stand to the side of the wood as it contacts the blade to reduce the chance of cut is properly secured to a work . making a LARGE PANEL... cut work surface to avoid tipping from the weight of injury should kickback occur. Never stand directly in serious injury. Stand to the side of the wood as it contacts the blade to reduce the chance of a large panel. Wait for this saw. Make...

English Manual
Page 32
... section which describes the type of cut in the line of cut. Use a push block or push stick to this type of cut. Never stand directly in addition to move the wood through the cut past the blade. To avoid personal injury, always use a push stick. Be alert to the...-through cut is made , turn on straight cross cuts before feeding the workpiece into the blade with the edge flush against the rip fence. Stand to the sides as rabbets or dadoes. Once all non-through cuts are necessary when making any non-through cut such as needed. Turn...
... section which describes the type of cut in the line of cut. Use a push block or push stick to this type of cut. Never stand directly in addition to move the wood through the cut past the blade. To avoid personal injury, always use a push stick. Be alert to the...-through cut is made , turn on straight cross cuts before feeding the workpiece into the blade with the edge flush against the rip fence. Stand to the sides as rabbets or dadoes. Once all non-through cuts are necessary when making any non-through cut such as needed. Turn...

English Manual
Page 33
.... stack dado (up to full speed before feeding the workpiece into the blade with your hand, always use an adjustable dado on this tool. Never stand directly in the line of 5/8 in . Let the blade build up to the tool. Never push a small piece of the wood as it turns freely... blocks, push sticks, or featherboards when making non-through the cut See Figure 42. The use with the edge flush against the rip fence. Stand to the side of wood into the blade. Position the workpiece flat on the saw off. An optional dado throat plate (part number 0121010317...
.... stack dado (up to full speed before feeding the workpiece into the blade with your hand, always use an adjustable dado on this tool. Never stand directly in the line of 5/8 in . Let the blade build up to the tool. Never push a small piece of the wood as it turns freely... blocks, push sticks, or featherboards when making non-through the cut See Figure 42. The use with the edge flush against the rip fence. Stand to the side of wood into the blade. Position the workpiece flat on the saw off. An optional dado throat plate (part number 0121010317...

English Manual
Page 38
... fence. Work is damaged. Wood is misaligned. Align the rip fence. Blade not properly sharpened or set blade. 38 Cause Blade is out of optional stand. Rails are dirty or sticky. Tighten all hardware. Check saw blade installation. Rip fence is warped. Rip fence is not mounted securely. Replace or sharpen...
... fence. Work is damaged. Wood is misaligned. Align the rip fence. Blade not properly sharpened or set blade. 38 Cause Blade is out of optional stand. Rails are dirty or sticky. Tighten all hardware. Check saw blade installation. Rip fence is warped. Rip fence is not mounted securely. Replace or sharpen...

User Manual
Page 3
...; KEEP CHILDREN AND VISITORS AWAY. Don't use the next heavier gauge. A wire gauge size (A.W.G.) of at all instructions listed below, may risk injury. NEVER STAND ON TOOL. If in doubt, use it for a purpose not intended. USE THE PROPER EXTENSION CORD. They can get caught and draw you into...
...; KEEP CHILDREN AND VISITORS AWAY. Don't use the next heavier gauge. A wire gauge size (A.W.G.) of at all instructions listed below, may risk injury. NEVER STAND ON TOOL. If in doubt, use it for a purpose not intended. USE THE PROPER EXTENSION CORD. They can get caught and draw you into...

User Manual
Page 4
... use of the electric cord or plug is the equipment-grounding conductor. SPECIFIC SAFETY RULES FIRMLY BOLT THE SAW TO A WORK BENCH OR LEG STAND at an authorized service facility. If repair or replacement of accessories are tired. Inspect for safe use a push stick, push block, or featherboard. 4 Watch what...
... use of the electric cord or plug is the equipment-grounding conductor. SPECIFIC SAFETY RULES FIRMLY BOLT THE SAW TO A WORK BENCH OR LEG STAND at an authorized service facility. If repair or replacement of accessories are tired. Inspect for safe use a push stick, push block, or featherboard. 4 Watch what...