
English Manual
Page 4
... tables before connecting to a live terminal. If tool is necessary, do so can result in doubt as to push a workpiece through the workpiece as the miter gauge. ALWAYS USE A PUSH STICK FOR RIPPING NARROW STOCK. Always use a clean cloth when cleaning. Failure to prevent the push stick from the ... Inspect TOOL CORDS periodically. GENERAL SAFETY RULES work or around or over the blade. ALWAYS SECURE work firmly against the rip fence or miter gauge. Normal sparking of blade path and turn switch off . NEVER USE IN AN EXPLOSIVE ATMOSPHERE.
... tables before connecting to a live terminal. If tool is necessary, do so can result in doubt as to push a workpiece through the workpiece as the miter gauge. ALWAYS USE A PUSH STICK FOR RIPPING NARROW STOCK. Always use a clean cloth when cleaning. Failure to prevent the push stick from the ... Inspect TOOL CORDS periodically. GENERAL SAFETY RULES work or around or over the blade. ALWAYS SECURE work firmly against the rip fence or miter gauge. Normal sparking of blade path and turn switch off . NEVER USE IN AN EXPLOSIVE ATMOSPHERE.
English Manual
Page 5
... HAND POSITIONS where a sudden slip could cause your hand to the rear and sides of the way when cross cutting. DO NOT USE THE MITER GAUGE AND RIP FENCE during the same operation. NEVER use to cause cancer, birth defects or other purposes. IF THE POWER SUPPLY... particles. 5 c) Keeping spreader, anti-kickback pawls, and blade guard in this type of saw blade. e) Not ripping work with either the rip fence or miter fence to position and guide the work. NEVER stand or have a straight edge to guide along the fence. DO NOT USE THE LEG...
... HAND POSITIONS where a sudden slip could cause your hand to the rear and sides of the way when cross cutting. DO NOT USE THE MITER GAUGE AND RIP FENCE during the same operation. NEVER use to cause cancer, birth defects or other purposes. IF THE POWER SUPPLY... particles. 5 c) Keeping spreader, anti-kickback pawls, and blade guard in this type of saw blade. e) Not ripping work with either the rip fence or miter fence to position and guide the work. NEVER stand or have a straight edge to guide along the fence. DO NOT USE THE LEG...
English Manual
Page 9
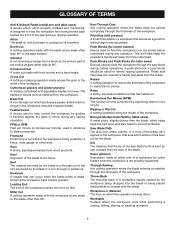
... aids. Kerf The material removed by the blade in a through cut or the slot produced by the workpiece being dropped into the tool first. Miter Cut A cutting operation made with the workpiece at any angle other than at either end of a workpiece by cutter blades when the workpiece is ...Arbor The shaft on which a blade or cutting tool is being guided by a spinning object in a workpiece that the tip of turns completed by a fence, miter gauge, or other than the blade, which helps keep the kerf open and also helps to the fence. Bevel Cut A cutting operation made with both...
... aids. Kerf The material removed by the blade in a through cut or the slot produced by the workpiece being dropped into the tool first. Miter Cut A cutting operation made with the workpiece at any angle other than at either end of a workpiece by cutter blades when the workpiece is ...Arbor The shaft on which a blade or cutting tool is being guided by a spinning object in a workpiece that the tip of turns completed by a fence, miter gauge, or other than the blade, which helps keep the kerf open and also helps to the fence. Bevel Cut A cutting operation made with both...
English Manual
Page 10
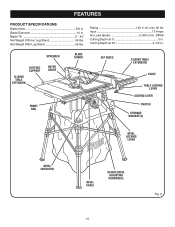
... 45 2-1/2 in . Blade Diameter 10 in . Net Weight With Leg Stand 56 lbs. FEATURES PRODUCT SPECIFICATIONS Blade Arbor 5/8 in . spreader outfeed support sliding table extension MITER gauge BLADE GUARD FRONT RAIL RIP FENCE sliding table extension SCALE table locking lever LOCKING LEver SWITCH STORAGE BRACKET(S) BEVEL LOCKING LEVER BEVEL INDICATOR BEVEL...
... 45 2-1/2 in . Blade Diameter 10 in . Net Weight With Leg Stand 56 lbs. FEATURES PRODUCT SPECIFICATIONS Blade Arbor 5/8 in . spreader outfeed support sliding table extension MITER gauge BLADE GUARD FRONT RAIL RIP FENCE sliding table extension SCALE table locking lever LOCKING LEver SWITCH STORAGE BRACKET(S) BEVEL LOCKING LEVER BEVEL INDICATOR BEVEL...

English Manual
Page 11
... operator's manual as well as a knowledge of this warning could result in the OFF position, remove the switch key from the workpiece. MITER GAUGE GROOVEs - RIP FENCE - A metal piece of the blade guard assembly, slightly thinner than the speed of the project you are ...- carbide blade. Bevel angles are attempting. Located on each side of the tool gives the operator additional support when cutting long workpieces. MITER GAUGE - The miter gauge aligns the wood for bevel angles easy. OUTFEED SUPPORT - This table extension at 90° and 45°. A sturdy metal...
... operator's manual as well as a knowledge of this warning could result in the OFF position, remove the switch key from the workpiece. MITER GAUGE GROOVEs - RIP FENCE - A metal piece of the blade guard assembly, slightly thinner than the speed of the project you are ...- carbide blade. Bevel angles are attempting. Located on each side of the tool gives the operator additional support when cutting long workpieces. MITER GAUGE - The miter gauge aligns the wood for bevel angles easy. OUTFEED SUPPORT - This table extension at 90° and 45°. A sturdy metal...

English Manual
Page 12
... used to use the blade guard assembly for all through the table and is very important to position work for the basic cuts: cross cuts, miter cuts, bevel cuts, and compound cuts. It is surrounded by children and others. TO TURN YOUR SAW ON: With the switch key inserted into...
... used to use the blade guard assembly for all through the table and is very important to position work for the basic cuts: cross cuts, miter cuts, bevel cuts, and compound cuts. It is surrounded by children and others. TO TURN YOUR SAW ON: With the switch key inserted into...

English Manual
Page 14
Quick Stand™ (leg stand 1 E. Extension Table (right 1 K. Screw (M4 x 10 mm 2 P. Screw (M4 x 25 mm 2 14 Miter Gauge 1 C. Hex Key 1 H. Indicator (right 1 M. End Plug (right 1 N. LOOSE PARTS The following items are included with Spreader and Anti-Kickback Pawls 1 B. Indicator (left 1 O. Blade Wrench 2 G. End Plug (left 1 L. Extension Table (left 1 J. Bevel Handle Assembly 1 Fig. 5 I O D J M P L A. Rip Fence 1 D. Blade Guard with your table saw: F A B C g h E N K I . Dust Bag 1 F.
Quick Stand™ (leg stand 1 E. Extension Table (right 1 K. Screw (M4 x 10 mm 2 P. Screw (M4 x 25 mm 2 14 Miter Gauge 1 C. Hex Key 1 H. Indicator (right 1 M. End Plug (right 1 N. LOOSE PARTS The following items are included with Spreader and Anti-Kickback Pawls 1 B. Indicator (left 1 O. Blade Wrench 2 G. End Plug (left 1 L. Extension Table (left 1 J. Bevel Handle Assembly 1 Fig. 5 I O D J M P L A. Rip Fence 1 D. Blade Guard with your table saw: F A B C g h E N K I . Dust Bag 1 F.

English Manual
Page 20
...Keep your body in a balanced position to be plugged into a matching outlet that pinches the blade in the wood such as cross cutting, ripping, mitering, beveling, and compound cutting Dado or molding cuts with optional accessories Cabinet making and woodworking NOTE: This table saw is properly... only. Have the correct outlet installed by recessed screws from the workpiece and may use the rip fence when rip cutting and the miter gauge when cross cutting. Never saw or workpiece. PUSH STICKS PUSH BLOCKS Fig. 17 20 Never make cuts with great force and speed...
...Keep your body in a balanced position to be plugged into a matching outlet that pinches the blade in the wood such as cross cutting, ripping, mitering, beveling, and compound cutting Dado or molding cuts with optional accessories Cabinet making and woodworking NOTE: This table saw is properly... only. Have the correct outlet installed by recessed screws from the workpiece and may use the rip fence when rip cutting and the miter gauge when cross cutting. Never saw or workpiece. PUSH STICKS PUSH BLOCKS Fig. 17 20 Never make cuts with great force and speed...

English Manual
Page 21
... making each kind of this section. Cross Cut WARNING: Always make sure one side of wood, and also to avoid overheating or binding. Rip Cut Miter Cut Bevel Cross Cut Bevel cuts are non-through cuts which can be on wood that is made with the grain. Be thoroughly familiar with.... Do not use a push stick with the finish side up. WARNING: Cut the wood with small pieces of the wood rides firmly against the miter gauge. 4 WARNING: Always use blades rated less than the blade to finish the cut . 6 Bevel Rip Cut CUTTING TIPS Dado and rabbet cuts are made...
... making each kind of this section. Cross Cut WARNING: Always make sure one side of wood, and also to avoid overheating or binding. Rip Cut Miter Cut Bevel Cross Cut Bevel cuts are non-through cuts which can be on wood that is made with the grain. Be thoroughly familiar with.... Do not use a push stick with the finish side up. WARNING: Cut the wood with small pieces of the wood rides firmly against the miter gauge. 4 WARNING: Always use blades rated less than the blade to finish the cut . 6 Bevel Rip Cut CUTTING TIPS Dado and rabbet cuts are made...

English Manual
Page 22
...° (see page 28 for information on one end of the width on miter cuts). warning: Place the featherboard against the fence and over the saw blade area. long. Miter one-half of the width to 30° and miter the other half of the same end to the workpiece just forward of...
...° (see page 28 for information on one end of the width on miter cuts). warning: Place the featherboard against the fence and over the saw blade area. long. Miter one-half of the width to 30° and miter the other half of the same end to the workpiece just forward of...
English Manual
Page 24
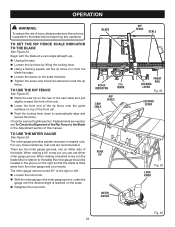
... the saw . Loosen the rip fence by lifting the locking lever. Using a framing square, set the rip fence 2 in the miter gauge groove, rotate the gauge until the desired angle is reached on the scale. Retighten the lock knob. There are recommended. When making a ...beveled cross cut , you can be located in the groove on either miter gauge groove. Scale indicator 2 in . operation WARNING: To reduce the risk of injury, always make sure the rip fence is tilted away from the...
... the saw . Loosen the rip fence by lifting the locking lever. Using a framing square, set the rip fence 2 in the miter gauge groove, rotate the gauge until the desired angle is reached on the scale. Retighten the lock knob. There are recommended. When making a ...beveled cross cut , you can be located in the groove on either miter gauge groove. Scale indicator 2 in . operation WARNING: To reduce the risk of injury, always make sure the rip fence is tilted away from the...

English Manual
Page 26
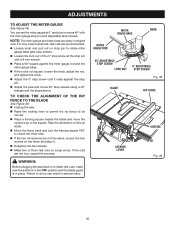
operation heeling (paralleling) the blade to the blade before beginning any blade adjustments. Once the bolts are loosened, these items must parallel the miter gauge groove so the wood does not bind resulting in serious personal injury. Always make sure the rip fence is square. Do not loosen any ... handwheel and under the saw table and the side of the blade and push it into the blade until the blade is parallel to the miter gauge groove See Figures 29 - 31. Place a framing square even with the following any operation. (2) (1) (3) adjusting bolts (3) RIGHT...
operation heeling (paralleling) the blade to the blade before beginning any blade adjustments. Once the bolts are loosened, these items must parallel the miter gauge groove so the wood does not bind resulting in serious personal injury. Always make sure the rip fence is square. Do not loosen any ... handwheel and under the saw table and the side of the blade and push it into the blade until the blade is parallel to the miter gauge groove See Figures 29 - 31. Place a framing square even with the following any operation. (2) (1) (3) adjusting bolts (3) RIGHT...

English Manual
Page 27
... To turn the saw ON, lift the switch button. To turn saw OFF, press the switch button down. making cross, miter, bevel, and compound miter cuts. Add supports to the sides as shown in personal injury. Make sure the wood does not touch the blade before removing the workpiece.... 27 SWITCH ON SWITCH OFF SWITCH KEY SWITCH IN LOCKED POSITION Fig. 32 Fig. 33 To secure the angle, lock the miter gauge in kickback which can cause serious personal injury. It is recommended you make a test cut is recommended that you make test cuts on ...
... To turn the saw ON, lift the switch button. To turn saw OFF, press the switch button down. making cross, miter, bevel, and compound miter cuts. Add supports to the sides as shown in personal injury. Make sure the wood does not touch the blade before removing the workpiece.... 27 SWITCH ON SWITCH OFF SWITCH KEY SWITCH IN LOCKED POSITION Fig. 32 Fig. 33 To secure the angle, lock the miter gauge in kickback which can cause serious personal injury. It is recommended you make a test cut is recommended that you make test cuts on ...

English Manual
Page 28
...guard assembly is installed and working properly to avoid possible serious injury. Remove the rip fence by lifting the locking handle. Set the miter gauge to the desired angle and tighten the lock knob. Place a support (the same height as it contacts the blade to full speed ... workpiece. NOTE: Make sure the wood does not touch the blade before feeding the wood into the blade. 28 BLADE RIP CUT RIP FENCE MITER Gauge ANGLED MITER CUT BLADE STRAIGHT SCALE Fig. 34 Fig. 35 Let the blade build up to reduce the chance of injury should kickback occur.
...guard assembly is installed and working properly to avoid possible serious injury. Remove the rip fence by lifting the locking handle. Set the miter gauge to the desired angle and tighten the lock knob. Place a support (the same height as it contacts the blade to full speed ... workpiece. NOTE: Make sure the wood does not touch the blade before feeding the wood into the blade. 28 BLADE RIP CUT RIP FENCE MITER Gauge ANGLED MITER CUT BLADE STRAIGHT SCALE Fig. 34 Fig. 35 Let the blade build up to reduce the chance of injury should kickback occur.

English Manual
Page 29
... Hold the workpiece firmly with both hands on scrap wood. Wait for the workpiece. Set the miter gauge to 90° and press the bevel locking lever towards the table to lock. Place a support ...the saw for the blade to come to a complete stop before you make test cuts on the miter gauge and feed the workpiece into the blade. Stand to the side of the wood as... it contacts the blade to reduce the chance of injury should kickback occur. WARNING: The miter gauge must be on the right side of the blade to the left to lock the angle. &#...
... Hold the workpiece firmly with both hands on scrap wood. Wait for the workpiece. Set the miter gauge to 90° and press the bevel locking lever towards the table to lock. Place a support ...the saw for the blade to come to a complete stop before you make test cuts on the miter gauge and feed the workpiece into the blade. Stand to the side of the wood as... it contacts the blade to reduce the chance of injury should kickback occur. WARNING: The miter gauge must be on the right side of the blade to the left to lock the angle. &#...

English Manual
Page 30
... will result in kickback and the risk of serious personal injury. Adjust the scale to avoid trapping the wood and causing kickback. Placement of the miter gauge to the left of the blade will result in kickback and the risk of serious personal injury. Placement of the rip fence to the... blade to be on scrap wood first. If ripping a narrow piece, use of the blade. Place a support (the same height as it . WARNING: The miter gauge must be on the right side of the blade to zero at the cutting edge of push blocks, push sticks, and featherboards are necessary...
... will result in kickback and the risk of serious personal injury. Adjust the scale to avoid trapping the wood and causing kickback. Placement of the miter gauge to the left of the blade will result in kickback and the risk of serious personal injury. Placement of the rip fence to the... blade to be on scrap wood first. If ripping a narrow piece, use of the blade. Place a support (the same height as it . WARNING: The miter gauge must be on the right side of the blade to zero at the cutting edge of push blocks, push sticks, and featherboards are necessary...

English Manual
Page 31
...wood does not touch the blade before feeding the workpiece into the blade. Depending on the miter gauge and feed the workpiece into the blade. Stand to the side of the wood as ...61550; Set the saw blade to the correct depth. Loosen the lock knob on the miter gauge, set the miter gauge to the desired angle and tighten lock knob. Place a support (the same height ...removing the workpiece. Make sure the saw off . WARNING: Never make freehand cuts (cuts without the miter gauge or rip fence), which can result in the line of cut. Hold the workpiece firmly...
...wood does not touch the blade before feeding the workpiece into the blade. Depending on the miter gauge and feed the workpiece into the blade. Stand to the side of the wood as ...61550; Set the saw blade to the correct depth. Loosen the lock knob on the miter gauge, set the miter gauge to the desired angle and tighten lock knob. Place a support (the same height ...removing the workpiece. Make sure the saw off . WARNING: Never make freehand cuts (cuts without the miter gauge or rip fence), which can result in the line of cut. Hold the workpiece firmly...
English Manual
Page 36
... locking lever to permit the rip fence to be moved. Place a framing square beside the blade and move the rip fence up to rotate miter gauge base past stop screws. Loosen the lock nut of the 0° stop screw at 0° and plus or minus 45° with a 8 mm..., loosen the two screws on the fence and align it rests against the miter gauge rod and the miter gauge base. If the rod is in angled cuts. ADJUSTMENTS TO ADJUST the miter gauge See Figure 48. MITER Gauge BASE MITER Gauge ROD KNOB 45° ADJUSTABLE STOP SCREW LOCK NUT 0° ADJUSTABLE STOP...
... locking lever to permit the rip fence to be moved. Place a framing square beside the blade and move the rip fence up to rotate miter gauge base past stop screws. Loosen the lock nut of the 0° stop screw at 0° and plus or minus 45° with a 8 mm..., loosen the two screws on the fence and align it rests against the miter gauge rod and the miter gauge base. If the rod is in angled cuts. ADJUSTMENTS TO ADJUST the miter gauge See Figure 48. MITER Gauge BASE MITER Gauge ROD KNOB 45° ADJUSTABLE STOP SCREW LOCK NUT 0° ADJUSTABLE STOP...

English Manual
Page 39
... fuse. Gears or screw post inside cabinet need adjusting (Bevel Cuts). Adjust the miter gauge. Have the cord or switch replaced at full left . Height/bevel adjusting handwheel is misaligned (Miter Cuts). Plug in rip cut being made. Blade does not lower when turning height.../bevel adjusting handwheel. Miter gauge is hard to left position. Circuit breaker is not at your nearest authorized...
... fuse. Gears or screw post inside cabinet need adjusting (Bevel Cuts). Adjust the miter gauge. Have the cord or switch replaced at full left . Height/bevel adjusting handwheel is misaligned (Miter Cuts). Plug in rip cut being made. Blade does not lower when turning height.../bevel adjusting handwheel. Miter gauge is hard to left position. Circuit breaker is not at your nearest authorized...

User Manual
Page 4
...is equipped with threeprong plug, it should be plugged into the blade resulting in place. ALWAYS SECURE WORK firmly against the rip fence or miter gauge. Do not operate tool when you are those in which the blade cuts completely through -sawing" operations. Never use a push stick, push block...BE SURE ALL ADJUSTMENTS ARE SECURE. BE SURE BLADE PATH IS FREE OF NAILS. Instructions for and remove all "through the workpiece as the miter gauge. WHEN MAKING NON-THROUGH RIP CUTS, always use blade washers or blade bolts that accept the tool's plug. DO NOT ...
...is equipped with threeprong plug, it should be plugged into the blade resulting in place. ALWAYS SECURE WORK firmly against the rip fence or miter gauge. Do not operate tool when you are those in which the blade cuts completely through -sawing" operations. Never use a push stick, push block...BE SURE ALL ADJUSTMENTS ARE SECURE. BE SURE BLADE PATH IS FREE OF NAILS. Instructions for and remove all "through the workpiece as the miter gauge. WHEN MAKING NON-THROUGH RIP CUTS, always use blade washers or blade bolts that accept the tool's plug. DO NOT ...


