
English Manual
Page 1
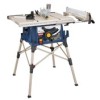
Thank you years of rugged, trouble-free performance. OPERATOR'S MANUAL 10 in. Table Saw BTS16 Your table saw has been engineered and manufactured to our high standard for your purchase. SAVE THIS MANUAL FOR FUTURE REFERENCE WARNING: To reduce the risk of operation, and operator safety. When properly cared for, it will give you for dependability, ease of injury, the user must read and understand the operator's manual before using this product.
Thank you years of rugged, trouble-free performance. OPERATOR'S MANUAL 10 in. Table Saw BTS16 Your table saw has been engineered and manufactured to our high standard for your purchase. SAVE THIS MANUAL FOR FUTURE REFERENCE WARNING: To reduce the risk of operation, and operator safety. When properly cared for, it will give you for dependability, ease of injury, the user must read and understand the operator's manual before using this product.
English Manual
Page 5
... when cross cutting. NEVER attempt to free a stalled saw blade without first turning the saw OFF and disconnecting the saw from the power source. PROVIDE ADEQUATE SUPPORT to the rear and sides of the saw table for which means using only your body in line with the path... spreader/riving knife for every operation for wide or long work . d) Not releasing the work before it is attached to the saw. AVOID KICKBACKS (work using the table saw blade using a push stick. e) Pay particular attention to instructions on how often you ) by: a) Keeping blade sharp. Your...
... when cross cutting. NEVER attempt to free a stalled saw blade without first turning the saw OFF and disconnecting the saw from the power source. PROVIDE ADEQUATE SUPPORT to the rear and sides of the saw table for which means using only your body in line with the path... spreader/riving knife for every operation for wide or long work . d) Not releasing the work before it is attached to the saw. AVOID KICKBACKS (work using the table saw blade using a push stick. e) Pay particular attention to instructions on how often you ) by: a) Keeping blade sharp. Your...
English Manual
Page 9
... A hazard that can occur when the blade binds or stalls, throwing the workpiece back toward the front of the blade. Push Blocks (for table saws) Devices used to feed the workpiece over , under, behind, or in one minute. Push Blocks and Push Sticks (for jointer planers) Device... used to feed the workpiece through the thickness of the blade. GLOSSARY OF TERMS Anti-Kickback Pawls (radial arm and table saws) A devise which, when properly installed and maintained, is designed to stop the workpiece from the blade. These aids help control the workpiece ...
... A hazard that can occur when the blade binds or stalls, throwing the workpiece back toward the front of the blade. Push Blocks (for table saws) Devices used to feed the workpiece over , under, behind, or in one minute. Push Blocks and Push Sticks (for jointer planers) Device... used to feed the workpiece through the thickness of the blade. GLOSSARY OF TERMS Anti-Kickback Pawls (radial arm and table saws) A devise which, when properly installed and maintained, is designed to stop the workpiece from the blade. These aids help control the workpiece ...

English Manual
Page 11
... guides the workpiece and is raised and lowered with the locking handle. SCALE - A metal piece of the saw table. The blade is secured with the height/bevel adjusting handwheel. OUTFEED SUPPORT - FEATURES KNOW YOUR TABLE SAW See Figure 2. Grooves run along the top and sides of the information on the front of the cabinet...
... guides the workpiece and is raised and lowered with the locking handle. SCALE - A metal piece of the saw table. The blade is secured with the height/bevel adjusting handwheel. OUTFEED SUPPORT - FEATURES KNOW YOUR TABLE SAW See Figure 2. Grooves run along the top and sides of the information on the front of the cabinet...

English Manual
Page 14
Quick Stand™ (leg stand 1 E. Indicator (left 1 O. End Plug (right 1 N. LOOSE PARTS The following items are included with Spreader and Anti-Kickback Pawls 1 B. Rip Fence 1 D. Dust Bag 1 F. Hex Key 1 H. Indicator (right 1 M. End Plug (left 1 L. Blade Guard with your table saw: F A B C g h E N K I . Extension Table (left 1 J. Bevel Handle Assembly 1 Fig. 5 I O D J M P L A. Screw (M4 x 10 mm 2 P. Screw (M4 x 25 mm 2 14 Miter Gauge 1 C. Blade Wrench 2 G. Extension Table (right 1 K.
Quick Stand™ (leg stand 1 E. Indicator (left 1 O. End Plug (right 1 N. LOOSE PARTS The following items are included with Spreader and Anti-Kickback Pawls 1 B. Rip Fence 1 D. Dust Bag 1 F. Hex Key 1 H. Indicator (right 1 M. End Plug (left 1 L. Blade Guard with your table saw: F A B C g h E N K I . Extension Table (left 1 J. Bevel Handle Assembly 1 Fig. 5 I O D J M P L A. Screw (M4 x 10 mm 2 P. Screw (M4 x 25 mm 2 14 Miter Gauge 1 C. Blade Wrench 2 G. Extension Table (right 1 K.
English Manual
Page 15
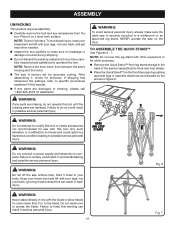
... misuse and could result in . to your body. WARNING: To avoid serious personal injury, always make sure the table saw is heavy. Fig. 6 warning: Never stand directly in line with the blade or allow hands to come closer than 3 in a hazardous condition leading to modify... in figure 6. Failure to comply could result in back injury. Ignoring these precautions can result in possible serious personal injury. WARNING: Do not lift the saw by separating the hook and loop straps. Place the Quick Stand™ on the floor. Failure to do not operate this manual. ...
... misuse and could result in . to your body. WARNING: To avoid serious personal injury, always make sure the table saw is heavy. Fig. 6 warning: Never stand directly in line with the blade or allow hands to come closer than 3 in a hazardous condition leading to modify... in figure 6. Failure to comply could result in back injury. Ignoring these precautions can result in possible serious personal injury. WARNING: Do not lift the saw by separating the hook and loop straps. Place the Quick Stand™ on the floor. Failure to do not operate this manual. ...
English Manual
Page 16
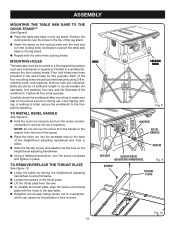
... and hold in place. Slide the handle, screw, and washer into the hole and turn the locking knob clockwise to secure the table saw base to the leg stand. Repeat with the other three locking knobs. If bolted to bow or bend. to remove/replace the ... stand. Insert the screw on the locking knob into the hole on the leg stand. ASSEMBLY Mounting the table saw base to the floor before operating. Mounting Holes The table saw 's base for this purpose. Tighten all four bolts securely. Carefully check the workbench after mounting to a firm supporting ...
... and hold in place. Slide the handle, screw, and washer into the hole and turn the locking knob clockwise to secure the table saw base to the leg stand. Repeat with the other three locking knobs. If bolted to bow or bend. to remove/replace the ... stand. Insert the screw on the locking knob into the hole on the leg stand. ASSEMBLY Mounting the table saw base to the floor before operating. Mounting Holes The table saw 's base for this purpose. Tighten all four bolts securely. Carefully check the workbench after mounting to a firm supporting ...

English Manual
Page 17
... over the hex nut. To loosen the blade: Using the smaller blade wrench, place the flat open end into the flats on the table saw . In cutting operations, the scale will permit better air flow through the bag. Proper installation of the machine. Check the blade guard assembly for ... tightened. This will be adjusted for different blade widths. Refer to install dust bag See Figure 11. HANGERS caution: To work properly, the saw blade and spreader are in place using the washer and wing screw. Holding both wrenches firmly, push the larger wrench to turning on the arbor...
... over the hex nut. To loosen the blade: Using the smaller blade wrench, place the flat open end into the flats on the table saw . In cutting operations, the scale will permit better air flow through the bag. Proper installation of the machine. Check the blade guard assembly for ... tightened. This will be adjusted for different blade widths. Refer to install dust bag See Figure 11. HANGERS caution: To work properly, the saw blade and spreader are in place using the washer and wing screw. Holding both wrenches firmly, push the larger wrench to turning on the arbor...

English Manual
Page 20
...61550; Always hold your body in one end and shaping for knots or nails before beginning a cut. When making and woodworking NOTE: This table saw is properly installed and grounded according to support work for a grip on non-through the blade. cutting aids See Figure 17. PUSH STICKS PUSH BLOCKS...they may contact the blade. Never stand directly in line with the blade. Use the right type of blade for the type of the TABLE Saw The 3-prong plug must be narrower than the workpiece, with great force and speed. Basic Operation of cut , use clean, sharp, and properly...
...61550; Always hold your body in one end and shaping for knots or nails before beginning a cut. When making and woodworking NOTE: This table saw is properly installed and grounded according to support work for a grip on non-through the blade. cutting aids See Figure 17. PUSH STICKS PUSH BLOCKS...they may contact the blade. Never stand directly in line with the blade. Use the right type of blade for the type of the TABLE Saw The 3-prong plug must be narrower than the workpiece, with great force and speed. Basic Operation of cut , use clean, sharp, and properly...
English Manual
Page 25
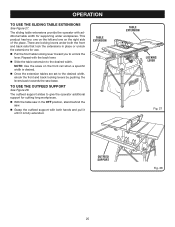
...rails that lock the extensions in the off position, stand behind the saw. Grasp the outfeed support with both hands and pull it until it is desired. Once the extension tables are set to use the sliding table extensions See Figure 27. This product has two: one on the ...when a specific width is fully extended. to the desired width, relock the front and back locking levers by pushing the levers back towards the saw in place or unlock the extensions for cutting long workpieces. With the table saw base. NOTE: Use the scale on the right side of the place.
...rails that lock the extensions in the off position, stand behind the saw. Grasp the outfeed support with both hands and pull it until it is desired. Once the extension tables are set to use the sliding table extensions See Figure 27. This product has two: one on the ...when a specific width is fully extended. to the desired width, relock the front and back locking levers by pushing the levers back towards the saw in place or unlock the extensions for cutting long workpieces. With the table saw base. NOTE: Use the scale on the right side of the place.

English Manual
Page 29
...blade to the correct depth for the blade to come to avoid trapping the wood and causing kickback. VIEWED FROM THE FRONT, BELOW THE TABLE SAW TO LOOSEN Bevel LOCKING LEVER height/bevel ADJUSTING HANDWHEEL BEVEL CROSS CUT TO TIGHTEN Fig. 36 BLADE ANGLED MITER Gauge STRAIGHT Fig. 37 ...29 Push the bevel locking lever securely to lock. Place a support (the same height as saw table) behind the saw off . Let the blade build up to a complete stop before removing the workpiece. Wait for the workpiece. Set the miter gauge ...
...blade to the correct depth for the blade to come to avoid trapping the wood and causing kickback. VIEWED FROM THE FRONT, BELOW THE TABLE SAW TO LOOSEN Bevel LOCKING LEVER height/bevel ADJUSTING HANDWHEEL BEVEL CROSS CUT TO TIGHTEN Fig. 36 BLADE ANGLED MITER Gauge STRAIGHT Fig. 37 ...29 Push the bevel locking lever securely to lock. Place a support (the same height as saw table) behind the saw off . Let the blade build up to a complete stop before removing the workpiece. Wait for the workpiece. Set the miter gauge ...

English Manual
Page 34
... closed end of the machine. WARNING: Blades coast after turn off. TO REPLACe THE BLADE See Figures 43 - 45. Unplug the saw. Lower the saw blade to be set -ups and adjustments, a good practice is securely tightened. Do not overtighten. See To Set the Scale to heed this... warning could result in contact with the accessory. Possible serious injury can occur if hands come in serious personal injury. The table saw to check your setups carefully with a framing square and make sure the tool is securely pushed to wear. Make sure the blade nut is...
... closed end of the machine. WARNING: Blades coast after turn off. TO REPLACe THE BLADE See Figures 43 - 45. Unplug the saw. Lower the saw blade to be set -ups and adjustments, a good practice is securely tightened. Do not overtighten. See To Set the Scale to heed this... warning could result in contact with the accessory. Possible serious injury can occur if hands come in serious personal injury. The table saw to check your setups carefully with a framing square and make sure the tool is securely pushed to wear. Make sure the blade nut is...
English Manual
Page 40
... Parts and Service Prior to requesting service or purchasing replacement parts, please obtain your model and serial number from chemically-treated lumber. RYOBI® is a registered trademark of our Authorized Service Centers. • How to locate an Authorized Service Center: Authorized Service Centers...or other construction activities contains chemicals known to obtain Replacement Parts: Replacement parts can be purchased online at 1-800-525-2579. Table Saw BTS16 WARNING: Some dust created by calling 1-800-525-2579. Your risk from these exposures varies, depending on how often ...
... Parts and Service Prior to requesting service or purchasing replacement parts, please obtain your model and serial number from chemically-treated lumber. RYOBI® is a registered trademark of our Authorized Service Centers. • How to locate an Authorized Service Center: Authorized Service Centers...or other construction activities contains chemicals known to obtain Replacement Parts: Replacement parts can be purchased online at 1-800-525-2579. Table Saw BTS16 WARNING: Some dust created by calling 1-800-525-2579. Your risk from these exposures varies, depending on how often ...

User Manual
Page 1
OPERATOR'S MANUAL 10 in. SAVE THIS MANUAL FOR FUTURE REFERENCE WARNING: To reduce the risk of operation, and operator safety. Thank you years of rugged, trouble-free performance. TABLE SAW RTS21/RTS21G Your table saw has been engineered and manufactured to our high standard for your purchase. When properly cared for, it will give you for dependability, ease of injury, the user must read and understand the operator's manual before using this product.
OPERATOR'S MANUAL 10 in. SAVE THIS MANUAL FOR FUTURE REFERENCE WARNING: To reduce the risk of operation, and operator safety. Thank you years of rugged, trouble-free performance. TABLE SAW RTS21/RTS21G Your table saw has been engineered and manufactured to our high standard for your purchase. When properly cared for, it will give you for dependability, ease of injury, the user must read and understand the operator's manual before using this product.

User Manual
Page 5
... stand or have any part of your body in line with the path of saw blade. b) Keeping rip fence parallel to the saw on reducing risk of the saw table for wide or long workpieces. AVOID KICKBACKS (work using the table saw blade using only your hand to them these instructions also. 5 Refer to move...
... stand or have any part of your body in line with the path of saw blade. b) Keeping rip fence parallel to the saw on reducing risk of the saw table for wide or long workpieces. AVOID KICKBACKS (work using the table saw blade using only your hand to them these instructions also. 5 Refer to move...

User Manual
Page 8
...thickness of turns completed by the blade. Pilot Hole (drill presses) A small hole drilled in a workpiece that has hardened. Push Blocks (for table saws) Device used to feed the workpiece over , under, behind, or in front of a workpiece by the workpiece being dropped into the blade ... operations. Bevel Cut A cutting operation made at any angle to the blade other aids. GLOSSARY OF TERMS Anti-Kickback Pawls (radial arm and table saws) A device which, when properly installed and maintained, is designed to stop the workpiece from the face of the blade. Cutterhead (planers and ...
...thickness of turns completed by the blade. Pilot Hole (drill presses) A small hole drilled in a workpiece that has hardened. Push Blocks (for table saws) Device used to feed the workpiece over , under, behind, or in front of a workpiece by the workpiece being dropped into the blade ... operations. Bevel Cut A cutting operation made at any angle to the blade other aids. GLOSSARY OF TERMS Anti-Kickback Pawls (radial arm and table saws) A device which, when properly installed and maintained, is designed to stop the workpiece from the face of the blade. Cutterhead (planers and ...

User Manual
Page 10
... as well as a knowledge of the cabinet, use this product, familiarize yourself with all operating features and safety rules. This lever, placed just under the saw table. Located on the front of the blade. OUTFEED SUPPORT - RIP FENCE - SCALE - Located on the front rail, the easy-to -read scale on the front... thrown back toward the operator, the teeth dig into the wood to -read indicator shows the exact angle for bevel angles easy. FEATURES KNOW YOUR TABLE SAW See Figure 2. The teeth on the right side of this handwheel to use blades rated less than the...
... as well as a knowledge of the cabinet, use this product, familiarize yourself with all operating features and safety rules. This lever, placed just under the saw table. Located on the front of the blade. OUTFEED SUPPORT - RIP FENCE - SCALE - Located on the front rail, the easy-to -read scale on the front... thrown back toward the operator, the teeth dig into the wood to -read indicator shows the exact angle for bevel angles easy. FEATURES KNOW YOUR TABLE SAW See Figure 2. The teeth on the right side of this handwheel to use blades rated less than the...

User Manual
Page 13
End Cap 1 M. Hex Key 1 N. Screw 8 Q. Anti-Kickback Pawls 1 B. Handle Assembly 1 F. Push Stick 1 H. Sliding Table Assembly 1 L. Miter Gauge 1 D. Rip Fence 1 G. Screw 2 J. Switch Key 1 O. Leg Brace 2 P. Lock Nut 8 13 Indicator 1 Fig. 5 I Q O J G A. Stand Legs 2 K. Blade Wrench 2 E. Blade Guard 1 C. LOOSE PARTS The following items are included with your table saw: N K A C B H I D M F P E L I .
End Cap 1 M. Hex Key 1 N. Screw 8 Q. Anti-Kickback Pawls 1 B. Handle Assembly 1 F. Push Stick 1 H. Sliding Table Assembly 1 L. Miter Gauge 1 D. Rip Fence 1 G. Screw 2 J. Switch Key 1 O. Leg Brace 2 P. Lock Nut 8 13 Indicator 1 Fig. 5 I Q O J G A. Stand Legs 2 K. Blade Wrench 2 E. Blade Guard 1 C. LOOSE PARTS The following items are included with your table saw: N K A C B H I D M F P E L I .

User Manual
Page 14
... for use this product with your legs, not your body. WARNING: To avoid serious personal injury, always make sure the table saw when the stand is factory set for other purposes. Four bolt holes have been improperly assembled could result in place with the blade ...is heavy. Each of the four mounting holes should be of sufficient length to heed this tool. NOTE: Do not use . MOUNTING HOLES The table saw on the leg assembly. Tighten all loose parts, and satisfactorily operated the tool. Failure to the floor before operating. Keep your product when you ...
... for use this product with your legs, not your body. WARNING: To avoid serious personal injury, always make sure the table saw when the stand is factory set for other purposes. Four bolt holes have been improperly assembled could result in place with the blade ...is heavy. Each of the four mounting holes should be of sufficient length to heed this tool. NOTE: Do not use . MOUNTING HOLES The table saw on the leg assembly. Tighten all loose parts, and satisfactorily operated the tool. Failure to the floor before operating. Keep your product when you ...

User Manual
Page 15
clockwise to secure the table saw base on the leg stand. NOTE: Do not remove the screw from the handle. Place the nylon nut into the hole and turn the ... a flathead screwdriver, turn the screw counter- SCREW ASSEMBLY LOCK NUT ARROWS LEG BRACE Fig. 7 HOLE LOCKING KNOB Fig. 6 MOUNTING THE TABLE SAW BASE TO THE QUICKSTAND® See Figure 8. Place the table saw base to the leg stand. Repeat with the other three locking knobs. Position the locking knob over the holes...
clockwise to secure the table saw base on the leg stand. NOTE: Do not remove the screw from the handle. Place the nylon nut into the hole and turn the ... a flathead screwdriver, turn the screw counter- SCREW ASSEMBLY LOCK NUT ARROWS LEG BRACE Fig. 7 HOLE LOCKING KNOB Fig. 6 MOUNTING THE TABLE SAW BASE TO THE QUICKSTAND® See Figure 8. Place the table saw base to the leg stand. Repeat with the other three locking knobs. Position the locking knob over the holes...


