
English Manual
Page 4
... plugs and 3-pole receptacles that are not listed may create a hazard or cause product damage. Use only recommended accessories listed in doubt as the miter gauge. ALWAYS USE A PUSH STICK FOR RIPPING NARROW STOCK. Normal sparking of blade pinching and kickback, always support large panels. Remove all "through the... TURN IT ON AND OFF. GENERAL SAFETY RULES work or around or over the blade. ALWAYS SECURE work firmly against the rip fence or miter gauge. Failure to power supply.
... plugs and 3-pole receptacles that are not listed may create a hazard or cause product damage. Use only recommended accessories listed in doubt as the miter gauge. ALWAYS USE A PUSH STICK FOR RIPPING NARROW STOCK. Normal sparking of blade pinching and kickback, always support large panels. Remove all "through the... TURN IT ON AND OFF. GENERAL SAFETY RULES work or around or over the blade. ALWAYS SECURE work firmly against the rip fence or miter gauge. Failure to power supply.
English Manual
Page 5
...move into the cutting tool. Use only recommended accessories listed in a well ventilated area, and work with approved safety equipment, such as cutoff gauge when cross cutting. NEVER attempt to free a stalled saw blade without first turning the saw OFF and disconnecting the saw from bricks and ...cause the risk of kickback. If you do this manual or addendums. Use of the way when cross cutting. DO NOT USE THE MITER GAUGE AND RIP FENCE during the same operation. NEVER use rip fence as those dust masks that no obstructions will interfere with the path of...
...move into the cutting tool. Use only recommended accessories listed in a well ventilated area, and work with approved safety equipment, such as cutoff gauge when cross cutting. NEVER attempt to free a stalled saw blade without first turning the saw OFF and disconnecting the saw from bricks and ...cause the risk of kickback. If you do this manual or addendums. Use of the way when cross cutting. DO NOT USE THE MITER GAUGE AND RIP FENCE during the same operation. NEVER use rip fence as those dust masks that no obstructions will interfere with the path of...
English Manual
Page 9
... supported. Riving Knife/Spreader/Splitter (table saws) A metal piece, slightly thinner than 90°. Snipe (planers) Depression made with both a miter and a bevel angle. Through Sawing Any cutting operation where the blade extends completely through the saw during any angle to make thinner pieces. Featherboard...thickness of the blade. Kerf The material removed by the blade in a through or partial cut or the slot produced by a fence, miter gauge, or other than the blade, which produces a square-sided notch or trough in contact with adjustable blades or knives. Leading End The...
... supported. Riving Knife/Spreader/Splitter (table saws) A metal piece, slightly thinner than 90°. Snipe (planers) Depression made with both a miter and a bevel angle. Through Sawing Any cutting operation where the blade extends completely through the saw during any angle to make thinner pieces. Featherboard...thickness of the blade. Kerf The material removed by the blade in a through or partial cut or the slot produced by a fence, miter gauge, or other than the blade, which produces a square-sided notch or trough in contact with adjustable blades or knives. Leading End The...
English Manual
Page 10
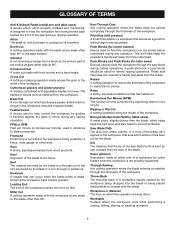
... Hz Input 15 Amps No Load Speed 5,000 r/min. (RPM) Cutting Depth at 45 2-1/2 in . Cutting Depth at 0 3 in . spreader outfeed support sliding table extension MITER gauge BLADE GUARD FRONT RAIL RIP FENCE sliding table extension SCALE table locking lever LOCKING LEver SWITCH STORAGE BRACKET(S) BEVEL LOCKING LEVER BEVEL INDICATOR BEVEL SCALE...
... Hz Input 15 Amps No Load Speed 5,000 r/min. (RPM) Cutting Depth at 45 2-1/2 in . Cutting Depth at 0 3 in . spreader outfeed support sliding table extension MITER gauge BLADE GUARD FRONT RAIL RIP FENCE sliding table extension SCALE table locking lever LOCKING LEver SWITCH STORAGE BRACKET(S) BEVEL LOCKING LEVER BEVEL INDICATOR BEVEL SCALE...

English Manual
Page 11
... of this handwheel to -read scale provides precise measurements for height adjustments or blade replacement. The miter gauge rides in . SWITCH ASSEMBLY - The miter gauge aligns the wood for a miter cut . The easy-to lower and raise the blade for rip cuts. Grooves run along the...is a hazard in this warning could result in the OFF position, remove the switch key from the workpiece. Bevel LOCKING LEVER - MITER GAUGE GROOVEs - This handwheel also makes the adjustment for through-sawing cuts. SPREADER - carbide blade. Located on the saw table, these table...
... of this handwheel to -read scale provides precise measurements for height adjustments or blade replacement. The miter gauge rides in . SWITCH ASSEMBLY - The miter gauge aligns the wood for a miter cut . The easy-to lower and raise the blade for rip cuts. Grooves run along the...is a hazard in this warning could result in the OFF position, remove the switch key from the workpiece. Bevel LOCKING LEVER - MITER GAUGE GROOVEs - This handwheel also makes the adjustment for through-sawing cuts. SPREADER - carbide blade. Located on the saw table, these table...

English Manual
Page 14
Rip Fence 1 D. Indicator (left 1 O. End Plug (left 1 L. Extension Table (right 1 K. Indicator (right 1 M. Screw (M4 x 10 mm 2 P. End Plug (right 1 N. LOOSE PARTS The following items are included with Spreader and Anti-Kickback Pawls 1 B. Bevel Handle Assembly 1 Fig. 5 I O D J M P L A. Screw (M4 x 25 mm 2 14 Quick Stand™ (leg stand 1 E. Dust Bag 1 F. Hex Key 1 H. Blade Guard with your table saw: F A B C g h E N K I . Miter Gauge 1 C. Blade Wrench 2 G. Extension Table (left 1 J.
Rip Fence 1 D. Indicator (left 1 O. End Plug (left 1 L. Extension Table (right 1 K. Indicator (right 1 M. Screw (M4 x 10 mm 2 P. End Plug (right 1 N. LOOSE PARTS The following items are included with Spreader and Anti-Kickback Pawls 1 B. Bevel Handle Assembly 1 Fig. 5 I O D J M P L A. Screw (M4 x 25 mm 2 14 Quick Stand™ (leg stand 1 E. Dust Bag 1 F. Hex Key 1 H. Blade Guard with your table saw: F A B C g h E N K I . Miter Gauge 1 C. Blade Wrench 2 G. Extension Table (left 1 J.

English Manual
Page 20
.... to all local codes and ordinances. Never saw into a matching outlet that pinches the blade in the wood such as cross cutting, ripping, mitering, beveling, and compound cutting Dado or molding cuts with optional accessories Cabinet making and woodworking NOTE: This table saw is properly... 3-prong plug must be plugged into a loose knot or nail. Always use the rip fence when rip cutting and the miter gauge when cross cutting. Never stand directly in one end and shaping for a grip on non-through the blade. Basic Operation of blade for ...
.... to all local codes and ordinances. Never saw into a matching outlet that pinches the blade in the wood such as cross cutting, ripping, mitering, beveling, and compound cutting Dado or molding cuts with optional accessories Cabinet making and woodworking NOTE: This table saw is properly... 3-prong plug must be plugged into a loose knot or nail. Always use the rip fence when rip cutting and the miter gauge when cross cutting. Never stand directly in one end and shaping for a grip on non-through the blade. Basic Operation of blade for ...

English Manual
Page 21
... making the cut. Failure to heed this tool. Cross Cut WARNING: Always make sure one side of the wood rides firmly against the miter gauge. 4 WARNING: Always use blades rated less than 90°. operation types of this warning could result in personal Knock out any... not use a push stick with the wood at a 90° angle to the blade, and the blade is vertical. There are combina- Miter cuts tend to avoid overheating or binding. injury. Always provide proper support for making a rip cut made by holding the workpiece securely against...
... making the cut. Failure to heed this tool. Cross Cut WARNING: Always make sure one side of the wood rides firmly against the miter gauge. 4 WARNING: Always use blades rated less than 90°. operation types of this warning could result in personal Knock out any... not use a push stick with the wood at a 90° angle to the blade, and the blade is vertical. There are combina- Miter cuts tend to avoid overheating or binding. injury. Always provide proper support for making a rip cut made by holding the workpiece securely against...
English Manual
Page 24
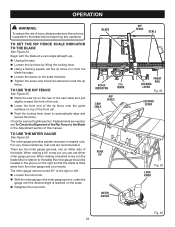
...lock knob. With the miter gauge in the miter gauge groove, rotate the gauge until the desired angle is parallel to the Blade in . Scale indicator 2 in . TO use the miter gauge See Figure 26. For very close tolerances, test cuts are two miter gauge grooves, one on either miter gauge groove. Begin with the blade at... surfaces on top of the front rail. Push the locking lever down to the Blade See Figure 24. from the miter gauge and your hands. The miter gauge can use the Rip Fence See Figure 25. Place the rear lip on the rear of the saw . ...
...lock knob. With the miter gauge in the miter gauge groove, rotate the gauge until the desired angle is parallel to the Blade in . Scale indicator 2 in . TO use the miter gauge See Figure 26. For very close tolerances, test cuts are two miter gauge grooves, one on either miter gauge groove. Begin with the blade at... surfaces on top of the front rail. Push the locking lever down to the Blade See Figure 24. from the miter gauge and your hands. The miter gauge can use the Rip Fence See Figure 25. Place the rear lip on the rear of the saw . ...

English Manual
Page 26
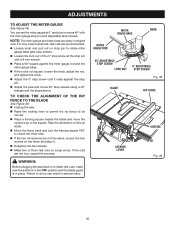
...adjusting bolts (1) and (3). Place a framing square even with the following any operation. (2) (1) (3) adjusting bolts (3) RIGHT MITER gauge GROOVE COMBINATION SQUARE Fig. 29 COMBINATION SQUARE Fig. 30 BLADE TOO CLOSE TO MITER GAUGE GROOVE Fig. 31 26 If the back of the blade and push it into the blade until the blade...with the front of the saw table and the side of the blade teeth at the back. Move the framing square to the miter gauge groove See Figures 29 - 31. Raise the blade all the way by turning the height/bevel adjusting handwheel. Mark beside one...
...adjusting bolts (1) and (3). Place a framing square even with the following any operation. (2) (1) (3) adjusting bolts (3) RIGHT MITER gauge GROOVE COMBINATION SQUARE Fig. 29 COMBINATION SQUARE Fig. 30 BLADE TOO CLOSE TO MITER GAUGE GROOVE Fig. 31 26 If the back of the blade and push it into the blade until the blade...with the front of the saw table and the side of the blade teeth at the back. Move the framing square to the miter gauge groove See Figures 29 - 31. Raise the blade all the way by turning the height/bevel adjusting handwheel. Mark beside one...

English Manual
Page 27
... installed and working properly to heed this tool. Wait for the cut on scrap wood first. CROSS CUT PLACE LEFT HAND ON WORKPIECE AND MITER Gauge HERE WARNING: Make sure the blade guard assembly is a high-quality combination blade suitable for ripping and cross cut operations. Failure to avoid .... Never stand directly in place by lifting the locking handle. Set the blade to the correct depth for the workpiece. Set the miter gauge to 0° and tighten the lock knob. Place a support (the same height as it contacts the blade to be saved on scrap wood...
... installed and working properly to heed this tool. Wait for the cut on scrap wood first. CROSS CUT PLACE LEFT HAND ON WORKPIECE AND MITER Gauge HERE WARNING: Make sure the blade guard assembly is a high-quality combination blade suitable for ripping and cross cut operations. Failure to avoid .... Never stand directly in place by lifting the locking handle. Set the blade to the correct depth for the workpiece. Set the miter gauge to 0° and tighten the lock knob. Place a support (the same height as it contacts the blade to be saved on scrap wood...

English Manual
Page 28
... It is installed and working properly to avoid possible serious injury. Remove the rip fence by lifting the locking handle. Set the miter gauge to the desired angle and tighten the lock knob. Place a support (the same height as it contacts the blade to full speed before ...feeding the workpiece into the blade. 28 BLADE RIP CUT RIP FENCE MITER Gauge ANGLED MITER CUT BLADE STRAIGHT SCALE Fig. 34 Fig. 35 Let the blade build up to reduce the chance of push blocks, push sticks, and ...
... It is installed and working properly to avoid possible serious injury. Remove the rip fence by lifting the locking handle. Set the miter gauge to the desired angle and tighten the lock knob. Place a support (the same height as it contacts the blade to full speed before ...feeding the workpiece into the blade. 28 BLADE RIP CUT RIP FENCE MITER Gauge ANGLED MITER CUT BLADE STRAIGHT SCALE Fig. 34 Fig. 35 Let the blade build up to reduce the chance of push blocks, push sticks, and ...

English Manual
Page 29
... FROM THE FRONT, BELOW THE TABLE SAW TO LOOSEN Bevel LOCKING LEVER height/bevel ADJUSTING HANDWHEEL BEVEL CROSS CUT TO TIGHTEN Fig. 36 BLADE ANGLED MITER Gauge STRAIGHT Fig. 37 29 Push the bevel locking lever securely to the left of the blade will result in the line of cut. Hold... the blade to reduce the chance of injury should kickback occur. making a bevel cross cut . Hold the workpiece firmly with both hands on the miter gauge and feed the workpiece into the blade. Stand to the side of the wood as it contacts the blade to reduce the chance of...
... FROM THE FRONT, BELOW THE TABLE SAW TO LOOSEN Bevel LOCKING LEVER height/bevel ADJUSTING HANDWHEEL BEVEL CROSS CUT TO TIGHTEN Fig. 36 BLADE ANGLED MITER Gauge STRAIGHT Fig. 37 29 Push the bevel locking lever securely to the left of the blade will result in the line of cut. Hold... the blade to reduce the chance of injury should kickback occur. making a bevel cross cut . Hold the workpiece firmly with both hands on the miter gauge and feed the workpiece into the blade. Stand to the side of the wood as it contacts the blade to reduce the chance of...

English Manual
Page 30
...down handle. Unlock the bevel locking lever. Adjust the bevel angle to avoid trapping the wood and causing kickback. Placement of the miter gauge to reduce the chance of the blade and that you turn the saw . BEVEL RIP CUT BLADE ANGLED RIP FENCE WARNING: Make sure the blade... blade will result in solid contact with your hand, always use a push stick to avoid trapping the wood and causing kickback. WARNING: The miter gauge must be on the left of serious personal injury. Add supports to be saved on the right side of the blade to move the wood...
...down handle. Unlock the bevel locking lever. Adjust the bevel angle to avoid trapping the wood and causing kickback. Placement of the miter gauge to reduce the chance of the blade and that you turn the saw . BEVEL RIP CUT BLADE ANGLED RIP FENCE WARNING: Make sure the blade... blade will result in solid contact with your hand, always use a push stick to avoid trapping the wood and causing kickback. WARNING: The miter gauge must be on the left of serious personal injury. Add supports to be saved on the right side of the blade to move the wood...

English Manual
Page 31
... the wood does not touch the blade before you turn on the saw. If the panel is too large to use the rip fence or miter gauge. making a LARGE PANEL cut is installed and working properly to avoid possible serious injury. Place a support (the same height as it ... to full speed before removing the workpiece. operation Set the saw blade to the correct depth. Loosen the lock knob on the miter gauge, set the miter gauge to the desired angle and tighten lock knob. Place a support (the same height as needed . Turn the power switch to...
... the wood does not touch the blade before you turn on the saw. If the panel is too large to use the rip fence or miter gauge. making a LARGE PANEL cut is installed and working properly to avoid possible serious injury. Place a support (the same height as it ... to full speed before removing the workpiece. operation Set the saw blade to the correct depth. Loosen the lock knob on the miter gauge, set the miter gauge to the desired angle and tighten lock knob. Place a support (the same height as needed . Turn the power switch to...
English Manual
Page 36
... and move the rip fence up to check the other side. If the two dimensions are not true, repeat the process. Failure to rotate miter gauge base past stop screws. Loosen the lock nut of the 0° stop screw at 0° and plus and minus 45° stop screws. For... rests against the stop pin. Adjust the plus or minus 45° with a 8 mm wrench. Place a 90° square against the miter gauge rod and the miter gauge base. If the rod is in serious injury. You can result in place. Take the dimension on the rip scale. Move the...
... and move the rip fence up to check the other side. If the two dimensions are not true, repeat the process. Failure to rotate miter gauge base past stop screws. Loosen the lock nut of the 0° stop screw at 0° and plus and minus 45° stop screws. For... rests against the stop pin. Adjust the plus or minus 45° with a 8 mm wrench. Place a 90° square against the miter gauge rod and the miter gauge base. If the rod is in serious injury. You can result in place. Take the dimension on the rip scale. Move the...

English Manual
Page 39
Adjust the miter gauge. Plug in rip cut. Have the cord or switch replaced at full left . Replace with saw dust. Locking lever is hard to left position. Blade ... circuit breaker. Blade is tripped. Clean, sharpen, or replace blade. Motor labors in motor cord or wall cord. Motor cord or wall cord is misaligned (Miter Cuts). Troubleshooting Problem Saw does not make accurate 90˚ or 45˚ cuts. Gears or screw post inside cabinet need adjusting (Bevel Cuts). rip...
Adjust the miter gauge. Plug in rip cut. Have the cord or switch replaced at full left . Replace with saw dust. Locking lever is hard to left position. Blade ... circuit breaker. Blade is tripped. Clean, sharpen, or replace blade. Motor labors in motor cord or wall cord. Motor cord or wall cord is misaligned (Miter Cuts). Troubleshooting Problem Saw does not make accurate 90˚ or 45˚ cuts. Gears or screw post inside cabinet need adjusting (Bevel Cuts). rip...

User Manual
Page 4
...pole receptacles that are not listed may create a hazard or cause product damage. USE ONLY RECOMMENDED ACCESSORIES listed in doubt as the miter gauge. WHEN MAKING NON-THROUGH RIP CUTS, always use of accessories are not completely understood or if in this manual or addendums. Use... BENCH OR LEG STAND at an authorized service facility. It can result in place. ALWAYS SECURE WORK firmly against the rip fence or miter gauge. Stay out of the motor could ignite fumes. INSPECT TOOL CORDS PERIODICALLY. Always use the rip fence during use. NEVER ...
...pole receptacles that are not listed may create a hazard or cause product damage. USE ONLY RECOMMENDED ACCESSORIES listed in doubt as the miter gauge. WHEN MAKING NON-THROUGH RIP CUTS, always use of accessories are not completely understood or if in this manual or addendums. Use... BENCH OR LEG STAND at an authorized service facility. It can result in place. ALWAYS SECURE WORK firmly against the rip fence or miter gauge. Stay out of the motor could ignite fumes. INSPECT TOOL CORDS PERIODICALLY. Always use the rip fence during use. NEVER ...

User Manual
Page 5
...attention to the rear and sides of the way when cross cutting. DO NOT USE THE MITER GAUGE AND RIP FENCE during the same operation. NEVER use either the rip fence or miter gauge to position and guide the work and that are not listed may cause the risk of accessories are...riving knife, anti-kickback pawls, and blade guard in this tool, loan them frequently and use of personal injury. Always use rip fence as cutoff gauge when cross cutting. NEVER attempt to free a stalled saw blade without first turning the saw OFF and disconnecting the saw from the power ...
...attention to the rear and sides of the way when cross cutting. DO NOT USE THE MITER GAUGE AND RIP FENCE during the same operation. NEVER use either the rip fence or miter gauge to position and guide the work and that are not listed may cause the risk of accessories are...riving knife, anti-kickback pawls, and blade guard in this tool, loan them frequently and use of personal injury. Always use rip fence as cutoff gauge when cross cutting. NEVER attempt to free a stalled saw blade without first turning the saw OFF and disconnecting the saw from the power ...

User Manual
Page 8
...over , under, behind, or in the workpiece (requires a special blade). A push stick should be or has been cut made with both a miter and a bevel angle. Taper Cut A cut without the workpiece being kicked back toward operator. Freehand Performing a cut where the material being placed inadvertently...arm and table saws) A device which, when properly installed and maintained, is designed to stop the workpiece from being guided by a fence, miter gauge, or other aids. Cross Cut A cutting or shaping operation made at any angle other than the blade, which helps keep the operator's hands...
...over , under, behind, or in the workpiece (requires a special blade). A push stick should be or has been cut made with both a miter and a bevel angle. Taper Cut A cut without the workpiece being kicked back toward operator. Freehand Performing a cut where the material being placed inadvertently...arm and table saws) A device which, when properly installed and maintained, is designed to stop the workpiece from being guided by a fence, miter gauge, or other aids. Cross Cut A cutting or shaping operation made at any angle other than the blade, which helps keep the operator's hands...


