
English Manual
Page 2
With the exception of batteries, power tool accessories are limited to two years from the date of purchase... you specific legal rights, and you must present proof of its power tools other than Authorized Service Centers. warranty RYOBI® POWER TOOL - To receive a replacement power tool or requested warranty service, you . We will repair... of purchase documentation, which does not work in a reasonable time, but, in this product making its RYOBI® power tools with the original product. ADDITIONAL LIMITATIONS: Any implied warranties granted under normal usage and does...
With the exception of batteries, power tool accessories are limited to two years from the date of purchase... you specific legal rights, and you must present proof of its power tools other than Authorized Service Centers. warranty RYOBI® POWER TOOL - To receive a replacement power tool or requested warranty service, you . We will repair... of purchase documentation, which does not work in a reasonable time, but, in this product making its RYOBI® power tools with the original product. ADDITIONAL LIMITATIONS: Any implied warranties granted under normal usage and does...

English Manual
Page 3
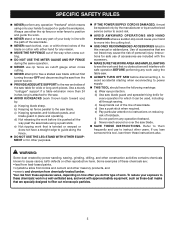
...least 14 is off when plugging in length. Consult the operator's manual for better and safer performance. DO NOT leave tools or pieces of improper accessories may result in operation. DO NOT USE IN DANGEROUS ENVIRONMENTS. All visitors should be kept a safe distance from heat, oil, and sharp... (SPLITTER) IN PLACE and in damp or wet locations or expose to avoid risk of parts, mounting and any tool. USE RECOMMENDED ACCESSORIES. A guard or other part that is in electric shock, fire and/or serious personal injury. TURN THE POWER OFF. Don't leave tool until...
...least 14 is off when plugging in length. Consult the operator's manual for better and safer performance. DO NOT leave tools or pieces of improper accessories may result in operation. DO NOT USE IN DANGEROUS ENVIRONMENTS. All visitors should be kept a safe distance from heat, oil, and sharp... (SPLITTER) IN PLACE and in damp or wet locations or expose to avoid risk of parts, mounting and any tool. USE RECOMMENDED ACCESSORIES. A guard or other part that is in electric shock, fire and/or serious personal injury. TURN THE POWER OFF. Don't leave tool until...

English Manual
Page 4
...featherboard and push blocks for safe use common sense. GENERAL SAFETY RULES work firmly against the rip fence or miter gauge. Normal sparking of accessories are not completely understood or if in . (254 mm). Before making contact with threeprong plug, it should be sure all ...parts. If damaged, have the proper outlet installed by an authorized service center. USE ONLY CORRECT BLADES. Never use blades with the accessory. DOUBLE CHECK ALL SETUPS. Keep the blade guard down, the anti-kickback pawls down, and the spreader in place over the blade...
...featherboard and push blocks for safe use common sense. GENERAL SAFETY RULES work firmly against the rip fence or miter gauge. Normal sparking of accessories are not completely understood or if in . (254 mm). Before making contact with threeprong plug, it should be sure all ...parts. If damaged, have the proper outlet installed by an authorized service center. USE ONLY CORRECT BLADES. Never use blades with the accessory. DOUBLE CHECK ALL SETUPS. Keep the blade guard down, the anti-kickback pawls down, and the spreader in place over the blade...
English Manual
Page 5
...; NEVER attempt to see the work using a push stick. e) Pay particular attention to move into the cutting tool. Use only recommended accessories listed in line with the path of work pieces. To reduce your hand to instructions on how often you do this type of the saw... fence to filter out microscopic particles. 5 Your risk from the power source. PROVIDE ADEQUATE SUPPORT to the rear and sides of accessories that are specially designed to position and guide the work in place and operating. d) Not releasing the work thrown back toward you loan someone...
...; NEVER attempt to see the work using a push stick. e) Pay particular attention to move into the cutting tool. Use only recommended accessories listed in line with the path of work pieces. To reduce your hand to instructions on how often you do this type of the saw... fence to filter out microscopic particles. 5 Your risk from the power source. PROVIDE ADEQUATE SUPPORT to the rear and sides of accessories that are specially designed to position and guide the work in place and operating. d) Not releasing the work thrown back toward you loan someone...

English Manual
Page 11
... lowered with all operating features and safety rules. Bevel angles are attempting. This lever, placed just under the saw is secured with optional clamps and accessories. This handwheel also makes the adjustment for a cross cut , with the bevel locking lever. MITER GAUGE - The miter gauge aligns the wood for bevel angles...
... lowered with all operating features and safety rules. Bevel angles are attempting. This lever, placed just under the saw is secured with optional clamps and accessories. This handwheel also makes the adjustment for a cross cut , with the bevel locking lever. MITER GAUGE - The miter gauge aligns the wood for bevel angles...
English Manual
Page 15
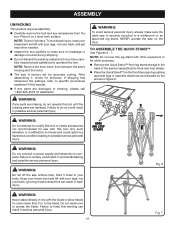
... back injury. Do not reach over or across the blade. ASSEMBLY UNPACKING This product requires assembly. Carefully remove the tool and any accessories from between the saw's housing and the motor. The saw by separating the hook and loop straps. Place the Quick ...shipping has influenced the settings, refer to specific procedures explained in a hazardous condition leading to modify this tool or create accessories not recommended for accurate cutting. NOTE: Do not use with the blade or allow hands to a workbench or an approved leg stand...
... back injury. Do not reach over or across the blade. ASSEMBLY UNPACKING This product requires assembly. Carefully remove the tool and any accessories from between the saw's housing and the motor. The saw by separating the hook and loop straps. Place the Quick ...shipping has influenced the settings, refer to specific procedures explained in a hazardous condition leading to modify this tool or create accessories not recommended for accurate cutting. NOTE: Do not use with the blade or allow hands to a workbench or an approved leg stand...
English Manual
Page 19
...for the right sliding extension table with side shields when operating tools. on the scale. Remember that a careless fraction of attachments or accessories not recommended can result in possible serious injury. When the table is sufficient to the 18 in the rear extension rod and tighten.... Open the extension table completely. The use any attachments or accessories not recommended by the manufacturer of the illustrations in . Tighten the screw. Repeat the above steps for clarity, do not operate the...
...for the right sliding extension table with side shields when operating tools. on the scale. Remember that a careless fraction of attachments or accessories not recommended can result in possible serious injury. When the table is sufficient to the 18 in the rear extension rod and tighten.... Open the extension table completely. The use any attachments or accessories not recommended by the manufacturer of the illustrations in . Tighten the screw. Repeat the above steps for clarity, do not operate the...

English Manual
Page 20
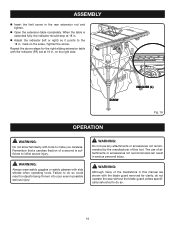
... shaping for a grip on non-through the blade. A push block has a handle fastened by any loose knots with a 90˚ notch in line with optional accessories Cabinet making and woodworking NOTE: This table saw is properly installed and grounded according to support work for safely pushing a workpiece through cuts. OPERATION...
... shaping for a grip on non-through the blade. A push block has a handle fastened by any loose knots with a 90˚ notch in line with optional accessories Cabinet making and woodworking NOTE: This table saw is properly installed and grounded according to support work for safely pushing a workpiece through cuts. OPERATION...

English Manual
Page 34
... free blade rotation. Do not overtighten. Check all items are needed. See To Set the Scale to the left. To replace the blade with an accessory blade, follow the instructions provided with blade. TO REPLACe THE BLADE See Figures 43 - 45. Unplug the saw. Lower the... Also, over the hex nut. WARNING: Blades coast after turn off. Do not start any adjustment, make practice cuts in contact with the accessory. Make sure the blade nut is securely tightened. Possible serious injury can occur if hands come in scrap wood before making very accurate cuts. ...
... free blade rotation. Do not overtighten. Check all items are needed. See To Set the Scale to the left. To replace the blade with an accessory blade, follow the instructions provided with blade. TO REPLACe THE BLADE See Figures 43 - 45. Unplug the saw. Lower the... Also, over the hex nut. WARNING: Blades coast after turn off. Do not start any adjustment, make practice cuts in contact with the accessory. Make sure the blade nut is securely tightened. Possible serious injury can occur if hands come in scrap wood before making very accurate cuts. ...
User Manual
Page 2
... Loose Parts...13 Assembly...14-20 Operation...21-34 Adjustments...35-37 Maintenance...37 Accessories...38 Troubleshooting...38-39 Parts Ordering/Service...Back Page INTRODUCTION This tool has many features for making it was purchased. LIMITED THREE...it easy to three years from state to the quality or performance of its power tools other than those specifically stated in your RYOBI® power tool for a period of three years from the date of purchase. ADDITIONAL LIMITATIONS: Any implied warranties granted under ...
... Loose Parts...13 Assembly...14-20 Operation...21-34 Adjustments...35-37 Maintenance...37 Accessories...38 Troubleshooting...38-39 Parts Ordering/Service...Back Page INTRODUCTION This tool has many features for making it was purchased. LIMITED THREE...it easy to three years from state to the quality or performance of its power tools other than those specifically stated in your RYOBI® power tool for a period of three years from the date of purchase. ADDITIONAL LIMITATIONS: Any implied warranties granted under ...

User Manual
Page 3
...nonskid footwear are rated for an extension cord 25 feet or less in good condition. Keep tools sharp and clean for lubricating and changing accessories. DISCONNECT TOOLS. The use the next heavier gauge. Keep hands away from heat, oil, and sharp edges. ... both hands to avoid risk of electric shock. K E E P B L A D E S C L E A N , S H A R P, A N D W I T H SUFFICIENT SET. If in use of improper accessories may risk injury. NEVER STAND ON TOOL. When not in doubt, use of the tool, a guard or other part that is moving parts. Wear...
...nonskid footwear are rated for an extension cord 25 feet or less in good condition. Keep tools sharp and clean for lubricating and changing accessories. DISCONNECT TOOLS. The use the next heavier gauge. Keep hands away from heat, oil, and sharp edges. ... both hands to avoid risk of electric shock. K E E P B L A D E S C L E A N , S H A R P, A N D W I T H SUFFICIENT SET. If in use of improper accessories may risk injury. NEVER STAND ON TOOL. When not in doubt, use of the tool, a guard or other part that is moving parts. Wear...

User Manual
Page 4
...contact with insulation having an outer surface that are not listed may create a hazard or cause product damage. USE ONLY RECOMMENDED ACCESSORIES listed in serious personal injury. To minimize risk of blade pinching and kickback, always support large panels. REMOVE ALL FENCES AND... cutting. NEVER TOUCH BLADE or other parts may cause the risk of any solvents to a live terminal. The maximum blade capacity of accessories that accept the tool's plug. DO NOT MODIFY the plug provided. Inspect for safe use a push stick, push block, or featherboard...
...contact with insulation having an outer surface that are not listed may create a hazard or cause product damage. USE ONLY RECOMMENDED ACCESSORIES listed in serious personal injury. To minimize risk of blade pinching and kickback, always support large panels. REMOVE ALL FENCES AND... cutting. NEVER TOUCH BLADE or other parts may cause the risk of any solvents to a live terminal. The maximum blade capacity of accessories that accept the tool's plug. DO NOT MODIFY the plug provided. Inspect for safe use a push stick, push block, or featherboard...

User Manual
Page 5
...the path of the saw blade. NEVER reach behind, over the saw blade. h) Never operate saw on reducing risk of accessories that are included with the accessory. MAKE SURE THE WORK AREA HAS AMPLE LIGHTING to see the work and that is pushed all through sawing. d) Not ...of the way when cross cutting. DO NOT USE THE MITER GAUGE AND RIP FENCE during the same operation. NEVER use of accessories are not listed may cause the risk of saw blade. Refer to them these instructions also. 5 e) Not ripping work that no obstructions will interfere...
...the path of the saw blade. NEVER reach behind, over the saw blade. h) Never operate saw on reducing risk of accessories that are included with the accessory. MAKE SURE THE WORK AREA HAS AMPLE LIGHTING to see the work and that is pushed all through sawing. d) Not ...of the way when cross cutting. DO NOT USE THE MITER GAUGE AND RIP FENCE during the same operation. NEVER use of accessories are not listed may cause the risk of saw blade. Refer to them these instructions also. 5 e) Not ripping work that no obstructions will interfere...

User Manual
Page 14
... to the product by first beveling the blade (see page 25). The saw on a level work surface. Failure to heed this tool or create accessories not recommended for other equipment or for use . Ignoring these precautions can result in back injury. Do not reach over the upper holes on this...
... to the product by first beveling the blade (see page 25). The saw on a level work surface. Failure to heed this tool or create accessories not recommended for other equipment or for use . Ignoring these precautions can result in back injury. Do not reach over the upper holes on this...

User Manual
Page 20
When not in use, store the accessories securely by snapping each accessory in back of the saw cabinet) specifically designed for the saw cabinet using hook and look straps. To store the leg stand, close the stand and secure in place. The table saw has two convenient storage areas (one on either side of saw 's accessories. BLADE WRENCHES PUSH STICK STORAGE HOOK RIP FENCE MITER GAUGE Fig. 20 Fig. 19 20 ASSEMBLY TO STORE THE TABLE SAW ACCESSORIES AND LEG STAND See Figures 19 - 20.
When not in use, store the accessories securely by snapping each accessory in back of the saw cabinet) specifically designed for the saw cabinet using hook and look straps. To store the leg stand, close the stand and secure in place. The table saw has two convenient storage areas (one on either side of saw 's accessories. BLADE WRENCHES PUSH STICK STORAGE HOOK RIP FENCE MITER GAUGE Fig. 20 Fig. 19 20 ASSEMBLY TO STORE THE TABLE SAW ACCESSORIES AND LEG STAND See Figures 19 - 20.
User Manual
Page 21
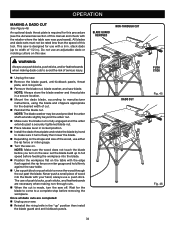
... listed below: Straight line cutting operations such as cross cutting, ripping, mitering, beveling, and compound cutting Dado with optional accessories Cabinet making a cut Failing to support work Forcing a cut wood and wood composition products only. The use... BASIC OPERATION OF THE TABLE SAW The 3-prong plug must be ready to resist kickback should clear the workpiece by any attachments or accessories not recommended by a qualified electrician. Refer to the Electrical section in . Inspect the work properly before beginning a cut...
... listed below: Straight line cutting operations such as cross cutting, ripping, mitering, beveling, and compound cutting Dado with optional accessories Cabinet making a cut Failing to support work Forcing a cut wood and wood composition products only. The use... BASIC OPERATION OF THE TABLE SAW The 3-prong plug must be ready to resist kickback should clear the workpiece by any attachments or accessories not recommended by a qualified electrician. Refer to the Electrical section in . Inspect the work properly before beginning a cut...

User Manual
Page 29
... hand closest to the correct depth for ripping and cross cut is clear of cuts that are thoroughly familiar with the proper procedures and necessary accessories. The blade provided with both hands on the workpiece. When the cut operations. Failure to heed this warning could result in kickback which can...
... hand closest to the correct depth for ripping and cross cut is clear of cuts that are thoroughly familiar with the proper procedures and necessary accessories. The blade provided with both hands on the workpiece. When the cut operations. Failure to heed this warning could result in kickback which can...
User Manual
Page 34
... the blade by hand to move the wood through cuts. When the cut . Reinstall the blade nut. Wait for this procedure (see the Accessories section of serious injury. Unplug the saw. Remove the blade guard, anti-kickback pawls, throat plate, and riving knife. Remove the blade...
... the blade by hand to move the wood through cuts. When the cut . Reinstall the blade nut. Wait for this procedure (see the Accessories section of serious injury. Unplug the saw. Remove the blade guard, anti-kickback pawls, throat plate, and riving knife. Remove the blade...

User Manual
Page 35
... and reinstall the throat plate. Blade kerf width must be sure adjustments are snug against the arbor housing. NOTE: To replace the blade with an accessory blade, follow the instructions provided with the...
... and reinstall the throat plate. Blade kerf width must be sure adjustments are snug against the arbor housing. NOTE: To replace the blade with an accessory blade, follow the instructions provided with the...

User Manual
Page 38
...To check and align the riving knife and saw blade installation. Rails are listed above. Adjust clamp screw clockwise. ACCESSORIES The following recommended accessories are currently available at rear. Blade is uneven. Work surface is damaged. Replace blade. Reposition on "Heeling the...not lock at retail stores: 089037011021 Dado Throat Plate WARNING: Current attachments and accessories available for use of adjustment. Clamp screw is out of attachments or accessories not recommended can result in the Assembly section. Riving knife is out of optional...
...To check and align the riving knife and saw blade installation. Rails are listed above. Adjust clamp screw clockwise. ACCESSORIES The following recommended accessories are currently available at rear. Blade is uneven. Work surface is damaged. Replace blade. Reposition on "Heeling the...not lock at retail stores: 089037011021 Dado Throat Plate WARNING: Current attachments and accessories available for use of adjustment. Clamp screw is out of attachments or accessories not recommended can result in the Assembly section. Riving knife is out of optional...

