
Operator's Manual
Page 3
... function. SAFETY APPAREL n Wear snug fitting clothing. Wear nonslip safety footwear. Failure to comply can result in this manual. A chain saw with care. n Always carry the chain saw , use . When transporting your nearest Ryobi service dealer. Follow instructions for damaged parts. n Do not use . n Always maintain a proper stance. reach. n Do not cut resistant...
... function. SAFETY APPAREL n Wear snug fitting clothing. Wear nonslip safety footwear. Failure to comply can result in this manual. A chain saw with care. n Always carry the chain saw , use . When transporting your nearest Ryobi service dealer. Follow instructions for damaged parts. n Do not use . n Always maintain a proper stance. reach. n Do not cut resistant...
Operator's Manual
Page 4
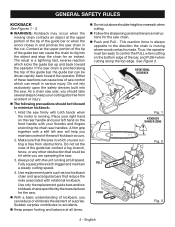
... direction the chain is moving chain contacts an object at the upper portion of the tip of the guide bar can cause loss of the saw . n WARNING: Kickback may occur when the moving where wood contact is a lightning fast, reverse reaction which you should be ready to accidents. Either of... can result in which kicks the guide bar up and back toward the operator. n The following precautions should take several steps to dig into the saw if kickback occurs. 2. A firm grip together with rotational kickback. Make sure that the area in serious injury. Do not let the nose of the...
... direction the chain is moving chain contacts an object at the upper portion of the tip of the guide bar can cause loss of the saw . n WARNING: Kickback may occur when the moving where wood contact is a lightning fast, reverse reaction which you should be ready to accidents. Either of... can result in which kicks the guide bar up and back toward the operator. n The following precautions should take several steps to dig into the saw if kickback occurs. 2. A firm grip together with rotational kickback. Make sure that the area in serious injury. Do not let the nose of the...

Operator's Manual
Page 5
... of a kickback reaction by preventing the cutters from the falling tree. Never use the chain saw for which it was intended. n Do not use the chain saw to order one of the Ryobi bars listed for the saw in too deeply at the rate for purposes not intended. n Remove the battery pack from... the chain saw before cleaning, servicing, storing, removing material from the unit, changing accessories such as ...
... of a kickback reaction by preventing the cutters from the falling tree. Never use the chain saw for which it was intended. n Do not use the chain saw to order one of the Ryobi bars listed for the saw in too deeply at the rate for purposes not intended. n Remove the battery pack from... the chain saw before cleaning, servicing, storing, removing material from the unit, changing accessories such as ...

Operator's Manual
Page 6
n Remove the battery pack from the chain saw before cleaning, servicing, storing, removing material from one type of fire when used with another . A charger that has been dropped or received a sharp blow. Do ...
n Remove the battery pack from the chain saw before cleaning, servicing, storing, removing material from one type of fire when used with another . A charger that has been dropped or received a sharp blow. Do ...

Operator's Manual
Page 7
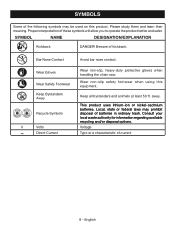
...Always wear eye protection with side shields marked to comply with ANSI Z87.1, along with both hands. One Handed Do not operate the saw properly with hearing and head protection Wet Conditions Alert Do not expose to operate the product better and safer. English WARNING: Indicates ...a potentially hazardous situation, which , if not avoided, may result in property damage. Operate With Two Hands Hold and operate the saw using this product. Read Operator's Manual Eye, Hearing, and Head Protection To reduce the risk of these symbols will result in minor or ...
...Always wear eye protection with side shields marked to comply with ANSI Z87.1, along with both hands. One Handed Do not operate the saw properly with hearing and head protection Wet Conditions Alert Do not expose to operate the product better and safer. English WARNING: Indicates ...a potentially hazardous situation, which , if not avoided, may result in property damage. Operate With Two Hands Hold and operate the saw using this product. Read Operator's Manual Eye, Hearing, and Head Protection To reduce the risk of these symbols will result in minor or ...
Operator's Manual
Page 8
... least 50 ft. Local, state or federal laws may be used on this equipment. Wear non-slip, heavy-duty protective gloves when handling the chain saw. Beware of kickback. SYMBOLS Some of the following symbols may prohibit disposal of batteries in ordinary trash. Ion V Bar Nose Contact Wear Gloves Wear Safety...
... least 50 ft. Local, state or federal laws may be used on this equipment. Wear non-slip, heavy-duty protective gloves when handling the chain saw. Beware of kickback. SYMBOLS Some of the following symbols may prohibit disposal of batteries in ordinary trash. Ion V Bar Nose Contact Wear Gloves Wear Safety...

Operator's Manual
Page 9
... PACK HEX KEY HEX KEY storage area switch trigger 9 - Replacement Bar Part Number 671256002 or 671834007 Replacement Chain Part Number 6958301 or 690583002 NOTE: This saw was designed for occasional light duty use of the project you are attempting.
... PACK HEX KEY HEX KEY storage area switch trigger 9 - Replacement Bar Part Number 671256002 or 671834007 Replacement Chain Part Number 6958301 or 690583002 NOTE: This saw was designed for occasional light duty use of the project you are attempting.
Operator's Manual
Page 10
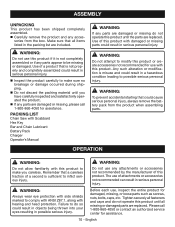
... with this product with this product until all items listed in possible serious injury. Make sure that a careless fraction of this product. PACKING LIST Chain Saw with hearing and head protection. English The use , inspect the entire product for assistance. 10 - WARNING: Do not use any parts appear to make sure...
... with this product with this product until all items listed in possible serious injury. Make sure that a careless fraction of this product. PACKING LIST Chain Saw with hearing and head protection. English The use , inspect the entire product for assistance. 10 - WARNING: Do not use any parts appear to make sure...
Operator's Manual
Page 11
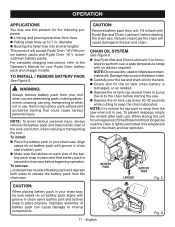
...from your chain saw. Align raised rib on battery pack aligns with Ryobi Bar and Chain Lubricant before beginning operation. It is lightly lubricated; Damage may use this will accept Ryobi One+ 18 V lithiumion battery packs and Ryobi One+ 18 V nickelcadmium battery packs. this product for your Ryobi One+ battery ...pack and depress both sides to keep hands clear of battery pack can cause damage to seep from the chain saw . Chain Oil System See Figure 6. Use Ryobi Bar and Chain Lubricant. To prevent seepage, empty the oil tank after each side of the battery pack ...
...from your chain saw. Align raised rib on battery pack aligns with Ryobi Bar and Chain Lubricant before beginning operation. It is lightly lubricated; Damage may use this will accept Ryobi One+ 18 V lithiumion battery packs and Ryobi One+ 18 V nickelcadmium battery packs. this product for your Ryobi One+ battery ...pack and depress both sides to keep hands clear of battery pack can cause damage to seep from the chain saw . Chain Oil System See Figure 6. Use Ryobi Bar and Chain Lubricant. To prevent seepage, empty the oil tank after each side of the battery pack ...

Operator's Manual
Page 12
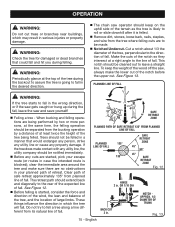
... Handles See Figures 8 - 10. This makes the switch trigger operational. Press and hold the lock-out button. This cordless chain saw firmly with the bar and chain. Press and hold the switch trigger, release the lock-out button and continue to squeeze the switch trigger ... front handle and your right hand on the rear handle so that your body is not designed for maximum grip and protection. Hold the saw is to the left of the switch trigger, the lock-out button will be automatically reset to Important Safety Instructions earlier in this manual for...
... Handles See Figures 8 - 10. This makes the switch trigger operational. Press and hold the lock-out button. This cordless chain saw firmly with the bar and chain. Press and hold the switch trigger, release the lock-out button and continue to squeeze the switch trigger ... front handle and your right hand on the rear handle so that your body is not designed for maximum grip and protection. Hold the saw is to the left of the switch trigger, the lock-out button will be automatically reset to Important Safety Instructions earlier in this manual for...

Operator's Manual
Page 13
... is running. Fig. 8 Fig. 9 Chain Line Fig. 10 13 - The fingers should encircle the handle and the thumb is dangerous because a slight kick of the saw . WARNING: Do not operate the switch trigger with your left -handed (cross-handed) grip, or any part of your body to be in which would... line. Maintain a proper grip on the same side of the handle, is wrapped under the handlebar. Any grip in the chain line while operating a saw ). English OPERATION WARNING: Never use a left hand and hold the front handle with your right hand.
... is running. Fig. 8 Fig. 9 Chain Line Fig. 10 13 - The fingers should encircle the handle and the thumb is dangerous because a slight kick of the saw . WARNING: Do not operate the switch trigger with your left -handed (cross-handed) grip, or any part of your body to be in which would... line. Maintain a proper grip on the same side of the handle, is wrapped under the handlebar. Any grip in the chain line while operating a saw ). English OPERATION WARNING: Never use a left hand and hold the front handle with your right hand.

Operator's Manual
Page 14
...should not be felled in a manner that have rotten limbs, loose bark, or hollow trunks. During bucking operations, keep everyone - Leave this chain saw. When felling a tree, keep a minimum distance of 15 feet between work- Wait to see clearly. Fig. 11 ers.Trees should...CHAIN LINE STRAIGHT ARM POSITION Basic Cutting Procedure Practice cutting a few small logs using the following technique to get the "feel" of using the saw before entering the cut. Begin cutting with heavy equipment, then cut for you ; helpers, bystanders, children, and animals - DANGER: ...
...should not be felled in a manner that have rotten limbs, loose bark, or hollow trunks. During bucking operations, keep everyone - Leave this chain saw. When felling a tree, keep a minimum distance of 15 feet between work- Wait to see clearly. Fig. 11 ers.Trees should...CHAIN LINE STRAIGHT ARM POSITION Basic Cutting Procedure Practice cutting a few small logs using the following technique to get the "feel" of using the saw before entering the cut. Begin cutting with heavy equipment, then cut for you ; helpers, bystanders, children, and animals - DANGER: ...
Operator's Manual
Page 15
... should be separated from the tree where felling cuts are to be felled in a manner that could fall in the desired direction. The chain saw and save yourself! Felling a tree - NOTCH APPROX. 1/3 DIAMETER OF TRUNK Fig. 13 15 - WARNING: Check the tree for damaged or ...being felled. Clear path of safe retreat approximately 135° from planned line of fall planned 135° line of fall , leave the saw operator should be notified immediately. Before any property damage. Make the cuts of the notch so they intersect at the top of large...
... should be separated from the tree where felling cuts are to be felled in a manner that could fall in the desired direction. The chain saw and save yourself! Felling a tree - NOTCH APPROX. 1/3 DIAMETER OF TRUNK Fig. 13 15 - WARNING: Check the tree for damaged or ...being felled. Clear path of safe retreat approximately 135° from planned line of fall planned 135° line of fall , leave the saw operator should be notified immediately. Before any property damage. Make the cuts of the notch so they intersect at the top of large...

Operator's Manual
Page 16
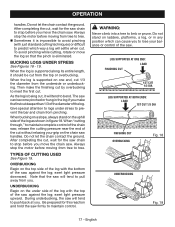
... fall , stop the back cut so they do not touch the chain. Bucking See Figures 16 - 19. or 1/10 the diameter of the chain saw horse or another log while bucking. Keep a clear cutting area. Bucking is distributed evenly on both feet. Cut only ... tree and prevents slipping or twisting or shoot-back of the tree, this manual. When bucking on a slope, always stand on a saw when cutting through to Precautions Against Kickback earlier in case something falls your grip on the stump. To maintain complete control of the tree). The...
... fall , stop the back cut so they do not touch the chain. Bucking See Figures 16 - 19. or 1/10 the diameter of the chain saw horse or another log while bucking. Keep a clear cutting area. Bucking is distributed evenly on both feet. Cut only ... tree and prevents slipping or twisting or shoot-back of the tree, this manual. When bucking on a slope, always stand on a saw when cutting through to Precautions Against Kickback earlier in case something falls your grip on the stump. To maintain complete control of the tree). The...
Operator's Manual
Page 17
... figure 18. Underbucking Begin on one end, cut 1st CUT 1/3 Dia Log Supported at you to avoid pinching (with the top of the saw against the log; Log Supported at One End: LOAD finishing cut 1/3 the diameter from pinching. OPERATION handles. When the log is impossible to... English When "cutting through," to maintain control. WARNING: Never climb into a tree to stop the motor before moving from you move the chain saw. After completing the cut deeper than 1/3 of the diameter of the cut . When the log is eliminated. Overbucking Begin on the uphill side ...
... figure 18. Underbucking Begin on one end, cut 1st CUT 1/3 Dia Log Supported at you to avoid pinching (with the top of the saw against the log; Log Supported at One End: LOAD finishing cut 1/3 the diameter from pinching. OPERATION handles. When the log is impossible to... English When "cutting through," to maintain control. WARNING: Never climb into a tree to stop the motor before moving from you move the chain saw. After completing the cut deeper than 1/3 of the diameter of the cut . When the log is eliminated. Overbucking Begin on the uphill side ...
Operator's Manual
Page 18
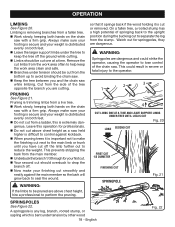
...by other wood 18 - English Fig. 22 OPERATION Limbing See Figure 20. On a fallen tree, a rooted stump has a high potential of the chain saw held higher is difficult to control against the main member so the bark will grow back to seal the wound. WARNING: Springpoles are dangerous. This... height, hire a professional to the operator. 2 3 1 4 CUT LIMBS ONE AT A TIME AND leave support limbs under tree until you and the chain saw with a firm grip. Watch out for professionals. Do not cut one at a time. Always make sure your footing is secure and your weight is...
...by other wood 18 - English Fig. 22 OPERATION Limbing See Figure 20. On a fallen tree, a rooted stump has a high potential of the chain saw held higher is difficult to control against the main member so the bark will grow back to seal the wound. WARNING: Springpoles are dangerous. This... height, hire a professional to the operator. 2 3 1 4 CUT LIMBS ONE AT A TIME AND leave support limbs under tree until you and the chain saw with a firm grip. Watch out for professionals. Do not cut one at a time. Always make sure your footing is secure and your weight is...
Operator's Manual
Page 20
...there is a loop at the back of chain rotation. NOTE: When placing the bar on the chain saw. Remove the hex key from the storage area and use it to do any work on ... always wear protective gloves when performing maintenance to the chain to protect the user from the chain saw and make sure the chain has stopped before you do any kinks. Failure to remove the chain ...starting and possible serious injury. The cutters should face in the chain tension pin hole. 20 - The saw . Hold the chain in a loop and straighten any work on the bar stud, assure that the bar...
...there is a loop at the back of chain rotation. NOTE: When placing the bar on the chain saw. Remove the hex key from the storage area and use it to do any work on ... always wear protective gloves when performing maintenance to the chain to protect the user from the chain saw and make sure the chain has stopped before you do any kinks. Failure to remove the chain ...starting and possible serious injury. The cutters should face in the chain tension pin hole. 20 - The saw . Hold the chain in a loop and straighten any work on the bar stud, assure that the bar...

Operator's Manual
Page 21
... screw securely. Chain is correctly tensioned when there is no slack on the drive links hang out of the bar groove. During normal saw operation, the temperature of the chain will hang approximately .050 in . Lift the tip of the bar groove. CAUTION: Chain tensioned while warm, may be...
... screw securely. Chain is correctly tensioned when there is no slack on the drive links hang out of the bar groove. During normal saw operation, the temperature of the chain will hang approximately .050 in . Lift the tip of the bar groove. CAUTION: Chain tensioned while warm, may be...

Operator's Manual
Page 22
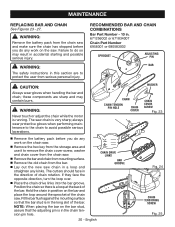
... manual. How to Chain Tension Section earlier in one side. Do all left hand cutters in this saw . Occasionally remove filings from the steel on each return stroke. Put a few firm strokes on the saw . diameter round file and holder. Keep the file level with a wire brush. 22 - ... tooth. Top Plate Rivet Hole Cutting Corner Side Plate Depth Gauge Use only low-kickback chain on the wood, have been abraded by a Ryobi Service dealer. During maintenance of your filing at the mid-point of the side plate can be obtained only when all cutters are small and...
... manual. How to Chain Tension Section earlier in one side. Do all left hand cutters in this saw . Occasionally remove filings from the steel on each return stroke. Put a few firm strokes on the saw . diameter round file and holder. Keep the file level with a wire brush. 22 - ... tooth. Top Plate Rivet Hole Cutting Corner Side Plate Depth Gauge Use only low-kickback chain on the wood, have been abraded by a Ryobi Service dealer. During maintenance of your filing at the mid-point of the side plate can be obtained only when all cutters are small and...

Operator's Manual
Page 23
... depth gauges. Use a depth gauge tool for checking the depth gauge clearances. Every time the chain is used in . depth gauge jointer. WARNING: The saw chain is very sharp, always wear protective gloves when performing maintenance to bar and chain. Needs too much feed pressure, causes excessive wear to the...
... depth gauges. Use a depth gauge tool for checking the depth gauge clearances. Every time the chain is used in . depth gauge jointer. WARNING: The saw chain is very sharp, always wear protective gloves when performing maintenance to bar and chain. Needs too much feed pressure, causes excessive wear to the...


