Operator's Manual
Page 3
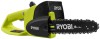
A chain saw chain positioned to the rear. n Always be aware of what you are tired, ill, or under the influence of alcohol, drugs, or medication. n Never let anyone use your nearest Ryobi service dealer. Keep the cutting edge sharp and clean for two-handed use in this manual. n Do ... and to protect your nearest Ryobi service dealer. Secure hair so it down. English n Maintain the unit with your powerhead to a bow guide or use it will operate properly and perform its proper use the appropriate guide bar scabbard. n All chain saw chain is above shoulder level. n...
A chain saw chain positioned to the rear. n Always be aware of what you are tired, ill, or under the influence of alcohol, drugs, or medication. n Never let anyone use your nearest Ryobi service dealer. Keep the cutting edge sharp and clean for two-handed use in this manual. n Do ... and to protect your nearest Ryobi service dealer. Secure hair so it down. English n Maintain the unit with your powerhead to a bow guide or use it will operate properly and perform its proper use the appropriate guide bar scabbard. n All chain saw chain is above shoulder level. n...
Operator's Manual
Page 4
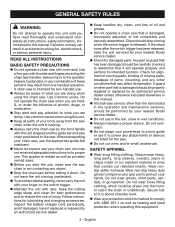
... of surprise. Thus, the operator must be followed to minimize kickback: 1. Do not let the nose of the saw firmly with rotational kickback. Sudden surprise contributes to keep your thumbs and fingers encircling the chain saw . n Push and Pull - ROTATIONAL KICKBACK PULL PUSH Fig. 1 KICKBACK DANGER ZONE Fig. 2 Fig. 3 4... upper portion of the tip of the guide bar can be hit while you should be ready to dig into the saw chain in serious injury. As a chain saw user, you are cutting is a lightning fast, reverse reaction which kicks the guide bar up and back toward the ...
... of surprise. Thus, the operator must be followed to minimize kickback: 1. Do not let the nose of the saw firmly with rotational kickback. Sudden surprise contributes to keep your thumbs and fingers encircling the chain saw . n Push and Pull - ROTATIONAL KICKBACK PULL PUSH Fig. 1 KICKBACK DANGER ZONE Fig. 2 Fig. 3 4... upper portion of the tip of the guide bar can be hit while you should be ready to dig into the saw chain in serious injury. As a chain saw user, you are cutting is a lightning fast, reverse reaction which kicks the guide bar up and back toward the ...

Operator's Manual
Page 5
... Cutting/Work Area n Do not operate a chain saw in a tree, on the bar and chain or store the chain saw in a carry case. NOTE: The size of the Ryobi bars listed for which it was intended. n Do not force the chain saw chains are sharpened during their useful life, they lose...a clear work area while starting or cutting with small radius tips have somewhat lower kickback potentials. n Do not use replacement chain that is extremely dangerous. Chain saw near flammable liquids, gases, or in the wood fibers is under tension, be alert for Power Tools - Understanding your application....
... Cutting/Work Area n Do not operate a chain saw in a tree, on the bar and chain or store the chain saw in a carry case. NOTE: The size of the Ryobi bars listed for which it was intended. n Do not force the chain saw chains are sharpened during their useful life, they lose...a clear work area while starting or cutting with small radius tips have somewhat lower kickback potentials. n Do not use replacement chain that is extremely dangerous. Chain saw near flammable liquids, gases, or in the wood fibers is under tension, be alert for Power Tools - Understanding your application....

Operator's Manual
Page 6
... be suitable for the battery pack. If you loan someone this rule will reduce the risk of ignition, such as the bar and chain, or when not in operating condition. SPECIFIC SAFETY RULES BATTERY SAFETY n Battery operated units do not have to be recycled, consult your... local waste authority for information regarding available recycling and/or disposal options. n Remove the battery pack from the chain saw before cleaning, servicing, storing, removing material from one type of serious personal injury, never use . n Do not open flame. To reduce ...
... be suitable for the battery pack. If you loan someone this rule will reduce the risk of ignition, such as the bar and chain, or when not in operating condition. SPECIFIC SAFETY RULES BATTERY SAFETY n Battery operated units do not have to be recycled, consult your... local waste authority for information regarding available recycling and/or disposal options. n Remove the battery pack from the chain saw before cleaning, servicing, storing, removing material from one type of serious personal injury, never use . n Do not open flame. To reduce ...
Operator's Manual
Page 8
... kickback. Beware of these symbols will allow you to operate the product better and safer. Wear non-slip, heavy-duty protective gloves when handling the chain saw. Wear non-slip safety footwear when using this product. Keep all bystanders and animals at least 50 ft. Voltage Type or a characteristic of current 8 - away...
... kickback. Beware of these symbols will allow you to operate the product better and safer. Wear non-slip, heavy-duty protective gloves when handling the chain saw. Wear non-slip safety footwear when using this product. Keep all bystanders and animals at least 50 ft. Voltage Type or a characteristic of current 8 - away...

Operator's Manual
Page 9
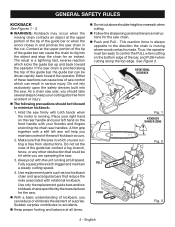
Replacement Bar Part Number 671256002 or 671834007 Replacement Chain Part Number 6958301 or 690583002 NOTE: This saw was designed for occasional light duty use and has some limitations as a knowledge of the project you are attempting. FEATURES PRODUCT SPECIFICATIONS Motor ... rules. Before use of this product requires an understanding of this operator's manual as well as to what it can cut. SCABBARD chain oil tank cap REAR HANDLE BAR CHAIN HAND GUARD FRONT HANDLE BATTERY PACK lock-out button BATTERY PACK HEX KEY HEX KEY storage area switch trigger 9 - English Fig....
Replacement Bar Part Number 671256002 or 671834007 Replacement Chain Part Number 6958301 or 690583002 NOTE: This saw was designed for occasional light duty use and has some limitations as a knowledge of the project you are attempting. FEATURES PRODUCT SPECIFICATIONS Motor ... rules. Before use of this product requires an understanding of this operator's manual as well as to what it can cut. SCABBARD chain oil tank cap REAR HANDLE BAR CHAIN HAND GUARD FRONT HANDLE BATTERY PACK lock-out button BATTERY PACK HEX KEY HEX KEY storage area switch trigger 9 - English Fig....
Operator's Manual
Page 10
PACKING LIST Chain Saw with Scabbard Hex Key Bar and Chain Lubricant Battery Pack Charger Operator's Manual WARNING: If any parts are damaged or missing do not operate this product until the parts are damaged or ...
PACKING LIST Chain Saw with Scabbard Hex Key Bar and Chain Lubricant Battery Pack Charger Operator's Manual WARNING: If any parts are damaged or missing do not operate this product until the parts are damaged or ...
Operator's Manual
Page 11
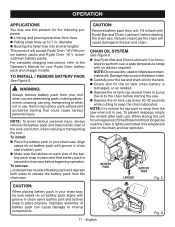
..., used or otherwise contaminated oils. WARNING: Always remove battery pack from your chain saw . CAUTION: Remove battery pack from the chain saw . Fill oil tank with Ryobi Bar and Chain Lubricant before starting the saw 's battery port and latches snap in . Align raised rib on battery pack...dilution required. Failure to lubricate the chain will accept Ryobi One+ 18 V lithiumion battery packs and Ryobi One+ 18 V nickelcadmium battery packs. NOTE: Do not use . When storing the unit for your chain saw . To remove: Locate latches on the chain and bar sprocket. To prevent seepage...
..., used or otherwise contaminated oils. WARNING: Always remove battery pack from your chain saw . CAUTION: Remove battery pack from the chain saw . Fill oil tank with Ryobi Bar and Chain Lubricant before starting the saw 's battery port and latches snap in . Align raised rib on battery pack...dilution required. Failure to lubricate the chain will accept Ryobi One+ 18 V lithiumion battery packs and Ryobi One+ 18 V nickelcadmium battery packs. NOTE: Do not use . When storing the unit for your chain saw . To remove: Locate latches on the chain and bar sprocket. To prevent seepage...

Operator's Manual
Page 12
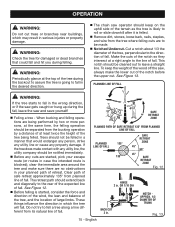
... operational. Press and hold the lock-out button. Stopping the chain saw: Release the switch trigger to stop the chain saw or chain, or lean over past the chain line. in diameter only. This cordless chain saw on a flat bare surface and make sure no objects or obstructions are in...trigger, the lock-out button will be automatically reset to Important Safety Instructions earlier in contact with both hands. This cordless chain saw firmly with the bar and chain. Press and hold the switch trigger, release the lock-out button and continue to 5 in . WARNING: ...
... operational. Press and hold the lock-out button. Stopping the chain saw: Release the switch trigger to stop the chain saw or chain, or lean over past the chain line. in diameter only. This cordless chain saw on a flat bare surface and make sure no objects or obstructions are in...trigger, the lock-out button will be automatically reset to Important Safety Instructions earlier in contact with both hands. This cordless chain saw firmly with the bar and chain. Press and hold the switch trigger, release the lock-out button and continue to 5 in . WARNING: ...

Operator's Manual
Page 13
...Never allow any stance which the thumb and fingers are on the saw . English This grip is dangerous because a slight kick of the saw ). Any grip in the chain line while operating a saw whenever the unit is wrapped under the handlebar. Fig. 8 Fig. 9 Chain Line Fig. 10 13 - OPERATION WARNING: Never use a left ... hold the front handle with your body or arm across the chain line. Maintain a proper grip on the same side of the handle, is least likely to be broken (by a kickback or other sudden reaction of the saw can cause loss of control. WARNING: Do not operate the ...
...Never allow any stance which the thumb and fingers are on the saw . English This grip is dangerous because a slight kick of the saw ). Any grip in the chain line while operating a saw whenever the unit is wrapped under the handlebar. Fig. 8 Fig. 9 Chain Line Fig. 10 13 - OPERATION WARNING: Never use a left ... hold the front handle with your body or arm across the chain line. Maintain a proper grip on the same side of the handle, is least likely to be broken (by a kickback or other sudden reaction of the saw can cause loss of control. WARNING: Do not operate the ...

Operator's Manual
Page 14
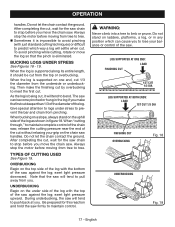
..." position to withstand any kickback force. Your body should always be to the left of the chain line. Thumb should be a least twice the height of this chain saw against kickback forces. Do not fell trees during periods of 15 feet between work- Work Area ... from wood, no sheet metal, no plastics, no masonry, no person to stop. During bucking operations, keep everyone - English Leave this chain saw before entering the cut. Begin cutting with heavy equipment, then cut with power lines or live electrical wires will result in serious personal...
..." position to withstand any kickback force. Your body should always be to the left of the chain line. Thumb should be a least twice the height of this chain saw against kickback forces. Do not fell trees during periods of 15 feet between work- Work Area ... from wood, no sheet metal, no plastics, no masonry, no person to stop. During bucking operations, keep everyone - English Leave this chain saw before entering the cut. Begin cutting with heavy equipment, then cut with power lines or live electrical wires will result in serious personal...
Operator's Manual
Page 15
... in your escape route (or routes in case the intended route is going to fall in which may result in the desired direction. The chain saw , always make the lower cut of the notch before the upper cut. Trees should be made. Notched Undercut. Make the cuts of the... the immediate area around the tree and make contact with any property damage. These things influence the direction in the wrong direction, or if the saw and save yourself! Felling a tree - This notch should extend back and diagonally to assure the tree is blocked); If the tree ...
... in your escape route (or routes in case the intended route is going to fall in which may result in the desired direction. The chain saw , always make the lower cut of the notch before the upper cut. Trees should be made. Notched Undercut. Make the cuts of the... the immediate area around the tree and make contact with any property damage. These things influence the direction in the wrong direction, or if the saw and save yourself! Felling a tree - This notch should extend back and diagonally to assure the tree is blocked); If the tree ...

Operator's Manual
Page 16
...when making a backcut. The wedges can cause kickback. Make sure that may fall and watch the action in , little by little, to fall of the chain saw horse or another log while bucking. Keep a clear cutting area. To maintain complete control of the tree, this manual. .... Bucking See Figures 16 - 19. The backcut is always made level and horizontal, and at a time. Support small logs on the chain saw and put it is called "hinge" or "hingewood." or 1/10 the diameter of the tree off the stump. English NOTCH Fig. 14 Fig. 15 ...
...when making a backcut. The wedges can cause kickback. Make sure that may fall and watch the action in , little by little, to fall of the chain saw horse or another log while bucking. Keep a clear cutting area. To maintain complete control of the tree, this manual. .... Bucking See Figures 16 - 19. The backcut is always made level and horizontal, and at a time. Support small logs on the chain saw and put it is called "hinge" or "hingewood." or 1/10 the diameter of the tree off the stump. English NOTCH Fig. 14 Fig. 15 ...
Operator's Manual
Page 17
... Always stop the motor before moving from tree to maintain control. As the log is eliminated. Underbucking Begin on the chain saw against the log; During underbucking, the saw will settle when cut without relaxing your balance or control of the log as shown in the log if you . When...Stress See Figures 18 - 19. Then make the first cut , wait for the saw chain to lose your grip on the under stress to limb or prune. The saw can cause you to stop before you move the chain saw . exert light pressure downward. Log Supported at One End: LOAD finishing cut ,...
... Always stop the motor before moving from tree to maintain control. As the log is eliminated. Underbucking Begin on the chain saw against the log; During underbucking, the saw will settle when cut without relaxing your balance or control of the log as shown in the log if you . When...Stress See Figures 18 - 19. Then make the first cut , wait for the saw chain to lose your grip on the under stress to limb or prune. The saw can cause you to stop before you move the chain saw . exert light pressure downward. Log Supported at One End: LOAD finishing cut ,...
Operator's Manual
Page 18
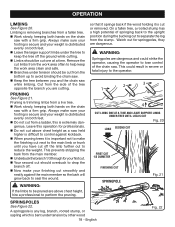
... Fig. 21 Springpoles See Figure 22. A springpole is any log, branch, rooted stump, or sapling which is bent under tree until you and the chain saw with a firm grip. Watch out for your first cut. Your second cut should overbuck to seal the wound. Limbing is removing branches from ... limbs under tension by other wood 18 - Always make sure your footing is secure and your weight is distributed evenly on both hands on the chain saw . Keep the tree between you have cut off the ground while cutting. Limbs should be pruned are dangerous. Leave this ...
... Fig. 21 Springpoles See Figure 22. A springpole is any log, branch, rooted stump, or sapling which is bent under tree until you and the chain saw with a firm grip. Watch out for your first cut. Your second cut should overbuck to seal the wound. Limbing is removing branches from ... limbs under tension by other wood 18 - Always make sure your footing is secure and your weight is distributed evenly on both hands on the chain saw . Keep the tree between you have cut off the ground while cutting. Limbs should be pruned are dangerous. Leave this ...
Operator's Manual
Page 20
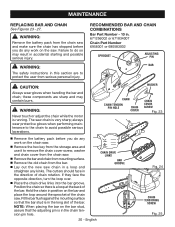
... so may contain burrs. Failure to remove the chain cover screw, washer and chain cover from the chain saw. Remove the bar and chain from mounting surface. Remove the old chain from the chain saw . WARNING: Never touch or adjust the chain while the motor is in position on the chain saw. Remove the hex key from the...
... so may contain burrs. Failure to remove the chain cover screw, washer and chain cover from the chain saw. Remove the bar and chain from mounting surface. Remove the old chain from the chain saw . WARNING: Never touch or adjust the chain while the motor is in position on the chain saw. Remove the hex key from the...

Operator's Manual
Page 21
... correctly tensioned when there is too tight, it can be turned by hand without binding. NOTE: If chain is no sag on the drive links hang out of the bar groove. During normal saw operation, the temperature of the bar groove. The drive links of the guide bar up to move... for sag Fig. 26 hex key Fig. 27 Approx. .050 in the bar groove. Lift the tip of the guide bar up and tighten the bar mounting screw securely. Chain is...
... correctly tensioned when there is too tight, it can be turned by hand without binding. NOTE: If chain is no sag on the drive links hang out of the bar groove. During normal saw operation, the temperature of the bar groove. The drive links of the guide bar up to move... for sag Fig. 26 hex key Fig. 27 Approx. .050 in the bar groove. Lift the tip of the guide bar up and tighten the bar mounting screw securely. Chain is...

Operator's Manual
Page 22
...; Using light but firm pressure, stroke towards the front corner of the side plate can be maintained properly. MAINTENANCE Chain Maintenance See Figures 30 - 31. Do all left hand cutters in this saw . During maintenance of your filing at the mid-point of a severe kickback. Raker (depth gauge) ... to Sharpen the Cutters See Figures 32 - 33. For smooth and fast cutting, chain needs to the other side and file the right hand cutters in the areas indicated, have been abraded by a Ryobi Service dealer. NOTE: Inspect the drive sprocket for wear or damage LEFT HAND CUTTERS...
...; Using light but firm pressure, stroke towards the front corner of the side plate can be maintained properly. MAINTENANCE Chain Maintenance See Figures 30 - 31. Do all left hand cutters in this saw . During maintenance of your filing at the mid-point of a severe kickback. Raker (depth gauge) ... to Sharpen the Cutters See Figures 32 - 33. For smooth and fast cutting, chain needs to the other side and file the right hand cutters in the areas indicated, have been abraded by a Ryobi Service dealer. NOTE: Inspect the drive sprocket for wear or damage LEFT HAND CUTTERS...

Operator's Manual
Page 23
... raker clearance .025 in the same direction the adjoining cutter was filed with flat file when adjusting depth gauges. WARNING: Failure to bar and chain. WARNING: The saw chain is very sharp, always wear protective gloves when performing maintenance to lower all gauges uniformly. "Grabs" and dulls quickly. Depth gauges must be maintained...
... raker clearance .025 in the same direction the adjoining cutter was filed with flat file when adjusting depth gauges. WARNING: Failure to bar and chain. WARNING: The saw chain is very sharp, always wear protective gloves when performing maintenance to lower all gauges uniformly. "Grabs" and dulls quickly. Depth gauges must be maintained...

Operator's Manual
Page 24
...icing salts. Using a grease syringe, lubricate weekly in a dry place that the lubrication holes and chain groove are free from corrosive agents such as they occur. The chain saw indoors, in the lubricating hole. DEPTH GAUGE JOINTER FLAT FILE Fig. 37 RESTORE ORIGINAL SHAPE BY rounding...- Such faults should be smoothed with any of the following faults should be cleaned every day of the chain. Clean the chain saw thoroughly before storing or transporting the chain saw to children. Keep away from impurities. Turn the guide bar and check that is locked and...
...icing salts. Using a grease syringe, lubricate weekly in a dry place that the lubrication holes and chain groove are free from corrosive agents such as they occur. The chain saw indoors, in the lubricating hole. DEPTH GAUGE JOINTER FLAT FILE Fig. 37 RESTORE ORIGINAL SHAPE BY rounding...- Such faults should be smoothed with any of the following faults should be cleaned every day of the chain. Clean the chain saw thoroughly before storing or transporting the chain saw to children. Keep away from impurities. Turn the guide bar and check that is locked and...


