
English Manual
Page 1
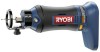
When properly cared for, it will give you for dependability, ease of operation, and operator safety. Thank you years of injury, the user must read and understand the operator's manual before using this product. SAVE THIS MANUAL FOR FUTURE REFERENCE WARNING: To reduce the risk of rugged, trouble-free performance. OPERATOR'S MANUAL 18 VOLT SPEED SAW™ P530 batterIES and chargers sold Separately ACCEPTS ALL one+ BATTERY PACKS Your speed saw has been engineered and manufactured to our high standard for your purchase.
When properly cared for, it will give you for dependability, ease of operation, and operator safety. Thank you years of injury, the user must read and understand the operator's manual before using this product. SAVE THIS MANUAL FOR FUTURE REFERENCE WARNING: To reduce the risk of rugged, trouble-free performance. OPERATOR'S MANUAL 18 VOLT SPEED SAW™ P530 batterIES and chargers sold Separately ACCEPTS ALL one+ BATTERY PACKS Your speed saw has been engineered and manufactured to our high standard for your purchase.
English Manual
Page 8
.... ERGONOMIC DESIGN The design of cut circles from 3.5 in . in . DEPTH ADJUSTMENT RING Your speed saw with a depth adjustment ring that allows you to adjust the depth of your speed saw has a conveniently located slide switch. DEPTH ADJUSTMENT RING SWITCH SPINDLE LOCK BIT COLLET NUT aDJUSTING KNOB ...Fig. 1 SWITCH Your speed saw provides for easy handling and maintaining proper control when cutting. SPINDLE LOCK A spindle lock secures the spindle and allows...
.... ERGONOMIC DESIGN The design of cut circles from 3.5 in . in . DEPTH ADJUSTMENT RING Your speed saw with a depth adjustment ring that allows you to adjust the depth of your speed saw has a conveniently located slide switch. DEPTH ADJUSTMENT RING SWITCH SPINDLE LOCK BIT COLLET NUT aDJUSTING KNOB ...Fig. 1 SWITCH Your speed saw provides for easy handling and maintaining proper control when cutting. SPINDLE LOCK A spindle lock secures the spindle and allows...
English Manual
Page 9
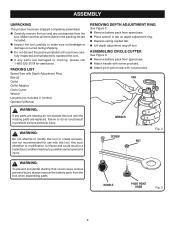
...result in a hazardous condition leading to do not operate this tool. ASSEMBLING CIRCLE CUTTER See Figure 3. Remove battery pack from speed saw. Attach handle with screw provided. Attach pivot point knob with Depth Adjustment Ring Bits (2) Collet Collet Adaptor Circle ...Cutter Wrench Lanyard (not included in combo) Operator's Manual REMOVING DEPTH ADJUSTMENT RING See Figure 2. Remove battery pack from speed saw. Place wrench in the packing list are included. WRENCH SCREW NUT Fig. 2 WARNING: To prevent accidental starting that all ...
...result in a hazardous condition leading to do not operate this tool. ASSEMBLING CIRCLE CUTTER See Figure 3. Remove battery pack from speed saw. Attach handle with screw provided. Attach pivot point knob with Depth Adjustment Ring Bits (2) Collet Collet Adaptor Circle ...Cutter Wrench Lanyard (not included in combo) Operator's Manual REMOVING DEPTH ADJUSTMENT RING See Figure 2. Remove battery pack from speed saw. Place wrench in the packing list are included. WRENCH SCREW NUT Fig. 2 WARNING: To prevent accidental starting that all ...
English Manual
Page 10
... accessories not recommended can result in this manual. bit for your eyes, resulting in . ASSEMBLY ATTACHING CIRCLE CUTTER See Figure 4. Remove Battery Pack From speed saw. Assemble circle cutter if necessary. THREADED RING DEPTH ADJUSTMENT RING ADAPTOR CIRCLE CUTTER ARM Fig. 4 OPERATION WARNING: Do not allow familiarity with side shields...
... accessories not recommended can result in this manual. bit for your eyes, resulting in . ASSEMBLY ATTACHING CIRCLE CUTTER See Figure 4. Remove Battery Pack From speed saw. Assemble circle cutter if necessary. THREADED RING DEPTH ADJUSTMENT RING ADAPTOR CIRCLE CUTTER ARM Fig. 4 OPERATION WARNING: Do not allow familiarity with side shields...
English Manual
Page 12
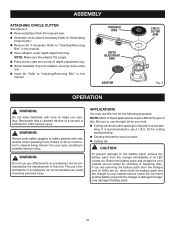
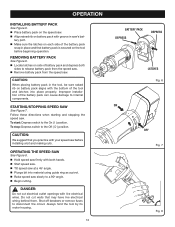
... To start: Depress switch to disconnect the circuit. To stop: Depress switch to release battery pack from the speed saw. Remove battery pack from the speed saw. CAUTION: We suggest that may have live electrical wires. tery port. Make sure the latches on .... CAUTION: When placing battery pack in saw slowly to internal components. OPERATing the SPEED SAW See Figure 8. Hold speed saw firmly with the bottom of battery pack and depress both hands. Start speed saw. Tilt speed saw . Do not cut electrical outlet openings with...
... To start: Depress switch to disconnect the circuit. To stop: Depress switch to release battery pack from the speed saw. Remove battery pack from the speed saw. CAUTION: We suggest that may have live electrical wires. tery port. Make sure the latches on .... CAUTION: When placing battery pack in saw slowly to internal components. OPERATing the SPEED SAW See Figure 8. Hold speed saw firmly with the bottom of battery pack and depress both hands. Start speed saw. Tilt speed saw . Do not cut electrical outlet openings with...
English Manual
Page 13
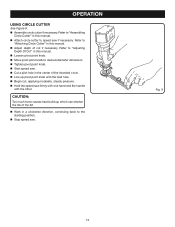
.... Loosen pivot point knob. Move pivot point knob to desired diameter dimension. Tighten pivot point knob. Start speed saw. Cut a pilot hole in this manual. Attach circle cutter to "Attaching Circle Cutter" in the center of the intended circle..... Work in this manual. Adjust depth of cut , applying moderate, steady pressure. Hold the speed saw if necessary. Refer to speed saw firmly with one hand and the handle with the other. OPERATION USING CIRCLE CUTTER See Figure 9. Assemble circle cutter if...
.... Loosen pivot point knob. Move pivot point knob to desired diameter dimension. Tighten pivot point knob. Start speed saw. Cut a pilot hole in this manual. Attach circle cutter to "Attaching Circle Cutter" in the center of the intended circle..... Work in this manual. Adjust depth of cut , applying moderate, steady pressure. Hold the speed saw if necessary. Refer to speed saw firmly with one hand and the handle with the other. OPERATION USING CIRCLE CUTTER See Figure 9. Assemble circle cutter if...
English Manual
Page 14
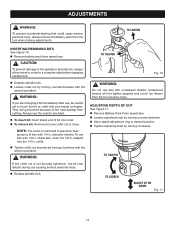
They will not tighten properly and could cause serious personal injury, always remove the battery pack from speed saw . Loosen adjusting knob by turning counterclockwise. Move depth adjustment ring to touch the bit or collet with the wrench provided. shank...lock. Loosen collet nut by turning counterclockwise with your hands or fingers. ADJUSTING DEPTH OF CUT See Figure 11. Remove Battery Pack From speed saw . diameter shanks. Always use bits with 1/4 in . To use the wrench provided. To insert bit: Insert shank end of the heat ...
They will not tighten properly and could cause serious personal injury, always remove the battery pack from speed saw . Loosen adjusting knob by turning counterclockwise. Move depth adjustment ring to touch the bit or collet with the wrench provided. shank...lock. Loosen collet nut by turning counterclockwise with your hands or fingers. ADJUSTING DEPTH OF CUT See Figure 11. Remove Battery Pack From speed saw . diameter shanks. Always use bits with 1/4 in . To use the wrench provided. To insert bit: Insert shank end of the heat ...

English Manual
Page 16
...complete list of Ryobi Limited used under license. ONE WORLD TECHNOLOGIES, INC. 1428 Pearman Dairy Road, Anderson, SC 29625 Phone 1-800-525-2579 www.ryobitools.com 983000-512 09-13-07 (REV: 03) Patent No. D477,758 OPERATOR'S MANUAL 18 VOLT SPEED SAW™ P530 WARNING: Some dust... created by power sanding, sawing, grinding, drilling, and other construction activities contains chemicals known to cause cancer, birth defects or other masonry products,...
...complete list of Ryobi Limited used under license. ONE WORLD TECHNOLOGIES, INC. 1428 Pearman Dairy Road, Anderson, SC 29625 Phone 1-800-525-2579 www.ryobitools.com 983000-512 09-13-07 (REV: 03) Patent No. D477,758 OPERATOR'S MANUAL 18 VOLT SPEED SAW™ P530 WARNING: Some dust... created by power sanding, sawing, grinding, drilling, and other construction activities contains chemicals known to cause cancer, birth defects or other masonry products,...
Repair Sheet
Page 2
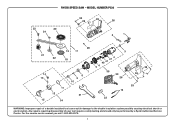
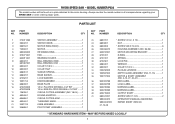
RYOBI SPEED SAW - MODEL NUMBER P530 23 20 24 30 39 29 37 26 2 1 28 19 17 3 21 22 18 4 27 40 41 56 38 14 13 7 8 9 10 35 33 36 26 11 12 31 15 34 25 16 32 WARNING: Improper repair of your tool requires safety testing and should only be performed by a Ryobi Authorized Service Center. Any repairs requiring disassembly of a double insulated tool can result in damage to the double insulation system possibly causing electrical shock or electrocution. For the service center nearest you call 1-800-525-2579. 2
RYOBI SPEED SAW - MODEL NUMBER P530 23 20 24 30 39 29 37 26 2 1 28 19 17 3 21 22 18 4 27 40 41 56 38 14 13 7 8 9 10 35 33 36 26 11 12 31 15 34 25 16 32 WARNING: Improper repair of your tool requires safety testing and should only be performed by a Ryobi Authorized Service Center. Any repairs requiring disassembly of a double insulated tool can result in damage to the double insulation system possibly causing electrical shock or electrocution. For the service center nearest you call 1-800-525-2579. 2
Repair Sheet
Page 3
... BEARING (CW 1 COLLET (1/8 in 1 COLLET NUT 1 SLEEVE SPRING 1 BASE SLEEVE 1 LOCK WASHER 1 KNOB ASSEMBLY 1 BASE PLATE 1 1/8 in all correspondence regarding your SPEED SAW or when ordering repair parts. X 12 1 24 6633801 NUT 1 25 6620805 * SCREW (M4 X 16 mm 6 26 200006012 HOUSING ASSEMBLY (INC. 36-39 1 27... 660441001 SCREW (M5 X 7 mm 2 983000512 OPERATOR'S MANUAL (960223358) 983000512R REPAIR SHEET (REV:02) 07-14-05 * STANDARD HARDWARE ITEM - RYOBI SPEED SAW - MODEL NUMBER P530 The model number will be found on a plate attached to the motor housing. KEY NO.
... BEARING (CW 1 COLLET (1/8 in 1 COLLET NUT 1 SLEEVE SPRING 1 BASE SLEEVE 1 LOCK WASHER 1 KNOB ASSEMBLY 1 BASE PLATE 1 1/8 in all correspondence regarding your SPEED SAW or when ordering repair parts. X 12 1 24 6633801 NUT 1 25 6620805 * SCREW (M4 X 16 mm 6 26 200006012 HOUSING ASSEMBLY (INC. 36-39 1 27... 660441001 SCREW (M5 X 7 mm 2 983000512 OPERATOR'S MANUAL (960223358) 983000512R REPAIR SHEET (REV:02) 07-14-05 * STANDARD HARDWARE ITEM - RYOBI SPEED SAW - MODEL NUMBER P530 The model number will be found on a plate attached to the motor housing. KEY NO.
Repair Sheet
Page 4
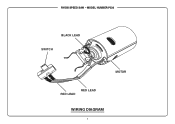
RYOBI SPEED SAW - MODEL NUMBER P530 BLACK LEAD SWITCH MOTOR RED LEAD RED LEAD WIRING DIAGRAM 4
RYOBI SPEED SAW - MODEL NUMBER P530 BLACK LEAD SWITCH MOTOR RED LEAD RED LEAD WIRING DIAGRAM 4


