English Manual
Page 1
Thank you years of rugged, trouble-free performance. WARNING: To reduce the risk of operation, and operator safety. OPERATOR'S MANUAL 18 VOLT CORNER CAT™ FINISH SANDER P400 BATTERIES AND CHARGERS SOLD SEPARATELY Your Corner Cat™ Finish Sander has been engineered and manufactured to our high standard for your purchase. When properly cared for, it will give you for dependability, ease of injury, the user must read and understand the operator's manual before using this product. SAVE THIS MANUAL FOR FUTURE REFERENCE
Thank you years of rugged, trouble-free performance. WARNING: To reduce the risk of operation, and operator safety. OPERATOR'S MANUAL 18 VOLT CORNER CAT™ FINISH SANDER P400 BATTERIES AND CHARGERS SOLD SEPARATELY Your Corner Cat™ Finish Sander has been engineered and manufactured to our high standard for your purchase. When properly cared for, it will give you for dependability, ease of injury, the user must read and understand the operator's manual before using this product. SAVE THIS MANUAL FOR FUTURE REFERENCE
English Manual
Page 11
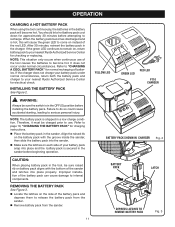
... be charged prior to your nearest Ryobi Authorized Service Center for electrical check. Improper installation of the battery pack and depress them to recharge. Refer to "CHARGING A COOL BATTERY PACK" for approximately 30 minutes before attempting to release the battery pack from the sander. Remove battery pack from the sander. 11 BATTERY PACK LATCH DEPRESS LATCHES TO...
... be charged prior to your nearest Ryobi Authorized Service Center for electrical check. Improper installation of the battery pack and depress them to recharge. Refer to "CHARGING A COOL BATTERY PACK" for approximately 30 minutes before attempting to release the battery pack from the sander. Remove battery pack from the sander. 11 BATTERY PACK LATCH DEPRESS LATCHES TO...
English Manual
Page 12
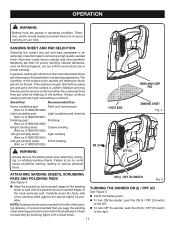
... be locked when not in use in operating condition. NOTE: Sanding sheets can be used to remove scratches left . To turn OFF the sander: push the ON (I ) / OFF (O) switch to provide for the life of the hook-and-loop pad. SANDING SHEET AND PAD SELECTION Selecting...to the left by brushing lightly with the pointed tip and rounded edges of the sanding abrasive. TURNING THE SANDER ON (I) / OFF (O) See Figure 5. Install the battery pack. To turn ON the sander: push the ON (I ) / OFF (O) switch to do the job. Sheet/Pad Recommended Use Heavy ...
... be locked when not in use in operating condition. NOTE: Sanding sheets can be used to remove scratches left . To turn OFF the sander: push the ON (I ) / OFF (O) switch to provide for the life of the hook-and-loop pad. SANDING SHEET AND PAD SELECTION Selecting...to the left by brushing lightly with the pointed tip and rounded edges of the sanding abrasive. TURNING THE SANDER ON (I) / OFF (O) See Figure 5. Install the battery pack. To turn ON the sander: push the ON (I ) / OFF (O) switch to do the job. Sheet/Pad Recommended Use Heavy ...
English Manual
Page 15
... a serious burn. This can also use only identical Ryobi replacement parts. Always store pads and sanding sheets flat in serious personal injury. CLEANING THE SANDING SHEETS The sanding sheets that came with the sander are doing. To clean sanding sheets, rub the sheets with these batteries, especially when wearing rings and jewelry, could...
... a serious burn. This can also use only identical Ryobi replacement parts. Always store pads and sanding sheets flat in serious personal injury. CLEANING THE SANDING SHEETS The sanding sheets that came with the sander are doing. To clean sanding sheets, rub the sheets with these batteries, especially when wearing rings and jewelry, could...


