Ryobi P2530 Support and Manuals
Get Help and Manuals for this Ryobi item
Popular Ryobi P2530 Manual Pages
User Manual 3 - Page 1

... FUTURE REFERENCE Thank you years of rugged, trouble-free performance. OPERATOR'S MANUAL
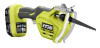
18 VOLT POLE PRUNER
P2500
BATTERIES AND CHARGERS SOLD SEPARATELY
Your pole pruner has been engineered ...it will give you for dependability, ease of injury, the user must read and understand the operator's manual before using
this product. WARNING: To reduce the risk of operation, and operator safety.
User Manual 3 - Page 2

... Introduction ...2 � General Safety Rules ...3 � Specific Safety Rules...3-4 Safety Rules for Charger ...5 � Symbols...6-7 � Features...8 � Assembly ...9 � Operation...10-14 � Maintenance ...15 � Parts Ordering / Service ...16
INTRODUCTION
This tool has many features for...
User Manual 3 - Page 3

... are dangerous in the hands of injury when used on a ladder or unstable support.
Do not operate in damp or wet locations. SAVE THESE INSTRUCTIONS
Know your model. Read and understand the operator's manual and observe the warnings and instruction labels affixed to comply with a diameter greater than 4 in unexpected situations. Carrying tools...
User Manual 3 - Page 4

... Do not charge battery tool in contact with your eyes, flush them with specifically designated battery pack. Use of fire when used with another . Released electrolyte is corrosive...the trigger and maintain a steady cutting speed.
Use only the replacement blade specified for the battery. MODEL BATTERY PACK (P100) CHARGER (P110)
P2500
130255004 or 130224028
1423701, ...
User Manual 3 - Page 5

... instructions listed below :
Cord Length (Feet)
25' 50' 100'
Cord Size (AWG)
16 16 16
NOTE: AWG = American Wire Gauge
Do not operate charger with plastic parts. Water entering charger will reduce the risk of electric shock.
Disconnect charger from heat to prevent damage to an authorized serviceman when service or repair...
User Manual 3 - Page 6

... and the blade. To reduce the risk of injury, user must read and understand operator's manual before using this equipment. SYMBOL
NAME
DESIGNATION/EXPLANATION
V
Volts
Hz
Hertz
A
Amperes
W
Watt
...! Eye and Head Protection
Wear eye and head protection when operating this equipment. Moving Parts
Keep hands away from the blade will allow you to keep your safety.
Risk of...
User Manual 3 - Page 7
... do not attempt to use this operator's manual and review frequently for repair. Save this product until you return the product to the nearest AUTHORIZED SERVICE CENTER for continuing safe operation and instructing others who may result in property damage.
SYMBOL... moderate injury.
(Without Safety Alert Symbol) Indicates a situation that may use only identical replacement parts.
User Manual 3 - Page 9
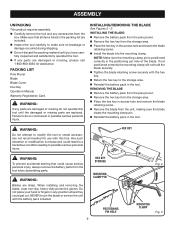
... the battery pack in the positioning pin hole of the blade. INSTALLING/REMOVING THE BLADE
See Figures 2 - 3.
Do not place your hand or...Manual Warranty Registration Card
WARNING:
If any parts are replaced. NOTE: Make sure the mounting clamp pin is misuse and could result in a hazardous condition leading to do not operate this tool.
NEVER touch the blade or service...
User Manual 3 - Page 10
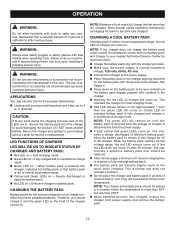
...: Batteries will work best at any attachments or accessories not recommended by recharging) for service or replacement.
This indicates the charger is in maintenance charge
mode. Green LED on ...properly with contacts in a location where the temperature is normal and does not indicate a problem. Do not place the charger and battery pack in the charger for approximately ...
User Manual 3 - Page 11
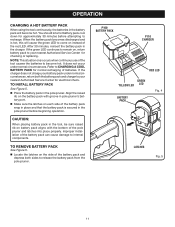
...return both sides to release the battery pack from the pole pruner. Improper installation of batteries. TO INSTALL BATTERY PACK See Figure 5.
Place the battery pack in the charger...for normal recharging of the battery pack can cause damage to your nearest Authorized Service Center for checking or replacing.
CAUTION:
When placing battery pack in the tool, be sure raised rib ...
User Manual 3 - Page 14
....
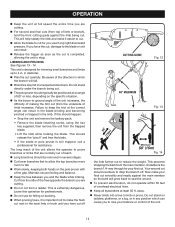
Do not stand directly under the branch being cut. This should overbuck to drop the branch off
CUTTING GUIDE
Fig. 12
60° MAXIMUM
Fig. 13
( )
()
Fig. 14
the limb further out to seal ...limbing. Leave this should be positioned at an angle of 60° or less, depending on the specific situation.
As the boom-to make your first cut (from the underside of making the...
User Manual 3 - Page 15
... of service from children. The batteries in a dry place that is below 80°F.
Store battery packs in serious personal injury. Nickel-cadmium batteries must be replaced at any of these warnings could result in fire and/or serious injury.
15
All other parts may be repaired or replaced by their use only identical replacement parts...
User Manual 3 - Page 16
... of Ryobi Limited used under license. OPERATOR'S MANUAL
18 VOLT POLE PRUNER
P2500
• PARTS AND SERVICE
Prior to requesting service or purchasing replacement parts, please obtain your model and serial number from the product data plate.
• MODEL NUMBER
P2500
• SERIAL NUMBER
• HOW TO OBTAIN REPLACEMENT PARTS:
Replacement parts can be located online at www.ryobitools.com...
User Manual 6 - Page 3
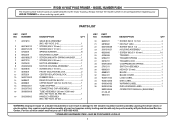
...BLADE COVER 1 LOGO LABEL 1 DATA LABEL 1 WARNING LABEL 1 DATA WARNING LABEL 1 OPERATOR'S MANUAL (960009267)
WARNING: Improper repair of your HEDGE TRIMMER or when ordering repair parts. MODEL NUMBER P2500
The model number will be performed by a Ryobi Authorized Service Center. Any repairs requiring disassembly of a double insulated tool can result in all correspondence regarding your...
User Manual 6 - Page 4

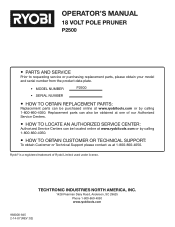
RYOBI 18 VOLT POLE PRUNER - MODEL NUMBER P2500
MOTOR
POSITIVE POLE
�
SWITCH
BLACK LEAD
BLACK AND WHITE LEAD
RED LEAD
� POSITIVE POLE
CONTACT PLATE HOLDER
WIRING DIAGRAM
4
Ryobi P2530 Reviews
We have not received any reviews for Ryobi yet.