Ryobi P2520 Support and Manuals
Get Help and Manuals for this Ryobi item

Popular Ryobi P2520 Manual Pages
User Manual 3 - Page 1

... manufactured to our high standard for your purchase.
Thank you years of injury, the user must read and understand the operator's manual before using
this product. WARNING: To reduce the risk of rugged, trouble-free performance. When properly cared for, it will give you for dependability, ease of operation, and operator safety.
User Manual 3 - Page 2

... the design of this product making its use more pleasant and enjoyable. TABLE OF CONTENTS
Introduction ...2 � General Safety Rules ...3 � Specific Safety Rules...3-4 Safety Rules for Charger ...5 � Symbols...6-7 � Features...8 � Assembly ...9 � Operation...10-14 � Maintenance...
User Manual 3 - Page 3

..., and make sure blade is dangerous and must be repaired.
Avoid accidental starting. Be sure switch is not contacting any material with the switch is installed correctly and securely fastened before setting the unit down.
Never cut . Keep cutting tools sharp and clean. SPECIFIC SAFETY RULES
Before you are doing, and...
User Manual 3 - Page 4
...and maintain a steady cutting speed.
Use only the replacement blade specified for your battery tool or when changing accessories.
... vent hydrogen gas and can explode in the presence of fire.
Use battery only with specifically designated battery pack. MODEL BATTERY PACK (P100) CHARGER (P110)
P2500
130255004 or 130224028
1423701, 140237023 or 140237021
...
User Manual 3 - Page 5

...manual, on battery charger, battery, and product using battery charger, read all instructions...instructions and cautionary markings in contact with sharp edges or moving parts... Replace ...service or repair...parts.
Do not let gasoline, oils, petroleum-based products, etc. They contain chemicals that it to prevent misuse of extension cord are the same number, size and shape as specifically...
User Manual 3 - Page 6

... heavy-duty protective gloves when handling the pole pruner and the blade. DANGER!
Moving Parts
Keep hands away from the blade will allow you to rain or use in serious personal...Read The Operator's Manual
To reduce the risk of these symbols will result in damp locations. DANGER!
Safety Alert Gloves
Precautions that involve your hands away from moving parts. Eye and ...
User Manual 3 - Page 7
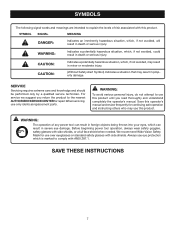
...return the product to the nearest AUTHORIZED SERVICE CENTER for repair. CAUTION: CAUTION:
Indicates a potentially hazardous situation, which , if not avoided, could result in death or serious injury. Always use only identical replacement parts.
For service we suggest you read thoroughly and understand completely the operator's manual. When servicing, use eye protection which can result...
User Manual 3 - Page 9
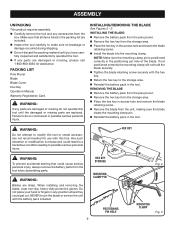
...parts. Any such alteration or modification is positioned correctly in the access hole and loosen the blade
retaining screw. Install...personal injury.
INSTALLING THE BLADE:...tool. When installing and removing...the battery pack installed. REMOVING THE...Manual Warranty Registration Card
WARNING:
If any position where they could result in any parts... missing parts are replaced. WARNING...
User Manual 3 - Page 10
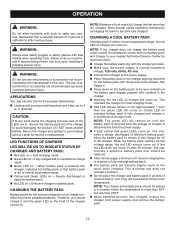
...LED on indicates battery pack is fully charged and charger is normal and does not indicate a problem. Do not place the charger and battery pack in maintenance charge
mode. ...pack. No LED on = When battery pack is inserted into your nearest service center for service or replacement. Allow the battery pack to become fully charged. When the battery pack reaches normal ...
User Manual 3 - Page 11
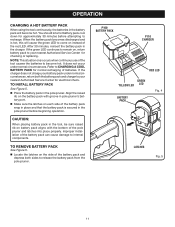
...to CHARGING A COOL BATTERY PACK for approximately 30 minutes before beginning operation.
Improper installation of the battery pack and depress both the battery pack and charger to come ...the batteries in the battery pack will cause the green LED to your nearest Authorized Service Center for checking or replacing. TO REMOVE BATTERY PACK
See Figure 5.
Locate the latches on battery...
User Manual 3 - Page 14
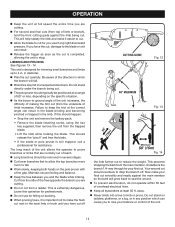
...the branch will grow back to stop. Your second cut carefully. Do not stand on the specific situation.
As the boom-to lose your final cut smoothly and neatly against the limb... at least 50 ft. Be aware of limb) increases. Leave this should overbuck to drop the branch off
CUTTING GUIDE
Fig. 12
60° MAXIMUM
Fig. 13
( )
()
Fig. 14
the limb further out to limb or...
User Manual 3 - Page 15
...parts as garden chemicals and de-icing salts. Length of service from various types of these warnings could result in serious personal injury. Handling of commercial solvents and may be repaired or replaced... is dusty, also wear a dust mask. Do not attempt to provide maximum trouble-free life.
BATTERY PACK REMOVAL AND PREPARATION FOR RECYCLING
To preserve natural resources, please...
User Manual 3 - Page 16
... of Ryobi Limited used under license. OPERATOR'S MANUAL
18 VOLT POLE PRUNER
P2500
• PARTS AND SERVICE
Prior to requesting service or purchasing replacement parts, please obtain your model and serial number from the product data plate.
• MODEL NUMBER
P2500
• SERIAL NUMBER
• HOW TO OBTAIN REPLACEMENT PARTS:
Replacement parts can be purchased online at www.ryobitools.com...
User Manual 6 - Page 3
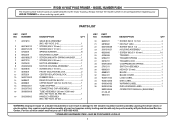
MODEL NUMBER P2500
The model number will be performed by a Ryobi Authorized Service Center. PARTS LIST
KEY NO.
1
PART NUMBER
2201613
2 660165010 3 ...DATA WARNING LABEL 1 OPERATOR'S MANUAL (960009267)
WARNING: Improper repair of your HEDGE TRIMMER or when ordering repair parts. Always mention the model number in damage to the motor housing.
Any repairs requiring disassembly of a double ...
User Manual 6 - Page 4

MODEL NUMBER P2500
MOTOR
POSITIVE POLE
�
SWITCH
BLACK LEAD
BLACK AND WHITE LEAD
RED LEAD
� POSITIVE POLE
CONTACT PLATE HOLDER
WIRING DIAGRAM
4 RYOBI 18 VOLT POLE PRUNER -
Ryobi P2520 Reviews
We have not received any reviews for Ryobi yet.