
Operation Manual 9
Page 2
... Cord Size (AWG) 16 16 16 NOTE: AWG = American Wire Gauge Do not operate charger with sharp edges or moving parts or otherwise subjected to damage or stress. Water entering charger will reduce the risk of electric shock. Disconnect charger from receptacle. ... or uninsulated battery terminal. Save these instructions also to reduce the risk of electric shock or damage to comply with plastic parts. SAVE THESE INSTRUCTIONS - For compatible battery packs see tool/ appliance/battery pack/charger correlation supplement 987000-432. Do not...
... Cord Size (AWG) 16 16 16 NOTE: AWG = American Wire Gauge Do not operate charger with sharp edges or moving parts or otherwise subjected to damage or stress. Water entering charger will reduce the risk of electric shock. Disconnect charger from receptacle. ... or uninsulated battery terminal. Save these instructions also to reduce the risk of electric shock or damage to comply with plastic parts. SAVE THESE INSTRUCTIONS - For compatible battery packs see tool/ appliance/battery pack/charger correlation supplement 987000-432. Do not...

Operation Manual 9
Page 3
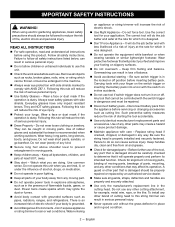
...a characteristic of these symbols will result in death or serious injury. Any such alteration or modification is not completely assembled or if any parts are intended to explain the levels of a product that , if not avoided, may be missing or damaged. Some of the following signal... with side shields marked to be used on this product. Use of risk associated with damaged or missing parts could result in serious personal injury. If any parts appear to comply with this product. SYMBOLS The following symbols may result in minor or moderate injury. Please...
...a characteristic of these symbols will result in death or serious injury. Any such alteration or modification is not completely assembled or if any parts are intended to explain the levels of a product that , if not avoided, may be missing or damaged. Some of the following signal... with side shields marked to be used on this product. Use of risk associated with damaged or missing parts could result in serious personal injury. If any parts appear to comply with this product. SYMBOLS The following symbols may result in minor or moderate injury. Please...
Operation Manual 9
Page 5
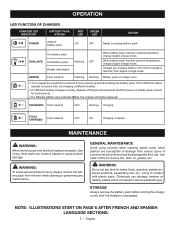
... and may be replaced. Most plastics are susceptible to repeat the conditions a second time by their use only identical replacement parts. English When battery pack reaches warmed temperature, charger begins charge mode. ERROR Pack inserted Flashing Flashing Battery pack or charger error..., the charger should be damaged by removing and reinstalling the battery pack. GENERAL MAINTENANCE Avoid using solvents when cleaning plastic parts. OPERATION LED FUNCTION OF CHARGER CHARGER LED INDICATOR BATTERY PACK STATUS RED LED GREEN LED ACTION POWER Without battery pack ON...
... and may be replaced. Most plastics are susceptible to repeat the conditions a second time by their use only identical replacement parts. English When battery pack reaches warmed temperature, charger begins charge mode. ERROR Pack inserted Flashing Flashing Battery pack or charger error..., the charger should be damaged by removing and reinstalling the battery pack. GENERAL MAINTENANCE Avoid using solvents when cleaning plastic parts. OPERATION LED FUNCTION OF CHARGER CHARGER LED INDICATOR BATTERY PACK STATUS RED LED GREEN LED ACTION POWER Without battery pack ON...
Operation Manual 4
Page 1
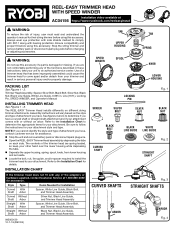
Stop the string trimmer and remove battery pack or disconnect spark plug wire before using this accessory if a part is damaged or missing. Line (16 ft.), Locking Pin, SPEED WINDER, and Operator's Manual INSTALLING TRIMMER HEAD See Figures 1 - 6. INSTALLATION CHART If the trimmer head ...
Stop the string trimmer and remove battery pack or disconnect spark plug wire before using this accessory if a part is damaged or missing. Line (16 ft.), Locking Pin, SPEED WINDER, and Operator's Manual INSTALLING TRIMMER HEAD See Figures 1 - 6. INSTALLATION CHART If the trimmer head ...
Operation Manual
Page 4
...create sparks which can result in serious personal injury. Never operate unit without the grass deflector in place and in moving parts. Use of rubber gloves and substantial footwear is in the machine. Always wear eye protection with ANSI Z87.1. Failure to ...correct tool will reduce the risk of balance. Avoid accidental starting the tool accidentally. Use only identical manufacturer's replacement parts and accessories. Carrying tools with the switch on invites accidents. Do not use this rule will do so can be repaired. ...
...create sparks which can result in serious personal injury. Never operate unit without the grass deflector in place and in moving parts. Use of rubber gloves and substantial footwear is in the machine. Always wear eye protection with ANSI Z87.1. Failure to ...correct tool will reduce the risk of balance. Avoid accidental starting the tool accidentally. Use only identical manufacturer's replacement parts and accessories. Carrying tools with the switch on invites accidents. Do not use this rule will do so can be repaired. ...

Operation Manual
Page 5
... may be charged in . Following this rule will ensure that can explode in the instructions. Use of possible hazards when not using only identical replacement parts. Charging improperly or at least 10 minutes, then seek immediate medical attention. This will reduce the risk of fire. Have servicing performed by the...
... may be charged in . Following this rule will ensure that can explode in the instructions. Use of possible hazards when not using only identical replacement parts. Charging improperly or at least 10 minutes, then seek immediate medical attention. This will reduce the risk of fire. Have servicing performed by the...

Operation Manual
Page 7
...n Inspect the product carefully to the product by the manufacturer and require customer installation. n Do not discard the packing material until the parts are not assembled to make sure no breakage or damage occurred during operation can be adjusted for ease of the information on the Packing ...CUTTING DIAMETER The cutting diameter is controlled by rotating the line cutoff blade. by the amount of control. n Carefully remove the product and any parts are damaged or missing do not operate this operator's manual as well as a knowledge of this product. WARNING: Do not use with this...
...n Inspect the product carefully to the product by the manufacturer and require customer installation. n Do not discard the packing material until the parts are not assembled to make sure no breakage or damage occurred during operation can be adjusted for ease of the information on the Packing ...CUTTING DIAMETER The cutting diameter is controlled by rotating the line cutoff blade. by the amount of control. n Carefully remove the product and any parts are damaged or missing do not operate this operator's manual as well as a knowledge of this product. WARNING: Do not use with this...
Operation Manual
Page 8
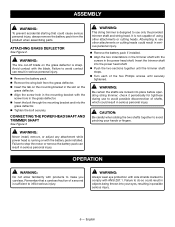
... remove the battery pack can result in serious personal injury. Remove the battery pack. Remove the wing bolt from the product when assembling parts. CONNECTING THE POWER HEAD SHAFT AND TRIMMER SHAFT See Figure 3 WARNING: This string trimmer is sufficient to comply with side shields marked to inflict serious...
... remove the battery pack can result in serious personal injury. Remove the battery pack. Remove the wing bolt from the product when assembling parts. CONNECTING THE POWER HEAD SHAFT AND TRIMMER SHAFT See Figure 3 WARNING: This string trimmer is sufficient to comply with side shields marked to inflict serious...
Operation Manual
Page 9
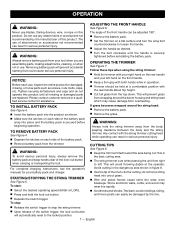
... the battery pack is secured before reinstalling the battery pack. WARNING: Turn the bolt clockwise until all missing or damaged parts are assembling parts, making adjustments, cleaning, or when not in serious personal injury. Remove battery pack from overheating. TO REMOVE BATTERY PACK... the trimmer tilted toward the area being cut; Please contact customer service or a qualified service center for damaged, missing, or loose parts such as shown. To stop: Release the switch trigger to left hand on this product. Always remove battery pack from ...
... the battery pack is secured before reinstalling the battery pack. WARNING: Turn the bolt clockwise until all missing or damaged parts are assembling parts, making adjustments, cleaning, or when not in serious personal injury. Remove battery pack from overheating. TO REMOVE BATTERY PACK... the trimmer tilted toward the area being cut; Please contact customer service or a qualified service center for damaged, missing, or loose parts such as shown. To stop: Release the switch trigger to left hand on this product. Always remove battery pack from ...

Operation Manual
Page 10
... 180°. Tighten the blade screw. Advance line whenever you may not be damaged by their use only identical replacement parts. cutting swath. Tighten securely all fasteners and caps and do so could result in contact with the arrows on the grass deflector.... To adjust to the correct length. NOTICE: Periodically inspect the entire product for assistance. GENERAL MAINTENANCE Avoid using solvents when cleaning plastic parts. Insert the line into your eyes, resulting in serious personal injury. MAINTENANCE WARNING: To avoid serious personal injury, always remove the...
... 180°. Tighten the blade screw. Advance line whenever you may not be damaged by their use only identical replacement parts. cutting swath. Tighten securely all fasteners and caps and do so could result in contact with the arrows on the grass deflector.... To adjust to the correct length. NOTICE: Periodically inspect the entire product for assistance. GENERAL MAINTENANCE Avoid using solvents when cleaning plastic parts. Insert the line into your eyes, resulting in serious personal injury. MAINTENANCE WARNING: To avoid serious personal injury, always remove the...
Parts Diagram
Page 3
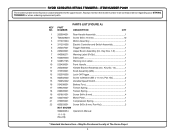
...-1-19 (Rev:09) * Standard Hardware Item - Always mention the model number in all correspondence regarding your STRING TRIMMER or when ordering replacement parts. May Be Purchased Locally at The Home Depot 3 NUMBER DESCRIPTION QTY 1 205004001 Rear Handle Assembly 1 2 T662028001 Screw (M4 x 16 mm...Fr/Sp 1 8 940028036 Data Label 1 9 940657185 Warning Icon Label 1 10 523409001 Front Handle 1 11 205006001 Handle Bracket Assembly (Inc. RYOBI CORDLESS STRING TRIMMERS - ITEM NUMBER P2009 The model number will be found on a label attached to the upper boom.
...-1-19 (Rev:09) * Standard Hardware Item - Always mention the model number in all correspondence regarding your STRING TRIMMER or when ordering replacement parts. May Be Purchased Locally at The Home Depot 3 NUMBER DESCRIPTION QTY 1 205004001 Rear Handle Assembly 1 2 T662028001 Screw (M4 x 16 mm...Fr/Sp 1 8 940028036 Data Label 1 9 940657185 Warning Icon Label 1 10 523409001 Front Handle 1 11 205006001 Handle Bracket Assembly (Inc. RYOBI CORDLESS STRING TRIMMERS - ITEM NUMBER P2009 The model number will be found on a label attached to the upper boom.
Parts Diagram
Page 4
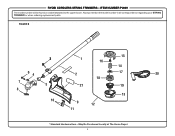
RYOBI CORDLESS STRING TRIMMERS - ITEM NUMBER P2009 The model number will be found on a label attached to the upper boom. Always mention the model number in all correspondence regarding your STRING TRIMMER or when ordering replacement parts. FIGURE B 15 3 1 16 14 64 2 17 20 18 7 5 21 19 8 13 10 9 12 11 * Standard Hardware Item - May Be Purchased Locally at The Home Depot 4
RYOBI CORDLESS STRING TRIMMERS - ITEM NUMBER P2009 The model number will be found on a label attached to the upper boom. Always mention the model number in all correspondence regarding your STRING TRIMMER or when ordering replacement parts. FIGURE B 15 3 1 16 14 64 2 17 20 18 7 5 21 19 8 13 10 9 12 11 * Standard Hardware Item - May Be Purchased Locally at The Home Depot 4

Parts Diagram
Page 5
... Spool Assembly 1 19 530455002 Bump Knob (Green 1 20 312283001 Crank Handle 1 21 941020005 Logo Label (Guard 1 * Standard Hardware Item - PARTS LIST (FIGURE B) KEY PART NO. Key No. 2 1 2 940020025 Logo Label (Shaft 1 3 660738002 Screw (1/4-20 x 3/4 in., Hex Washer Hd 1 4 660641001... 1 5 518367001 Spacer 1 6 660642001 Screw (1/4-20 x 3/4 in all correspondence regarding your STRING TRIMMER or when ordering replacement parts. RYOBI CORDLESS STRING TRIMMERS - ITEM NUMBER P2009 The model number will be found on a label attached to the upper boom...
... Spool Assembly 1 19 530455002 Bump Knob (Green 1 20 312283001 Crank Handle 1 21 941020005 Logo Label (Guard 1 * Standard Hardware Item - PARTS LIST (FIGURE B) KEY PART NO. Key No. 2 1 2 940020025 Logo Label (Shaft 1 3 660738002 Screw (1/4-20 x 3/4 in., Hex Washer Hd 1 4 660641001... 1 5 518367001 Spacer 1 6 660642001 Screw (1/4-20 x 3/4 in all correspondence regarding your STRING TRIMMER or when ordering replacement parts. RYOBI CORDLESS STRING TRIMMERS - ITEM NUMBER P2009 The model number will be found on a label attached to the upper boom...


