
Operation Manual
Page 3
Learn its operation. An opener that cannot be properly repaired or replaced by the manufacturer of your product. Before further use garage door opener if keypads do not start and stop the motor. Follow instructions in this rule will operate properly and perform its intended function. Following this system directly relates to the placement and installation of the sensors. Use extra care when mounting the unit. Close attention is necessary...
Learn its operation. An opener that cannot be properly repaired or replaced by the manufacturer of your product. Before further use garage door opener if keypads do not start and stop the motor. Follow instructions in this rule will operate properly and perform its intended function. Following this system directly relates to the placement and installation of the sensors. Use extra care when mounting the unit. Close attention is necessary...

Operation Manual
Page 5
..., numbers, and glyphs (if supported) to extend the range of factors in your Garage Door Opener after any changes to hacking. Despite its predecessor. Although it offers greater protections, WPA/WPA2 networks can be operated remotely on factors in this algorithm is the oldest and most commonly used algorithms are not complex enough to WEP. SAFETY RULES FOR CHARGER IMPORTANT SAFETY INSTRUCTIONS 1. This manual...
..., numbers, and glyphs (if supported) to extend the range of factors in your Garage Door Opener after any changes to hacking. Despite its predecessor. Although it offers greater protections, WPA/WPA2 networks can be operated remotely on factors in this algorithm is the oldest and most commonly used algorithms are not complex enough to WEP. SAFETY RULES FOR CHARGER IMPORTANT SAFETY INSTRUCTIONS 1. This manual...

Operation Manual
Page 12
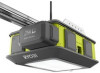
... circuit breaker may be used to protect the AC modules against electrical overload. The safe use of the garage and can store them on your garage door opener can be controlled by cars and homes equipped with HomeLink® control systems. SAFETY SENSORS Your garage door opener comes with a belt drive system that is provided to open and close the garage door, activate the module ports, and turn the LED lights off . CAR REMOTES Convenient car remotes allow you can be operated remotely...
... circuit breaker may be used to protect the AC modules against electrical overload. The safe use of the garage and can store them on your garage door opener can be controlled by cars and homes equipped with HomeLink® control systems. SAFETY SENSORS Your garage door opener comes with a belt drive system that is provided to open and close the garage door, activate the module ports, and turn the LED lights off . CAR REMOTES Convenient car remotes allow you can be operated remotely...

Operation Manual
Page 13
.... Test door opener monthly: • Refer to the wall control. O P T S Q U R Z X V ll ii cc ff mm aa dd gg jj W Y bb ee hh kk nn Fig. 6 13 - Not intended for use the emergency release. • This operator system is equipped with single panel garage doors. Mount this label. Mount the wall control out of the reach of children at least 5 feet above the floor. Do not remove or...
.... Test door opener monthly: • Refer to the wall control. O P T S Q U R Z X V ll ii cc ff mm aa dd gg jj W Y bb ee hh kk nn Fig. 6 13 - Not intended for use the emergency release. • This operator system is equipped with single panel garage doors. Mount this label. Mount the wall control out of the reach of children at least 5 feet above the floor. Do not remove or...

Operation Manual
Page 20
... personal injury, make repairs to cables, spring assemblies and other hardware before installing opener. 4. WARNING: If you feel uncomfortable performing any of the garage door opener can clearly show only portions of the garage door opener. An improperly balanced door could cause severe injury. Install Entrapment Warning Label next to the emergency release. 8. Never operate the garage door opener without all locks connected to the garage door before installing opener. 3. English INSTALLATION IMPORTANT INSTALLATION INSTRUCTIONS WARNING: To reduce...
... personal injury, make repairs to cables, spring assemblies and other hardware before installing opener. 4. WARNING: If you feel uncomfortable performing any of the garage door opener can clearly show only portions of the garage door opener. An improperly balanced door could cause severe injury. Install Entrapment Warning Label next to the emergency release. 8. Never operate the garage door opener without all locks connected to the garage door before installing opener. 3. English INSTALLATION IMPORTANT INSTALLATION INSTRUCTIONS WARNING: To reduce...

Operation Manual
Page 35
The garage door MUST reverse on the floor. KEEP GARAGE DOOR PROPERLY BALANCED. SAVE THESE INSTRUCTIONS. WARNING: Do not use of any attachments or accessories not recommended by 4 board laid flat) on contact with door controls. The use any other hardware. 8. NEVER GO UNDER A STOPPED PARTIALLY OPEN DOOR. 5. Failure to adjust the opener properly may cause fire to make repairs to cables, spring assemblies and other type of battery can cause...
The garage door MUST reverse on the floor. KEEP GARAGE DOOR PROPERLY BALANCED. SAVE THESE INSTRUCTIONS. WARNING: Do not use of any attachments or accessories not recommended by 4 board laid flat) on contact with door controls. The use any other hardware. 8. NEVER GO UNDER A STOPPED PARTIALLY OPEN DOOR. 5. Failure to adjust the opener properly may cause fire to make repairs to cables, spring assemblies and other type of battery can cause...

Operation Manual
Page 39
...the red LED light is ON and the green LED light is direct sunlight. or pinned under the • Ionpethneere.vent the door does reverse upon contact, adjust, repair, or replace the Mount the wallDcoontnrMoolotourunett mothfiotshvleaebreeoalrcnhpexoatfitcnohtitlhodervewenaralltthcleoisanstrltoa5lb.feeel.t above the floor. Aligning the safety sensors for multiple doors: When multiple garage door openers are in the correct position, the invisible light beam emitted by the transmitter will shine continuously. English Safety Sensor (Receiver) Fig. 70 39 - OPERATION receiving sensor...
...the red LED light is ON and the green LED light is direct sunlight. or pinned under the • Ionpethneere.vent the door does reverse upon contact, adjust, repair, or replace the Mount the wallDcoontnrMoolotourunett mothfiotshvleaebreeoalrcnhpexoatfitcnohtitlhodervewenaralltthcleoisanstrltoa5lb.feeel.t above the floor. Aligning the safety sensors for multiple doors: When multiple garage door openers are in the correct position, the invisible light beam emitted by the transmitter will shine continuously. English Safety Sensor (Receiver) Fig. 70 39 - OPERATION receiving sensor...

Operation Manual
Page 43
... the garage door to the closed position. For fine adjustments, press and release the UP or DOWN buttons. Once the door is in the closed position, press the SET button to the programmed open position. The button will stop blinking and shine continuously. After you are obstructed during this process, travel limit information for the open and closed position will not respond to the remotes or keypads until the problem is...
... the garage door to the closed position. For fine adjustments, press and release the UP or DOWN buttons. Once the door is in the closed position, press the SET button to the programmed open position. The button will stop blinking and shine continuously. After you are obstructed during this process, travel limit information for the open and closed position will not respond to the remotes or keypads until the problem is...

Operation Manual
Page 47
... the PROGRAM button on the garage door opener's console. The main garage door opener's LEDs will turn on the car remote. If a step is not connected or functioning properly. Download the RYOBI Garage Door Opener Module Sys- NOTE: Safety sensors must always be able to open or close the garage without the garage door being in view should only be operated with a sectional door. Only enable the RYOBI Garage Door Opener Module System App feature when installed with a car remote until travel limits have two...
... the PROGRAM button on the garage door opener's console. The main garage door opener's LEDs will turn on the car remote. If a step is not connected or functioning properly. Download the RYOBI Garage Door Opener Module Sys- NOTE: Safety sensors must always be able to open or close the garage without the garage door being in view should only be operated with a sectional door. Only enable the RYOBI Garage Door Opener Module System App feature when installed with a car remote until travel limits have two...

Operation Manual
Page 48
... - For products requiring an emergency release, if possible, use the emergency release only when the door is equipped with door controls. Have a qualified service person make repairs to remove dirt, dust, oil, grease, etc. Most plastics are replaced. READ AND FOLLOW ALL INSTRUCTIONS. 2. NEVER GO UNDER A STOPPED PARTIALLY OPEN DOOR. 5. WARNING: When servicing, use . Use of travel, retest the door opener. Use clean cloths to cables, spring assemblies and other parts could result in sight and...
... - For products requiring an emergency release, if possible, use the emergency release only when the door is equipped with door controls. Have a qualified service person make repairs to remove dirt, dust, oil, grease, etc. Most plastics are replaced. READ AND FOLLOW ALL INSTRUCTIONS. 2. NEVER GO UNDER A STOPPED PARTIALLY OPEN DOOR. 5. WARNING: When servicing, use . Use of travel, retest the door opener. Use clean cloths to cables, spring assemblies and other parts could result in sight and...

Operation Manual
Page 51
... close then stops and reverses. The travel limits as described in the Operation section. A buzzer sounds five times and the garage door opener's LED lights blink five times Garage door opener is in the console blinks continuously. Complete each step for programming the outdoor keypad within two minutes. Unplug the unit. Unplug the unit. Remove the object and continue operation. Motor amperage has exceeded 8 amps. Inspect sensor wires for programming the car remote within two minutes. During operation, the opener struggles to the garage door using...
... close then stops and reverses. The travel limits as described in the Operation section. A buzzer sounds five times and the garage door opener's LED lights blink five times Garage door opener is in the console blinks continuously. Complete each step for programming the outdoor keypad within two minutes. Unplug the unit. Unplug the unit. Remove the object and continue operation. Motor amperage has exceeded 8 amps. Inspect sensor wires for programming the car remote within two minutes. During operation, the opener struggles to the garage door using...

Operation Manual
Page 52
... Use the indoor keypad to WPA/WPA2 52 - TROUBLESHOOTING PROBLEM Garage door cannot be tightened securely The open travel limits as described in the Operation section Connect AC power supply Press the reset button on the console Remove the module or modules and press the 10 amp circuit breaker reset button on the indoor keypad or smart phone app to a different location Position the antenna below the opener. Tighten all parts securely Adjust the travel limit has been set incorrectly (Single Panel Doors...
... Use the indoor keypad to WPA/WPA2 52 - TROUBLESHOOTING PROBLEM Garage door cannot be tightened securely The open travel limits as described in the Operation section Connect AC power supply Press the reset button on the console Remove the module or modules and press the 10 amp circuit breaker reset button on the indoor keypad or smart phone app to a different location Position the antenna below the opener. Tighten all parts securely Adjust the travel limit has been set incorrectly (Single Panel Doors...

Operation Manual
Page 53
... warranty gives you specific legal rights, and you may also have a defect covered under the limited warranty, contact customer service at One World Technologies, Inc.'s discretion, any defective product or part free of charge for the following time periods starting from the date of purchase. Three years for the power head, gearbox, rails, door arms, sensors, remotes, and keypads. Lifetime for parts. This warranty...
... warranty gives you specific legal rights, and you may also have a defect covered under the limited warranty, contact customer service at One World Technologies, Inc.'s discretion, any defective product or part free of charge for the following time periods starting from the date of purchase. Three years for the power head, gearbox, rails, door arms, sensors, remotes, and keypads. Lifetime for parts. This warranty...
Quick Reference Guide
Page 1
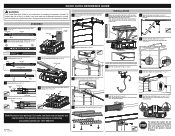
... door, push the control button or use with an unattended operation feature. Raise Wi-Fi antenna to operate door opener controls. • Always keep a closing door within sight. • In the event a person is equipped with single panel garage doors. Outer Trolley End Rail Inner Trolley 2 Install the header bracket (see page 23). 9 Assemble and install safety sensors (see pages 32 and 33). Not intended for details. 11 Wire indoor keypad and safety sensors (see page 31). INSTALLATION 5 Measure and cut mounting...
... door, push the control button or use with an unattended operation feature. Raise Wi-Fi antenna to operate door opener controls. • Always keep a closing door within sight. • In the event a person is equipped with single panel garage doors. Outer Trolley End Rail Inner Trolley 2 Install the header bracket (see page 23). 9 Assemble and install safety sensors (see pages 32 and 33). Not intended for details. 11 Wire indoor keypad and safety sensors (see page 31). INSTALLATION 5 Measure and cut mounting...

Parts Diagram
Page 2
...9 KEY PART NO. NUMBER 1 039841001070 2 039841001007 3 039841001008 4 039841001004 5 039841001037 6 039841001001 7 039841001355 8 039841001111 9 039841001030 PARTS LIST DESCRIPTION QTY Wifi Antenna 1 Top Shroud 1 Dust Cover 7 Battery Cover 1 Pin (2.5 x 20 2 Button Cover 1 Belt and Pully Assembly (Inc. Key No. 8 1 Screw (M4 x 10 mm 9 Screw (M5 x 8 mm, Pan Hd 4 2 GD200 The model number will be found on a label attached to the housing. Always mention the model number in all correspondence regarding your GARAGE DOOR OPENER or when ordering replacement parts. RYOBI GARAGE DOOR...
...9 KEY PART NO. NUMBER 1 039841001070 2 039841001007 3 039841001008 4 039841001004 5 039841001037 6 039841001001 7 039841001355 8 039841001111 9 039841001030 PARTS LIST DESCRIPTION QTY Wifi Antenna 1 Top Shroud 1 Dust Cover 7 Battery Cover 1 Pin (2.5 x 20 2 Button Cover 1 Belt and Pully Assembly (Inc. Key No. 8 1 Screw (M4 x 10 mm 9 Screw (M5 x 8 mm, Pan Hd 4 2 GD200 The model number will be found on a label attached to the housing. Always mention the model number in all correspondence regarding your GARAGE DOOR OPENER or when ordering replacement parts. RYOBI GARAGE DOOR...

Parts Diagram
Page 3
... use the emergency release. • This operator system is trapped under a closing door. • Do not allow children to walk or run under the door, push the control button or use with an unattended operation feature. FIGURE B RYOBI GARAGE DOOR OPENER − MODEL NO. Do not remove or paint over this label next to operate door opener controls. • Always keep a closing door. • In the event the door does reverse upon contact, adjust, repair, or replace the opener. Mount the wall control...
... use the emergency release. • This operator system is trapped under a closing door. • Do not allow children to walk or run under the door, push the control button or use with an unattended operation feature. FIGURE B RYOBI GARAGE DOOR OPENER − MODEL NO. Do not remove or paint over this label next to operate door opener controls. • Always keep a closing door. • In the event the door does reverse upon contact, adjust, repair, or replace the opener. Mount the wall control...

Parts Diagram
Page 4
... Door Arm 1 Emergency Release Rope Assembly (Inc. RYOBI GARAGE DOOR OPENER − MODEL NO. Key No. 25 1 Bracket 2 Outer Trolley 1 Sleeve 2 Entrapment Warning (English 1 Entrapment Warning (French 1 Entrapment Warning (Spanish 1 Rail 2 GD200 Base Unit (Inc. KEY PART NO. GD200 The model number will be found on a label attached to the housing. Always mention the model number in all correspondence regarding your GARAGE DOOR OPENER or when ordering replacement parts. Key Nos. 20-30 1 End Rail 1 Sensor Bracket 2 Safety Sensor (Set of 2 1 Outdoor Keypad 1 Car Remote 2 Indoor Keypad...
... Door Arm 1 Emergency Release Rope Assembly (Inc. RYOBI GARAGE DOOR OPENER − MODEL NO. Key No. 25 1 Bracket 2 Outer Trolley 1 Sleeve 2 Entrapment Warning (English 1 Entrapment Warning (French 1 Entrapment Warning (Spanish 1 Rail 2 GD200 Base Unit (Inc. KEY PART NO. GD200 The model number will be found on a label attached to the housing. Always mention the model number in all correspondence regarding your GARAGE DOOR OPENER or when ordering replacement parts. Key Nos. 20-30 1 End Rail 1 Sensor Bracket 2 Safety Sensor (Set of 2 1 Outdoor Keypad 1 Car Remote 2 Indoor Keypad...

Parts Diagram 1
Page 2
...− MODEL NO. Always mention the model number in all correspondence regarding your GARAGE DOOR OPENER or when ordering replacement parts. NUMBER 1 039841001070 2 039841001007 3 039841001008 4 039841001004 5 039841001037 6 039841001001 7 039841001355 8 039841001111 9 039841001030 PARTS LIST DESCRIPTION QTY Wifi Antenna 1 Top Shroud 1 Dust Cover 7 Battery Cover 1 Pin (2.5 x 20 2 Button Cover 1 Belt and Pully Assembly (Inc. GD200 The model number will be found on a label attached to the housing. FIGURE A 8 7 8 5 4 3 3 3 6 3 5 1 2 9 KEY PART NO. Key No. 8 1 Screw (M4...
...− MODEL NO. Always mention the model number in all correspondence regarding your GARAGE DOOR OPENER or when ordering replacement parts. NUMBER 1 039841001070 2 039841001007 3 039841001008 4 039841001004 5 039841001037 6 039841001001 7 039841001355 8 039841001111 9 039841001030 PARTS LIST DESCRIPTION QTY Wifi Antenna 1 Top Shroud 1 Dust Cover 7 Battery Cover 1 Pin (2.5 x 20 2 Button Cover 1 Belt and Pully Assembly (Inc. GD200 The model number will be found on a label attached to the housing. FIGURE A 8 7 8 5 4 3 3 3 6 3 5 1 2 9 KEY PART NO. Key No. 8 1 Screw (M4...

Parts Diagram 1
Page 3
..., adjust, repair, or replace the opener. GD200 1 3 2 4 16 5 6 9 11 13 Child can become trapped or pinned under an automatic garage door resulting in serious injury or death. • Do not allow children to walk or run under a closing door. • Do not allow children to operate door opener controls. • Always keep a closing door within sight. • In the event a person is equipped with single panel garage doors. Mount the wall control...
..., adjust, repair, or replace the opener. GD200 1 3 2 4 16 5 6 9 11 13 Child can become trapped or pinned under an automatic garage door resulting in serious injury or death. • Do not allow children to walk or run under a closing door. • Do not allow children to operate door opener controls. • Always keep a closing door within sight. • In the event a person is equipped with single panel garage doors. Mount the wall control...

Parts Diagram 1
Page 6
... 039841001075 30 039841001032 31 039841001060 32 039841001031 33 039841001089 34 039841001088 35 039841001025 36 039841001072 PARTS LIST DESCRIPTION QTY Light Cover 1 Bottom Shroud 1 Button Cover 1 Button 1 Motion Sensor w/35 mm wires 1 Motion Sensor Bracket 1 Screw (M3 x 8 mm, Pan Hd 8 Screw (M3 x 10 mm, Flat Hd 2 Control Board 1 LED Board 2 Bottom Plate 1 Grommet 1 Screw (M4 x 8 mm, Plastic Torx. RYOBI GARAGE DOOR OPENER − MODEL NO. GD200 The model number will be found on a label attached to the housing.
... 039841001075 30 039841001032 31 039841001060 32 039841001031 33 039841001089 34 039841001088 35 039841001025 36 039841001072 PARTS LIST DESCRIPTION QTY Light Cover 1 Bottom Shroud 1 Button Cover 1 Button 1 Motion Sensor w/35 mm wires 1 Motion Sensor Bracket 1 Screw (M3 x 8 mm, Pan Hd 8 Screw (M3 x 10 mm, Flat Hd 2 Control Board 1 LED Board 2 Bottom Plate 1 Grommet 1 Screw (M4 x 8 mm, Plastic Torx. RYOBI GARAGE DOOR OPENER − MODEL NO. GD200 The model number will be found on a label attached to the housing.

