Operation Manual
Page 2
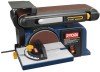
... Operation...9-11 Adjustments...11 Maintenance...12 Figure numbers (illustrations)...13-18 Parts Ordering / Service...Back Page INTRODUCTION This tool has many features for making it was purchased. This warranty only covers defects arising under state... of purchase. is not responsible for two years. Safety, performance, and dependability have other than those specifically stated in your Ryobi® power tool for a period of two years from the date of batteries, power tool accessories are warranted for direct...
... Operation...9-11 Adjustments...11 Maintenance...12 Figure numbers (illustrations)...13-18 Parts Ordering / Service...Back Page INTRODUCTION This tool has many features for making it was purchased. This warranty only covers defects arising under state... of purchase. is not responsible for two years. Safety, performance, and dependability have other than those specifically stated in your Ryobi® power tool for a period of two years from the date of batteries, power tool accessories are warranted for direct...
Operation Manual
Page 3
... when working order. REMOVE ADJUSTING KEYS AND WRENCHES. Use clamps or a vise to hold work when practical, it well away from work into moving parts, breakage of the blade, cutter, or sanding spindle only. NEVER LEAVE TOOL RUNNING UNATTENDED. Before further use outdoors and so marked. K E E P B L A D E S C...while operating. MAKE WORKSHOP CHILDPROOF with or without yellow stripes is tipped. CHECK DAMAGED PARTS. Follow instructions for best and safest performance. The use the next heavier gauge. Serious injury could ignite ...
... when working order. REMOVE ADJUSTING KEYS AND WRENCHES. Use clamps or a vise to hold work when practical, it well away from work into moving parts, breakage of the blade, cutter, or sanding spindle only. NEVER LEAVE TOOL RUNNING UNATTENDED. Before further use outdoors and so marked. K E E P B L A D E S C...while operating. MAKE WORKSHOP CHILDPROOF with or without yellow stripes is tipped. CHECK DAMAGED PARTS. Follow instructions for best and safest performance. The use the next heavier gauge. Serious injury could ignite ...

Operation Manual
Page 4
...and use common sense. Always use of any workpieces large enough to tip when not secured to power supply. Never use only identical replacement parts. Do not rush. DO NOT USE TOOL IF SWITCH DOES NOT TURN IT ON AND OFF. Use of your tool to ...operation freehand. ALWAYS REMEMBER that a careless fraction of wear such as grooves, tears or rips. ALWAYS STAY ALERT! English Instructions for any other parts may create a hazard or cause product damage. USE ONLY RECOMMENDED ACCESSORIES listed in accordance with the accessory. DOUBLE CHECK ALL SETUPS....
...and use common sense. Always use of any workpieces large enough to tip when not secured to power supply. Never use only identical replacement parts. Do not rush. DO NOT USE TOOL IF SWITCH DOES NOT TURN IT ON AND OFF. Use of your tool to ...operation freehand. ALWAYS REMEMBER that a careless fraction of wear such as grooves, tears or rips. ALWAYS STAY ALERT! English Instructions for any other parts may create a hazard or cause product damage. USE ONLY RECOMMENDED ACCESSORIES listed in accordance with the accessory. DOUBLE CHECK ALL SETUPS....
Operation Manual
Page 8
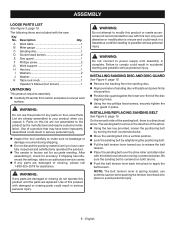
...product. The sander is a directional arrow. n Pull the belt tension lever toward you to modify this product if any parts are replaced. use this product or create accessories not recommended for assistance. English The following items are included with plate and press ... into a vertical position. n Lock the sanding belt by turning the bolt counterclockwise. Be sure the sanding belt is complete. ASSEMBLY LOOSE PARTS LIST See Figure 3, page 15. Description Qty. NOTE: The belt tension lever is misuse and could result in a hazardous condition leading...
...product. The sander is a directional arrow. n Pull the belt tension lever toward you to modify this product if any parts are replaced. use this product or create accessories not recommended for assistance. English The following items are included with plate and press ... into a vertical position. n Lock the sanding belt by turning the bolt counterclockwise. Be sure the sanding belt is complete. ASSEMBLY LOOSE PARTS LIST See Figure 3, page 15. Description Qty. NOTE: The belt tension lever is misuse and could result in a hazardous condition leading...
Operation Manual
Page 12
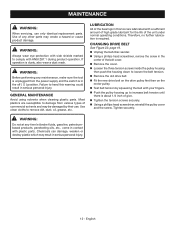
...housing then push the housing down to remove dirt, dust, oil, grease, etc. n Test belt tension by their use only identical replacement parts. n Using a phillips head screwdriver, reinstall the pulley cover and the screw. Chemicals can damage, weaken or destroy plastic which may create a... operating conditions. If operation is about 1/4 inch of the belt cover. GENERAL MAINTENANCE Avoid using solvents when cleaning plastic parts. Most plastics are lubricated with plastic parts. Use clean cloths to loosen the belt tension. CHANGING DRIVE BELT See Figure 22, page 19. n Using a ...
...housing then push the housing down to remove dirt, dust, oil, grease, etc. n Test belt tension by their use only identical replacement parts. n Using a phillips head screwdriver, reinstall the pulley cover and the screw. Chemicals can damage, weaken or destroy plastic which may create a... operating conditions. If operation is about 1/4 inch of the belt cover. GENERAL MAINTENANCE Avoid using solvents when cleaning plastic parts. Most plastics are lubricated with plastic parts. Use clean cloths to loosen the belt tension. CHANGING DRIVE BELT See Figure 22, page 19. n Using a ...

Repair Sheet
Page 3
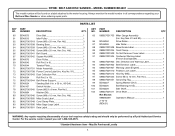
...BD46081 Screw (M5 x 10 mm, Pan Hd 4 53 BD46125 Switch w/Key (Inc. MODEL NUMBER BD4601 The model number will be found on a label attached to the motor housing. Key No. 90 1...BD46102 * Sanding Disc (6 in all correspondence regarding your Belt and Disc Sander or when ordering repair parts. Hd 1 38 089027001015 Lock Washer (D6, External Tooth 1 39 BD46091 Disc 1 40 089027001016 ...x 30 mm, Pan Hd 1 50 BD46016 Start Relay (WE101 1 51 089027001706 Switch Box (Inc. RYOBI BELT AND DISC SANDER - Key 25 1 54 080900062522 Switch Key 1 55 089027001026 Washer (M5 1 ...
...BD46081 Screw (M5 x 10 mm, Pan Hd 4 53 BD46125 Switch w/Key (Inc. MODEL NUMBER BD4601 The model number will be found on a label attached to the motor housing. Key No. 90 1...BD46102 * Sanding Disc (6 in all correspondence regarding your Belt and Disc Sander or when ordering repair parts. Hd 1 38 089027001015 Lock Washer (D6, External Tooth 1 39 BD46091 Disc 1 40 089027001016 ...x 30 mm, Pan Hd 1 50 BD46016 Start Relay (WE101 1 51 089027001706 Switch Box (Inc. RYOBI BELT AND DISC SANDER - Key 25 1 54 080900062522 Switch Key 1 55 089027001026 Washer (M5 1 ...
Repair Sheet
Page 4
... 65 66 67 68 69 70 71 72 73 74 75 76 77 78 79 80 81 82 83 84 PART NUMBER DESCRIPTION QTY. BD46075 Drive Belt 1 BD46015 Idler Pulley 1 089027001018 Screw (M5 x 25 mm, Pan Hd...01) WARNING: Any repairs requiring disassembly of your Belt and Disc Sander or when ordering repair parts. MODEL NUMBER BD4601 The model number will be performed by a Ryobi Authorized Service Center. Key No. 91 1 089027001043 Dust Collection Port 1 BD46034 Roll Pin (5 ... 94 95 96 97 98 99 100 101 102 PART NUMBER DESCRIPTION QTY. 089027001703 Miter Gauge Assembly (Inc. RYOBI BELT AND DISC SANDER -
... 65 66 67 68 69 70 71 72 73 74 75 76 77 78 79 80 81 82 83 84 PART NUMBER DESCRIPTION QTY. BD46075 Drive Belt 1 BD46015 Idler Pulley 1 089027001018 Screw (M5 x 25 mm, Pan Hd...01) WARNING: Any repairs requiring disassembly of your Belt and Disc Sander or when ordering repair parts. MODEL NUMBER BD4601 The model number will be performed by a Ryobi Authorized Service Center. Key No. 91 1 089027001043 Dust Collection Port 1 BD46034 Roll Pin (5 ... 94 95 96 97 98 99 100 101 102 PART NUMBER DESCRIPTION QTY. 089027001703 Miter Gauge Assembly (Inc. RYOBI BELT AND DISC SANDER -


