

User Manual (English)
Page 4
...; Light-weight and comfortable • Unique rotating earcups provide a comfortable fit and flip up inside the headband for compact storage • Versatile, noise-reducing, boom microphone that is flexible and fits in either earcup • Thick, soft, breathable padding for hours of comfort • Separate volume controls for game and chat 4
...; Light-weight and comfortable • Unique rotating earcups provide a comfortable fit and flip up inside the headband for compact storage • Versatile, noise-reducing, boom microphone that is flexible and fits in either earcup • Thick, soft, breathable padding for hours of comfort • Separate volume controls for game and chat 4
User Manual (English)
Page 5
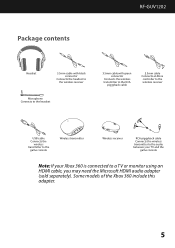
Some models of the Xbox 360 include this adapter. 5 Package contents RF-GUV1202 Headset 3.5mm cable with black connector Connects the headset to the wireless receiver Microphone Connects to the headset 3.5mm cable with green connector Connects the wireless transmitter to the RCA piggyback cable 2.5mm cable Connects an Xbox controller to ...
Some models of the Xbox 360 include this adapter. 5 Package contents RF-GUV1202 Headset 3.5mm cable with black connector Connects the headset to the wireless receiver Microphone Connects to the headset 3.5mm cable with green connector Connects the wireless transmitter to the RCA piggyback cable 2.5mm cable Connects an Xbox controller to ...
User Manual (English)
Page 7
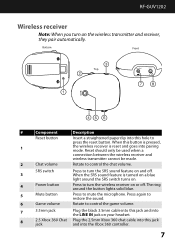
RF-GUV1202 Wireless receiver Note: When you turn on your headset. 8 2.5 Xbox 360 Chat Plug the 2.5mm Xbox 360 chat cable into this jack jack and into .... Bottom Front Top # Component Description Reset button 1 Insert a straightened paperclip into this hole to turn the wireless receiver on . 4 Power button Press to mute the microphone. When this jack and into pairing mode. The ring around the SRS switch turns on or off . When the SRS sound feature is reset and...
RF-GUV1202 Wireless receiver Note: When you turn on your headset. 8 2.5 Xbox 360 Chat Plug the 2.5mm Xbox 360 chat cable into this jack jack and into .... Bottom Front Top # Component Description Reset button 1 Insert a straightened paperclip into this hole to turn the wireless receiver on . 4 Power button Press to mute the microphone. When this jack and into pairing mode. The ring around the SRS switch turns on or off . When the SRS sound feature is reset and...

User Manual (English)
Page 8
jack (MIC) 2 Left microphone jack (MIC) Plug the microphone into this jack. LINE IN jack 3 Plug the black 3.5mm cable into this jack and into the 3.5mm jack on the wireless transmitter or other audio device. 4 MUTE ALL button Press to un-mute the audio and chat. 8 Press again to mute all audio and chat. Headset jacks and controls Right side Left side # Component Description 1 Right microphone Plug the microphone into this jack.
jack (MIC) 2 Left microphone jack (MIC) Plug the microphone into this jack. LINE IN jack 3 Plug the black 3.5mm cable into this jack and into the 3.5mm jack on the wireless transmitter or other audio device. 4 MUTE ALL button Press to un-mute the audio and chat. 8 Press again to mute all audio and chat. Headset jacks and controls Right side Left side # Component Description 1 Right microphone Plug the microphone into this jack.

User Manual (English)
Page 11
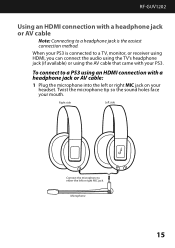
... a PS3 using a a headphone jack or AV cable: 1 Plug the microphone into the left or right MIC jack. RF-GUV1202 Connecting to a PlayStation 3 (PS3) You can connect your headset to your PS3 in a variety of ways to receive PS3 audio: • AV cable or TV ... or AV cable" on page 15) Using a headphone jack or AV cable To connect to either the left or right MIC jack on your mouth. Microphone 11 Twist the microphone tip so the sound holes face your headset.
... a PS3 using a a headphone jack or AV cable: 1 Plug the microphone into the left or right MIC jack. RF-GUV1202 Connecting to a PlayStation 3 (PS3) You can connect your headset to your PS3 in a variety of ways to receive PS3 audio: • AV cable or TV ... or AV cable" on page 15) Using a headphone jack or AV cable To connect to either the left or right MIC jack on your mouth. Microphone 11 Twist the microphone tip so the sound holes face your headset.
User Manual (English)
Page 15
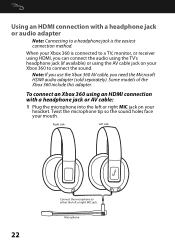
To connect to a PS3 using the AV cable that came with your PS3. Microphone 15 When your PS3 is connected to a TV, monitor, or receiver using HDMI, you can connect the audio using the TV's headphone jack (if available) ... cable Note: Connecting to either the left or right MIC jack on your headset. Right side Left side Connect the microphone to a headphone jack is the easiest connection method. Twist the microphone tip so the sound holes face your mouth. RF-GUV1202 Using an HDMI connection with a headphone jack or AV cable: 1 Plug the...
To connect to a PS3 using the AV cable that came with your PS3. Microphone 15 When your PS3 is connected to a TV, monitor, or receiver using HDMI, you can connect the audio using the TV's headphone jack (if available) ... cable Note: Connecting to either the left or right MIC jack on your headset. Right side Left side Connect the microphone to a headphone jack is the easiest connection method. Twist the microphone tip so the sound holes face your mouth. RF-GUV1202 Using an HDMI connection with a headphone jack or AV cable: 1 Plug the...
User Manual (English)
Page 19
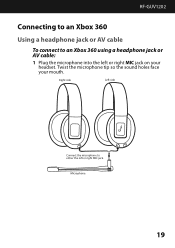
Microphone 19 RF-GUV1202 Connecting to an Xbox 360 Using a headphone jack or AV cable To connect to either the left or right MIC jack on your mouth. Twist the microphone tip so the sound holes face your headset. Right side Left side Connect the microphone to an Xbox 360 using a headphone jack or AV cable: 1 Plug the microphone into the left or right MIC jack.
Microphone 19 RF-GUV1202 Connecting to an Xbox 360 Using a headphone jack or AV cable To connect to either the left or right MIC jack on your mouth. Twist the microphone tip so the sound holes face your headset. Right side Left side Connect the microphone to an Xbox 360 using a headphone jack or AV cable: 1 Plug the microphone into the left or right MIC jack.
User Manual (English)
Page 22
... holes face your mouth. Some models of the Xbox 360 include this adapter. Right side Left side 22 Connect the microphone to connect the sound. To connect an Xbox 360 using the AV cable jack on your headset. Using an HDMI ...connection with a headphone jack or AV cable: 1 Plug the microphone into the left or right MIC jack on your Xbox 360 to either the left or right MIC jack. Note: If you ...is connected to a TV, monitor, or receiver using HDMI, you need the Microsoft HDMI audio adapter (sold separately). Microphone
... holes face your mouth. Some models of the Xbox 360 include this adapter. Right side Left side 22 Connect the microphone to connect the sound. To connect an Xbox 360 using the AV cable jack on your headset. Using an HDMI ...connection with a headphone jack or AV cable: 1 Plug the microphone into the left or right MIC jack on your Xbox 360 to either the left or right MIC jack. Note: If you ...is connected to a TV, monitor, or receiver using HDMI, you need the Microsoft HDMI audio adapter (sold separately). Microphone
User Manual (English)
Page 25
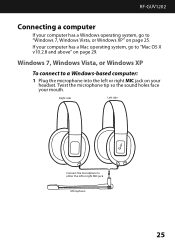
RF-GUV1202 Connecting a computer If your computer has a Windows operating system, go to "Mac OS X v10.2.8 and above" on page 29. Right side Left side Connect the microphone to either the left or right MIC jack on page 25. If your computer has a Mac operating system, go to a Windows-based computer: 1 Plug the microphone into the left or right MIC jack. Microphone 25 Windows 7, Windows Vista, or Windows XP To connect to "Windows 7, Windows Vista, or Windows XP" on your mouth. Twist the microphone tip so the sound holes face your headset.
RF-GUV1202 Connecting a computer If your computer has a Windows operating system, go to "Mac OS X v10.2.8 and above" on page 29. Right side Left side Connect the microphone to either the left or right MIC jack on page 25. If your computer has a Mac operating system, go to a Windows-based computer: 1 Plug the microphone into the left or right MIC jack. Microphone 25 Windows 7, Windows Vista, or Windows XP To connect to "Windows 7, Windows Vista, or Windows XP" on your mouth. Twist the microphone tip so the sound holes face your headset.
User Manual (English)
Page 27
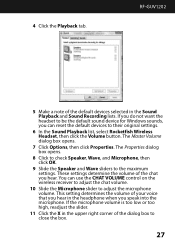
... do not want the headset to be the default sound device for Windows sounds, you speak into the microphone. The Properties dialog box opens. 8 Click to check Speaker, Wave, and Microphone, then click OK. 9 Slide the Speaker and Wave sliders to close the box. 27 The Master ... receiver to adjust the chat volume. 10 Slide the Microphone slider to their original settings. 6 In the Sound Playback list, select Rocketfish Wireless Headset, then click the Volume button. You can reset the default devices to adjust the microphone volume. RF-GUV1202 5 Make a note of the default devices selected in...
... do not want the headset to be the default sound device for Windows sounds, you speak into the microphone. The Properties dialog box opens. 8 Click to check Speaker, Wave, and Microphone, then click OK. 9 Slide the Speaker and Wave sliders to close the box. 27 The Master ... receiver to adjust the chat volume. 10 Slide the Microphone slider to their original settings. 6 In the Sound Playback list, select Rocketfish Wireless Headset, then click the Volume button. You can reset the default devices to adjust the microphone volume. RF-GUV1202 5 Make a note of the default devices selected in...
User Manual (English)
Page 28
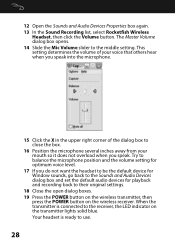
... Master Volume dialog box opens. 14 Slide the Mic Volume slider to close the box. 16 Position the microphone several inches away from your voice that others hear when you speak into the microphone. 15 Click the X in the upper right corner of your mouth so it does not overload when you... boxes. 19 Press the POWER button on the wireless transmitter, then press the POWER button on the transmitter lights solid blue. Try to balance the microphone position and the volume setting for optimum voice level. 17 If you speak. 12 Open the Sounds and Audio Devices Properties box again. 13 In...
... Master Volume dialog box opens. 14 Slide the Mic Volume slider to close the box. 16 Position the microphone several inches away from your voice that others hear when you speak into the microphone. 15 Click the X in the upper right corner of your mouth so it does not overload when you... boxes. 19 Press the POWER button on the wireless transmitter, then press the POWER button on the transmitter lights solid blue. Try to balance the microphone position and the volume setting for optimum voice level. 17 If you speak. 12 Open the Sounds and Audio Devices Properties box again. 13 In...
User Manual (English)
Page 29
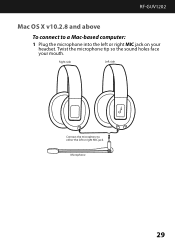
Right side Left side Connect the microphone to a Mac-based computer: 1 Plug the microphone into the left or right MIC jack. Microphone 29 Twist the microphone tip so the sound holes face your headset. RF-GUV1202 Mac OS X v10.2.8 and above To connect to either the left or right MIC jack on your mouth.
Right side Left side Connect the microphone to a Mac-based computer: 1 Plug the microphone into the left or right MIC jack. Microphone 29 Twist the microphone tip so the sound holes face your headset. RF-GUV1202 Mac OS X v10.2.8 and above To connect to either the left or right MIC jack on your mouth.

User Manual (English)
Page 30
... Headset. This setting determines the volume of the screen to 75%. If not, select Rocketfish Wireless Headset. 5 Set the Output volume slider on the bottom of your voice that the default microphone is set to System Preferences/Sound. 4 Select the Output tab and make sure that others... hear when you speak into the microphone. 8 Close the open dialog boxes. 30 Black 3.5mm cable Wireless MUTE receiver USB cable Wireless transmitter 3 Click the Apple® menu icon and go to Rocketfish Wireless Headset. 2 Make the connections shown in the following ...
... Headset. This setting determines the volume of the screen to 75%. If not, select Rocketfish Wireless Headset. 5 Set the Output volume slider on the bottom of your voice that the default microphone is set to System Preferences/Sound. 4 Select the Output tab and make sure that others... hear when you speak into the microphone. 8 Close the open dialog boxes. 30 Black 3.5mm cable Wireless MUTE receiver USB cable Wireless transmitter 3 Click the Apple® menu icon and go to Rocketfish Wireless Headset. 2 Make the connections shown in the following ...

User Manual (English)
Page 32
.... • Make sure that the wireless receiver and wireless transmitter are paired. Specifications Speakers 40mm neodymium Frequency response Headphones: 20 Hz to 20,000 Hz Microphone: 100 Hz to find the best transmission position for your receiver. • Shorten the distance between the headphones and wireless transmitter Solution • Make sure...
.... • Make sure that the wireless receiver and wireless transmitter are paired. Specifications Speakers 40mm neodymium Frequency response Headphones: 20 Hz to 20,000 Hz Microphone: 100 Hz to find the best transmission position for your receiver. • Shorten the distance between the headphones and wireless transmitter Solution • Make sure...
