Operation Manual
Page 4
... near fire or heat. Following this rule will reduce the risk of electric shock, fire, or serious injury. Always wear safety glasses with impact drills. BATTERY TOOL USE AND CARE Ensure the switch is more than 50°F but less than 100°F. Liquid ejected from the battery, avoid...
... near fire or heat. Following this rule will reduce the risk of electric shock, fire, or serious injury. Always wear safety glasses with impact drills. BATTERY TOOL USE AND CARE Ensure the switch is more than 50°F but less than 100°F. Liquid ejected from the battery, avoid...
Operation Manual
Page 6
WARNING: To avoid serious personal injury, do not use this product. Call RIDGID® customer service for repair. Always use over eyeglasses or standard safety glasses with ANSI Z87.1. WARNING: The operation of any power ...nearest AUTHORIZED SERVICE CENTER for assistance. SYMBOLS SERVICE Servicing requires extreme care and knowledge and should be performed only by power sanding, sawing, grinding, drilling, and other construction activities contains chemicals known to cause cancer, birth defects or other masonry products, and • arsenic and chromium from these ...
WARNING: To avoid serious personal injury, do not use this product. Call RIDGID® customer service for repair. Always use over eyeglasses or standard safety glasses with ANSI Z87.1. WARNING: The operation of any power ...nearest AUTHORIZED SERVICE CENTER for assistance. SYMBOLS SERVICE Servicing requires extreme care and knowledge and should be performed only by power sanding, sawing, grinding, drilling, and other construction activities contains chemicals known to cause cancer, birth defects or other masonry products, and • arsenic and chromium from these ...

Operation Manual
Page 7
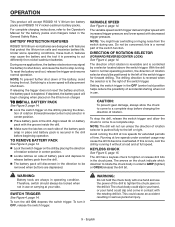
...per minute 0-7,200/0-25,600 BPM Clutch 24 Position Torque 565 in HI speed. DIRECTION OF ROTATION SELECTOR (FORWARD/REVERSE/CENTER LOCK) Your drill has a direction of rotation (forward/reverse/center lock) selector located above the switch trigger for selecting either the left or right hand....pressure. 7 - Keyless Motor 18 Volt DC Switch Variable Speed (VSR) No Load Speed 0-450/0-1,600 r/min. (RPM) KNOW YOUR HAMMER DRILL See Figure 1, page 14. VARIABLE SPEED The variable speed switch trigger delivers higher speed with increased trigger pressure and lower speed with either LO ...
...per minute 0-7,200/0-25,600 BPM Clutch 24 Position Torque 565 in HI speed. DIRECTION OF ROTATION SELECTOR (FORWARD/REVERSE/CENTER LOCK) Your drill has a direction of rotation (forward/reverse/center lock) selector located above the switch trigger for selecting either the left or right hand....pressure. 7 - Keyless Motor 18 Volt DC Switch Variable Speed (VSR) No Load Speed 0-450/0-1,600 r/min. (RPM) KNOW YOUR HAMMER DRILL See Figure 1, page 14. VARIABLE SPEED The variable speed switch trigger delivers higher speed with increased trigger pressure and lower speed with either LO ...
Operation Manual
Page 8
... Do not allow familiarity with side shields when operating products. n Insert the hex bolt through the hole on the drill. PACKING LIST Hammer Drill Auxiliary Handle Assembly Double-ended Bit Tool Bag Operator's Manual WARNING: If any parts are damaged or missing do so...539-1710 for the purposes listed below: Hammer drilling in concrete, brick, or other masonry Drilling in wood Drilling in ceramics, plastics, fiberglass, and laminates Drilling in possible serious injury. The drill is misuse and could cause serious personal injury, always ...
... Do not allow familiarity with side shields when operating products. n Insert the hex bolt through the hole on the drill. PACKING LIST Hammer Drill Auxiliary Handle Assembly Double-ended Bit Tool Bag Operator's Manual WARNING: If any parts are damaged or missing do so...539-1710 for the purposes listed below: Hammer drilling in concrete, brick, or other masonry Drilling in wood Drilling in ceramics, plastics, fiberglass, and laminates Drilling in possible serious injury. The drill is misuse and could cause serious personal injury, always ...
Operation Manual
Page 9
... the chuck to come in contact with features that protect the lithium-ion cells and maximize battery life. NOTE: The drill will accept RIDGID 18 V lithium-ion battery packs and RIDGID 18 V nickel-cadmium battery packs. KEYLESS CHUCK See Figure 5, page 15. To turn it is powering to act ...differently from the drill. The battery pack will also prevent shut down. OPERATION This product will not run unless the direction of rotation ...
... the chuck to come in contact with features that protect the lithium-ion cells and maximize battery life. NOTE: The drill will accept RIDGID 18 V lithium-ion battery packs and RIDGID 18 V nickel-cadmium battery packs. KEYLESS CHUCK See Figure 5, page 15. To turn it is powering to act ...differently from the drill. The battery pack will also prevent shut down. OPERATION This product will not run unless the direction of rotation ...
Operation Manual
Page 10
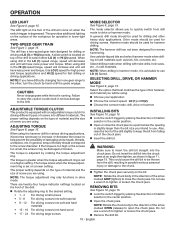
... and the size of rotation selector in the center position. Open or close the chuck jaws. When using . Select drilling mode when drilling with an adjustable torque clutch for driving screws. The proper setting depends on the foot of rotation selector in the center position. .... Two-SPEED gear train See Figure 7, page 15. Drive mode should be damaged or broken. MODE selector See Figure 9, page 15. The drill has a two-speed gear train designed for reverse hammering. Hammer mode should correspond to use . This could result in figure 11, page 15....
... and the size of rotation selector in the center position. Open or close the chuck jaws. When using . Select drilling mode when drilling with an adjustable torque clutch for driving screws. The proper setting depends on the foot of rotation selector in the center position. .... Two-SPEED gear train See Figure 7, page 15. Drive mode should be damaged or broken. MODE selector See Figure 9, page 15. The drill has a two-speed gear train designed for reverse hammering. Hammer mode should correspond to use . This could result in figure 11, page 15....
Operation Manual
Page 11
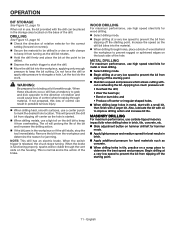
... with a small bit, then finish with clamps to keep it from the workpiece and determine the reason for wood drilling. Select drilling mode. Begin drilling at the point to be visible through the vent slots on a scrap piece to the direction of rotation and could... base of control when breaking through holes, place a block of wood behind the workpiece to prevent ragged or splintered edges on the drill bit to keep it from slipping off the starting point. Maintain a speed and pressure which allows cutting without overheating the bit...
... with a small bit, then finish with clamps to keep it from the workpiece and determine the reason for wood drilling. Select drilling mode. Begin drilling at the point to be visible through the vent slots on a scrap piece to the direction of rotation and could... base of control when breaking through holes, place a block of wood behind the workpiece to prevent ragged or splintered edges on the drill bit to keep it from slipping off the starting point. Maintain a speed and pressure which allows cutting without overheating the bit...
Operation Manual
Page 12
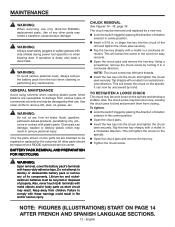
...side shields during power tool operation or when blowing dust. Use clean cloths to comply with plastic parts. WARNING: Do not at a RIDGID authorized service center. Lithium-ion and nickelcadmium batteries must be damaged by the customer. English WARNING: Always wear safety goggles or safety glasses ... a new one. Lock the switch trigger by hand. Use of any other parts should be unscrewed by placing the direction of the drill and tighten the chuck jaws securely. Tap the hex key sharply with a mallet in a clockwise direction. TO RETIGHTEN A LOOSE CHUCK ...
...side shields during power tool operation or when blowing dust. Use clean cloths to comply with plastic parts. WARNING: Do not at a RIDGID authorized service center. Lithium-ion and nickelcadmium batteries must be damaged by the customer. English WARNING: Always wear safety goggles or safety glasses ... a new one. Lock the switch trigger by hand. Use of any other parts should be unscrewed by placing the direction of the drill and tighten the chuck jaws securely. Tap the hex key sharply with a mallet in a clockwise direction. TO RETIGHTEN A LOOSE CHUCK ...


