User Guide
Page 7
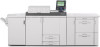
...operators who have received training in the procedures shown in this manual. • Contents of handling or operating this machine. c Accessory hex driver d Black hex screws 3 Developer bottle 4 Drum setting powder pad applicator RPG017S You will the company be removed. • Drum setting powder... pad applicator (provided). Important: The accessory hex driver and drum setting powder pad are included in this machine. This manual is supplied this manual. General users are subject to do a...
...operators who have received training in the procedures shown in this manual. • Contents of handling or operating this machine. c Accessory hex driver d Black hex screws 3 Developer bottle 4 Drum setting powder pad applicator RPG017S You will the company be removed. • Drum setting powder... pad applicator (provided). Important: The accessory hex driver and drum setting powder pad are included in this machine. This manual is supplied this manual. General users are subject to do a...
User Guide
Page 18
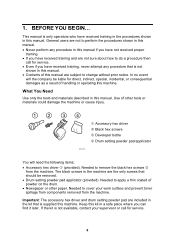
... this message appears, use the following procedure to replace the unit. CHARGE CORONA UNIT 3.1 REMOVING THE CHARGE CORONA UNIT What You Need • Accessory hex driver provided with the machine. • Newspaper or other paper covering a nearby flat surface on the control panel (see "CONTROL PANEL") and print out the counter...
... this message appears, use the following procedure to replace the unit. CHARGE CORONA UNIT 3.1 REMOVING THE CHARGE CORONA UNIT What You Need • Accessory hex driver provided with the machine. • Newspaper or other paper covering a nearby flat surface on the control panel (see "CONTROL PANEL") and print out the counter...
User Guide
Page 23
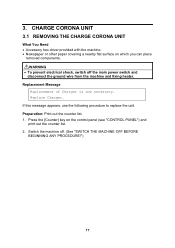
...Replacement Message Replacement of the development unit drawer. 22 Press the [Counter] key on which you can place removed components. Using the hex driver, remove the three black screws (1) from the machine and fixing heater. Preparation: Print out the counter list. 1. Switch the machine off ... unit. (See "REMOVING THE CHARGE CORONA UNIT.) 3. DRUM CLEANING UNIT 4.1 REMOVING THE DRUM CLEANING UNIT What You Need • Accessory hex driver provided with the machine. • Newspaper or other paper covering a nearby flat surface on the control panel (see "CONTROL PANEL") and print ...
...Replacement Message Replacement of the development unit drawer. 22 Press the [Counter] key on which you can place removed components. Using the hex driver, remove the three black screws (1) from the machine and fixing heater. Preparation: Print out the counter list. 1. Switch the machine off ... unit. (See "REMOVING THE CHARGE CORONA UNIT.) 3. DRUM CLEANING UNIT 4.1 REMOVING THE DRUM CLEANING UNIT What You Need • Accessory hex driver provided with the machine. • Newspaper or other paper covering a nearby flat surface on the control panel (see "CONTROL PANEL") and print ...
User Guide
Page 27
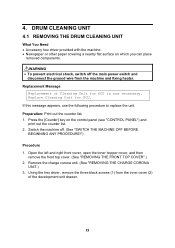
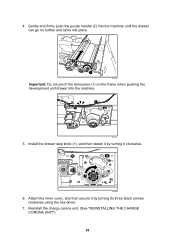
Reinstall the charge corona unit. (See "REINSTALLING THE CHARGE CORONA UNIT") 26 4. Attach the inner cover, and then secure it by turning it by turning its three black screws clockwise using the hex driver. 7. Install the drawer stop knob (1), and then fasten it clockwise. 1 RPG035 6. Gently and firmly push the purple handle (2) into the machine until the drawer can go no further and locks into place. 2 1 RPG032 Important: Do not pinch the harnesses (1) on the frame when pushing the development unit drawer into the machine. 1 RPG036 5.
Reinstall the charge corona unit. (See "REINSTALLING THE CHARGE CORONA UNIT") 26 4. Attach the inner cover, and then secure it by turning it by turning its three black screws clockwise using the hex driver. 7. Install the drawer stop knob (1), and then fasten it clockwise. 1 RPG035 6. Gently and firmly push the purple handle (2) into the machine until the drawer can go no further and locks into place. 2 1 RPG032 Important: Do not pinch the harnesses (1) on the frame when pushing the development unit drawer into the machine. 1 RPG036 5.
User Guide
Page 29
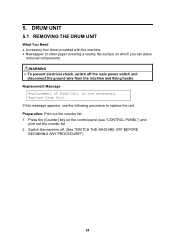
... heater. Replacement Message Replacement of Drum Unit is now necessary. Replace Drum Unit. DRUM UNIT 5.1 REMOVING THE DRUM UNIT What You Need • Accessory hex driver provided with the machine. • Newspaper or other paper covering a nearby flat surface on the control panel (see "CONTROL PANEL") and print out the counter...
... heater. Replacement Message Replacement of Drum Unit is now necessary. Replace Drum Unit. DRUM UNIT 5.1 REMOVING THE DRUM UNIT What You Need • Accessory hex driver provided with the machine. • Newspaper or other paper covering a nearby flat surface on the control panel (see "CONTROL PANEL") and print out the counter...
User Guide
Page 32
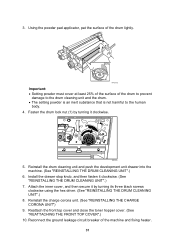
... the drawer stop knob, and then fasten it clockwise. 1 RPG033 5. Fasten the drum lock nut (1) by turning its three black screws clockwise using the hex driver. (See "REINSTALLING THE DRUM CLEANING UNIT".) 8. Attach the inner cover, and then secure it by turning it clockwise. (See "REINSTALLING THE DRUM CLEANING UNIT...
... the drawer stop knob, and then fasten it clockwise. 1 RPG033 5. Fasten the drum lock nut (1) by turning its three black screws clockwise using the hex driver. (See "REINSTALLING THE DRUM CLEANING UNIT".) 8. Attach the inner cover, and then secure it by turning it clockwise. (See "REINSTALLING THE DRUM CLEANING UNIT...

User Guide
Page 42
... ANY PROCEDURE!") 41 Trans. Replacement Message Intermed. IMAGE TRANSFER BELT CLEANING UNIT 7.1 REMOVING THE IMAGE TRANSFER BELT CLEANING UNIT What You Need • Accessory hex driver provided with machine. • Newspaper or other paper covering a nearby flat surface on the control panel (see "CONTROL PANEL") and print out the counter list...
... ANY PROCEDURE!") 41 Trans. Replacement Message Intermed. IMAGE TRANSFER BELT CLEANING UNIT 7.1 REMOVING THE IMAGE TRANSFER BELT CLEANING UNIT What You Need • Accessory hex driver provided with machine. • Newspaper or other paper covering a nearby flat surface on the control panel (see "CONTROL PANEL") and print out the counter list...
User Guide
Page 43
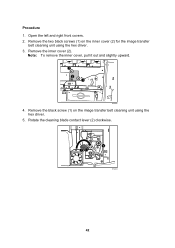
Remove the two black screws (1) on the image transfer belt cleaning unit using the hex driver. 3. Procedure 1. Note: To remove the inner cover, pull it out and slightly upward. 1 2 1 RPG044 4. Rotate the cleaning blade contact lever (2) clockwise. 1 2 RPG038 42 Open the left and right front covers. 2. Remove the inner cover (2). Remove the black screw (1) on the inner cover (2) for the image transfer belt cleaning unit using the hex driver. 5.
Remove the two black screws (1) on the image transfer belt cleaning unit using the hex driver. 3. Procedure 1. Note: To remove the inner cover, pull it out and slightly upward. 1 2 1 RPG044 4. Rotate the cleaning blade contact lever (2) clockwise. 1 2 RPG038 42 Open the left and right front covers. 2. Remove the inner cover (2). Remove the black screw (1) on the inner cover (2) for the image transfer belt cleaning unit using the hex driver. 5.
User Guide
Page 45
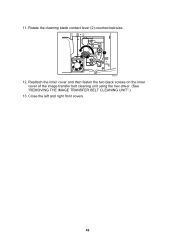
... IMAGE TRANSFER BELT CLEANING UNIT Procedure 1. Press the main power switch to turn the machine on the image transfer belt cleaning unit using the hex driver. 3. Fasten the black screw (1) on , close the left and right front covers. 44 Open the TCRU display. (See "OPENING THE TCRU DISPLAY".) 6. Press the [Image...
... IMAGE TRANSFER BELT CLEANING UNIT Procedure 1. Press the main power switch to turn the machine on the image transfer belt cleaning unit using the hex driver. 3. Fasten the black screw (1) on , close the left and right front covers. 44 Open the TCRU display. (See "OPENING THE TCRU DISPLAY".) 6. Press the [Image...
User Guide
Page 46
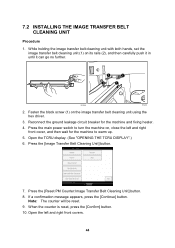
11. Reattach the inner cover and then fasten the two black screws on the inner cover of the image transfer belt cleaning unit using the hex driver. (See "REMOVING THE IMAGE TRANSFER BELT CLEANING UNIT".) 13. Rotate the cleaning blade contact lever (2) counterclockwise. 1 2 RPG037 12. Close the left and right front covers. 45
11. Reattach the inner cover and then fasten the two black screws on the inner cover of the image transfer belt cleaning unit using the hex driver. (See "REMOVING THE IMAGE TRANSFER BELT CLEANING UNIT".) 13. Rotate the cleaning blade contact lever (2) counterclockwise. 1 2 RPG037 12. Close the left and right front covers. 45
User Guide
Page 48
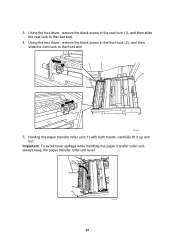
Important: To avoid toner spillage while handling the paper transfer roller unit, always keep the paper transfer roller unit level. 1 RPG046 47 Using the hex driver, remove the black screw in the front lock (2), and then slide the front lock to the rear end. 4. 3. Holding the paper transfer roller unit (1) with both hands, carefully lift it up and out. Using the hex driver, remove the black screw in the rear lock (1), and then slide the rear lock to the front end. 1 2 RPG065S 5.
Important: To avoid toner spillage while handling the paper transfer roller unit, always keep the paper transfer roller unit level. 1 RPG046 47 Using the hex driver, remove the black screw in the front lock (2), and then slide the front lock to the rear end. 4. 3. Holding the paper transfer roller unit (1) with both hands, carefully lift it up and out. Using the hex driver, remove the black screw in the rear lock (1), and then slide the rear lock to the front end. 1 2 RPG065S 5.
User Guide
Page 80
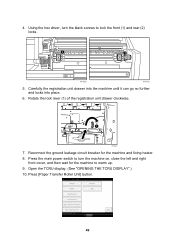
... the machine until it can go no further and locks into place. 6. Open the TCRU display. (See "OPENING THE TCRU DISPLAY".) 10. 4. Using the hex driver, turn the machine on, close the left and right front cover, and then wait for the machine and fixing heater. 8. Press [Paper Transfer Roller Unit...
... the machine until it can go no further and locks into place. 6. Open the TCRU display. (See "OPENING THE TCRU DISPLAY".) 10. 4. Using the hex driver, turn the machine on, close the left and right front cover, and then wait for the machine and fixing heater. 8. Press [Paper Transfer Roller Unit...


