

Operating Instructions
Page 1
Operating Instructions Preparations for Using the Projector Projecting an Image Projecting Images from a USB Memory Device or Digital Camera Useful Functions Using the Projector via a Network Using the Interactive Function (RICOH PJ WX4152NI only) Changing the Projector Settings Troubleshooting Maintenance Appendix For safe and correct use, be sure to read the Safety Information in Read This First before using the machine.
Operating Instructions Preparations for Using the Projector Projecting an Image Projecting Images from a USB Memory Device or Digital Camera Useful Functions Using the Projector via a Network Using the Interactive Function (RICOH PJ WX4152NI only) Changing the Projector Settings Troubleshooting Maintenance Appendix For safe and correct use, be sure to read the Safety Information in Read This First before using the machine.
Operating Instructions
Page 3
......6 Copyrights to Images...6 Important...6 Notes to Users Viewing 3D Images...6 Manuals Provided with the Remote Control 24 Positioning the Projector...27 Projection Mode...27 Relationship Between the Projection Distance and the Screen Size 29 Connecting Equipment to Read This Manual...9 Symbols......9 Notes...9 Model-Specific Information...10 1. Projecting an Image Basic Operations for Using the Projector...11 Main Functions...13 Checking the Accessories...15 Projector Parts and Their Functions...16 Control Panel (Top View)...16 Front and Left-Side View...17 Rear ...
......6 Copyrights to Images...6 Important...6 Notes to Users Viewing 3D Images...6 Manuals Provided with the Remote Control 24 Positioning the Projector...27 Projection Mode...27 Relationship Between the Projection Distance and the Screen Size 29 Connecting Equipment to Read This Manual...9 Symbols......9 Notes...9 Model-Specific Information...10 1. Projecting an Image Basic Operations for Using the Projector...11 Main Functions...13 Checking the Accessories...15 Projector Parts and Their Functions...16 Control Panel (Top View)...16 Front and Left-Side View...17 Rear ...

Operating Instructions
Page 4
... Projecting an Image...36 Turning Off the Projector...38 Adjusting the Projected Image...39 Adjusting the Angle of the Projection...39 Adjusting the Focus...39 Adjusting for Playing Music 62 2 Useful Functions Projecting ...
... Projecting an Image...36 Turning Off the Projector...38 Adjusting the Projected Image...39 Adjusting the Angle of the Projection...39 Adjusting the Focus...39 Adjusting for Playing Music 62 2 Useful Functions Projecting ...
Operating Instructions
Page 5
... Wireless LAN Settings for Using the Interactive Function (RICOH PJ WX4152NI only 83 Enabling Interactive Mode...84 Registering the Computer USB Adapter...85 Enabling the Projector to Recognize the Electronic Pen 88 Installing RICOH PJ Interactive Software 90 Using the Electronic Pen...93 Electronic... on the DLNA Server 78 Projecting Images Using Smart Devices...81 6. Changing the Projector Settings Viewing the Menu Screen...103 Changing the Settings...105 3 Using the Interactive Function (RICOH PJ WX4152NI only) Preparations for Ad Hoc Mode 71 Projecting a Computer's Screen via ...
... Wireless LAN Settings for Using the Interactive Function (RICOH PJ WX4152NI only 83 Enabling Interactive Mode...84 Registering the Computer USB Adapter...85 Enabling the Projector to Recognize the Electronic Pen 88 Installing RICOH PJ Interactive Software 90 Using the Electronic Pen...93 Electronic... on the DLNA Server 78 Projecting Images Using Smart Devices...81 6. Changing the Projector Settings Viewing the Menu Screen...103 Changing the Settings...105 3 Using the Interactive Function (RICOH PJ WX4152NI only) Preparations for Ad Hoc Mode 71 Projecting a Computer's Screen via ...
Operating Instructions
Page 6
Maintenance Operating Precautions...153 Cleaning the Projector...155 Cleaning the Air Filter...155 Cleaning the Bottom Air Intake Vent...156 4 Restoring All the Settings to Their Defaults 107 Image Adjustment Menu...108 ... Settings 2 Menu...120 USB Settings Menu...123 Settings...123 Display Status...124 Network Settings Menu...125 Wired LAN...125 Wireless LAN...126 LAN Common...131 Projector ID...132 Setup Wizard...133 Display Status...133 Network Application Settings Menu...134 Administration Tools...134 Security...136 Miracast...137 Server...138 Display Status...139...
Maintenance Operating Precautions...153 Cleaning the Projector...155 Cleaning the Air Filter...155 Cleaning the Bottom Air Intake Vent...156 4 Restoring All the Settings to Their Defaults 107 Image Adjustment Menu...108 ... Settings 2 Menu...120 USB Settings Menu...123 Settings...123 Display Status...124 Network Settings Menu...125 Wired LAN...125 Wireless LAN...126 LAN Common...131 Projector ID...132 Setup Wizard...133 Display Status...133 Network Application Settings Menu...134 Administration Tools...134 Security...136 Miracast...137 Server...138 Display Status...139...
Operating Instructions
Page 7
... 166 Displaying Web Image Monitor...166 About Browse Mode and Edit Mode...167 Login to Inquire...185 Trademarks...186 INDEX...189 5 Appendix Specifications for the Projector...175 List of Compatible Signals...177 Video Input...177 Y/Pb/Pr Input...177 Computer Input...178 HDMI Input...179 3D Format...180 Specifications for Ports...
... 166 Displaying Web Image Monitor...166 About Browse Mode and Edit Mode...167 Login to Inquire...185 Trademarks...186 INDEX...189 5 Appendix Specifications for the Projector...175 List of Compatible Signals...177 Video Input...177 Y/Pb/Pr Input...177 Computer Input...178 HDMI Input...179 3D Format...180 Specifications for Ports...
Operating Instructions
Page 8
Introduction Copyrights to Images When projecting images using the projector, be careful not to infringe the copyright of viewing. • If you feel that support DLP Link. • How 3D images are viewed may vary ... compatible content. • Avoid viewing 3D images for commercial purposes • Modifying images or movies using 3D glasses with the projector: • You need to synchronize with your office products. The projector uses DLP Link technology to use of handling or operating the machine. If you continue to feel sick, consult a doctor...
Introduction Copyrights to Images When projecting images using the projector, be careful not to infringe the copyright of viewing. • If you feel that support DLP Link. • How 3D images are viewed may vary ... compatible content. • Avoid viewing 3D images for commercial purposes • Modifying images or movies using 3D glasses with the projector: • You need to synchronize with your office products. The projector uses DLP Link technology to use of handling or operating the machine. If you continue to feel sick, consult a doctor...
Operating Instructions
Page 10
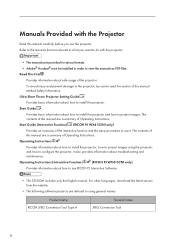
... information about troubleshooting and maintenance. It also provides information about safe usage of Operating Instructions. Operating Instructions (Interactive Function) (RICOH PJ WX4152NI only) Provides information about how to install the projector. Manuals Provided with the projector. • The manuals are provided in various formats. • Adobe® Acrobat® must be sure to do...
... information about troubleshooting and maintenance. It also provides information about safe usage of Operating Instructions. Operating Instructions (Interactive Function) (RICOH PJ WX4152NI only) Provides information about how to install the projector. Manuals Provided with the projector. • The manuals are provided in various formats. • Adobe® Acrobat® must be sure to do...
Operating Instructions
Page 11
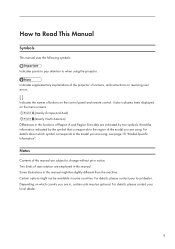
Read the information indicated by two symbols. For details, please contact your local dealer. Indicates supplementary explanations of the projector's functions, and instructions on resolving user errors. [ ] Indicates the names of buttons on the menu screens. (mainly Europe and Asia) ... please contact your local dealer. 9 Depending on which symbol corresponds to the region of size notation are subject to when using the projector. It also indicates items displayed on the control panel and remote control. Certain options might be available in this manual are employed in...
Read the information indicated by two symbols. For details, please contact your local dealer. Indicates supplementary explanations of the projector's functions, and instructions on resolving user errors. [ ] Indicates the names of buttons on the menu screens. (mainly Europe and Asia) ... please contact your local dealer. 9 Depending on which symbol corresponds to the region of size notation are subject to when using the projector. It also indicates items displayed on the control panel and remote control. Certain options might be available in this manual are employed in...
Operating Instructions
Page 12
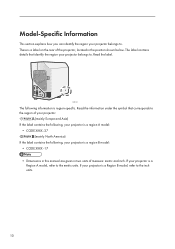
... model: • CODE XXXX -27 (mainly North America) If the label contains the following information is a label on the rear of the projector, located in two units of measure: metric and inch. The label contains details that corresponds to . Read the label. Model-Specific Information This ...section explains how you can identify the region your projector is a region B model: • CODE XXXX -17 • Dimensions in this manual are given in the position shown below. There is...
... model: • CODE XXXX -27 (mainly North America) If the label contains the following information is a label on the rear of the projector, located in two units of measure: metric and inch. The label contains details that corresponds to . Read the label. Model-Specific Information This ...section explains how you can identify the region your projector is a region B model: • CODE XXXX -17 • Dimensions in this manual are given in the position shown below. There is...
Operating Instructions
Page 13
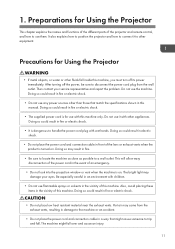
...fire or electric shock. • Do not place low heat resistant material near the exhaust vents. Be especially careful in the vicinity of the projector and remote control, and how to trip and fall inside this machine. Doing so may damage your service representative and report the problem. Then... contact your eyes. The machine might cause someone to use with wet hands. Preparations for Using the Projector • If metal objects, or water or other than those that might fall over and cause an injury. 11 It also explains how ...
...fire or electric shock. • Do not place low heat resistant material near the exhaust vents. Be especially careful in the vicinity of the projector and remote control, and how to trip and fall inside this machine. Doing so may damage your service representative and report the problem. Then... contact your eyes. The machine might cause someone to use with wet hands. Preparations for Using the Projector • If metal objects, or water or other than those that might fall over and cause an injury. 11 It also explains how ...
Operating Instructions
Page 14
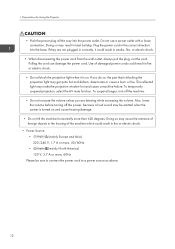
Preparations for Using the Projector • Push the power plug all the way into the base. Plug the power cord in smoke, fire, or electric shock. • When disconnecting the ...
Preparations for Using the Projector • Push the power plug all the way into the base. Plug the power cord in smoke, fire, or electric shock. • When disconnecting the ...
Operating Instructions
Page 15
...projected. Administrator authentication Enable administrator authentication so that only the administrator can change the settings. Start on which the projector is useful for the projector to the angle at which it is starting up. 13 Magnify/Zoom Pressing the [Magnify] button enlarges the ...in accordance with the key lock setting to prevent misoperation. This function is positioned. Auto keystone function The projector automatically adjusts the shape of the projector because general users cannot change the security settings. AV Mute/Freeze Pressing the [AV Mute] button mutes...
...projected. Administrator authentication Enable administrator authentication so that only the administrator can change the settings. Start on which the projector is useful for the projector to the angle at which it is starting up. 13 Magnify/Zoom Pressing the [Magnify] button enlarges the ...in accordance with the key lock setting to prevent misoperation. This function is positioned. Auto keystone function The projector automatically adjusts the shape of the projector because general users cannot change the security settings. AV Mute/Freeze Pressing the [AV Mute] button mutes...
Operating Instructions
Page 16
... PC, and "Discussion mode" that is provided with Miracast, which allows you to JPEG format using JPEG Conversion Tool and then project them using the projector. Two modes of projection are available: "Presentation mode" that projects the screen of four PCs at the same time. For details, see Help of ...your smart device on a USB memory device or a digital camera. Miracast The projector is compatible with the projector and is possible to convert PowerPoint materials to duplicate the screen of QuickProjection.
... PC, and "Discussion mode" that is provided with Miracast, which allows you to JPEG format using JPEG Conversion Tool and then project them using the projector. Two modes of projection are available: "Presentation mode" that projects the screen of four PCs at the same time. For details, see Help of ...your smart device on a USB memory device or a digital camera. Miracast The projector is compatible with the projector and is possible to convert PowerPoint materials to duplicate the screen of QuickProjection.
Operating Instructions
Page 17
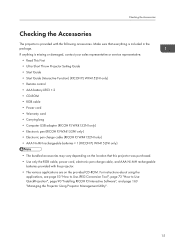
... page 73 "How to Use QuickProjection", page 90 "Installing RICOH PJ Interactive Software", and page 163 "Managing the Projector Using Projector Management Utility". 15 Checking the Accessories Checking the Accessories The projector is included in the package. If anything is missing or damaged..., contact your sales representative or service representative. • Read This First • Ultra Short Throw Projector Setting Guide • Start Guide • Start Guide (Interactive Function) (RICOH PJ WX4152NI only) • Remote control • AAA battery LR03 × 2 • CD-ROM ...
... page 73 "How to Use QuickProjection", page 90 "Installing RICOH PJ Interactive Software", and page 163 "Managing the Projector Using Projector Management Utility". 15 Checking the Accessories Checking the Accessories The projector is included in the package. If anything is missing or damaged..., contact your sales representative or service representative. • Read This First • Ultra Short Throw Projector Setting Guide • Start Guide • Start Guide (Interactive Function) (RICOH PJ WX4152NI only) • Remote control • AAA battery LR03 × 2 • CD-ROM ...
Operating Instructions
Page 18
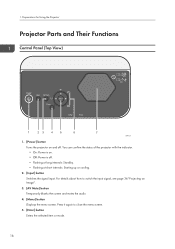
...Image". 3. [AV Mute] button Temporarily blanks the screen and mutes the audio 4. [Menu] button Displays the menu screen. 1. You can confirm the status of the projector with the indicator. • On: Power is on and off . • Flashing at long intervals: Standby. • Flashing at short intervals: Starting up or ... signal input. For details about how to close the menu screen. 5. [Enter] button Enters the selected item or mode. 16 Preparations for Using the Projector Projector Parts and Their Functions Control Panel (Top View) 1 23 4 5 6 7 DPE139 1. [Power] button Turns the...
...Image". 3. [AV Mute] button Temporarily blanks the screen and mutes the audio 4. [Menu] button Displays the menu screen. 1. You can confirm the status of the projector with the indicator. • On: Power is on and off . • Flashing at long intervals: Standby. • Flashing at short intervals: Starting up or ... signal input. For details about how to close the menu screen. 5. [Enter] button Enters the selected item or mode. 16 Preparations for Using the Projector Projector Parts and Their Functions Control Panel (Top View) 1 23 4 5 6 7 DPE139 1. [Power] button Turns the...
Operating Instructions
Page 19
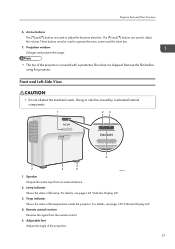
...operate the menu screen and the value bar. 7. Projection window Enlarges and projects the image. • The top of the temperature inside the projector. Arrow buttons The [ ] and [ ] buttons are used to adjust the keystone distortion. Speaker Outputs the audio input from the remote ..., see page 143 "Indicator Display List". 3. Remove the film before using the projector. Temp indicator Shows the status of the projector is covered with a protective film when it is shipped. Projector Parts and Their Functions 6. Lamp indicator Shows the status of the projection. 17 Doing...
...operate the menu screen and the value bar. 7. Projection window Enlarges and projects the image. • The top of the temperature inside the projector. Arrow buttons The [ ] and [ ] buttons are used to adjust the keystone distortion. Speaker Outputs the audio input from the remote ..., see page 143 "Indicator Display List". 3. Remove the film before using the projector. Temp indicator Shows the status of the projector is covered with a protective film when it is shipped. Projector Parts and Their Functions 6. Lamp indicator Shows the status of the projection. 17 Doing...
Operating Instructions
Page 20
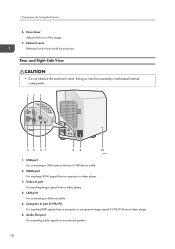
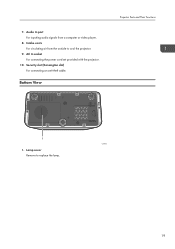
... connecting an Ethernet cable. 5. USB port For connecting a USB memory device or USB device cable. 2. Video In port For inputting image signals from inside the projector. 1. Exhaust vents Releases hot air from a video player. 4. Computer In port (Y/Pb/Pr) For inputting RGB signals from a computer or component image signals (Y/Pb/Pr... 1. Audio Out port For outputting audio signals to an external speaker. 18 HDMI port For inputting HDMI signals from a video player. 6. Preparations for Using the Projector 6.
... connecting an Ethernet cable. 5. USB port For connecting a USB memory device or USB device cable. 2. Video In port For inputting image signals from inside the projector. 1. Exhaust vents Releases hot air from a video player. 4. Computer In port (Y/Pb/Pr) For inputting RGB signals from a computer or component image signals (Y/Pb/Pr... 1. Audio Out port For outputting audio signals to an external speaker. 18 HDMI port For inputting HDMI signals from a video player. 6. Preparations for Using the Projector 6.
Operating Instructions
Page 21
AC In socket For connecting the power cord set provided with the projector. 10. Bottom View Projector Parts and Their Functions 1 CZE105 1. Intake vents For circulating air from a computer or video player. 8. 7. Security slot (Kensington slot) For connecting an anti-theft cable. Lamp cover Remove to cool the projector. 9. Audio In port For inputting audio signals from the outside to replace the lamp. 19
AC In socket For connecting the power cord set provided with the projector. 10. Bottom View Projector Parts and Their Functions 1 CZE105 1. Intake vents For circulating air from a computer or video player. 8. 7. Security slot (Kensington slot) For connecting an anti-theft cable. Lamp cover Remove to cool the projector. 9. Audio In port For inputting audio signals from the outside to replace the lamp. 19
Operating Instructions
Page 22
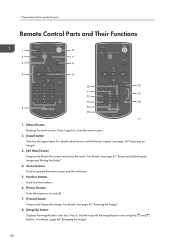
...4. Number buttons Used to operate the menu screen and the value bar. 5. Arrow buttons Used to enter numbers. 6. [Power] button Turns the projector on and off. 7. [Freeze] button Temporarily freezes the image. Press it again to switch the input signal, see page 36 "Projecting an Image...". 3. [AV Mute] button Temporarily blanks the screen and mutes the audio. For details, page 44 "Enlarging the Image". 20 Preparations for Using the Projector Remote Control Parts and Their Functions 1 6 2 7 3 8 4 9 10 16 11 17 12 13 18 5 14 15 CZE108 1. [Menu] button ...
...4. Number buttons Used to operate the menu screen and the value bar. 5. Arrow buttons Used to enter numbers. 6. [Power] button Turns the projector on and off. 7. [Freeze] button Temporarily freezes the image. Press it again to switch the input signal, see page 36 "Projecting an Image...". 3. [AV Mute] button Temporarily blanks the screen and mutes the audio. For details, page 44 "Enlarging the Image". 20 Preparations for Using the Projector Remote Control Parts and Their Functions 1 6 2 7 3 8 4 9 10 16 11 17 12 13 18 5 14 15 CZE108 1. [Menu] button ...
