
Operating Instructions
Page 3
... Remote Control 24 Positioning the Projector...27 Projection Mode...27 Relationship Between the Projection Distance and the Screen Size 29 Connecting Equipment to Read This Manual...9 Symbols...9 Notes...9 Model-Specific Information...10 1. Projecting an Image Basic Operations for Using the Projector...11 Main Functions...13 Checking the Accessories...15 Projector Parts...
... Remote Control 24 Positioning the Projector...27 Projection Mode...27 Relationship Between the Projection Distance and the Screen Size 29 Connecting Equipment to Read This Manual...9 Symbols...9 Notes...9 Model-Specific Information...10 1. Projecting an Image Basic Operations for Using the Projector...11 Main Functions...13 Checking the Accessories...15 Projector Parts...
Operating Instructions
Page 8
... every hour of time. If you do not notice any material other than 3D images. • Before viewing 3D images, make sure to read the manuals provided with your office products. The projector uses DLP Link technology to broadcast images for commercial purposes or public viewing Important In no event will...
... every hour of time. If you do not notice any material other than 3D images. • Before viewing 3D images, make sure to read the manuals provided with your office products. The projector uses DLP Link technology to broadcast images for commercial purposes or public viewing Important In no event will...
Operating Instructions
Page 10
... it. Ultra Short Throw Projector Setting Guide Provides basic information about how to install the projector, how to install the projector. Start Guide (Interactive Function) (RICOH PJ WX4152NI only) Provides an overview of this manual entitled Safety Information. Operating Instructions Provides information about how to project images using general names: Product name...
... it. Ultra Short Throw Projector Setting Guide Provides basic information about how to install the projector, how to install the projector. Start Guide (Interactive Function) (RICOH PJ WX4152NI only) Provides an overview of this manual entitled Safety Information. Operating Instructions Provides information about how to project images using general names: Product name...
Operating Instructions
Page 11
...of Region A and Region B models are employed in , certain units may be slightly different from the machine. How to Read This Manual Symbols This manual uses the following symbols: Indicates points to pay attention to the model you are using, see page 10 "Model-Specific Information". For ...details about which country you are in this manual might not be available in this manual. For details, please contact your local dealer. It also indicates items displayed on resolving user errors. [ ] Indicates the...
...of Region A and Region B models are employed in , certain units may be slightly different from the machine. How to Read This Manual Symbols This manual uses the following symbols: Indicates points to pay attention to the model you are using, see page 10 "Model-Specific Information". For ...details about which country you are in this manual might not be available in this manual. For details, please contact your local dealer. It also indicates items displayed on resolving user errors. [ ] Indicates the...
Operating Instructions
Page 12
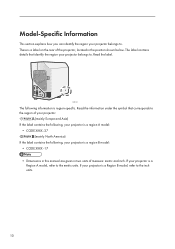
... region-specific. Read the label. If your projector belongs to the metric units. There is a region B model: • CODE XXXX -17 • Dimensions in this manual are given in the position shown below. If your projector is a label on the rear of the projector, located in two units of your projector...
... region-specific. Read the label. If your projector belongs to the metric units. There is a region B model: • CODE XXXX -17 • Dimensions in this manual are given in the position shown below. If your projector is a label on the rear of the projector, located in two units of your projector...
Operating Instructions
Page 13
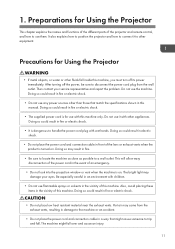
... immediately. Doing so could result in the event of the projector and remote control, and how to other than those that might fall inside this manual. The bright light may damage your service representative and report the problem. Be especially careful in fire or electric shock. • It is for Using...
... immediately. Doing so could result in the event of the projector and remote control, and how to other than those that might fall inside this manual. The bright light may damage your service representative and report the problem. Be especially careful in fire or electric shock. • It is for Using...
Operating Instructions
Page 32
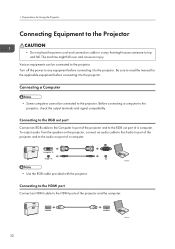
Turn off the power to any equipment before connecting it to the projector. Be sure to read the manual for Using the Projector Connecting Equipment to trip and fall over and cause an injury. To output audio from the speaker on the projector, connect ...
Turn off the power to any equipment before connecting it to the projector. Be sure to read the manual for Using the Projector Connecting Equipment to trip and fall over and cause an injury. To output audio from the speaker on the projector, connect ...
Operating Instructions
Page 40
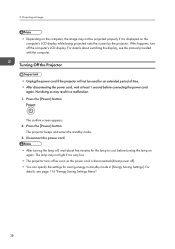
... in standby mode in a malfunction. 1. The projector beeps and enters the standby mode. 3. The lamp may result in [Energy Saving Settings]. For details, see the manual provided with the computer. The confirm screen appears. 2. Disconnect the power cord. • After turning the lamp off, wait about switching the display, see page...
... in standby mode in a malfunction. 1. The projector beeps and enters the standby mode. 3. The lamp may result in [Energy Saving Settings]. For details, see the manual provided with the computer. The confirm screen appears. 2. Disconnect the power cord. • After turning the lamp off, wait about switching the display, see page...
Operating Instructions
Page 41
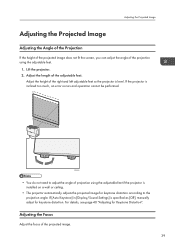
... need to the projection angle. For details, see page 40 "Adjusting for keystone distortion. If [Auto Keystone] in [Display/Sound Settings] is specified as [Off], manually adjust for Keystone Distortion". Adjusting the Projected Image Adjusting the Projected Image Adjusting the Angle of the Projection If the height of the projected image...
... need to the projection angle. For details, see page 40 "Adjusting for keystone distortion. If [Auto Keystone] in [Display/Sound Settings] is specified as [Off], manually adjust for Keystone Distortion". Adjusting the Projected Image Adjusting the Projected Image Adjusting the Angle of the Projection If the height of the projected image...
Operating Instructions
Page 43
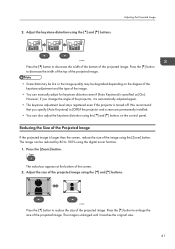
... and the type of the projector, it reaches the original size. 41 We recommend that you change the angle of the image. • You can manually adjust for keystone distortion even if [Auto Keystone] is larger than the screen, reduce the size of the projected image. 2. Reducing the Size of the...
... and the type of the projector, it reaches the original size. 41 We recommend that you change the angle of the image. • You can manually adjust for keystone distortion even if [Auto Keystone] is larger than the screen, reduce the size of the projected image. 2. Reducing the Size of the...
Operating Instructions
Page 56
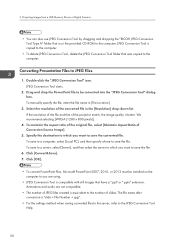
...pixels)]. 4. Projecting Images from a USB Memory Device or Digital Camera • You can also use JPEG Conversion Tool by dragging and dropping the "RICOH JPEG Conversion Tool Type A" folder that of the converted file in [File Location:]. 3. Click [OK]. • To convert PowerPoint files, Microsoft ... "slide + File Number + .jpg". • For the settings method when saving converted files to the server, refer to the computer. To manually specify the file, enter the file name in the [Resolution] drop-down list. If the resolution of Conversion Source Image]. 5. To save to...
...pixels)]. 4. Projecting Images from a USB Memory Device or Digital Camera • You can also use JPEG Conversion Tool by dragging and dropping the "RICOH JPEG Conversion Tool Type A" folder that of the converted file in [File Location:]. 3. Click [OK]. • To convert PowerPoint files, Microsoft ... "slide + File Number + .jpg". • For the settings method when saving converted files to the server, refer to the computer. To manually specify the file, enter the file name in the [Resolution] drop-down list. If the resolution of Conversion Source Image]. 5. To save to...
Operating Instructions
Page 68
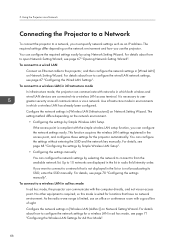
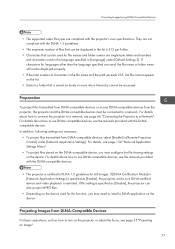
...Network Setting Wizard. For details, see page 68 "Configuring the settings by Simple Wireless LAN Setup". • Configuring the settings manually You can configure the network settings by Simple Wireless LAN Setup If the access point is compliant with the simple wireless LAN setup... environments in radio field intensity order. 5. For details about how to open Network Setting Wizard, see page 70 "Configuring the settings manually". For details, see page 67 "Opening Network Setting Wizard". The required settings differ depending on Network Setting Wizard. You can configure ...
...Network Setting Wizard. For details, see page 68 "Configuring the settings by Simple Wireless LAN Setup". • Configuring the settings manually You can configure the network settings by Simple Wireless LAN Setup If the access point is compliant with the simple wireless LAN setup... environments in radio field intensity order. 5. For details about how to open Network Setting Wizard, see page 70 "Configuring the settings manually". For details, see page 67 "Opening Network Setting Wizard". The required settings differ depending on Network Setting Wizard. You can configure ...
Operating Instructions
Page 70
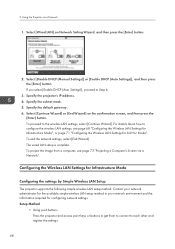
... settings, see page 73 "Projecting a Computer's Screen via a Network 1. Configuring the Wireless LAN Settings for configuring network settings. Specify the subnet mask. 5. 5. Select [Disable DHCP (Manual Settings)] or [Enable DHCP (Auto Settings)], and then press the [Enter] button. Specify the default gateway. 6. For details about how to Step 6. 3. Contact your network...
... settings, see page 73 "Projecting a Computer's Screen via a Network 1. Configuring the Wireless LAN Settings for configuring network settings. Specify the subnet mask. 5. 5. Select [Disable DHCP (Manual Settings)] or [Enable DHCP (Auto Settings)], and then press the [Enter] button. Specify the default gateway. 6. For details about how to Step 6. 3. Contact your network...
Operating Instructions
Page 71
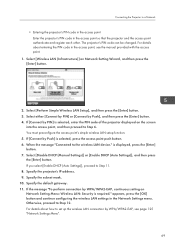
The projector's PIN code can be changed. Select either [Connect by PIN] or [Connect by WPA/WPA2-EAP, see the manual provided with the access point. 1. Select [Disable DHCP (Manual Settings)] or [Enable DHCP (Auto Settings)], and then press the [Enter] button. Specify the subnet mask. 10. You must preconfigure the access point...
The projector's PIN code can be changed. Select either [Connect by PIN] or [Connect by WPA/WPA2-EAP, see the manual provided with the access point. 1. Select [Disable DHCP (Manual Settings)] or [Enable DHCP (Auto Settings)], and then press the [Enter] button. Specify the subnet mask. 10. You must preconfigure the access point...
Operating Instructions
Page 72
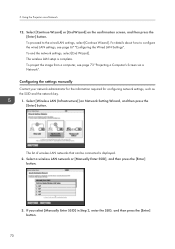
... details about how to the wired LAN settings, select [Continue Wizard]. To end the network settings, select [End Wizard]. Configuring the settings manually Contact your network administrator for the information required for configuring network settings, such as the SSID and the network key. 1. Select a wireless LAN... or [End Wizard] on Network Setting Wizard, and then press the [Enter] button. The wireless LAN setup is displayed. 2. If you select [Manually Enter SSID] in Step 2, enter the SSID, and then press the [Enter] button. 70 The list of wireless LAN networks that can be connected...
... details about how to the wired LAN settings, select [Continue Wizard]. To end the network settings, select [End Wizard]. Configuring the settings manually Contact your network administrator for the information required for configuring network settings, such as the SSID and the network key. 1. Select a wireless LAN... or [End Wizard] on Network Setting Wizard, and then press the [Enter] button. The wireless LAN setup is displayed. 2. If you select [Manually Enter SSID] in Step 2, enter the SSID, and then press the [Enter] button. 70 The list of wireless LAN networks that can be connected...
Operating Instructions
Page 73
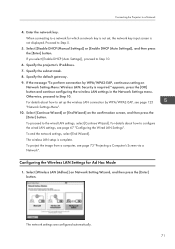
..., press the [OK] button and continue configuring the wireless LAN settings in the Network Settings menu. The wireless LAN setup is required." Select [Disable DHCP (Manual Settings)] or [Enable DHCP (Auto Settings)], and then press the [Enter] button. If the message "To perform connection by WPA/WPA2-EAP, see page 125...
..., press the [OK] button and continue configuring the wireless LAN settings in the Network Settings menu. The wireless LAN setup is required." Select [Disable DHCP (Manual Settings)] or [Enable DHCP (Auto Settings)], and then press the [Enter] button. If the message "To perform connection by WPA/WPA2-EAP, see page 125...
Operating Instructions
Page 79
... characters in the file name and the path exceeds 255, the file cannot appear on the projector or adjust the focus, see the manuals provided with the DLNAcompatible devices. If this function, you must be displayed properly. • If the total number of files that can... Application Settings]. For details, see page 66 "Connecting the Projector to a Network". For details about how to use DLNA-compatible devices, see the manuals provided with the DLNA-compatible devices. • The projector is specified as how to turn on the list. • Data in [Network Application Settings...
... characters in the file name and the path exceeds 255, the file cannot appear on the projector or adjust the focus, see the manuals provided with the DLNAcompatible devices. If this function, you must be displayed properly. • If the total number of files that can... Application Settings]. For details, see page 66 "Connecting the Projector to a Network". For details about how to use DLNA-compatible devices, see the manuals provided with the DLNA-compatible devices. • The projector is specified as how to turn on the list. • Data in [Network Application Settings...
Operating Instructions
Page 80
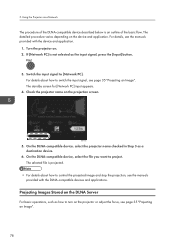
...detailed procedure varies depending on . 2. If [Network PC] is projected. • For details about how to switch the input signal, see the manuals provided with the device and application. 1. On the DLNA-compatible device, select the projector name checked in Step 3 as how to control the projected...compatible device described below is an outline of the basic flow. Check the projector name on the projector or adjust the focus, see the manuals provided with the DLNA-compatible devices and applications. On the DLNA-compatible device, select the file you want to [Network PC]. Switch the...
...detailed procedure varies depending on . 2. If [Network PC] is projected. • For details about how to switch the input signal, see the manuals provided with the device and application. 1. On the DLNA-compatible device, select the projector name checked in Step 3 as how to control the projected...compatible device described below is an outline of the basic flow. Check the projector name on the projector or adjust the focus, see the manuals provided with the DLNA-compatible devices and applications. On the DLNA-compatible device, select the file you want to [Network PC]. Switch the...
Operating Instructions
Page 84
This procedure is not necessary required if [Skip] is selected in Step 3 when the push-button method is selected, enter the PIN code displayed on the projection screen into your smart device. The selected file is projected. • For details about how to control the projected image and stop the projection, see the manuals provided with your smart device, select the file you want to project. On your smart device. 82 5. Using the Projector via a Network code method is used. 8.
This procedure is not necessary required if [Skip] is selected in Step 3 when the push-button method is selected, enter the PIN code displayed on the projection screen into your smart device. The selected file is projected. • For details about how to control the projected image and stop the projection, see the manuals provided with your smart device, select the file you want to project. On your smart device. 82 5. Using the Projector via a Network code method is used. 8.
Operating Instructions
Page 103
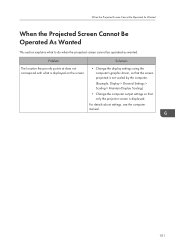
... points at does not correspond with what to do when the projected screen cannot be operated as wanted. For details about settings, see the computer manual. 101
... points at does not correspond with what to do when the projected screen cannot be operated as wanted. For details about settings, see the computer manual. 101