

Operating Instructions
Page 4
......43 Switching the Sound Quality...43 Enlarging the Image...44 Temporarily Blanking the Image and Muting the Audio 45 Freezing the Image...45 Switching the Lamp Mode...45 Using the Presentation Timer...46 3. Projecting Images from a USB Memory Device or Digital Camera Requirements for Projecting Images from a USB Device 47 How...
......43 Switching the Sound Quality...43 Enlarging the Image...44 Temporarily Blanking the Image and Muting the Audio 45 Freezing the Image...45 Switching the Lamp Mode...45 Using the Presentation Timer...46 3. Projecting Images from a USB Memory Device or Digital Camera Requirements for Projecting Images from a USB Device 47 How...
Operating Instructions
Page 7
... Crestron RoomView 169 Displaying Crestron WebUI...169 Using Crestron WebUI...170 Consumables...173 10. Cleaning the Projection Window...157 Cleaning the Projector...158 Replacing the Lamp...159 Managing the Projector Using Projector Management Utility 163 Installing Projector Management Utility 163 Settings Required to Use Projector Management Utility 164 Starting Projector Management...
... Crestron RoomView 169 Displaying Crestron WebUI...169 Using Crestron WebUI...170 Consumables...173 10. Cleaning the Projection Window...157 Cleaning the Projector...158 Replacing the Lamp...159 Managing the Projector Using Projector Management Utility 163 Installing Projector Management Utility 163 Settings Required to Use Projector Management Utility 164 Starting Projector Management...
Operating Instructions
Page 15
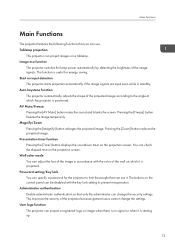
... use it is positioned. Administrator authentication Enable administrator authentication so that you can specify a password for energy saving. Image eco function The projector switches the lamp power automatically by detecting the brightness of the projector because general users cannot change the security settings. Magnify/Zoom Pressing the [Magnify] button enlarges the...
... use it is positioned. Administrator authentication Enable administrator authentication so that you can specify a password for energy saving. Image eco function The projector switches the lamp power automatically by detecting the brightness of the projector because general users cannot change the security settings. Magnify/Zoom Pressing the [Magnify] button enlarges the...
Operating Instructions
Page 19
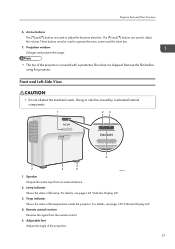
... [ ] and [ ] buttons are used to operate the menu screen and the value bar. 7. Remove the film before using the projector. Lamp indicator Shows the status of the projection. 17 Remote control receiver Receives the signal from an external device. 2. Adjustable feet Adjusts the angle of ...the lamp. Projector Parts and Their Functions 6. The [ ] and [ ] buttons are used to adjust the volume. Front and Left-Side View &#...
... [ ] and [ ] buttons are used to operate the menu screen and the value bar. 7. Remove the film before using the projector. Lamp indicator Shows the status of the projection. 17 Remote control receiver Receives the signal from an external device. 2. Adjustable feet Adjusts the angle of ...the lamp. Projector Parts and Their Functions 6. The [ ] and [ ] buttons are used to adjust the volume. Front and Left-Side View &#...
Operating Instructions
Page 21
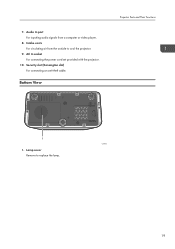
Intake vents For circulating air from a computer or video player. 8. Lamp cover Remove to cool the projector. 9. 7. AC In socket For connecting the power cord set provided with the projector. 10. Security slot (Kensington slot) For connecting an anti-theft cable. Audio In port For inputting audio signals from the outside to replace the lamp. 19 Bottom View Projector Parts and Their Functions 1 CZE105 1.
Intake vents For circulating air from a computer or video player. 8. Lamp cover Remove to cool the projector. 9. 7. AC In socket For connecting the power cord set provided with the projector. 10. Security slot (Kensington slot) For connecting an anti-theft cable. Audio In port For inputting audio signals from the outside to replace the lamp. 19 Bottom View Projector Parts and Their Functions 1 CZE105 1.

Operating Instructions
Page 23
Press it , and then select the sound quality using the [ ] and [ ] buttons. For details, see page 45 "Switching the Lamp Mode". 21 For details, see page 46 "Using the Presentation Timer". 15. [ID] button Registers the remote control ID. Press it , and then adjust ...the keystone distortion using the [ ] and [ ] buttons. Press [ ] to go to the previous page. 18. [Eco] button Switches the lamp power level. For details, see page 43 "Switching the Sound Quality". 12. [Keystone] button Displays the keystone adjustment bar. Press it , and then adjust the...
Press it , and then select the sound quality using the [ ] and [ ] buttons. For details, see page 45 "Switching the Lamp Mode". 21 For details, see page 46 "Using the Presentation Timer". 15. [ID] button Registers the remote control ID. Press it , and then adjust ...the keystone distortion using the [ ] and [ ] buttons. Press [ ] to go to the previous page. 18. [Eco] button Switches the lamp power level. For details, see page 43 "Switching the Sound Quality". 12. [Keystone] button Displays the keystone adjustment bar. Press it , and then adjust the...
Operating Instructions
Page 38
... password. • The start menu is displayed". • The password input screen is displayed if a password for the projector is used. Select the lamp power level, and then press the [Enter] button. 3. To project a laptop computer's screen, switch the computer's image output. For details, see page... details, see page 66 "Connecting the Projector to use Network Setting Wizard, see page 120 "Default Settings 2 Menu". • The lamp power level can also be changed in [Startup Password] under [Default Settings 1]. Specify the network settings on for the first time after it...
... password. • The start menu is displayed". • The password input screen is displayed if a password for the projector is used. Select the lamp power level, and then press the [Enter] button. 3. To project a laptop computer's screen, switch the computer's image output. For details, see page... details, see page 66 "Connecting the Projector to use Network Setting Wizard, see page 120 "Default Settings 2 Menu". • The lamp power level can also be changed in [Startup Password] under [Default Settings 1]. Specify the network settings on for the first time after it...

Operating Instructions
Page 39
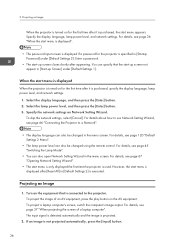
...; If the projector does not support the input signal, a "Unsupported signal" message is displayed. • The brightness of the image may vary temporarily because the lamp may automatically adjust to the projector, switch the computer's image output.
...; If the projector does not support the input signal, a "Unsupported signal" message is displayed. • The brightness of the image may vary temporarily because the lamp may automatically adjust to the projector, switch the computer's image output.
Operating Instructions
Page 40
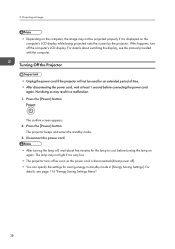
... Press the [Power] button. The projector beeps and enters the standby mode. 3. 2. The confirm screen appears. 2. The lamp may not be used for the lamp to cool before connecting the power cord again. For details, see the manual provided with the computer. Turning Off the Projector &#...the settings for saving energy in standby mode in a malfunction. 1. Press the [Power] button. Disconnect the power cord. • After turning the lamp off the computer's LCD display. If this happens, turn off , wait about switching the display, see page 116 "Energy Saving Settings Menu". 38...
... Press the [Power] button. The projector beeps and enters the standby mode. 3. 2. The confirm screen appears. 2. The lamp may not be used for the lamp to cool before connecting the power cord again. For details, see the manual provided with the computer. Turning Off the Projector &#...the settings for saving energy in standby mode in a malfunction. 1. Press the [Power] button. Disconnect the power cord. • After turning the lamp off the computer's LCD display. If this happens, turn off , wait about switching the display, see page 116 "Energy Saving Settings Menu". 38...

Operating Instructions
Page 47
... The AV mute function is canceled automatically if any operation is performed. • The Freeze function is pressed. • You can switch the lamp mode. Press the [AV Mute] button. To make images brighter, select the standard mode. 45 Freezing the Image Freezes the video or moving image... that is useful when projecting images from another projector or an OHP. 1. Switching the Lamp Mode You can also use the pause function of the connected equipment. Operations while Projecting Images Temporarily Blanking the Image and Muting the ...
... The AV mute function is canceled automatically if any operation is performed. • The Freeze function is pressed. • You can switch the lamp mode. Press the [AV Mute] button. To make images brighter, select the standard mode. 45 Freezing the Image Freezes the video or moving image... that is useful when projecting images from another projector or an OHP. 1. Switching the Lamp Mode You can also use the pause function of the connected equipment. Operations while Projecting Images Temporarily Blanking the Image and Muting the ...

Operating Instructions
Page 48
...the [Enter] button. For details, see page 116 "Energy Saving Settings Menu". • The image may flicker, depending on the characteristics of the lamp, when you are giving a presentation. 1. Using the Presentation Timer Displays the timer on the confirmation screen. Select [Display Position] using the [ ... press the [Timer] button, and then select [OK] on the projection screen. This function is specified as [Off]. 46 You can also change the lamp settings with [Energy Saving Settings]. Press the [Eco] button. Select [Display Size] using the [ ] and [ ] buttons, and then select [Large...
...the [Enter] button. For details, see page 116 "Energy Saving Settings Menu". • The image may flicker, depending on the characteristics of the lamp, when you are giving a presentation. 1. Using the Presentation Timer Displays the timer on the confirmation screen. Select [Display Position] using the [ ... press the [Timer] button, and then select [OK] on the projection screen. This function is specified as [Off]. 46 You can also change the lamp settings with [Energy Saving Settings]. Press the [Eco] button. Select [Display Size] using the [ ] and [ ] buttons, and then select [Large...

Operating Instructions
Page 106
... the Network Application Settings menu settings, see page 123 "USB Settings Menu". • Network Settings menu Specify the network settings, such as input signals and lamp usage time, etc., to be displayed. 104 For the Default Settings 1 menu settings, see page 120 "Default Settings 2 Menu". 6. Settings The settings and information for...
... the Network Application Settings menu settings, see page 123 "USB Settings Menu". • Network Settings menu Specify the network settings, such as input signals and lamp usage time, etc., to be displayed. 104 For the Default Settings 1 menu settings, see page 120 "Default Settings 2 Menu". 6. Settings The settings and information for...

Operating Instructions
Page 118
... on the brightness of the image. Changing the Projector Settings Energy Saving Settings Menu Item Default Lamp Power Stnd. Image Eco On Specify whether or not to lower the lamp power when there is switched to the standard mode regardless of time from the last input signal... Mode], [3D Projection], or [Interactive Mode] is enabled. • Eco • Stnd. This function does not work when [DICOM Sim. Select the lamp power level. Mode], [3D Projection], or [Interactive Mode] is enabled. To make images brighter, select the standard mode. If you select [Eco], the ...
... on the brightness of the image. Changing the Projector Settings Energy Saving Settings Menu Item Default Lamp Power Stnd. Image Eco On Specify whether or not to lower the lamp power when there is switched to the standard mode regardless of time from the last input signal... Mode], [3D Projection], or [Interactive Mode] is enabled. • Eco • Stnd. This function does not work when [DICOM Sim. Select the lamp power level. Mode], [3D Projection], or [Interactive Mode] is enabled. To make images brighter, select the standard mode. If you select [Eco], the ...

Operating Instructions
Page 119
...or wireless LAN. You can save energy. This function is cut by disabling the network function. If this happens, specify the lamp settings as follows: • Lamp Power: Stnd. • Lamp Pwr on Standby]. • Do not Use Disable the wired LAN and the wireless LAN while in standby to be enabled ... Stnd. • Image Eco: Off 117 Wired LAN • The image may flicker, depending on Standby Select a network function to save energy by the lamp settings. NW Settings on the characteristics of the lamp, when the lamp power is available when you select [Eco] in standby.
...or wireless LAN. You can save energy. This function is cut by disabling the network function. If this happens, specify the lamp settings as follows: • Lamp Power: Stnd. • Lamp Pwr on Standby]. • Do not Use Disable the wired LAN and the wireless LAN while in standby to be enabled ... Stnd. • Image Eco: Off 117 Wired LAN • The image may flicker, depending on Standby Select a network function to save energy by the lamp settings. NW Settings on the characteristics of the lamp, when the lamp power is available when you select [Eco] in standby.
Operating Instructions
Page 143
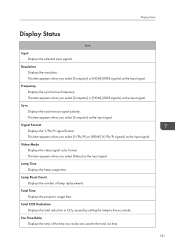
...Resolution Displays the resolution. Video Mode Displays the video signal color format. Total CO2 Reduction Displays the total reduction in CO2 caused by setting the lamp to the total use time. 141 This item appears when you select [Computer] or [HDMI] (RGB signals) as the input signal.... Lamp Time Displays the lamp usage time. This item appears when you select [Video] as the input signal. This item appears when you select [Y/Pb/Pr] or [HDMI] (Y/Pb/Pr...
...Resolution Displays the resolution. Video Mode Displays the video signal color format. Total CO2 Reduction Displays the total reduction in CO2 caused by setting the lamp to the total use time. 141 This item appears when you select [Computer] or [HDMI] (RGB signals) as the input signal.... Lamp Time Displays the lamp usage time. This item appears when you select [Video] as the input signal. This item appears when you select [Y/Pb/Pr] or [HDMI] (Y/Pb/Pr...

Operating Instructions
Page 145
... following measures. Temp indicator Status The projector does not turn on. " " in the table means the indicator is lit. Causes Solutions The projector has malfunctioned. Lamp indicator 3. Indicator Display List The projector uses the [Power] button, indicators, and beeps to notify you if a malfunction occurs. Indicator location 1 23 CZE123 1. [Power] button...
... following measures. Temp indicator Status The projector does not turn on. " " in the table means the indicator is lit. Causes Solutions The projector has malfunctioned. Lamp indicator 3. Indicator Display List The projector uses the [Power] button, indicators, and beeps to notify you if a malfunction occurs. Indicator location 1 23 CZE123 1. [Power] button...
Operating Instructions
Page 146
...press and hold the [Power] button on the remote control or the control panel for two seconds. • If the lamp burns out, replace it with a new lamp. You can also press and hold the [Power] button on the remote control or the control panel for two seconds. ... the projector again. For details of how to replace the lamp, see page 159 "Replacing the Lamp". displayed, and the projector turned off during operation. The lamp does not turn on. • The lamp has overheated and cannot turn on. • The lamp's service life has expired. • The projector has malfunctioned...
...press and hold the [Power] button on the remote control or the control panel for two seconds. • If the lamp burns out, replace it with a new lamp. You can also press and hold the [Power] button on the remote control or the control panel for two seconds. ... the projector again. For details of how to replace the lamp, see page 159 "Replacing the Lamp". displayed, and the projector turned off during operation. The lamp does not turn on. • The lamp has overheated and cannot turn on. • The lamp's service life has expired. • The projector has malfunctioned...
Operating Instructions
Page 147
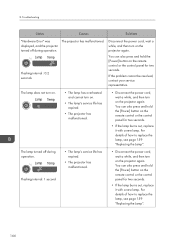
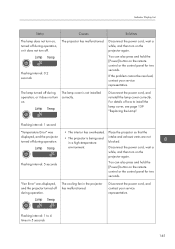
...Flashing interval: 5 seconds • The interior has overheated. • The projector is not installed operation, or it does not turn off. The lamp turned off during operation. Flashing interval: 1 second "Temperature Error" was displayed, and the projector turned off during operation, or it does not turn..., wait a while, and then turn on the projector again. "Fan Error" was displayed, and the projector turned off during The lamp cover is being used in the projector has malfunctioned. Place the projector so that the intake and exhaust vents are not blocked. Disconnect ...
...Flashing interval: 5 seconds • The interior has overheated. • The projector is not installed operation, or it does not turn off. The lamp turned off during operation. Flashing interval: 1 second "Temperature Error" was displayed, and the projector turned off during operation, or it does not turn..., wait a while, and then turn on the projector again. "Fan Error" was displayed, and the projector turned off during The lamp cover is being used in the projector has malfunctioned. Place the projector so that the intake and exhaust vents are not blocked. Disconnect ...

Operating Instructions
Page 148
... or the control panel for two seconds. For details of how to replace the lamp, see page 127 "Replacing the Lamp". 146 Flashing interval: 0.2 seconds The projector has malfunctioned. The lamp turned off during operation. • The lamp's service life has expired. If the problem cannot be resolved, contact your service representative... can also press and hold the [Power] button on the remote control or the control panel for two seconds. • If the lamp burns out, replace it does not turn on . You can also press and hold the [Power] button on the remote control or the ...
... or the control panel for two seconds. For details of how to replace the lamp, see page 127 "Replacing the Lamp". 146 Flashing interval: 0.2 seconds The projector has malfunctioned. The lamp turned off during operation. • The lamp's service life has expired. If the problem cannot be resolved, contact your service representative... can also press and hold the [Power] button on the remote control or the control panel for two seconds. • If the lamp burns out, replace it does not turn on . You can also press and hold the [Power] button on the remote control or the ...

Operating Instructions
Page 149
... again. You can also press and hold the [Power] button on . Indicator Display List Status The lamp does not turn on the remote control or the control panel for two seconds. Flashing interval: 1 second The lamp turned off during operation. You can also press and hold the [Power] button on the remote...
... again. You can also press and hold the [Power] button on . Indicator Display List Status The lamp does not turn on the remote control or the control panel for two seconds. Flashing interval: 1 second The lamp turned off during operation. You can also press and hold the [Power] button on the remote...
