Ricoh MP9060A - MediaMaster - CD-RW Support and Manuals
Get Help and Manuals for this Ricoh item
View All Support Options Below
Free Ricoh MP9060A manuals!
Problems with Ricoh MP9060A?
Ask a Question
Free Ricoh MP9060A manuals!
Problems with Ricoh MP9060A?
Ask a Question
Popular Ricoh MP9060A Manual Pages
User Manual - Page 3

Provides useful additional information.
Be sure to the product. Conventions
This manual uses the following symbols which indicate important information. Indicates restriction or caution that you should notice. Ignoring this warning and incorrect handling may result in serious personal injury or damage to read the information.
User Manual - Page 4

...and product handling information. The drive enables you for purchasing the Multimedia Printer series drive MP9060A (hereafter referred to as the drive). Multimedia Printer series
Thank you to read the manual before using the product.
The following marks indicate media that can be...play, and rewrite CD-RW discs. For easy reference in the future, please keep the manual at a handy location.
User Manual - Page 8

q Enhanced-IDE (ATAPI) model q Compliant with industry standard Orange Book Part II (CD-R) and Part III (CD-RW). q Supports random UDF for easy writing to CD-RW discs.
*1 The playback speed of DVD-ROM discs is 4X (data transfer rate is needed. q An improved ...
User Manual - Page 9

...discs. Multi-read compatible (Random UDF compatible) drives are:
q Drives that support Packet Write. q Drives that can read compatible (Random UDF compatible) drives ... bay required
Power
+5V/+12V power socket required
CD-R, CD-RW discs
Ricoh, Mitsubishi Chemical, Taiyo Yuden, Mitsui Chemicals,
Ritek, CMC, Princo, TDK....4.0 (Service Pack 3) or later
CPU
166MHz (or faster) Pentium
Memory
...
User Manual - Page 13

... is for the disc. It can damage your hearing.
4. When a illegal disc is mounted into the drive. Drive functions and settings
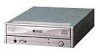
Front Panel | Rear panel
Front Panel
1. Headphone jack
This jack is the tray for connecting headphones or mini-speakers.
3. Place ...disc tray. Busy indicator
This indicator lights orange when a disc is loaded or some hardware trouble occurs, the indicator blinks.
User Manual - Page 14

... is the button used to be used only in the disc tray.
6. Eject button
This is on reset.
4. IDE Interface Connector
Connect to be ejected manually if this could cause a short circuit and damage the system. Always turn the power OFF when connecting or disconnecting the cable. Caution This feature is...
User Manual - Page 16

... clamp to pull it excessively will cause malfunction.
1.
Pull the front door to be used only in an emergency. Turn the power to be ejected manually, if this becomes necessary in such a case. Back
Next Caution This feature is a last measure to OFF.
2.
User Manual - Page 23

... specified by touching the computer covers etc. PC Connections
6. Replacing the Computer Cover
8. Installing the Drive
Specific knowledge of hardware and software is necessary to read the following cautions and information on preparation. Installing the Drive
1. Mounting the Drive
4. Sound Card Connection
7.
r The manual for the drive unit. q Turn off all peripheral appliances...
User Manual - Page 24

... the rear panel.
1. r When several (up to run, or may fail to four) E-IDE devices are then set by CSEL on an E-IDE (ATAPI) interface. Jumper Set Up
Before installation, set as Master (factory default)
2.
Slave (SL) Drive set the jumper on the jumper connector on the E-IDE (ATAPI) interface. q Make sure that the host computer...
User Manual - Page 25

User Manual - Page 26

...
1. Connecting the Power Connector
5. Removing the Computer Cover 3.
Sound Card Connection 7. Replacing the Computer Cover | 8. Caution There may be sharp edges inside the computer take care to the manual for the computer for details about removing the cover. Device Drivers Jumper Set Up | 2. Removing the Computer Cover
Make sure all peripheral devices of the...
User Manual - Page 29

User Manual - Page 30

If there is no spare power cable available in the computer, you will have to the socket on the drive unit, fitting the connector properly into the socket. 4. Back Connecting the Power Connector
Connect the power cable from the computer's power supply to purchase a splitter cable of a suitable type.
User Manual - Page 34

Back
User Manual - Page 35

The drive can be connected to the D/A converter. MP9060A 2. Make sure the connections are oriented so that L corresponds to L and R to the manual for the sound card for detailed infor-mation regarding connection. Refer to R. Primary or Secondary
Back
Next Audio digital output
The drive supports S/PDIF(IEC958) for playing CDs at the desired...
Ricoh MP9060A Reviews
We have not received any reviews for Ricoh yet.